【车牌识别】基于matlab GUI BP神经网络车牌识别(带面板+语音播报)【含Matlab源码 1220期】

一、BP车牌识别简介(附课程作业报告)
车牌识别系统设计与实现
车牌识别系统主要分为三部分:车牌图像预处理、特征提取以及基于BP神经网络对特征进行训练和分类,流程图如图1所示。

图1 车牌识别系统组成示意图
1 车牌图像预处理
车牌图像预处理是对车牌进行智能识别的基础,处理结果直接影响后续车牌识别的精度。车牌图像预处理过程主要包括车牌定位和字符分割,作用是将车牌从复杂的背景中分割出来,并按照国内车牌的设计规则,将其分割为7个字符块,以便进行后续的特征提取及字符识别。
1.1车牌定位
车牌定位主要采用图像处理中的一些去噪算法及数学形态学方法,流程图如图2所示。

图2 车牌定位流程图
主要步骤包括:
1)将图像灰度化以增强图像效果,如图3所示;
2)采用均值滤波平滑图像,去除图像中的噪声;
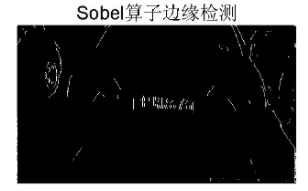
3) 利用Sobel算子对图像进行边缘提取 , 将图片中的车牌边缘保留, 如图4所示;

图3 图像灰度化前后图片
4) 利用HSV模型和RGB模型中的蓝色区域取交集, 得到疑似蓝色区域位置, 如图5所示;
5) 利用[15] 的矩形结构元素对图像先进行膨胀, 再进行腐蚀, 并和Sobel算子提取到的边缘信息取交集, 去掉无
用的边缘信息,选出竖向纹理复杂的疑似车牌区域,如图6所示;
6)利用结构元素为[1040]的矩形对疑似车牌区域进行闭运算,得到一些内部填充较为完整的区域,如图7所示;
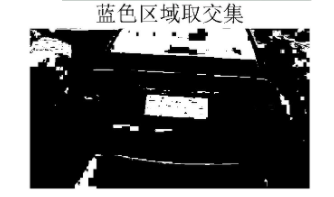
图5 蓝色区域取交集
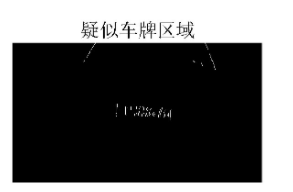
图6 疑似车牌区域
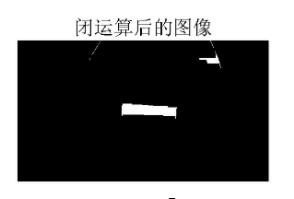
图7 闭运算后的图像
7)删除连通区域小于1300的小区域,如图8所示;
8)通过计算矩形区域的长宽比,去除长宽比低于2.5或大于3.8的区域[6],得到真正的车牌区域,并将车牌区域剪切出来,如图9所示。
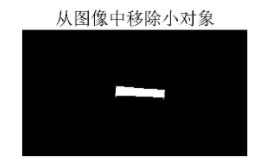
图8 从图像中移除小对象

图9 剪切后车牌区域
1.2 字符分割
根据《中华人民共和国机动车号牌》行业标准,国内普通汽车车牌宽度为44cm,高度为14cm,字符宽度为4.5cm,高度为9cm[71。对车牌定位后得到的剪切后的车牌区域首先进行灰度化,再进行二值化,如图10所示。对图10中二值化后的车牌图像进行垂直方向像素统计,根据车牌字符的宽度和高度、字符间距离等特征,将车牌分为七个区域,最后归一化为32×40像素的统一格式,如图11所示。

图10 二值化图像
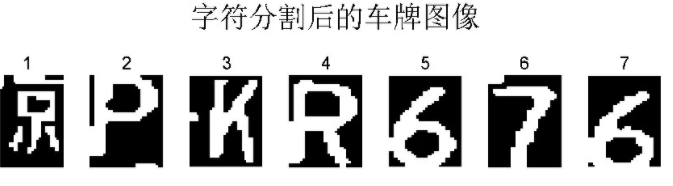
图11 字符分割后的车牌图像
2 车牌字符特征提取
对分割后的每个车牌字符二值图像进行基于白像素的特征提取,共提取13维特征。以上述字符分割后的第5个字符为例,将单个字符按照两行两列分为8块小区域,统计每个小区域中白像素的个数,得到第1-8维特征,如图12所示。
在水平方向画两条横线,将单个字符在水平方向上分为三部分,统计两条横线上的白色像素个数,得到第9-10维特征,如图13所示。在垂直方向上画两条竖线,将单个字符在垂直方向上分为三部分,统计两条竖线上的白色像素个数,得到第11-12维特征,如图14所示。最后,统计整个字符图片上白色像素的总点数,作为第13维特征。

图1 2 第1-8维特征

图1 3 第9、10维特征

图1 4 第11、12维特征
3 BP神经网络训练与分类
神经网络是由多输入、单输出或多输出的神经元连接而成的网络,能通过学习外界环境中的知识不断优化自身的网各参数,从而提高自身性能18]。由于神经网络可以采用并行方式大规模、高速地处理大型问题,目前已经被广泛应用在车牌识别领域19].
BP神经网络是一种基于最速下降法的多层前馈神经网络,由输入层、隐含层、输出层三部分构成,其拓扑结构如图15所示。BP神经网络的激活函数通常采用非线性转移函数,即S型函数-Sigmoid函数。BP神经网络主要通过来自每个神经元信息的前向传播和误差的反向传播来不断调整自身网络的权重和阈值,从而使整个网络的平方误差之和最小化。

图1 5 BP神经网络的结构
基于BP神经网络的车牌字符识别算法主要分为以下三个步骤:建立BP神经网络、利用字符特征对BP神经网络进行训练、对输入车牌的字符特征进行分类。
3.1建立BP神经网络
根据国内普通车牌字符内容的特点, 基于MATLAB平台建立了三个BP子网分别识别不同位置的字符。其中第一个BP子网用于识别车牌的第一个汉字字符(由于数据采集局限性,选取6个汉字字符进行训练和测试),第二个BP子网用于识别车牌的第二个英文字母字符,第三个BP子网用于识别车牌的第3-7个字符,这5个字符为英文字母+数字组合形式。在数据进入神经网络之前, 首先采用pre mn mx函数对数据进行归一化, 防止出现较大误差。
对于第一个BP子网,建立13个输入、4个隐含层、6个输出的BP神经网络;对于第二个BP子网,建立13个输入、6个隐含层、24个输出的BP神经网络;对于第三个BP子网,建立13个输入、10个隐含层、34个输出的BP神经网络。三个BP子网的第一层神经元的激活函数均为log sig, 第二层均为pure lin, 学习方法均采用train gdx。
3.2训练BP神经网络
对于三个BP子网,分别输入其对应种类字符的13维特征值进行训练。对于第一个BP子网,收集了“沪”“京”“闽”“苏”“粤”“浙”六种汉字字符,共计1249幅字符图片进行13维特征提取,并输入BP子网进行训练,部分训练样本如图16所示。

图1 6 部分汉字字符训练库
对于第二个BP子网,由于车牌号中不含有字母“"和“O”,收集了除这两种字母之外的24种英文字母字符,共计3198幅字符图片进行13维特征提取,并输入BP子网进行训练,部分训练样本如图17所示。

图1 7 部分英文字母字符训练库
对于第三个BP子网,收集了上述24种英文字母字符以及数字0-9共34种字符,共计4285幅字符图片进行13维特征提取,并输入BP子网进行训练,部分训练样本如图18所示。

图1 8 部分英文字母+数字字符训练库
3.3 BP神经网络分类结果
对于每个测试字符,将提取到的13维特征输入训练好的BP神经网络进行分类,输出BP神经网络识别结果。对于上述车牌号为“京PKR 676”的原图, 识别结果正确显示为“京PKR 676”, 如图19所示。

图1 9 识别结果
二、部分源代码
function varargout = run(varargin)
% RUN MATLAB code for run.fig
%      RUN, by itself, creates a new RUN or raises the existing
%      singleton*.
%
%      H = RUN returns the handle to a new RUN or the handle to
%      the existing singleton*.
%
%      RUN('CALLBACK',hObject,eventData,handles,...) calls the local
%      function named CALLBACK in RUN.M with the given input arguments.
%
%      RUN('Property','Value',...) creates a new RUN or raises the
%      existing singleton*.  Starting from the left, property value pairs are
%      applied to the GUI before run_OpeningFcn gets called.  An
%      unrecognized property name or invalid value makes property application
%      stop.  All inputs are passed to run_OpeningFcn via varargin.
%
%      *See GUI Options on GUIDE's Tools menu.  Choose "GUI allows only one
%      instance to run (singleton)".
%
% See also: GUIDE, GUIDATA, GUIHANDLES

% Edit the above text to modify the response to help run

% Last Modified by GUIDE v2.5 28-Mar-2020 10:04:49
%%%%%%%%%%%%%%%%%%%%%%%%%%%%%%%%%%%%%%%%%%%%%%%%%%%%%%%%%%%%%%%%%%%%%%%%%%%%%%%%
%通过.fig文件自动生成的文件,可以在这里加入自己的程序
%%%%%%%%%%%%%%%%%%%%%%%%%%%%%%%%%%%%%%%%%%%%%%%%%%%%%%%%%%%%%%%%%%%%%%%%%%%%%%%%
% Begin initialization code - DO NOT EDIT
gui_Singleton = 1;
gui_State = struct('gui_Name',       mfilename, ...
                   'gui_Singleton',  gui_Singleton, ...
                   'gui_OpeningFcn', @run_OpeningFcn, ...
                   'gui_OutputFcn',  @run_OutputFcn, ...
                   'gui_LayoutFcn',  [] , ...
                   'gui_Callback',   []);
if nargin && ischar(varargin{1})
    gui_State.gui_Callback = str2func(varargin{1});
end

if nargout
    [varargout{1:nargout}] = gui_mainfcn(gui_State, varargin{:});
else
    gui_mainfcn(gui_State, varargin{:});
end
% End initialization code - DO NOT EDIT


% --- Executes just before run is made visible.
function run_OpeningFcn(hObject, eventdata, handles, varargin)
% This function has no output args, see OutputFcn.
% hObject    handle to figure
% eventdata  reserved - to be defined in a future version of MATLAB
% handles    structure with handles and user data (see GUIDATA)
% varargin   command line arguments to run (see VARARGIN)

% Choose default command line output for run
handles.output = hObject;
handles.cd0 = cd;
handles.Color = 0;
handles.I = [];

axes(handles.axes1);
set(gca,'Xtick',[]);
set(gca,'Ytick',[]);
box on;

axes(handles.axes2);
set(gca,'Xtick',[]);
set(gca,'Ytick',[]);
box on;

axes(handles.axes3);
set(gca,'Xtick',[]);
set(gca,'Ytick',[]);
box on;

axes(handles.axes4);
set(gca,'Xtick',[]);
set(gca,'Ytick',[]);
box on;

axes(handles.axes5);
set(gca,'Xtick',[]);
set(gca,'Ytick',[]);
box on;

axes(handles.axes6);
set(gca,'Xtick',[]);
set(gca,'Ytick',[]);
box on;

axes(handles.axes8);
set(gca,'Xtick',[]);
set(gca,'Ytick',[]);
box on;

axes(handles.axes9);
set(gca,'Xtick',[]);
set(gca,'Ytick',[]);
box on;

axes(handles.axes12);
set(gca,'Xtick',[]);
set(gca,'Ytick',[]);
box on;
axes(handles.axes13);
set(gca,'Xtick',[]);
set(gca,'Ytick',[]);
box on;
axes(handles.axes14);
set(gca,'Xtick',[]);
set(gca,'Ytick',[]);
box on;
axes(handles.axes15);
set(gca,'Xtick',[]);
set(gca,'Ytick',[]);
box on;
axes(handles.axes16);
set(gca,'Xtick',[]);
set(gca,'Ytick',[]);
box on;
axes(handles.axes17);
set(gca,'Xtick',[]);
set(gca,'Ytick',[]);
box on;


% Update handles structure
guidata(hObject, handles);

% UIWAIT makes run wait for user response (see UIRESUME)
% uiwait(handles.figure1);


% --- Outputs from this function are returned to the command line.
function varargout = run_OutputFcn(hObject, eventdata, handles)
% varargout  cell array for returning output args (see VARARGOUT);
% hObject    handle to figure
% eventdata  reserved - to be defined in a future version of MATLAB
% handles    structure with handles and user data (see GUIDATA)

% Get default command line output from handles structure
varargout{1} = handles.output;


% --- Executes on button press in pushbutton1.
function pushbutton1_Callback(hObject, eventdata, handles)
% hObject    handle to pushbutton1 (see GCBO)
% eventdata  reserved - to be defined in a future version of MATLAB
% handles    structure with handles and user data (see GUIDATA)
%%  读图
[filename, cd1] = uigetfile( ...
    {'*.tif;*.TIF;*.JPG;*.jpg;*.bmp;*.BMP;*.jpeg;*.JPEG;','Image file';...
    '*.*', 'All file (*.*)'},'Pick an Image');
axes(handles.axes1);
cla;
axes(handles.axes2);
cla;
axes(handles.axes3);
cla;
axes(handles.axes4);
cla;
if filename

    cd(cd1);
    d = imread(filename);
    cd(handles.cd0);
    handles.I = d;
    axes(handles.axes1);
    imshow(d);
    handles.filename = filename;

    box on;

end

handles.Color = 0;
cd(handles.cd0);
set(handles.text2,'string','');
guidata(hObject, handles);

% --- Executes on button press in pushbutton2.
function pushbutton2_Callback(hObject, eventdata, handles)
% hObject    handle to pushbutton2 (see GCBO)
% eventdata  reserved - to be defined in a future version of MATLAB
% handles    structure with handles and user data (see GUIDATA)
%读取图像矩阵
image =  handles.I;
gray = rgb2gray(image);     % 图像灰度化
axes(handles.axes2);
%输出灰度化图像
imshow(gray);

% --- Executes on button press in pushbutton3.
function pushbutton3_Callback(hObject, eventdata, handles)
% hObject    handle to pushbutton3 (see GCBO)
% eventdata  reserved - to be defined in a future version of MATLAB
% handles    structure with handles and user data (see GUIDATA)
image =  handles.I;
gray = rgb2gray(image);
new_gray = histeq(gray);  % 直方图均衡 ,图像增强
axes(handles.axes3);
imshow(new_gray);

% --- Executes on button press in pushbutton4.
function pushbutton4_Callback(hObject, eventdata, handles)
% hObject    handle to pushbutton4 (see GCBO)
% eventdata  reserved - to be defined in a future version of MATLAB
% handles    structure with handles and user data (see GUIDATA)
image =  handles.I;
gray = rgb2gray(image);
new_gray = histeq(gray);  % 直方图均衡 ,图像增强
if size(new_gray,1)>1000
    new_gray_1 = imresize(new_gray,0.1);
else
    new_gray_1  =new_gray;
end
bw  = edge(new_gray_1,'canny');
axes(handles.axes4);
imshow(bw);


% --- Executes on button press in pushbutton5.
function pushbutton5_Callback(hObject, eventdata, handles)
% hObject    handle to pushbutton5 (see GCBO)
% eventdata  reserved - to be defined in a future version of MATLAB
% handles    structure with handles and user data (see GUIDATA)
%% chepai dingwei
Image = handles.I;


DI = Image(:,:,3);

GI = (Image(:,:,1)<100 & Image(:,:,2)<150 & Image(:,:,3)>120 ...
     & abs(double(Image(:,:,2))-double(Image(:,:,3)))>30);

axes(handles.axes5);
imshow(GI);
handles.GI = GI;
guidata(hObject, handles);

% --- Executes on button press in pushbutton6.
function pushbutton6_Callback(hObject, eventdata, handles)
% hObject    handle to pushbutton6 (see GCBO)
% eventdata  reserved - to be defined in a future version of MATLAB
% handles    structure with handles and user data (see GUIDATA)
%%  fengecheoai
d = handles.GI;

se = ones(40);  % 腐蚀膨胀模版

d = imdilate(d,se);% 再做膨胀运算
d = imerode(d,se); % 先做腐蚀运算
% 先膨胀后腐蚀的过程称为开运算。用来填充物体内细小空洞、连接邻近物体、平滑其边界的同时并不明显改变其面积。
d = bwareaopen(d,100); % 移除小对象 小区域肯定是噪声

STATS = regionprops(d);%统计被标记的区域的面积分布,显示区域总数
area = [];
- 1
- 2
- 3
- 4
- 5
- 6
- 7
- 8
- 9
- 10
- 11
- 12
- 13
- 14
- 15
- 16
- 17
- 18
- 19
- 20
- 21
- 22
- 23
- 24
- 25
- 26
- 27
- 28
- 29
- 30
- 31
- 32
- 33
- 34
- 35
- 36
- 37
- 38
- 39
- 40
- 41
- 42
- 43
- 44
- 45
- 46
- 47
- 48
- 49
- 50
- 51
- 52
- 53
- 54
- 55
- 56
- 57
- 58
- 59
- 60
- 61
- 62
- 63
- 64
- 65
- 66
- 67
- 68
- 69
- 70
- 71
- 72
- 73
- 74
- 75
- 76
- 77
- 78
- 79
- 80
- 81
- 82
- 83
- 84
- 85
- 86
- 87
- 88
- 89
- 90
- 91
- 92
- 93
- 94
- 95
- 96
- 97
- 98
- 99
- 100
- 101
- 102
- 103
- 104
- 105
- 106
- 107
- 108
- 109
- 110
- 111
- 112
- 113
- 114
- 115
- 116
- 117
- 118
- 119
- 120
- 121
- 122
- 123
- 124
- 125
- 126
- 127
- 128
- 129
- 130
- 131
- 132
- 133
- 134
- 135
- 136
- 137
- 138
- 139
- 140
- 141
- 142
- 143
- 144
- 145
- 146
- 147
- 148
- 149
- 150
- 151
- 152
- 153
- 154
- 155
- 156
- 157
- 158
- 159
- 160
- 161
- 162
- 163
- 164
- 165
- 166
- 167
- 168
- 169
- 170
- 171
- 172
- 173
- 174
- 175
- 176
- 177
- 178
- 179
- 180
- 181
- 182
- 183
- 184
- 185
- 186
- 187
- 188
- 189
- 190
- 191
- 192
- 193
- 194
- 195
- 196
- 197
- 198
- 199
- 200
- 201
- 202
- 203
- 204
- 205
- 206
- 207
- 208
- 209
- 210
- 211
- 212
- 213
- 214
- 215
- 216
- 217
- 218
- 219
- 220
- 221
- 222
- 223
- 224
- 225
- 226
- 227
- 228
- 229
- 230
- 231
- 232
- 233
- 234
- 235
- 236
- 237
- 238
- 239
- 240
- 241
- 242
- 243
- 244
- 245
- 246
- 247
- 248
- 249
- 250
- 251
- 252
- 253
- 254
- 255
- 256
- 257
- 258
- 259
三、运行结果

四、matlab版本及参考文献
1 matlab版本
2014a
2 参考文献
[1] 蔡利梅.MATLAB图像处理——理论、算法与实例分析[M].清华大学出版社,2020.
[2]杨丹,赵海滨,龙哲.MATLAB图像处理实例详解[M].清华大学出版社,2013.
[3]周品.MATLAB图像处理与图形用户界面设计[M].清华大学出版社,2013.
[4]刘成龙.精通MATLAB图像处理[M].清华大学出版社,2015.
[5]呙润华,苏婷婷,马晓伟.BP神经网络联合模板匹配的车牌识别系统[J].清华大学学报(自然科学版),2013,53(9):1221-1226.
[6]鲁扬.基于BP神经网络的车牌识别算法研究[D].大庆:东北石油大学,2018.
[7]申瑾.基于BP神经网络的车牌识别技术的研究[D].天津:河北工业大学,2013.
[8] 梁凯.基于MATLAB的汽车车牌识别系统的设计与实现[D] .哈尔滨:黑龙江大学, 2018.
[9]刘雄飞,朱盛春.车牌字符多特征提取与BP神经网络的识别算法[J].计算机仿真,2014,31(10):161-164,290.
[10] 曾泉, 谭北海.基于SVM和BP神经网络的车牌识别系统[J] .电子科技, 2016, 29(1) :98-101.
文章来源: qq912100926.blog.csdn.net,作者:海神之光,版权归原作者所有,如需转载,请联系作者。
原文链接:qq912100926.blog.csdn.net/article/details/122253957

- 点赞
- 收藏
- 关注作者
评论(0)