【Vue】快乐学习第四篇,组件访问及插槽使用

欢迎来到快乐学习Vue,组件访问及插槽的使用,快来学习吧 🏄🏼
引出
有时候我们需要父组件直接访问子组件,子组件直接访问父组件,或者是子组件访问跟组件等等……这时候我们可以使用
🥣 父组件访问子组件:使用$children或$refs
🥣 子组件访问父组件:使用$parent
父访问子$children
使用 $children 可以访问到子组件对象,如果有多个会返回一个数组对象,我们可以通过数组下标控制访问子组件的属性,方法等等
<body>
<div id="app">
    <zi></zi>
    <zi></zi>
    <button @click="getChildren">点击</button>
</div>

<template id="zi">
    <div>
        我是子组件
    </div>
</template>

<script src="https://cdn.jsdelivr.net/npm/vue@2/dist/vue.js"></script>
<script>
    new Vue({
        el: '#app',
        data: {
            message: '你好'
        },
        methods: {
            getChildren() {
                console.log(this.$children)
                this.$children[0].showMessage()
                for (let i of this.$children) {
                    console.log(i.name)
                }
            }
        },
        components: {
            zi: {
                template: '#zi',
                data() {
                    return {
                        name: "小明·1"
                    }
                },
                methods: {
                    showMessage() {
                        console.log("showMessage 拿到了")
                    }
                }
            }
        }
    })
</script>
</body>
实际开发中,使用$children的次数可能并不多,原因很简单,实际业务复杂多变,对于使用数组下标的方式访问子组件,一旦子组件增加或删除,会直接导致数组下标的移位,导致bug出现,所以还有一种方式,比较推荐,就是使用 $ref
父访问子$refs
在组件上使用ref属性给组件标识,再通过 $ref 获取属性值,就可以获取相应的组件对象,就不会出现使用下标获取导致的问题
<body>
<div id="app">
    <hello ref="a"></hello>
    <tip ref="b"></tip>
    <button @click="showMessage">获取组件message</button>
</div>

<template id="hello">
    <div>
        我是Hello组件
    </div>
</template>

<template id="tip">
    <div>
        我是tip组件
    </div>
</template>

<script src="https://cdn.jsdelivr.net/npm/vue@2/dist/vue.js"></script>
<script>
    new Vue({
        el: '#app',
        methods: {
            showMessage() {
                console.log(this.$refs)
                console.log('hello组件message: ' + this.$refs.a.message)
                console.log('tip组件message: ' + this.$refs.b.message)

            }
        },
        components: {
            hello: {
                template: '#hello',
                data() {
                    return {
                        message: 'Hello组件的message数据'
                    }
                }
            },
            tip: {
                template: '#tip',
                data() {
                    return {
                        message: 'Tip组件的message数据'
                    }
                }
            }
        }
    })
</script>
</body>
子访问父$parent
使用
$parent可以访问父组件,但是并不推荐这样使用,因为组件化开发的核心,就是拆分组件,复用组件,这样做有耦合,不利于组件的复用
<body>
<div id="app">
    <hello></hello>
</div>

<template id="hello">
    <div>
        <p>我是Hello组件是Vue实例的子组件</p>
        <button @click="getMessage">点击获取父组件的message</button>
    </div>
</template>

<script src="https://cdn.jsdelivr.net/npm/vue@2/dist/vue.js"></script>
<script>
    new Vue({
        el: '#app',
        data: {
            message: 'Vue实例:Hello World'
        },
        components: {
            hello: {
                template: '#hello',
                methods: {
                    getMessage() {
                        console.log(this.$parent)
                        console.log(this.$parent.message)
                    }
                }
            }
        }
    })
</script>
</body>
访问跟组件$root
使用
$root可以访问跟组件
<body>
<div id="app">
    <hello></hello>
</div>

<template id="hello">
    <div>
        <p>我是Hello组件是Vue实例的子组件</p>
        <button @click="getMessage">点击获取根组件的message</button>
    </div>
</template>

<script src="https://cdn.jsdelivr.net/npm/vue@2/dist/vue.js"></script>
<script>
    new Vue({
        el: '#app',
        data: {
            message: 'Vue实例:Hello World'
        },
        components: {
            hello: {
                template: '#hello',
                methods: {
                    getMessage() {
                        console.log(this.$root)
                        console.log(this.$root.message)
                    }
                }
            }
        }
    })
</script>
</body>
插槽 slot
组件的插槽:
组件的插槽是为了让我们封装的组件更加具有扩展性
让使用者可以决定组件内部的一些内容到底显示什么
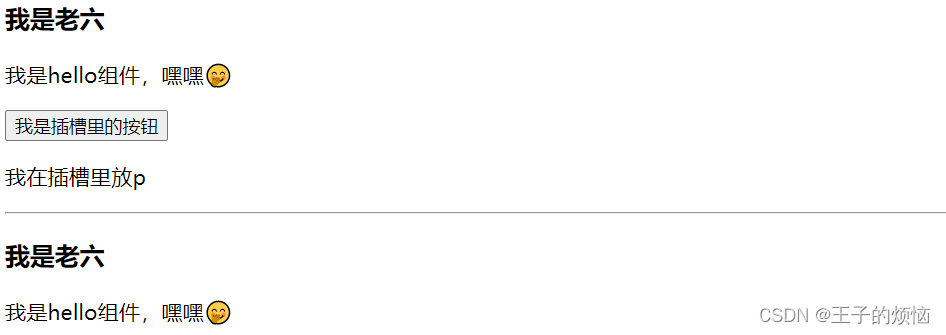
基本使用
<body>
<div id="app">
    <hello>
        <button>我是插槽里的按钮</button>
        <p>我在插槽里放p</p>
    </hello>
    <hr>
    <hello></hello>
</div>

<template id="hello">
    <div>
        <h3>我是老六</h3>
        <p>我是hello组件,嘿嘿🤭</p>
        <slot></slot>
    </div>
</template>

<script src="https://cdn.jsdelivr.net/npm/vue@2/dist/vue.js"></script>
<script>
    new Vue({
        el: '#app',
        components: {
            hello: {
                template: '#hello'
            }
        }
    })
</script>
</body>

具名插槽
给插槽起名,便于多个插槽替换时能定位
<body>
<div id="app">
    <hello>
        <button slot="3">wo</button>
        <span slot="2">嘿嘿</span>
    </hello>

</div>

<template id="hello">
    <div>
        <h3>我是老六</h3>
        <p>我是hello组件,嘿嘿🤭</p>
        <slot name="1">
            <button>我是插槽里的按钮1</button>
        </slot>
        <slot name="2">
            <button>我是插槽里的按钮2</button>
        </slot>
        <slot name="3">
            <button>我是插槽里的按钮3</button>
        </slot>
    </div>
</template>

<script src="https://cdn.jsdelivr.net/npm/vue@2/dist/vue.js"></script>
<script>
    new Vue({
        el: '#app',
        components: {
            hello: {
                template: '#hello'
            }
        }
    })
</script>
</body>

作用域插槽
父组件替换插槽的标签,但是内容由子组件来提供
<body>
<div id="app">
    <hello></hello>
    <hr>
    <hello>
        <span>java-c</span>
    </hello>
    <hr>
    <hello>
        <div slot-scope="slot">
            <span v-for="item in slot.data">{{item}} - </span>
        </div>
    </hello>
</div>


<template id="hello">
    <div>
        <slot :data="pLanguages">
            <ul>
                <li v-for="item in pLanguages">{{item}}</li>
            </ul>
        </slot>
    </div>
</template>
<script src="https://cdn.jsdelivr.net/npm/vue@2/dist/vue.js"></script>
<script>
    new Vue({
        el: '#app',
        components: {
            hello: {
                template: '#hello',
                data() {
                    return {
                        pLanguages: ['JavaScript', 'C++', 'Java', 'Python', 'Go']
                    }
                }
            }
        }
    })
</script>
</body>


文章来源: blog.csdn.net,作者:周棋洛ყ ᥱ ᥉,版权归原作者所有,如需转载,请联系作者。
原文链接:blog.csdn.net/m0_53321320/article/details/124302611
- 点赞
- 收藏
- 关注作者


评论(0)