【进阶篇】全流程学习《20天掌握Pytorch实战》纪实 | Day03 | 文本数据建模流程范例

开源自由,知识无价~
@TOC
所用到的源代码及书籍+数据集以帮各位小伙伴下载放在文末,自取即可~
😁概览
一、 🎉准备数据(存在问题)
流程和之前都一样。
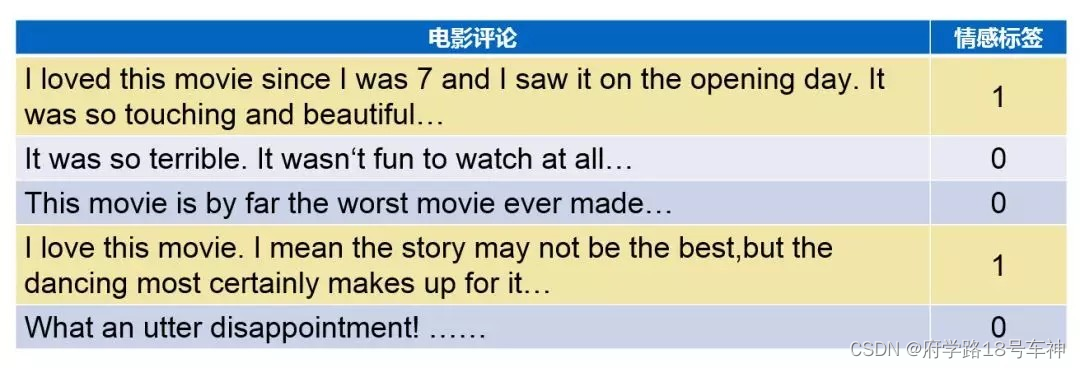
imdb数据集的目标是==根据电影评论的文本内容预测评论的情感标签==。
训练集有20000条电影评论文本,测试集有5000条电影评论文本,其中正面评论和负面评论都各占一半。
文本数据预处理较为繁琐,包括中文切词(本示例不涉及),构建词典,编码转换,序列填充,构建数据管道等等。
在torch中预处理文本数据一般使用torchtext或者自定义Dataset,torchtext功能非常强大,可以构建文本分类,序列标注,问答模型,机器翻译等NLP任务的数据集。
下面仅演示使用它来构建文本分类数据集的方法。
较完整的教程可以参考以下知乎文章:==《pytorch学习笔记—Torchtext》==
https://zhuanlan.zhihu.com/p/65833208
这个链接好像已经失效了,另外我找了C站的一个关于
Torchtext的讲解:
https://blog.csdn.net/nlpuser/article/details/88067167
关于torchtext常见API一览:
torchtext.data.Example: 用来表示一个样本,数据和标签torchtext.vocab.Vocab: 词汇表,可以导入一些预训练词向量torchtext.data.Datasets: 数据集类,`getitem`返回 Example实例, torchtext.data.TabularDataset是其子类。torchtext.data.Field: 用来定义字段的处理方法(文本字段,标签字段)创建 Example时的 预处理,batch 时的一些处理操作。torchtext.data.Iterator: 迭代器,用来生成 batchtorchtext.datasets: 包含了常见的数据集.
下面开始预处理数据(==标准化的构建流程,自推自敲一遍较为适宜==):
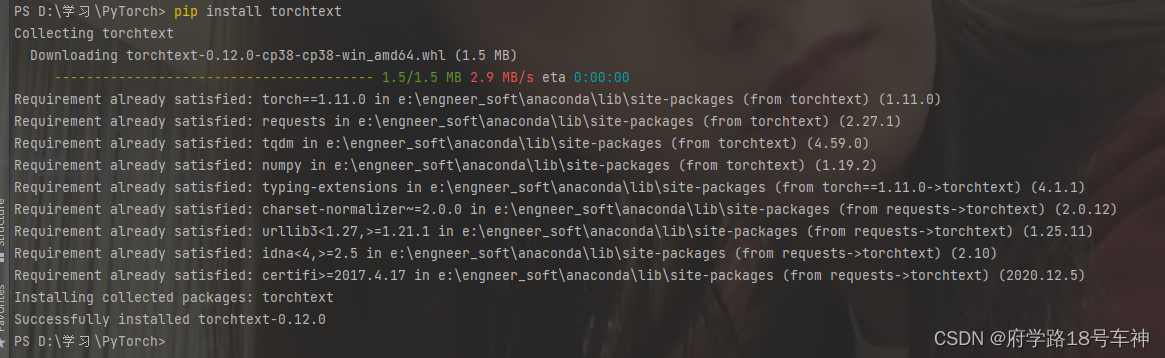
注意一点,这里用到了新的库函数,直接
pip即可
pip install torchtext
import torch
import string,re
import torchtext

MAX_WORDS = 10000  # 仅考虑最高频的10000个词
MAX_LEN = 200  # 每个样本保留200个词的长度
BATCH_SIZE = 20

#分词方法
tokenizer = lambda x:re.sub('[%s]'%string.punctuation,"",x).split(" ")

#过滤掉低频词
def filterLowFreqWords(arr,vocab):
    arr = [[x if x<MAX_WORDS else 0 for x in example]
           for example in arr]
    return arr

#1,定义各个字段的预处理方法
TEXT = torchtext.data.Field(sequential=True, tokenize=tokenizer, lower=True,
                  fix_length=MAX_LEN,postprocessing = filterLowFreqWords)

LABEL = torchtext.data.Field(sequential=False, use_vocab=False)

#2,构建表格型dataset
#torchtext.data.TabularDataset可读取csv,tsv,json等格式
ds_train, ds_valid = torchtext.data.TabularDataset.splits(
        path='./data/imdb', train='train.tsv',test='test.tsv', format='tsv',
        fields=[('label', LABEL), ('text', TEXT)],skip_header = False)

#3,构建词典
TEXT.build_vocab(ds_train)

#4,构建数据管道迭代器
train_iter, valid_iter = torchtext.data.Iterator.splits(
        (ds_train, ds_valid),  sort_within_batch=True,sort_key=lambda x: len(x.text),
        batch_sizes=(BATCH_SIZE,BATCH_SIZE))

#查看example信息
print(ds_train[0].text)
print(ds_train[0].label)
注意:这里会报错,好像是版本更新了,之前的用法已经不能用了
AttributeError: module 'torchtext.data' has no attribute 'Field'

解决方法:
将
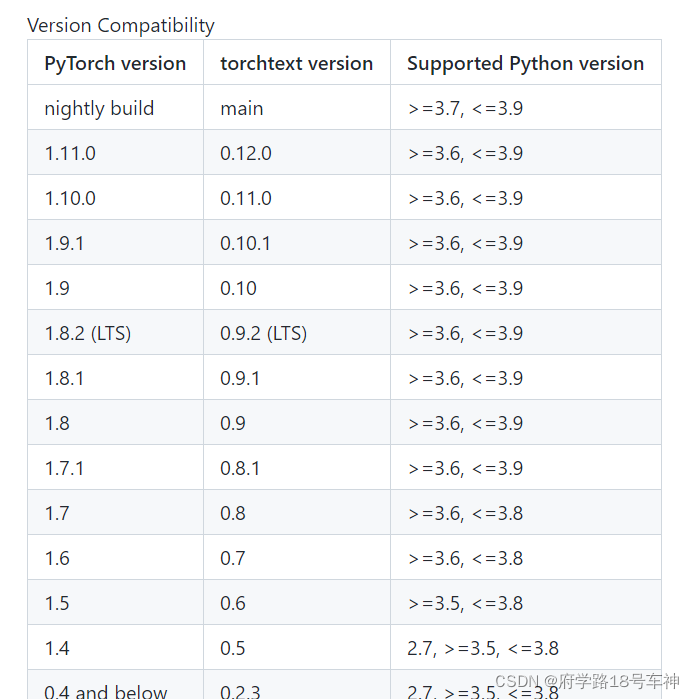
from torchtext.data import Field替换为from torchtext.legacy.data import Field(==但是这个方法对于torchtext 0.12.0版本不适用==),在torchtext 0.11版本中field方法被移到了torchtext.legacy下,所以会看到其他博客的评论区里出现下面代码适用的情况,但是在torchtext 0.12.0版本中legacy目录和field方法都没了,所以上面的代码无法再适用,会报错。
唯一的办法就是下载旧版本,哎~
下面是对应的版本,对照着更新吧
安装低版本的torchtext方法:
conda install -c pytorch torchtext==版本号
直接安装0.6或者0.8都行,然后就可以使用啦~
直接pip安装也行:
pip install torchtext==0.4
解决完上一个问题后,下一个问题又来啦
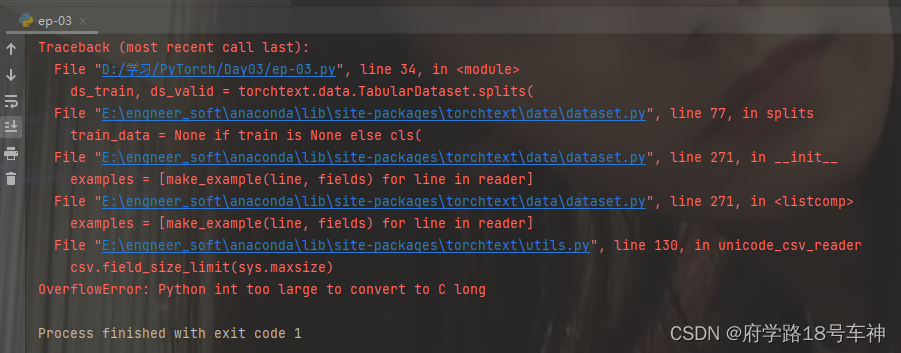
OverflowError: Python int too large to convert to C long
尝试了各种办法也没有解决,哎~
打印显示的文档结果为:
['it', 'really', 'boggles', 'my', 'mind', 'when', 'someone', 'comes', 'across', 'a', 'movie', 'like', 'this', 'and', 'claims', 'it', 'to', 'be', 'one', 'of', 'the', 'worst', 'slasher', 'films', 'out', 'there', 'this', 'is', 'by', 'far', 'not', 'one', 'of', 'the', 'worst', 'out', 'there', 'still', 'not', 'a', 'good', 'movie', 'but', 'not', 'the', 'worst', 'nonetheless', 'go', 'see', 'something', 'like', 'death', 'nurse', 'or', 'blood', 'lake', 'and', 'then', 'come', 'back', 'to', 'me', 'and', 'tell', 'me', 'if', 'you', 'think', 'the', 'night', 'brings', 'charlie', 'is', 'the', 'worst', 'the', 'film', 'has', 'decent', 'camera', 'work', 'and', 'editing', 'which', 'is', 'way', 'more', 'than', 'i', 'can', 'say', 'for', 'many', 'more', 'extremely', 'obscure', 'slasher', 'filmsbr', 'br', 'the', 'film', 'doesnt', 'deliver', 'on', 'the', 'onscreen', 'deaths', 'theres', 'one', 'death', 'where', 'you', 'see', 'his', 'pruning', 'saw', 'rip', 'into', 'a', 'neck', 'but', 'all', 'other', 'deaths', 'are', 'hardly', 'interesting', 'but', 'the', 'lack', 'of', 'onscreen', 'graphic', 'violence', 'doesnt', 'mean', 'this', 'isnt', 'a', 'slasher', 'film', 'just', 'a', 'bad', 'onebr', 'br', 'the', 'film', 'was', 'obviously', 'intended', 'not', 'to', 'be', 'taken', 'too', 'seriously', 'the', 'film', 'came', 'in', 'at', 'the', 'end', 'of', 'the', 'second', 'slasher', 'cycle', 'so', 'it', 'certainly', 'was', 'a', 'reflection', 'on', 'traditional', 'slasher', 'elements', 'done', 'in', 'a', 'tongue', 'in', 'cheek', 'way', 'for', 'example', 'after', 'a', 'kill', 'charlie', 'goes', 'to', 'the', 'towns', 'welcome', 'sign', 'and', 'marks', 'the', 'population', 'down', 'one', 'less', 'this', 'is', 'something', 'that', 'can', 'only', 'get', 'a', 'laughbr', 'br', 'if', 'youre', 'into', 'slasher', 'films', 'definitely', 'give', 'this', 'film', 'a', 'watch', 'it', 'is', 'slightly', 'different', 'than', 'your', 'usual', 'slasher', 'film', 'with', 'possibility', 'of', 'two', 'killers', 'but', 'not', 'by', 'much', 'the', 'comedy', 'of', 'the', 'movie', 'is', 'pretty', 'much', 'telling', 'the', 'audience', 'to', 'relax', 'and', 'not', 'take', 'the', 'movie', 'so', 'god', 'darn', 'serious', 'you', 'may', 'forget', 'the', 'movie', 'you', 'may', 'remember', 'it', 'ill', 'remember', 'it', 'because', 'i', 'love', 'the', 'name']
0
继续查看词典信息
# 查看词典信息
print(len(TEXT.vocab))

#itos: index to string
print(TEXT.vocab.itos[0])
print(TEXT.vocab.itos[1])

#stoi: string to index
print(TEXT.vocab.stoi['<unk>']) #unknown 未知词
print(TEXT.vocab.stoi['<pad>']) #padding  填充


#freqs: 词频
print(TEXT.vocab.freqs['<unk>'])
print(TEXT.vocab.freqs['a'])
print(TEXT.vocab.freqs['good'])
输出结果为:
108197
<unk>
<pad>
0
1
0
129453
11457
再查看:
# 查看数据管道信息
# 注意有坑:text第0维是句子长度
for batch in train_iter:
    features = batch.text
    labels = batch.label
    print(features)
    print(features.shape)
    print(labels)
    break
打印结果:
tensor([[  17,   31,  148,  ...,   54,   11,  201],
        [   2,    2,  904,  ...,  335,    7,  109],
        [1371, 1737,   44,  ...,  806,    2,   11],
        ...,
        [   6,    5,   62,  ...,    1,    1,    1],
        [ 170,    0,   27,  ...,    1,    1,    1],
        [  15,    0,   45,  ...,    1,    1,    1]])
torch.Size([200, 20])
tensor([0, 1, 0, 1, 0, 1, 1, 0, 1, 0, 1, 0, 1, 0, 1, 1, 0, 0, 0, 0])
# 将数据管道组织成torch.utils.data.DataLoader相似的features,label输出形式
class DataLoader:
    def __init__(self,data_iter):
        self.data_iter = data_iter
        self.length = len(data_iter)

    def __len__(self):
        return self.length

    def __iter__(self):
        # 注意:此处调整features为 batch first,并调整label的shape和dtype
        for batch in self.data_iter:
            yield(torch.transpose(batch.text,0,1),
                  torch.unsqueeze(batch.label.float(),dim = 1))

dl_train = DataLoader(train_iter)
dl_valid = DataLoader(valid_iter)
上面的问题还没解决,下面就不做过多的解释了,基本思路都差不多,如果上面问题有解决的,留言说一下哈~
二、🎉定义模型
使用Pytorch通常有三种方式构建模型:使用nn.Sequential按层顺序构建模型,继承nn.Module基类构建自定义模型,继承nn.Module基类构建模型并辅助应用模型容器(nn.Sequential,nn.ModuleList,nn.ModuleDict)进行封装。
此处选择使用第三种方式进行构建。
和图片还有Day01结构化一致,后面应该殴打his这么定义模型了,就不解释了,只是对于不同的对象建模有区别,大致都是标准化模型(==调包嘛,不寒颤==)
- 导入库
import torch
from torch import nn
from torchkeras import LightModel,summary
- 定义模型
torch.random.seed()
import torch
from torch import nn

class Net(nn.Module):

    def __init__(self):
        super(Net, self).__init__()

        #设置padding_idx参数后将在训练过程中将填充的token始终赋值为0向量
        self.embedding = nn.Embedding(num_embeddings = MAX_WORDS,embedding_dim = 3,padding_idx = 1)
        self.conv = nn.Sequential()
        self.conv.add_module("conv_1",nn.Conv1d(in_channels = 3,out_channels = 16,kernel_size = 5))
        self.conv.add_module("pool_1",nn.MaxPool1d(kernel_size = 2))
        self.conv.add_module("relu_1",nn.ReLU())
        self.conv.add_module("conv_2",nn.Conv1d(in_channels = 16,out_channels = 128,kernel_size = 2))
        self.conv.add_module("pool_2",nn.MaxPool1d(kernel_size = 2))
        self.conv.add_module("relu_2",nn.ReLU())

        self.dense = nn.Sequential()
        self.dense.add_module("flatten",nn.Flatten())
        self.dense.add_module("linear",nn.Linear(6144,1))
        self.dense.add_module("sigmoid",nn.Sigmoid())

    def forward(self,x):
        x = self.embedding(x).transpose(1,2)
        x = self.conv(x)
        y = self.dense(x)
        return y


net = Net()
print(net)

summary(net, input_shape = (200,),input_dtype = torch.LongTensor)
输出打印构建好的网络模型:
Net(
  (embedding): Embedding(10000, 3, padding_idx=1)
  (conv): Sequential(
    (conv_1): Conv1d(3, 16, kernel_size=(5,), stride=(1,))
    (pool_1): MaxPool1d(kernel_size=2, stride=2, padding=0, dilation=1, ceil_mode=False)
    (relu_1): ReLU()
    (conv_2): Conv1d(16, 128, kernel_size=(2,), stride=(1,))
    (pool_2): MaxPool1d(kernel_size=2, stride=2, padding=0, dilation=1, ceil_mode=False)
    (relu_2): ReLU()
  )
  (dense): Sequential(
    (flatten): Flatten()
    (linear): Linear(in_features=6144, out_features=1, bias=True)
    (sigmoid): Sigmoid()
  )
)
----------------------------------------------------------------
        Layer (type)               Output Shape         Param #
================================================================
         Embedding-1               [-1, 200, 3]          30,000
            Conv1d-2              [-1, 16, 196]             256
         MaxPool1d-3               [-1, 16, 98]               0
              ReLU-4               [-1, 16, 98]               0
            Conv1d-5              [-1, 128, 97]           4,224
         MaxPool1d-6              [-1, 128, 48]               0
              ReLU-7              [-1, 128, 48]               0
           Flatten-8                 [-1, 6144]               0
            Linear-9                    [-1, 1]           6,145
          Sigmoid-10                    [-1, 1]               0
================================================================
Total params: 40,625
Trainable params: 40,625
Non-trainable params: 0
----------------------------------------------------------------
Input size (MB): 0.000763
Forward/backward pass size (MB): 0.287796
Params size (MB): 0.154972
Estimated Total Size (MB): 0.443531
----------------------------------------------------------------
三、🎉训练模型
训练Pytorch通常需要用户编写自定义训练循环,训练循环的代码风格因人而异。
有3类典型的训练循环代码风格:脚本形式训练循环,函数形式训练循环,类形式训练循环。
此处介绍一种类形式的训练循环。
我们利用Pytorch-Lightning定义了一个高阶的模型接口LightModel, 封装在torchkeras中, 可以非常方便地训练模型。
import pytorch_lightning as pl
from torchkeras import LightModel

class Model(LightModel):

    #loss,and optional metrics
    def shared_step(self,batch)->dict:
        x, y = batch
        prediction = self(x)
        loss = nn.BCELoss()(prediction,y)
        preds = torch.where(prediction>0.5,torch.ones_like(prediction),torch.zeros_like(prediction))
        acc = pl.metrics.functional.accuracy(preds, y)
        dic = {"loss":loss,"accuracy":acc}
        return dic

    #optimizer,and optional lr_scheduler
    def configure_optimizers(self):
        optimizer= torch.optim.Adagrad(self.parameters(),lr = 0.02)
        return optimizer
开始训练:
pl.seed_everything(1234)
net = Net()
model = Model(net)

ckpt_cb = pl.callbacks.ModelCheckpoint(monitor='val_loss')

# set gpus=0 will use cpu,
# set gpus=1 will use 1 gpu
# set gpus=2 will use 2gpus
# set gpus = -1 will use all gpus
# you can also set gpus = [0,1] to use the  given gpus
# you can even set tpu_cores=2 to use two tpus

trainer = pl.Trainer(max_epochs=20,gpus = 0, callbacks=[ckpt_cb])
trainer.fit(model,dl_train,dl_valid)
训练结果:
================================================================================2021-01-16 21:47:29
epoch =  0
{'val_loss': 0.6834630966186523, 'val_accuracy': 0.5546000003814697}
{'accuracy': 0.5224003791809082, 'loss': 0.7246873378753662}

================================================================================2021-01-16 21:48:07
epoch =  1
{'val_loss': 0.6371415257453918, 'val_accuracy': 0.63319993019104}
{'accuracy': 0.6110503673553467, 'loss': 0.6552867889404297}

================================================================================2021-01-16 21:48:50
epoch =  2
{'val_loss': 0.5896139740943909, 'val_accuracy': 0.6798002123832703}
{'accuracy': 0.6910000443458557, 'loss': 0.5874115824699402}

================================================================================2021-01-16 21:49:32
epoch =  3
{'val_loss': 0.5726749300956726, 'val_accuracy': 0.6971999406814575}
{'accuracy': 0.7391000390052795, 'loss': 0.5251786112785339}

================================================================================2021-01-16 21:50:13
epoch =  4
{'val_loss': 0.5328916311264038, 'val_accuracy': 0.7326000332832336}
{'accuracy': 0.7705488801002502, 'loss': 0.4773417115211487}

================================================================================2021-01-16 21:50:54
epoch =  5
{'val_loss': 0.5194208025932312, 'val_accuracy': 0.7413997650146484}
{'accuracy': 0.7968998551368713, 'loss': 0.43944093585014343}

================================================================================2021-01-16 21:51:35
epoch =  6
{'val_loss': 0.5199333429336548, 'val_accuracy': 0.7429998517036438}
{'accuracy': 0.8130489587783813, 'loss': 0.4102325737476349}

================================================================================2021-01-16 21:52:16
epoch =  7
{'val_loss': 0.5124538540840149, 'val_accuracy': 0.7517998814582825}
{'accuracy': 0.8314500451087952, 'loss': 0.3849221169948578}

================================================================================2021-01-16 21:52:58
epoch =  8
{'val_loss': 0.510671079158783, 'val_accuracy': 0.7554002404212952}
{'accuracy': 0.8438503742218018, 'loss': 0.3616768419742584}

================================================================================2021-01-16 21:53:39
epoch =  9
{'val_loss': 0.5184627771377563, 'val_accuracy': 0.7530001997947693}
{'accuracy': 0.8568001985549927, 'loss': 0.34138554334640503}

================================================================================2021-01-16 21:54:20
epoch =  10
{'val_loss': 0.5105863809585571, 'val_accuracy': 0.7580001354217529}
{'accuracy': 0.865899920463562, 'loss': 0.32265418767929077}

================================================================================2021-01-16 21:55:02
epoch =  11
{'val_loss': 0.5222727656364441, 'val_accuracy': 0.7586002349853516}
{'accuracy': 0.8747013211250305, 'loss': 0.306064248085022}

================================================================================2021-01-16 21:55:43
epoch =  12
{'val_loss': 0.5208917856216431, 'val_accuracy': 0.7597998976707458}
{'accuracy': 0.8820013403892517, 'loss': 0.29068493843078613}

================================================================================2021-01-16 21:56:24
epoch =  13
{'val_loss': 0.5236031413078308, 'val_accuracy': 0.7603999376296997}
{'accuracy': 0.889351487159729, 'loss': 0.2765159606933594}

================================================================================2021-01-16 21:57:04
epoch =  14
{'val_loss': 0.5428195595741272, 'val_accuracy': 0.7572000622749329}
{'accuracy': 0.8975020051002502, 'loss': 0.26261812448501587}

================================================================================2021-01-16 21:57:45
epoch =  15
{'val_loss': 0.5340956449508667, 'val_accuracy': 0.7602002024650574}
{'accuracy': 0.9049026966094971, 'loss': 0.25028231739997864}

================================================================================2021-01-16 21:58:25
epoch =  16
{'val_loss': 0.5380828380584717, 'val_accuracy': 0.7612000107765198}
{'accuracy': 0.9085531234741211, 'loss': 0.23980091512203217}

================================================================================2021-01-16 21:59:05
epoch =  17
{'val_loss': 0.5447139739990234, 'val_accuracy': 0.7638000249862671}
{'accuracy': 0.9168024659156799, 'loss': 0.22760336101055145}

================================================================================2021-01-16 21:59:45
epoch =  18
{'val_loss': 0.5505074858665466, 'val_accuracy': 0.7636001110076904}
{'accuracy': 0.921653687953949, 'loss': 0.21746191382408142}

================================================================================2021-01-16 22:00:26
epoch =  19
{'val_loss': 0.5615255236625671, 'val_accuracy': 0.7634001970291138}
{'accuracy': 0.9263033270835876, 'loss': 0.2077799290418625}
四、🎉评估模型
评估模型,老规矩
import pandas as pd

history = model.history
dfhistory = pd.DataFrame(history)
dfhistory
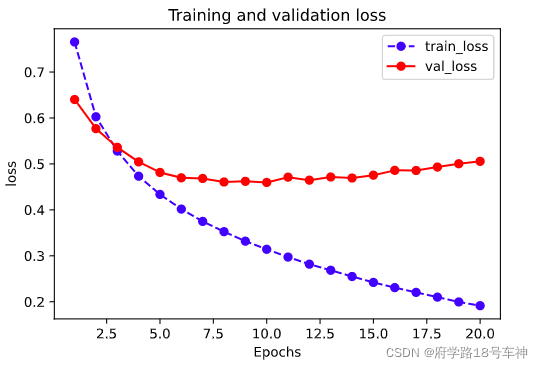
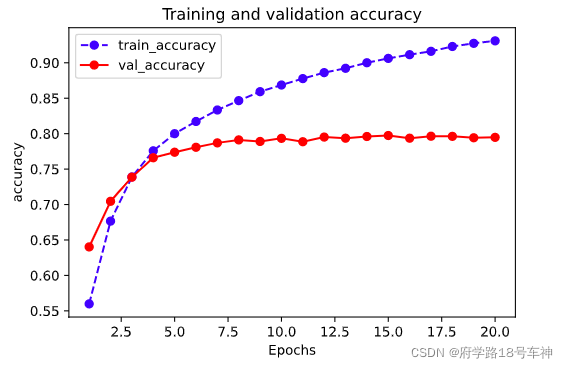
可视化:
%matplotlib inline
%config InlineBackend.figure_format = 'svg'

import matplotlib.pyplot as plt

def plot_metric(dfhistory, metric):
    train_metrics = dfhistory[metric]
    val_metrics = dfhistory['val_'+metric]
    epochs = range(1, len(train_metrics) + 1)
    plt.plot(epochs, train_metrics, 'bo--')
    plt.plot(epochs, val_metrics, 'ro-')
    plt.title('Training and validation '+ metric)
    plt.xlabel("Epochs")
    plt.ylabel(metric)
    plt.legend(["train_"+metric, 'val_'+metric])
    plt.show()
plot_metric(dfhistory,"loss")
plot_metric(dfhistory,"accuracy")
# 评估
results = trainer.test(model, test_dataloaders=dl_valid, verbose = False)
print(results[0])
{'val_loss': 0.5056138457655907, 'val_accuracy': 0.7948000040054322}
五、🎉使用模型
使用模型来做预测:
def predict(model,dl):
    model.eval()
    result = torch.cat([model.forward(t[0].to(model.device)) for t in dl])
    return(result.data)

result = predict(model,dl_valid)
result
结果:
tensor([[0.0357],
        [0.8699],
        [0.3303],
        ...,
        [0.9962],
        [0.5566],
        [0.0491]])
六、🎉保存模型
也同样是老套路。
print(ckpt_cb.best_model_score)
model.load_from_checkpoint(ckpt_cb.best_model_path)

best_net  = model.net
torch.save(best_net.state_dict(),"./data/net.pt")
net_clone = Net()
net_clone.load_state_dict(torch.load("./data/net.pt"))
model_clone = Model(net_clone)
trainer = pl.Trainer()
result = trainer.test(model_clone,test_dataloaders=dl_valid, verbose = False)

print(result)
结果:
[{'test_loss': 0.4958915710449219, 'test_accuracy': 0.75}]
🤗往期纪实
| Date | 《20天掌握Pytorch实战》 |
|---|---|
| Day01 | 【进阶篇】全流程学习《20天掌握Pytorch实战》纪实 | Day01 | 结构化数据建模流程范例 |
| Day02 | 【进阶篇】全流程学习《20天掌握Pytorch实战》纪实| Day02 | 图片数据建模流程范例 |
🥇总结
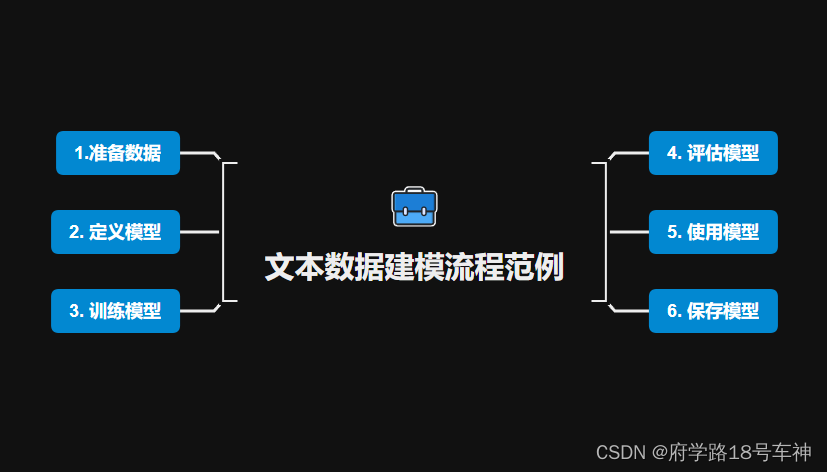
从数据建模的流程开始学习,按照准备数据、定义模型、训练模型、评估模型、使用模型、保存模型这六大常规思路,简单数据集入手,对于0基础的同学来说可能还是稍有难度,因此,本文中给出了大部分使用到的库的解释,同时给出了部分代码的注释,以便小伙伴的理解,仅供参考,如有错误,请留言指出,最后一句:开源万岁~
同时为原作者打Call:
如果本书对你有所帮助,想鼓励一下作者,记得给本项目加一颗星星star⭐️,并分享给你的朋友们喔😊!
地址在这里哦:https://github.com/lyhue1991/eat_pytorch_in_20_days
😊Reference
书籍源码在此:
链接:https://pan.baidu.com/s/1P3WRVTYMpv1DUiK-y9FG3A
提取码:yyds

- 点赞
- 收藏
- 关注作者
评论(0)