【数据结构】顺序表详解 | 从零开始步步解读 | 画图理解并调试分析


![]()
前言:
本章节将对顺序表的概念进行介绍,着重讲解动态顺序表。对常用的接口函数进行一个个讲解,并进行解析。顺序表讲解部分将从零实现顺序表接口函数,遇到问题我会进行一步步地调试说明,通过对本章的学习不仅能学会顺序表,还能实战练习下调试的技能。调试不仅仅是帮助我们分析程序找到错误的,也可以让我们去观察和理解程序。调试才是硬技能!写一点点测一点点,不要写完了再来测,这样我们就可以很轻松的找出问题。
一、线性表的概念
【百度百科】线性表是最基本、最简单、也是最常用的一种数据结构。线性表(linear list)是数据结构的一种,一个线性表是n个具有相同特性的数据元素的有限序列。
线性表中数据元素之间的关系是一对一的关系,即除了第一个和最后一个数据元素之外,其它数据元素都是首尾相接的(注意,这句话只适用大部分线性表,而不是全部。比如,循环链表逻辑层次上也是一种线性表(存储层次上属于链式存储,但是把最后一个数据元素的尾指针指向了首位结点)。
📚 概念:线性表(Linear list)是n个具有相同特性的数据元素的有限序列,线性表是一种在实际中广泛使用的数据结构,常见的线性表有:顺序表、链表、栈、队列、字符串等……
线性表在逻辑上是线性结构,呈现出一条线性,他们在逻辑上是挨着挨着的。但是在物理结构上并不一定是连续的,线性表在物理上存储时,通常以数组和链式结构的形式存储。
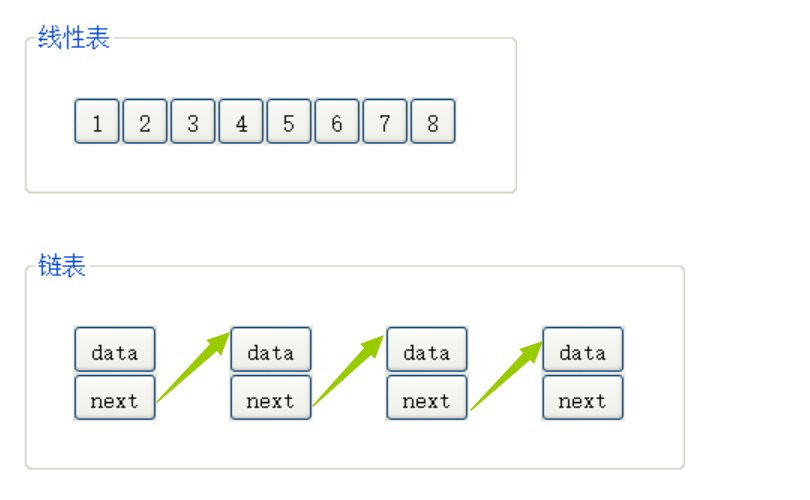
![]()
二、顺序表
0x00 顺序表的概念

![]()
【百度百科】顺序表是在计算机内存中以数组的形式保存的线性表,线性表的顺序存储是指用一组地址连续的存储单元依次存储线性表中的各个元素、使得线性表中在逻辑结构上相邻的数据元素存储在相邻的物理存储单元中,即通过数据元素物理存储的相邻关系来反映数据元素之间逻辑上的相邻关系,采用顺序存储结构的线性表通常称为顺序表。顺序表是将表中的结点依次存放在计算机内存中一组地址连续的存储单元中。
📚 概念:顺序表是用一段物理地址连续的存储单元依次存储数据元素的线性结构,一般情况下采用数组存储。在数组上完成数据的增删查改。顺序表一般可以分为静态顺序表和动态顺序表:
静态顺序表:使用定长数组存储元素
动态顺序表:使用动态开辟的数组存储
❓ 顺序表的本质是什么?
🔑 顺序表的本质就是数组,但是在数组的基础上它还要求数组是从头开始存,并且是连续存储的,不能跳跃间隔。换言之,顺序表既然叫顺序表,那么数据一定必须是挨着挨着存的。
0x01 静态顺序表
💬 使用定长数组存储元素:
#define N 8
typedef int SLDataType

typedef struct SeqList {
    SLDataType array[N];  //定长数组
    size_t size;          //有效数据的个数
} SeqList;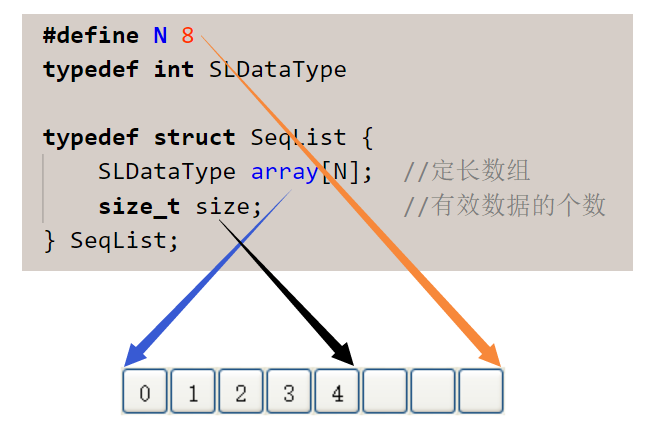
![]()
📚 静态顺序表的特点:如果满了就不让插入。
💭 静态顺序表的缺点:是给多少合适呢?这个往往难以斟酌,N给小了不够用,N给大了又浪费空间。
0x02 动态顺序表
💬 使用动态开辟的数组存储元素:
typedef int SLDataType

typedef struct SeqList {
    SLDataType* array;    //指向动态开辟的数组
    size_t size;          //有效数据的个数
    size_t capacity;      //容量空间的大小
} SeqList;
![]()
三、接口实现
0x00 Q&A
❓ 为什么使用动态顺序表?
🔑 静态顺序表只适用于确定知道需要存多少数据的场景,如果静态顺序表的定长数组导致N定大了,就会造成空间浪费,如果N定小了又不够用。所以现实中基本都是使用动态顺序表,可以根据需要动态地分配空间大小。
❓ 什么是接口函数?
🔑 接口函数是在数据进行操作时进行调用的函数,通过调用数据结构的接口帮助你完成一系列操作。
0x00 基本增删查改接口
/* 接口函数 */
void SeqListInit(SL* psl);							   //初始化
void SeqListDestory(SL* psl);						   //销毁
void SeqListCheckCapacity(SL* psl);					   //检查是否需要增容
void SeqListPushBack(SL* psl, SLDataType x);	       //尾插
void SeqListPrint(SL* psl);							   //打印
void SeqListPushFront(SL* psl, SLDataType x);	       //头插
void SeqListPopBack(SL* psl);						   //尾删
void SeqListPopFront(SL* psl);					       //头删
int SeqListFind(SL* psl, SLDataType x);				   //查找
int SeqListInsert(SL* psl, int pos, SLDataType x);     //指定位置插入
int SeqListEarse(SL* psl, int pos);			           //指定位置删除
0x01顺序表初始化(SeqListInit)
📜 为了养成模块化好习惯,我们尽量把代码分开来写。首先打开 VS2017,在解决方案资源管理器中的 "头文件" 文件夹中创建 SeqList.h 用来存放头文件。在 "源文件" 文件夹中创建 SeqList.c 用来实现函数,Test.c 用来测试我们的顺序表:
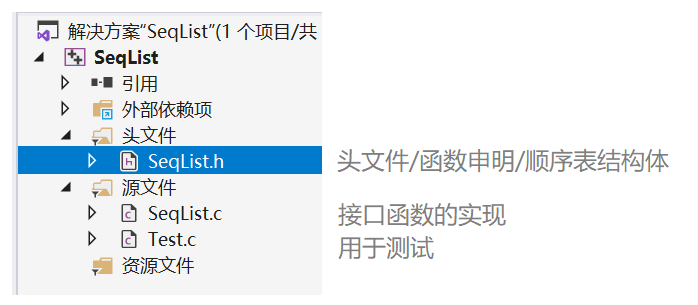
![]()
💬 SeqList.h:
#pragma once
#include <stdio.h>
#include <stdlib.h>

typedef int SLDataType;

/* 动态顺序表 */
typedef struct SeqList {
	SLDataType* array;
	int size;            //有效数据个数
	int capacity;        //数组实际能存数据的空间容量是多大
}SL;

/* 接口函数 */
void SeqListInit(SL* psl);
🔑 解读:
为了避免同一个头文件被包含多次我们可以使用 #pragma once(在C语言系列预处理章节提到过,为了加深印象我在这里不得不再重申一下)。
为了方便后续修改数据类型,我们可以使用 typedef 定义一个新的数据类型,这里我们把它取名为 SLDataType(顺序表数据类型)。
我们为了让定义的结构体使用时更方便,我们同样可以使用 typedef 将其定义为 SL(此时 SL = struct SeqList,后续在使用时可以更加方便)。
最后声明我们要实现的接口函数——顺序表初始化函数并取名为 SeqListInit ,参数部分为 SL* psl(这里的 SL 就是之前被 typedef 定义的结构体 struct SeqList ),考虑到形参是只是实参的临时拷贝的问题,为了能够伤其内部,这里我们会使用址传递。所以,为了能够接收 "这个" 地址,我们使用指针 psl 来接收。
💬 SeqList.c:
#include "SeqList.h"

/* 初始化 */
void SeqListInit(SL* psl) {
	psl->array = NULL;
	psl->size = psl->capacity = 0;
}
🔑 解读:
首先引入我们自己创建的头文件 #include "SeqList.h" ,我们就可以开始动手实现顺序表初始化函数了。
首先通过 psl 指向 array,将数组为空。因为是初始化,所以将有效数据个数和数组时即能存数据的空间容量一并置为0。
💬 Test.c:
#include "SeqList.h"

void TestSeqList1() {
	SL sl;
	SeqListInit(&sl);
}

int main() {
	TestSeqList1();

	return 0;
}
🔑 解读:测试代码部分,我们不在 main 函数内直接测试而是通过函数来测试,这样的好处是可以方便我们选择性的测试一部分的代码。
为了测试,TestSeqList1 函数中首先创建一个结构体,这里取名为 sl ,随后将 sl 址传递传入 SeqListInit 函数中进行测试。
我们运行代码发现代码可以成功运行,我们下面进入调试来看一下 SeqListInit 函数是否起作用了。
🐞 调试代码:

![]()
至此,SeqListInit 函数就写好了。
0x02 尾插(SeqListPushBack)
📚 说明:所谓的尾插,就是在后面进行插入。

![]()
💡 出现三种情况:
① 第一种情况是顺序表压根就没有空间。
② 第二种情况就是我们创建的 capacity 空间满了。
③ 第三种情况是空间足够,直接插入数据即可。

![]()
💬 SeqList.h:
...
void SeqListPushBack(SL* psl, SLDataType x);  //尾插
🔑 解读:SLDataType x 是要添加到顺序表的元素。
💬 SeqList.c:
...
/* 尾插 */
void SeqListPushBack(SL* psl, SLDataType x) {
	// 首先判断有没有空间,如果没有空间或者空间不足,那么我们就扩容
	if (psl->size == psl->capacity) {
        // 如果容量是0(第一次)就赋4,如果不是0,就把容量翻一倍
		int new_capacity = psl->capacity == 0 ? 4 : psl->capacity*2;
		// 这里使用realloc,因为如果原空间为空,就等于malloc。调整为 new_capacity个SLDataType大小的空间
		SLDataType* tmp_array = (SLDataType*)realloc(psl->array, new_capacity * sizeof(SLDataType));
        // 检测是否realloc成功
		if (tmp_array == NULL) {
			printf("realloc fail {扩容失败}\n");
			exit(-1);
		}
		// 更新它们的大小
		psl->array = tmp_array;
		psl->capacity = new_capacity;
	}

	//插入
	psl->array[psl->size] = x;
	psl->size++;
}
🔑 解读:
根据我们刚才分析的三种情况,首先我们需要判断是空间是否足够。判断思路如下:如果 size == capacity(有效数据个数等于实际能存的最大空间容量),我们进行扩容操作。
如果空间不足,我们就创建一个变量 new_capacity 用来存放 "新容量" ,int new_capacity = psl->capacity 首先把 capacity 的值赋值给这个 "新容量" ,因为考虑到第一次使用 capacity 大小为0,翻倍会出问题(0乘以任何数都是0),这里巧妙地使用三目操作符:int new_capacity = psl->capacity == 0 ? 4 : psl->capacity*2 , 如果 capacity 为 0 (第一次使用大小是0),就把4赋值给它;如果不为0,就把 capacity 的值翻一倍(x2)。
❓ 这里为什么要x2(翻一倍)?
💡 随便你,你想一次扩容多少就扩容多少,乘2只是一个比较折中的扩容容量方案。
此时,new_capacity 中就存放了扩容的新容量(如果第一次使用为容量为4,容量扩容后为capacity的二倍)。
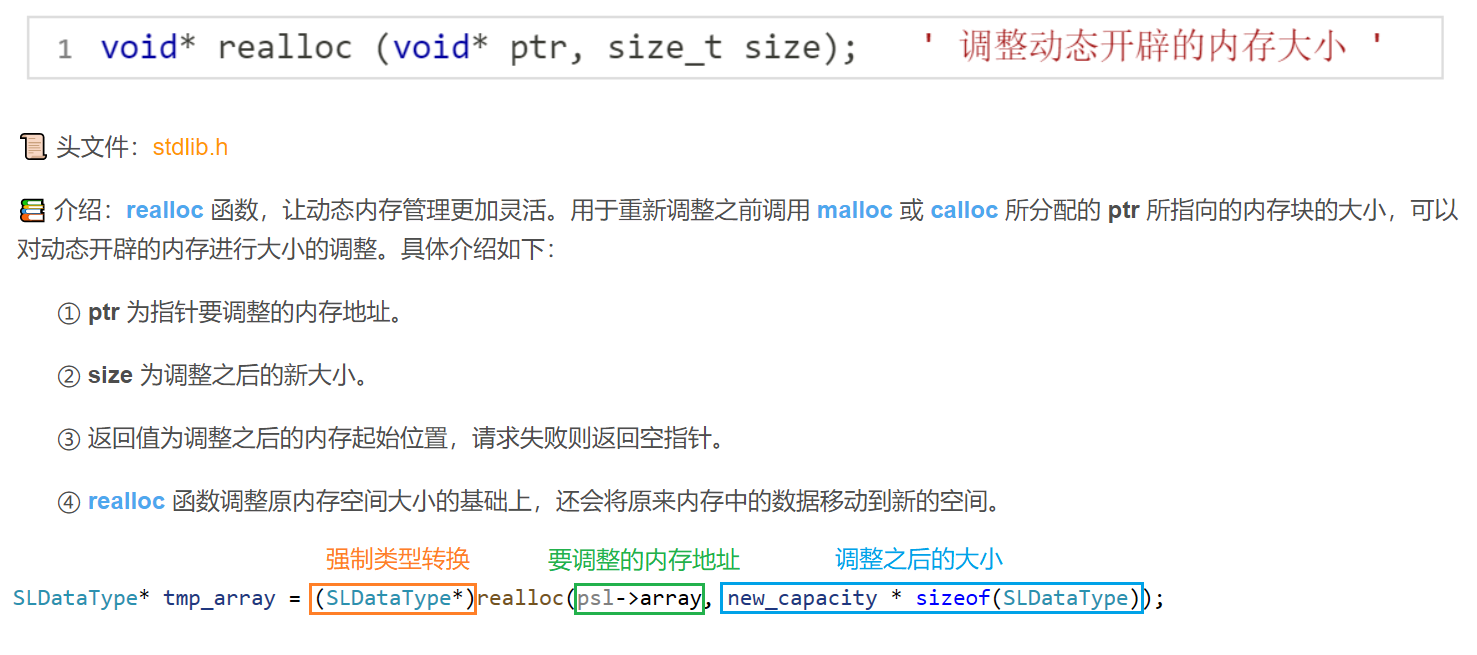
确定好新的容量后,我们可以对数组动刀子了。为了防止翻车,我们先创建一个临时数组来扩容。这里要进行动态内存开辟,我们选择使用 realloc 而不是 malloc 函数,因为 realloc 可以调整并且如果是第一次用自带 malloc 的效果:

![]() (摘自MSDN)
(摘自MSDN)
下面我们来看是如何扩容的:
![]()
🔗 如果还是比较懵,建议详细复习:
这里我们还加了一段判断,如果你动态内存管理学的比较好这里就不难理解:

![]()
如果没有问题,就可以进行赋值操作了。将 new_capacity 交给 psl->capacity,将 tmp_array 交给 psl->array :

![]()
扩容成功后就可以插入了,插入相对来说就很很简单了。

![]()
🔺 当然,如果一开始空间足够就不需要扩容,就可以直接跳到这里:

![]()
💬 Test.c:
#include "SeqList.h"

void TestSeqList1() {
	SL sl;
	SeqListInit(&sl);

	SeqListPushBack(&sl, 1);
	SeqListPushBack(&sl, 2);
	SeqListPushBack(&sl, 3);
	SeqListPushBack(&sl, 4);
	SeqListPushBack(&sl, 5);
}

int main() {
	TestSeqList1();

	return 0;
}
🔑 解读:我们来测试下 SeqListPushBack 尾插功能是否实现成功了。我们之前定义的 SLDataType 是 int 型,所以我们传入数字进行测试。

![]()
🐞 调试:

![]()
至此,SeqListPushBack 函数就写好了。
0x03 顺序表打印(SeqListPrint)
📚 顺序表打印就是打印顺序表内数据,我们可以利用循环解决。
💬 SeqList.h:
···
void SeqListPrint(SL* psl);        //打印
🔑 解读:因为是单纯的打印,所以只需要把顺序表传过去就行。
💬 SeqList.c:
/* 打印 */
void SeqListPrint(SL* psl) {
	int i = 0;
	for (i = 0; i < psl->size; i++) {
		printf("%d ", psl->array[i]);
	}
	printf("\n");
}
🔑 解读:遍历整个顺序表,利用 for 循环就可以轻松解决,把他们都打印出来就可以了。
💬 Test.c:
void TestSeqList1() {
	SL sl;
	SeqListInit(&sl);

	SeqListPushBack(&sl, 1);
	SeqListPushBack(&sl, 2);
	SeqListPushBack(&sl, 3);
	SeqListPushBack(&sl, 4);
	SeqListPushBack(&sl, 5);

	SeqListPrint(&sl);
}
🚩 运行结果如下:

![]()
0x04 销毁(SeqListDestroy)
📚 因为是动态开辟的,所以如果空间不用我们就需要销毁掉。如果不销毁会存在内存泄漏的风险,所以与之对应的我们写一个销毁的接口函数。
💬 SeqList.h:
...
void SeqListDestory(SL* psl);		//销毁
💬 SeqList.c:
/* 销毁 */
void SeqListDestory(SL* psl) {
	//首先把空间还给操作系统
	free(psl->array);
	psl->array = NULL; //置空防止空指针
	psl->capacity = psl->size = 0; //空间置0
}
🔑 解读:首先使用 free 函数把动态开辟的内存空间释放掉,因为 free 之后那块开辟的内存空间已经不在了,为了防止野指针,我们还需要手动把它置为空指针。最后再把 capacity 和 size 全部设为0,做到空着手来,空着手去,销毁部分就实现好了。
💬 Test.c:
void TestSeqList1() {
	SL sl;
	SeqListInit(&sl);

	SeqListPushBack(&sl, 1);
	SeqListPushBack(&sl, 2);
	SeqListPushBack(&sl, 3);
	SeqListPushBack(&sl, 4);
	SeqListPushBack(&sl, 5);

	SeqListPrint(&sl);

	SeqListDestory(&sl);
}
0x05 尾删(SeqListPopBack)
📚 如果我们想把第一个数据删除,最简单的思路是把要尾删的地方置为 0,然后再把 size-- 即可实现。这就是尾删:

![]()
💬 SeqList.h:
void SeqListPopBack(SL* psl); //尾删💬 SeqList.c:
/* 尾删 */
void SeqListPopBack(SL* psl) {
	psl->array[psl->size - 1] = 0;		//因为是下标,所以size-1才能对的上
	psl->size--;	//实际有效个数-1
}
🔑 解读:首先 psl->array[psl -> size - 1] 这里 -1 ,是因为下标的原因,减1才可以对的上。这里把末尾的元素设为了0,此时再 size-- 让实际有效个数减1。
💬 Test.c:我们来删除两个数据测试一下
void TestSeqList1() {
	SL sl;
	SeqListInit(&sl);

	SeqListPushBack(&sl, 1);
	SeqListPushBack(&sl, 2);
	SeqListPushBack(&sl, 3);
	SeqListPushBack(&sl, 4);
	SeqListPushBack(&sl, 5);
	SeqListPrint(&sl); //打印

	SeqListPopBack(&sl);
	SeqListPopBack(&sl);
	SeqListPrint(&sl);  //打印

    SeqListDestory(&sl); //销毁
}
🚩 运行结果:
![]()

![]()
🤔 不知道你有没有发现,其实我们只需要 psl -> size-- 就可以了…… 找到尾部的目标然后把他置为0其实没有意义,因为 size 一减,货一拉,就什么痕迹都没有了。是 size 标识了我们存入了多少个有效数据,比如有5个数据,size-- 后就只有前4个数据有意义了。所以,尾删我们只需要 size-- ,就可以达到目的:
/* 尾删 */
void SeqListPopBack(SL* psl) {
	// psl->array[psl->size - 1] = 0;
	psl->size--;						//实际有效个数-1
}
❓ 尾删就这么简单?
当然不是,我们还需要考虑一些情况的发生。如果我们一直删,删到没有数据可以删了,是不是会出现问题呢?我们试着删完5个数据后继续删,然后再插入输入打印看看:
void TestSeqList1() {
SL sl;
SeqListInit(&sl);
SeqListPushBack(&sl, 1);
SeqListPushBack(&sl, 2);
SeqListPushBack(&sl, 3);
SeqListPushBack(&sl, 4);
SeqListPushBack(&sl, 5);
SeqListPrint(&sl); //打印
SeqListPopBack(&sl);
SeqListPopBack(&sl);
SeqListPopBack(&sl);
SeqListPopBack(&sl);
SeqListPopBack(&sl);
SeqListPopBack(&sl);
SeqListPopBack(&sl);
SeqListPrint(&sl); //打印
SeqListPushBack(&sl, 10);
SeqListPushBack(&sl, 20);
SeqListPrint(&sl); //打印
SeqListDestory(&sl); //销毁
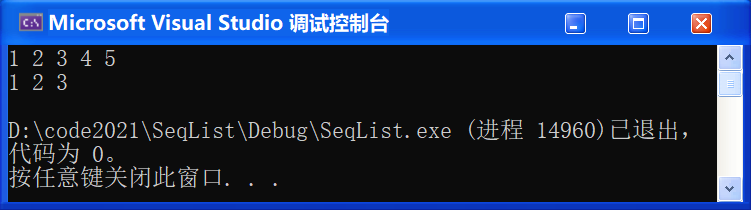
}🚩 运行结果如下:
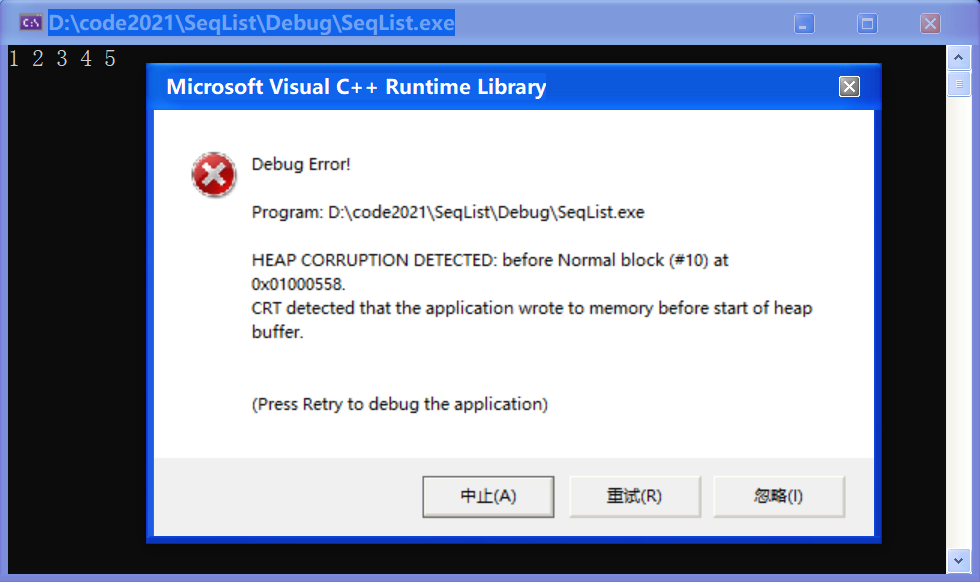
![]()
(吐槽:这时候一打印,就爆炸了。以为写的很完美的尾插,一直以为它是不会翻车的,就,就,爆炸了,碎成了片片,我同情它甚至超过了同情我自己。)
🐞 不慌,我们来调试看看!

![]()
💡 解决方案:添加 SeqListPopBack 限制条件
方式一:如果没有数据了,使调用 SeqListPopBack 没效果(儒雅随和的方式)
💬 SeqList.c:
/* 尾删 */
void SeqListPopBack(SL* psl) {
	if (psl->size > 0) {
		// psl->array[psl->size - 1] = 0;
		psl->size--;	//实际有效个数-1
	}
}
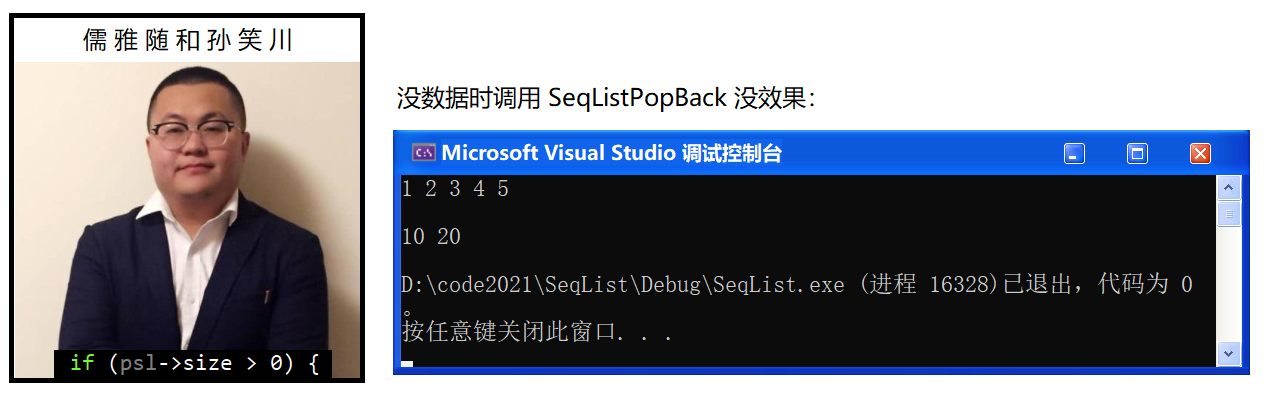
![]()
方式二:使用断言,直接不允许你做类似这样的动作。你在调用这个接口之前你必须确定它是有数据的,如果没有数据就不能调了,调了就给你报错。
💬 SeqList.h:使用断言需引入 assert.h
#pragma once
#include <stdio.h>
#include <stdlib.h>
#include <assert.h>
···
💬 SeqList.c:
/* 尾删 */
void SeqListPopBack(SL* psl) {
	//if (psl->size > 0) {
	//	// psl->array[psl->size - 1] = 0;
	//	psl->size--;	//实际有效个数-1
	//}

	assert(psl->size > 0);
	psl->size--;
}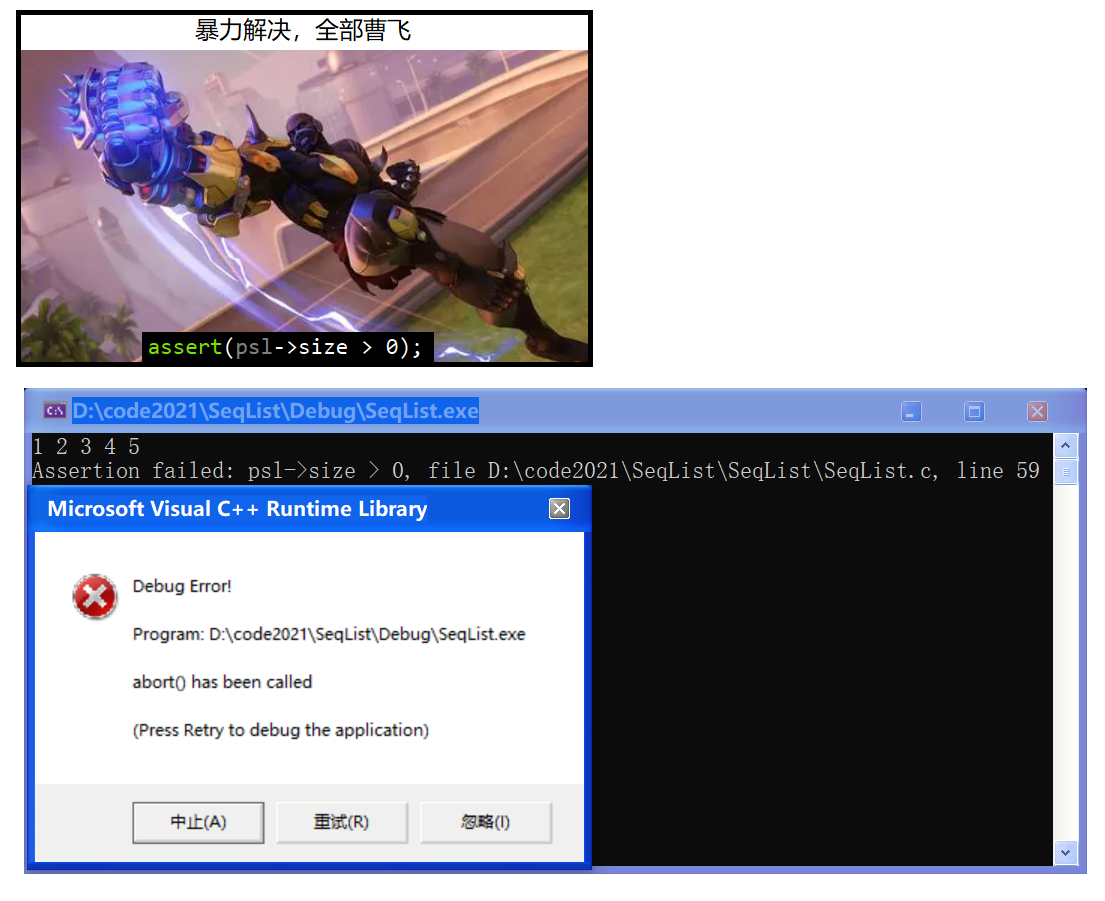
![]()
🔺 至于选择儒雅随和的方式还是暴力解决的方式,就看你自己喜好了。
0x06 头插(SeqListPushFront)和检查是否需要增容(SeqListCheckCapacity)
📚 顺序表要求数据是连续存储的,且必须是从头开始存储。所以,对于顺序表而言如果要实现头插,就需要把数据往后挪动。不能从前往后挪,如果从前往后挪就挪就会把后面的数据覆盖掉。
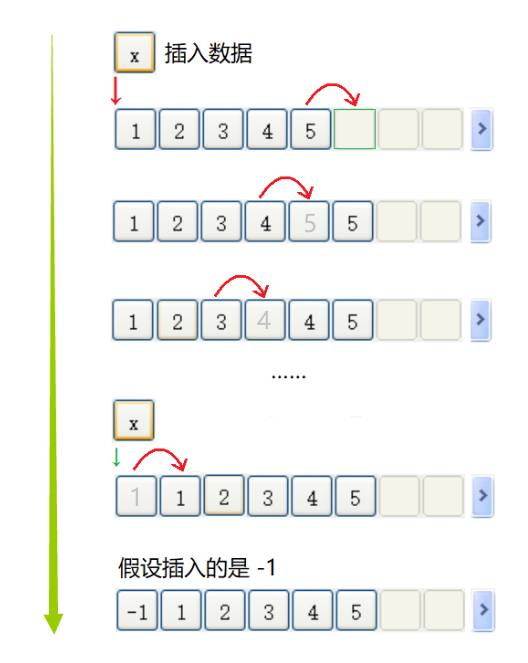
![]()
💬 SeqList.h:
void SeqListPushFront(SL* psl, SLDataType x); //头插
💬 SeqList.c:
/* 头插 */
void SeqListPushFront(SL* psl, SLDataType x) {
	// 挪动数据
	int end = psl->size - 1; // 因为指向的是数据的下标,所以要 -1
	while (end >= 0) {
		psl->array[end + 1] = psl->array[end];
		end--; //让end指向下一个要移的数据
	}

	// 此时第一个位置已经被腾出来了,可以插入了
	psl->array[0] = x;
	psl->size++;
}
🔑 解读:首先创建一个 end 变量用来指向要移动的数据,因为指向的是数据的下标,所以是 size 要减 1 。随后进入 while 循环,如果 end >= 0 说明还没有移动完,就会进入循环。循环体内利用下标,进行向后移动操作,移动结束后再 end-- ,进行下一个数据的向后移动。挪动数据成功后,就可以插入了。此时顺序表第一个位置就被腾出来了,就可以在下标0位置插入欲插入的数据 x 了。最后记得 size++ 。
💬 Test.c:测试头插
我们之前用的 TestSeqList1 测试函数里东西太多了很乱,现在我们再创建一个 TestSeqList2 函数来继续测试。现在就能体现出不在 main 函数内直接测试而是通过函数来测试的好处了,我们可以选择性地测试一部分代码,互相之间不干扰。
void TestSeqList2() {
	SL sl;
	SeqListInit(&sl);

	SeqListPushBack(&sl, 1);
	SeqListPushBack(&sl, 2);
	SeqListPushBack(&sl, 3);
	SeqListPushBack(&sl, 4);
	SeqListPushBack(&sl, 5);
	SeqListPrint(&sl); //打印

	SeqListPushFront(&sl, -1);
	SeqListPushFront(&sl, -2);
	SeqListPushFront(&sl, -3);
	SeqListPrint(&sl); //打印

	SeqListDestory(&sl); //销毁
}

int main() {
	// TestSeqList1();
	TestSeqList2();

	return 0;
}
🚩 运行结果如下:(先插入了12345,又在12345前面头插了 -1、-2、-3)
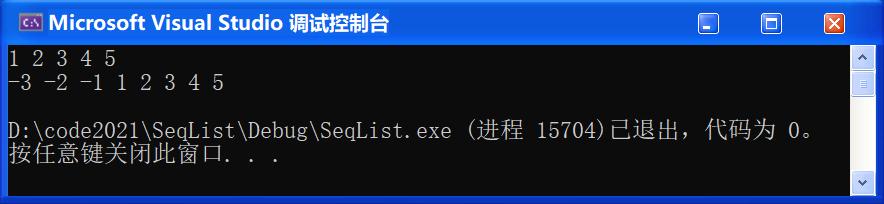
![]()
❓ 我们是不是少了点啥?
💡 我们还需要检查是否需要扩容,和尾插一样。
📚 我们之前在完成 SeqListPushBack 尾插的时候就已经写好了,我们不妨把它抽取出来写成一个函数,方便以后多次调用:
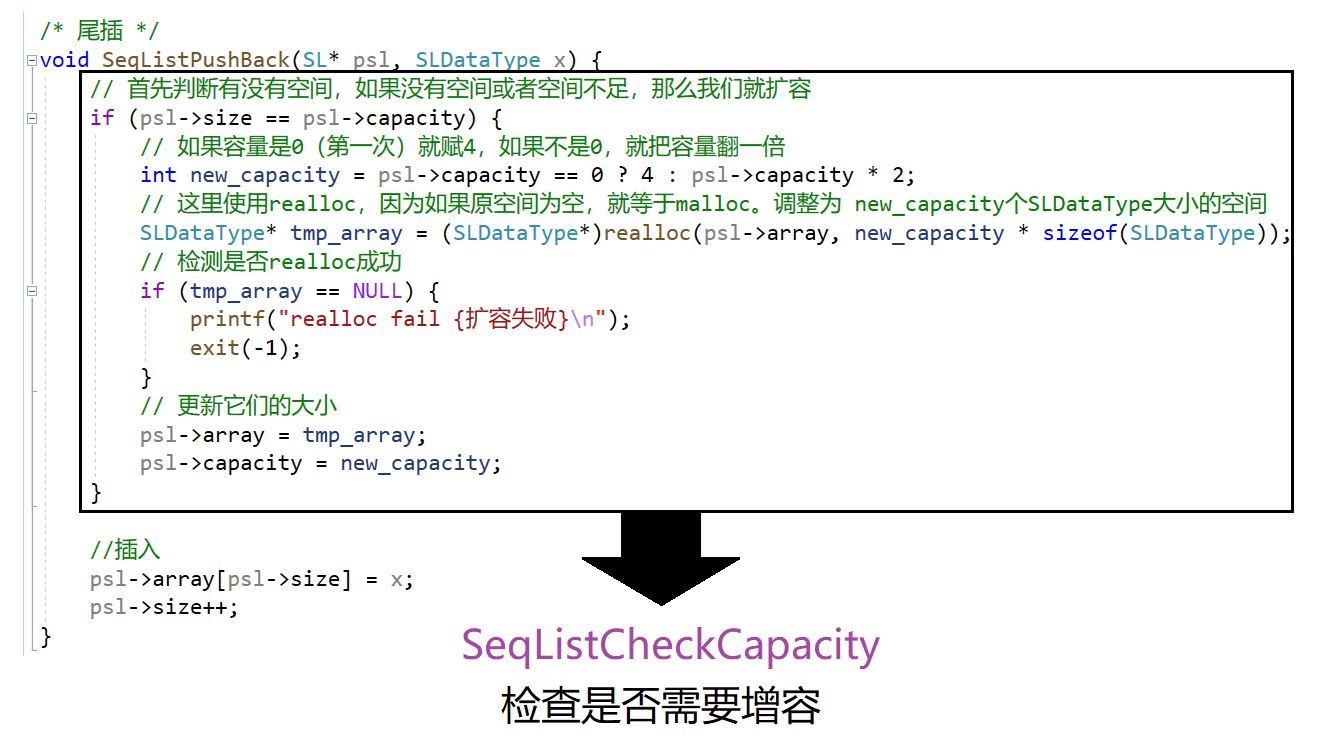
![]()
💬 SeqList.c:检查是否需要增容函数
/* 检查是否需要扩容 */
void SeqListCheckCapacity(SL* psl) {
	// 首先判断有没有空间,如果没有空间或者空间不足,那么我们就扩容
	if (psl->size == psl->capacity) {
		// 如果容量是0(第一次)就赋4,如果不是0,就把容量翻一倍
		int new_capacity = psl->capacity == 0 ? 4 : psl->capacity * 2;
		// 这里使用realloc,因为如果原空间为空,就等于malloc。调整为 new_capacity个SLDataType大小的空间
		SLDataType* tmp_array = (SLDataType*)realloc(psl->array, new_capacity * sizeof(SLDataType));
		// 检测是否realloc成功
		if (tmp_array == NULL) {
			printf("realloc fail {扩容失败}\n");
			exit(-1);
		}
		// 更新它们的大小
		psl->array = tmp_array;
		psl->capacity = new_capacity;
	}
}
🔑 解读:我们把之前写在 SeqListPushBack 中的检查增容的代码直接复制粘贴过来就可以了,这样一来,我们需要检查是否需要增容时直接调用 SeqListCheckCapacity 函数就可以了!
💬 SeqList.c:更新下尾插函数
/* 尾插 */
void SeqListPushBack(SL* psl, SLDataType x) {
	//检查增容
	SeqListCheckCapacity(psl);

	//插入
	psl->array[psl->size] = x;
	psl->size++;
}
💬 SeqList.c:更新下头插函数
/* 头插 */
void SeqListPushFront(SL* psl, SLDataType x) {
	//检查增容
	SeqListCheckCapacity(psl);

	// 挪动数据
	int end = psl->size - 1; // 因为指向的是数据的下标,所以要 -1
	while (end >= 0) {
		psl->array[end + 1] = psl->array[end];
		end--; //让end指向下一个要移的数据
	}

	// 此时第一个位置已经被腾出来了,可以插入了
	psl->array[0] = x;
	psl->size++;
}
📌 如果不扩容,继续往下添加会造成的后果:【不感兴趣可跳过】
💬 Test.c:把尾插函数内的 SeqListCheckCapacity(psl); 注释掉
void TestSeqList2() {
	SL sl;
	SeqListInit(&sl);

	SeqListPushBack(&sl, 1);
	SeqListPushBack(&sl, 2);
	SeqListPushBack(&sl, 3);
	SeqListPushBack(&sl, 4);
	SeqListPushBack(&sl, 5);
	SeqListPrint(&sl); //打印

	SeqListPushFront(&sl, -1);
	SeqListPushFront(&sl, -2);
	SeqListPushFront(&sl, -3);
	SeqListPushFront(&sl, -4); //继续添加
	SeqListPrint(&sl); //打印

	SeqListDestory(&sl); //销毁
}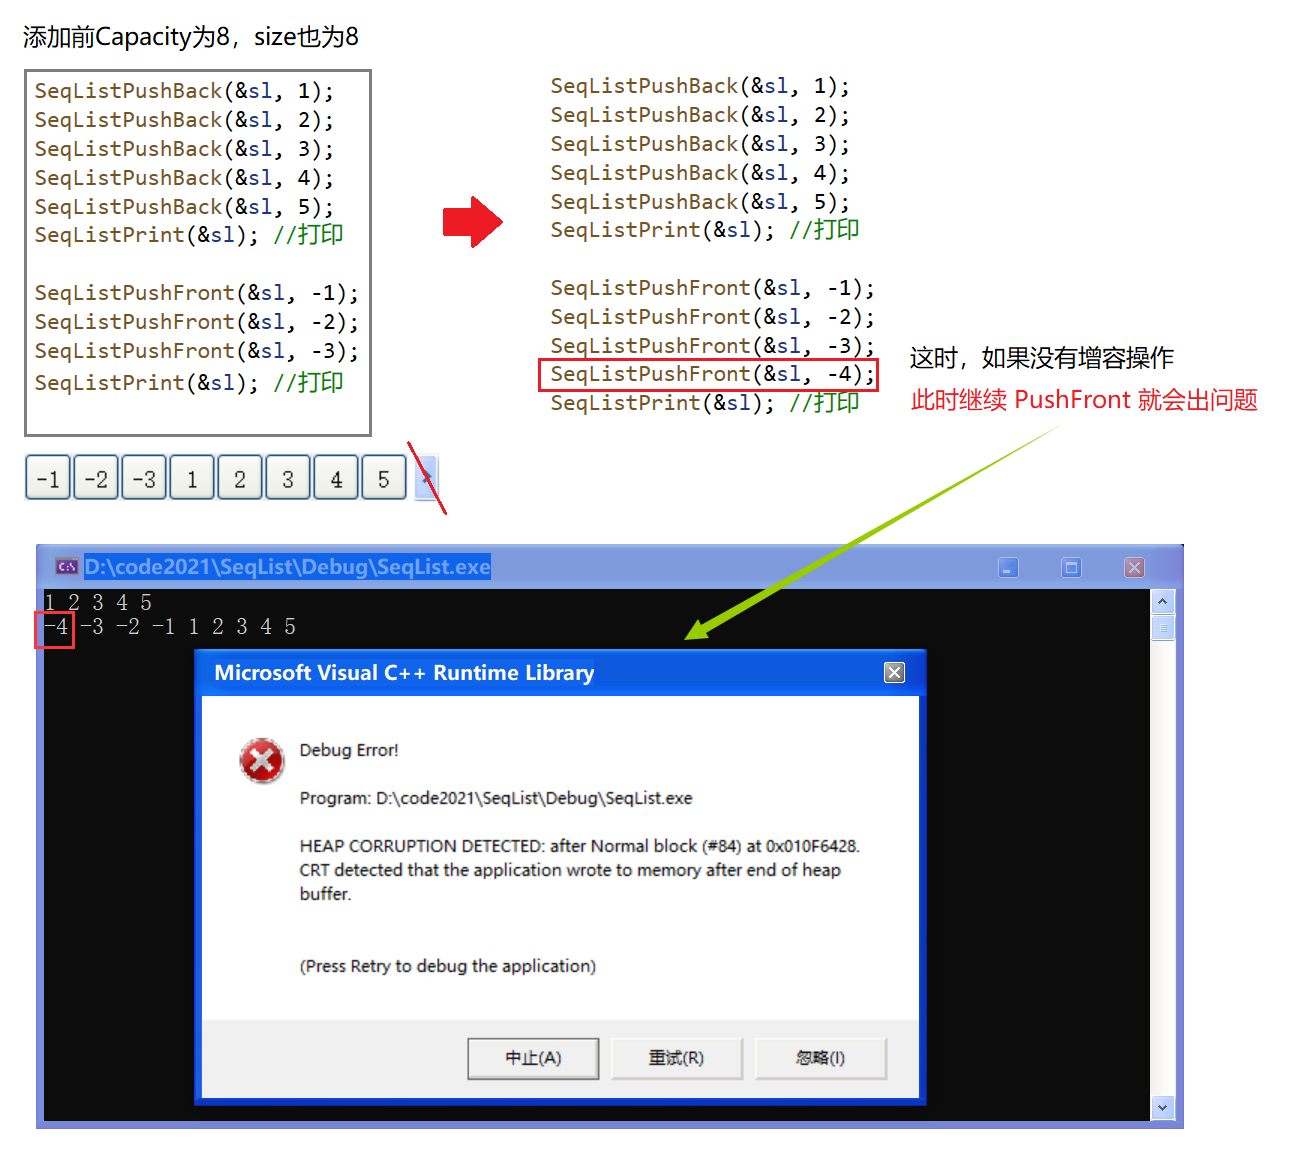
![]()
0x07 头删(SeqListPopFront)
📚 如果我们想把第一个数据删除,用尾删的方法直接把 size-- 显然是没有用的了。因为顺序表数据是从头开始存且有顺序的, size-- 无效的也只是最后一个数据。所以要想实现头删,我们不得不把数据先往前挪动,然后再 --size 。
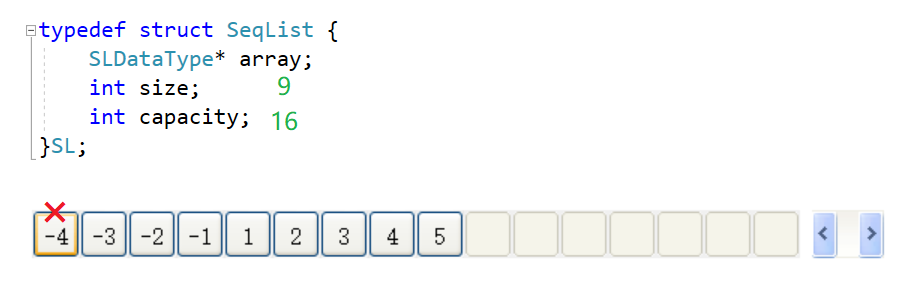
![]()
💬 SeqList.h:
···
void SeqListPopFront(SL* psl);                  //头删
💬 SeqList.c:
/* 头删 */
void SeqListPopFront(SL* psl) {
	assert(psl->size > 0);

	//挪动数据
	int begin = 1;
	while (begin < psl->size) {
		psl->array[begin - 1] = psl->array[begin];
		begin++;
	}

    //int begin = 0;
	//while (begin < psl->size - 1) {
	//	psl->array[begin] = psl->array[begin + 1];
	//	begin++;
	//}

	psl->size--; //实际有效个数-1
}
🔑 解读:首先断言顺序表有数据,这个前面讲过了这里就不再赘述了。然后开始挪动数据,创建一个 begin 变量并赋个 1,然后进入循环。只要 size 大于 begin 就会进入循环。每次进入循环后将下标 begin -1 上的数据赋给下标 begin 上的数据,这样就达到了右向左移动的目的。最后 begin++ 移动下一个(如果满足条件的话)。移动完毕后,第一个数据就被第二个数据覆盖掉了,而第二个数据被第三个数据覆盖掉了……最后多出来的一块我们再用 size-- 解决掉,实际容量减1 。此时,就实现了头删。
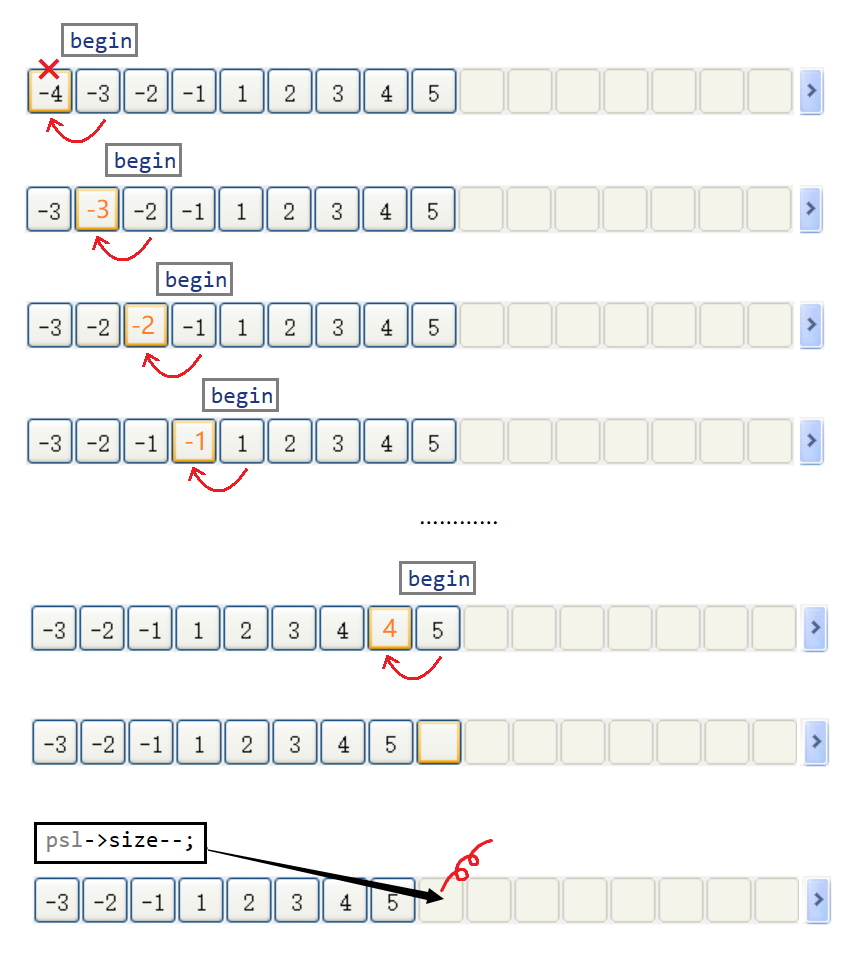
![]()
💬 Test.c:测试代码
void TestSeqList2() {
	SL sl;
	SeqListInit(&sl);

	SeqListPushBack(&sl, 1);
	SeqListPushBack(&sl, 2);
	SeqListPushBack(&sl, 3);
	SeqListPushBack(&sl, 4);
	SeqListPushBack(&sl, 5);
	SeqListPrint(&sl); //打印

	SeqListPushFront(&sl, -1);
	SeqListPushFront(&sl, -2);
	SeqListPushFront(&sl, -3);
	SeqListPushFront(&sl, -4);
	SeqListPrint(&sl); //打印

	SeqListPopFront(&sl);
	SeqListPopFront(&sl);
	SeqListPrint(&sl); //打印

	SeqListDestory(&sl); //销毁
}
🚩 运行结果如下:

![]()
0x08 查找位置(SeqListFind)
📚 查找顺序表中某值的位置,如果找到了就返回该值的下标,没有找到我们就返回 -1 。
💬 SeqList.h:
···
int SeqListFind(SL* psl, SLDataType x);				   //查找
💬 SeqList.c:查找
/* 查找 */
int SeqListFind(SL* psl, SLDataType x) {
	int i = 0;
	for (i = 0; i < psl->size; i++) {
		if (psl->array[i] == x) {
			return i;
		}
	}
	// 没找到
	return -1;
}
🔑 解读:首先遍历整个顺序表,如果 psl->array[i] == x 就返回 i 接,没找到就返回 -1。这里我们用的方法就是简单粗暴的 O(N) Find 暴力求解,当然你还可以试着用二分查找做,排序一下,写一个二分查找的接口。
💬 Test.c:
void TestSeqList3() {
	SL sl;
	SeqListInit(&sl);

	SeqListPushBack(&sl, 1);
	SeqListPushBack(&sl, 2);
	SeqListPushBack(&sl, 3);
	SeqListPushBack(&sl, 4);
	SeqListPushBack(&sl, 5);
	SeqListPrint(&sl); //打印

	int ret = SeqListFind(&sl, 3);
	if (ret != -1)
		printf("找到了,下标为%d\n", ret);
	else
		printf("没找到!\n");


	SeqListDestory(&sl); //销毁
}

int main() {
	// TestSeqList1();
	// TestSeqList2();
	TestSeqList3();

	return 0;
}
🚩 运行结果如下
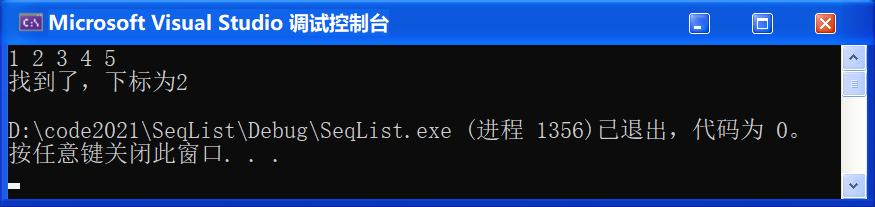
![]()
0x09 在指定的下标位置插入(SeqListInsert)
📚 顺序表要求数据从第一个开始放并且数据是连续存储的,所以我们就要注意下指定指定的下标位置 pos 的位置了!有些位置并不可以,所以我们需要进行一些检查。
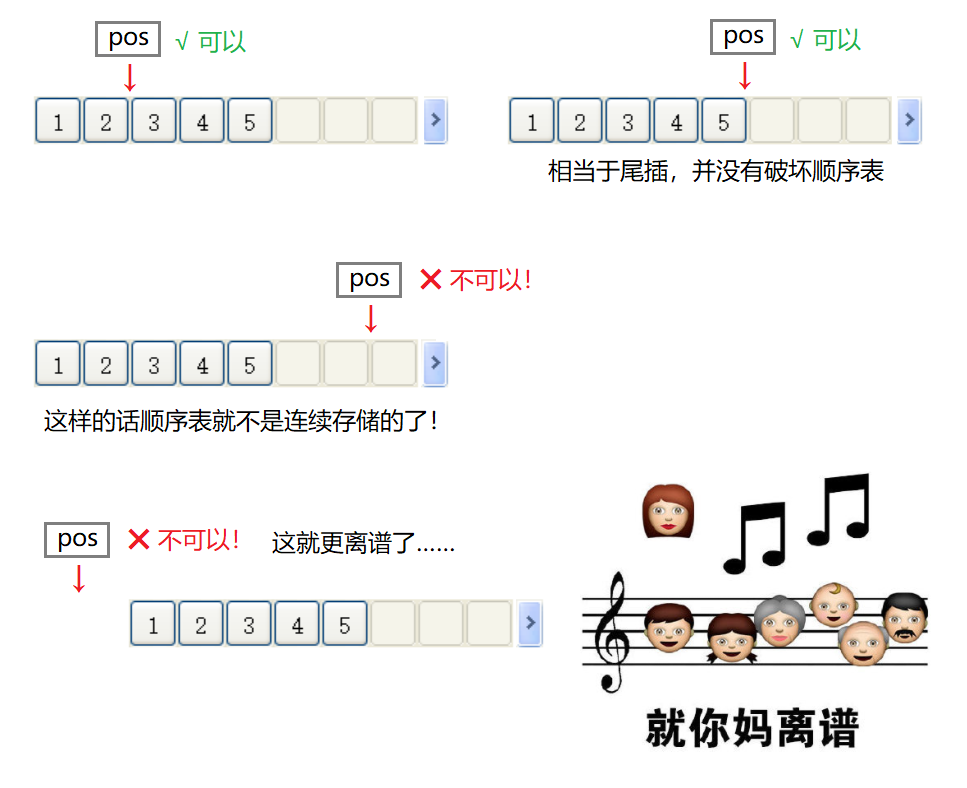
![]()
💬 SeqList.h:
int SeqListInsert(SL* psl, int pos, SLDataType x); //指定位置插入💬 SeqList.c:
/* 指定位置插入 */
int SeqListInsert(SL* psl, int pos, SLDataType x) {
	//if (pos > psl->size || pos < 0) {
	//	printf("pos invalid {pos非法}\n");
	//	return;
	//}

	assert(pos >= 0 && pos <= psl->size);

	//检查增容
	SeqListCheckCapacity(psl);

	int end = psl->size - 1;
	while (end >= pos) {
		psl->array[end + 1] = psl->array[end];
		end--;
	}

	//插入
	psl->array[pos] = x;
	psl->size++;
}
🔑 解读:首先添加 pos 位置的限定条件,可以根据自己的喜好选择是儒雅随和的处理方式,还是暴力处理方式。这里我的选择是简单粗暴地使用断言解决,限定 pos >= 0 并且 pos <= psl->size 从而保证 pos 合法。然后,因为是插入所以免不了要检查增容,直接调用之前写好的检查增容的函数即可。检查完后就可以开始移动了,和头插差不多,我们创建一个变量 end 记录最后一个的下标(psl->size-1),并通过它来指向要移动的数据。最后进入 while 循环,以 end >= pos 作为条件。移动完后,x 的位置就腾出来了,再把 x 插入进去,最后再 size++,就完成了。
💬 Test.c:
void TestSeqList3() {
	SL sl;
	SeqListInit(&sl);

	SeqListPushBack(&sl, 1);
	SeqListPushBack(&sl, 2);
	SeqListPushBack(&sl, 3);
	SeqListPushBack(&sl, 4);
	SeqListPushBack(&sl, 5);
	SeqListPrint(&sl); //打印

	SeqListInsert(&sl, 2, 30);
	SeqListPrint(&sl); //打印

	int pos = SeqListFind(&sl, 4);
	if (pos != -1) {
		SeqListInsert(&sl, pos, 40);
	}
	SeqListPrint(&sl); //打印

	SeqListInsert(&sl, 0, -10);
	SeqListPrint(&sl); //打印

	SeqListInsert(&sl, 8, 80);
	SeqListPrint(&sl); //打印


	SeqListDestory(&sl); //销毁
}

int main() {
	// TestSeqList1();
	// TestSeqList2();
	TestSeqList3();

	return 0;
}
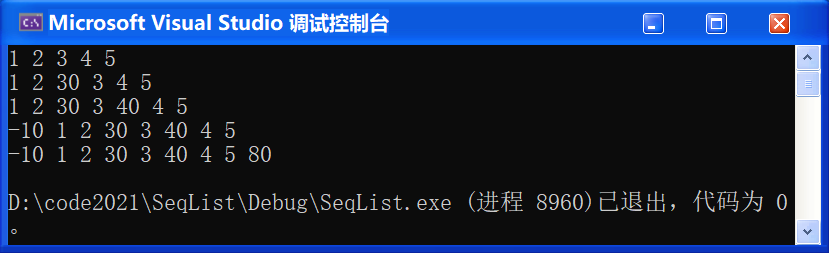
🔑 解读:这里为了防止有问题,我们不妨多测测试。
🚩 运行结果如下:
![]()
⚡ 头插函数和尾插函数的修改:
我们都把功能这么强的 SeqListInsert 写出来了,我们之前写的头插和尾插接口函数是不是可以直接复用下 SeqListInsert ?
💬 SeqList.c:尾插复用 SeqListInsert
/* 尾插 */
void SeqListPushBack(SL* psl, SLDataType x) {
	SeqListInsert(psl, psl->size, x);
}
💬 SeqList.c:头插复用 SeqListInsert
/* 头插 */
void SeqListPushFront(SL* psl, SLDataType x) {
	SeqListInsert(psl, 0, x);
}
💬 Test.c:测试下有没有问题,先尾插12345,再头插12345
void TestSeqList4() {
	SL sl;
	SeqListInit(&sl);
	SeqListPushBack(&sl, 1);
	SeqListPushBack(&sl, 2);
	SeqListPushBack(&sl, 3);
	SeqListPushBack(&sl, 4);
	SeqListPushBack(&sl, 5);
	SeqListPrint(&sl); //打印

	SeqListPushFront(&sl, 1);
	SeqListPushFront(&sl, 2);
	SeqListPushFront(&sl, 3);
	SeqListPushFront(&sl, 4);
	SeqListPushFront(&sl, 5);
	SeqListPrint(&sl); //打印


	SeqListDestory(&sl); //销毁
}

int main() {
	// TestSeqList1();
	// TestSeqList2();
	// TestSeqList3();
	TestSeqList4();


	return 0;
}
🚩 运行结果如下:
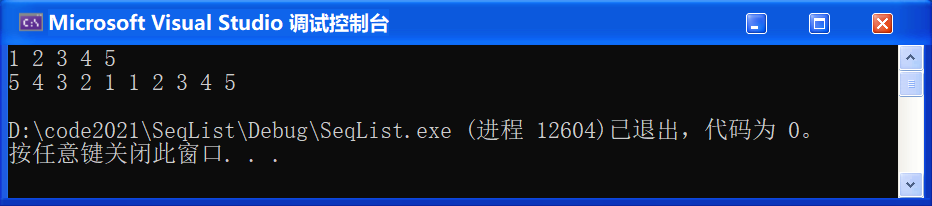
![]()
🔺 我们把 Insert 写好了,就可以直接复用到前面的写的尾插和头插了。其实只要写好 SeqListInsert 任意位置插入,头尾就都能控制了。
0x10 删除指定位置的数据(SeqListErase)
📚 删除指定位置的数据,我们仍然要限制 pos 的位置。限制条件部分和 SeqListInsert 不同的是,因为 psl->size 这个位置没有效数据,所以删除的位置不能是 psl->size!
💬 SeqList.h:
···
int SeqListEarse(SL* psl, int pos);			       //指定位置删除
💬 SeqList.c:
/* 指定位置删除 */
int SeqListEarse(SL* psl, int pos) {
	assert(pos >= 0 && pos < psl->size);

	int begin = pos + 1;
	while (begin < psl->size) {
		psl->array[begin - 1] = psl->array[begin];
		begin++;
	}

	psl->size--;
}
💬 Test.c:测试下代码
void TestSeqList4() {
	SL sl;
	SeqListInit(&sl);
	SeqListPushBack(&sl, 1);
	SeqListPushBack(&sl, 2);
	SeqListPushBack(&sl, 3);
	SeqListPushBack(&sl, 4);
	SeqListPushBack(&sl, 5);
	SeqListPrint(&sl); //打印

	SeqListPushFront(&sl, 1);
	SeqListPushFront(&sl, 2);
	SeqListPushFront(&sl, 3);
	SeqListPushFront(&sl, 4);
	SeqListPushFront(&sl, 5);
	SeqListPrint(&sl); //打印

	SeqListEarse(&sl, 2);
	SeqListPrint(&sl); //打印


	SeqListDestory(&sl); //销毁
}

int main() {
	// TestSeqList1();
	// TestSeqList2();
	// TestSeqList3();
	TestSeqList4();

	return 0;
}
🚩 运行结果如下:
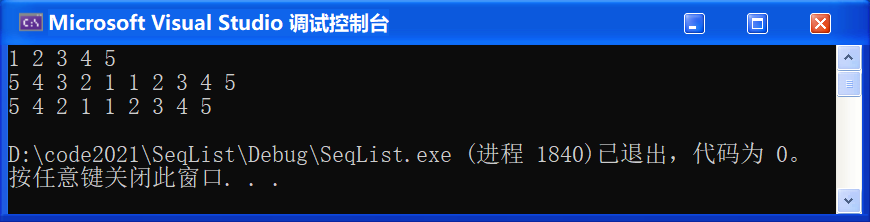
![]()
⚡ 对应的,和上面一样。头删尾删都可以复用 SeqListEarse 了
💬 SeqList.c:头删复用 SeqListEarse
/* 头删 */
void SeqListPopFront(SL* psl) {
	SeqListEarse(psl, 0);
}
💬 SeqList.c:尾删复用 SeqListEarse
/* 尾删 */
void SeqListPopBack(SL* psl) {
	/*
	//if (psl->size > 0) {
	//	 psl->array[psl->size - 1] = 0;
	//	psl->size--;	//实际有效个数-1
	//}

	assert(psl->size > 0);
	psl->size--;
	*/

	SeqListEarse(psl, psl->size - 1);
}
💬 Test.c:测试下代码
void TestSeqList4() {
	SL sl;
	SeqListInit(&sl);
	SeqListPushBack(&sl, 1);
	SeqListPushBack(&sl, 2);
	SeqListPushBack(&sl, 3);
	SeqListPushBack(&sl, 4);
	SeqListPushBack(&sl, 5);
	SeqListPrint(&sl); //打印

	SeqListPushFront(&sl, 1);
	SeqListPushFront(&sl, 2);
	SeqListPushFront(&sl, 3);
	SeqListPushFront(&sl, 4);
	SeqListPushFront(&sl, 5);
	SeqListPrint(&sl); //打印

	SeqListEarse(&sl, 2);
	SeqListPrint(&sl); //打印

	SeqListPopBack(&sl);
	SeqListPopBack(&sl);
	SeqListPopFront(&sl);
	SeqListPopFront(&sl);
	SeqListPrint(&sl); //打印


	SeqListDestory(&sl); //销毁
}

int main() {
	// TestSeqList1();
	// TestSeqList2();
	// TestSeqList3();
	TestSeqList4();

	return 0;
}
🚩 运行结果如下:
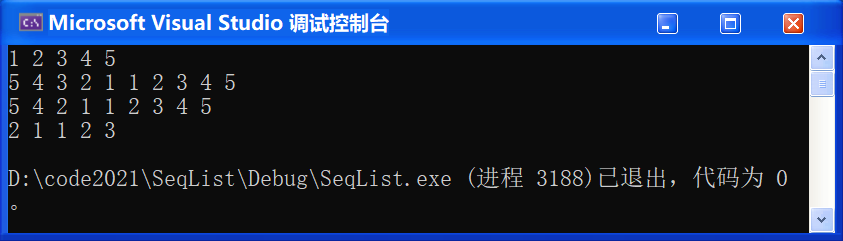
![]()
四、完整代码
💬 SeqList.h:头文件以及函数申明
#pragma once
#include <stdio.h>
#include <stdlib.h>
#include <assert.h>


typedef int SLDataType;

/* 动态顺序表 */
typedef struct SeqList {
	SLDataType* array;
	int size;            //有效数据个数
	int capacity;        //数组实际能存数据的空间容量是多大
}SL;


/* 接口函数 */
void SeqListInit(SL* psl);							   //初始化
void SeqListDestory(SL* psl);						   //销毁
void SeqListCheckCapacity(SL* psl);					   //检查是否需要增容
void SeqListPushBack(SL* psl, SLDataType x);	       //尾插
void SeqListPrint(SL* psl);							   //打印
void SeqListPushFront(SL* psl, SLDataType x);	       //头插
void SeqListPopBack(SL* psl);						   //尾删
void SeqListPopFront(SL* psl);					       //头删

int SeqListFind(SL* psl, SLDataType x);				   //查找
int SeqListInsert(SL* psl, int pos, SLDataType x);     //指定位置插入
int SeqListEarse(SL* psl, int pos);			           //指定位置删除
💬 SeqList.c:接口实现
#include "SeqList.h"

/* 初始化 */
void SeqListInit(SL* psl) {
	psl->array = NULL;
	psl->size = psl->capacity = 0;
}

/* 销毁 */
void SeqListDestory(SL* psl) {
//首先把空间还给操作系统
free(psl->array);
psl->array = NULL; //置空防止空指针
psl->capacity = psl->size = 0; //空间置0
}

/* 打印 */
void SeqListPrint(SL* psl) {
	int i = 0;
	for (i = 0; i < psl->size; i++) {
		printf("%d ", psl->array[i]);
	}
	printf("\n");
}

/* 检查是否需要扩容 */
void SeqListCheckCapacity(SL* psl) {
	if (psl->size == psl->capacity) {
		// 如果容量是0(第一次)就赋4,如果不是0,就把容量翻一倍
		int new_capacity = psl->capacity == 0 ? 4 : psl->capacity * 2;
		// 这里使用realloc,因为如果原空间为空,就等于malloc。调整为 new_capacity个SLDataType大小的空间
		SLDataType* tmp_array = (SLDataType*)realloc(psl->array, new_capacity * sizeof(SLDataType));
		// 检测是否realloc成功
		if (tmp_array == NULL) {
			printf("realloc fail {扩容失败}\n");
			exit(-1);
		}
		// 更新它们的大小
		psl->array = tmp_array;
		psl->capacity = new_capacity;
	}
}

/* 尾插 */
void SeqListPushBack(SL* psl, SLDataType x) {
	/*
	//检查增容
	SeqListCheckCapacity(psl);

	//插入
	psl->array[psl->size] = x;
	psl->size++;
	*/

	SeqListInsert(psl, psl->size, x);
}

/* 尾删 */
void SeqListPopBack(SL* psl) {
	/*
	//if (psl->size > 0) {
	//	 psl->array[psl->size - 1] = 0;
	//	psl->size--;	//实际有效个数-1
	//}

	assert(psl->size > 0);
	psl->size--;
	*/

	SeqListEarse(psl, psl->size - 1);
}

/* 头插 */
void SeqListPushFront(SL* psl, SLDataType x) {
	/*
	//检查增容
	SeqListCheckCapacity(psl);

	// 挪动数据
	int end = psl->size - 1; // 因为指向的是数据的下标,所以要 -1
	while (end >= 0) {
		psl->array[end + 1] = psl->array[end];
		end--; //让end指向下一个要移的数据
	}

	// 此时第一个位置已经被腾出来了,可以插入了
	psl->array[0] = x;
	psl->size++;
	*/

	SeqListInsert(psl, 0, x);
}


/* 头删 */
void SeqListPopFront(SL* psl) {
	assert(psl->size > 0);
	/*
	// 挪动数据
	int begin = 1;
	while (begin < psl->size) {
		psl->array[begin - 1] = psl->array[begin];
		begin++;
	}

	psl->size--; //实际有效个数-1
	*/

	SeqListEarse(psl, 0);
}

/* 查找 */
int SeqListFind(SL* psl, SLDataType x) {
	int i = 0;
	for (i = 0; i < psl->size; i++) {
		if (psl->array[i] == x) {
			return i;
		}
	}
	// 没找到
	return -1;
}

/* 指定位置插入 */
int SeqListInsert(SL* psl, int pos, SLDataType x) {
	//if (pos > psl->size || pos < 0) {
	//	printf("pos invalid {pos非法}\n");
	//	return;
	//}

	assert(pos >= 0 && pos <= psl->size);

	//检查增容
	SeqListCheckCapacity(psl);

	int end = psl->size - 1;
	while (end >= pos) {
		psl->array[end + 1] = psl->array[end];
		end--;
	}

	//插入
	psl->array[pos] = x;
	psl->size++;
}

/* 指定位置删除 */
int SeqListEarse(SL* psl, int pos) {
	assert(pos >= 0 && pos < psl->size);

	int begin = pos + 1;
	while (begin < psl->size) {
		psl->array[begin - 1] = psl->array[begin];
		begin++;
	}

	psl->size--;
}
💬 Test.c:测试用例
#include "SeqList.h"

void TestSeqList1() {
	SL sl;
	SeqListInit(&sl);

	SeqListPushBack(&sl, 1);
	SeqListPushBack(&sl, 2);
	SeqListPushBack(&sl, 3);
	SeqListPushBack(&sl, 4);
	SeqListPushBack(&sl, 5);
	SeqListPrint(&sl); //打印

	SeqListPopBack(&sl);
	SeqListPopBack(&sl);
	SeqListPopBack(&sl);
	SeqListPopBack(&sl);
	SeqListPopBack(&sl);
	SeqListPopBack(&sl);
	SeqListPopBack(&sl);
	SeqListPrint(&sl); //打印

	SeqListPushBack(&sl, 10);
	SeqListPushBack(&sl, 20);
	SeqListPrint(&sl); //打印

	SeqListDestory(&sl); //销毁
}

void TestSeqList2() {
	SL sl;
	SeqListInit(&sl);

	SeqListPushBack(&sl, 1);
	SeqListPushBack(&sl, 2);
	SeqListPushBack(&sl, 3);
	SeqListPushBack(&sl, 4);
	SeqListPushBack(&sl, 5);
	SeqListPrint(&sl); //打印

	SeqListPushFront(&sl, -1);
	SeqListPushFront(&sl, -2);
	SeqListPushFront(&sl, -3);
	SeqListPushFront(&sl, -4);
	SeqListPrint(&sl); //打印

	SeqListPopFront(&sl);
	SeqListPopFront(&sl);
	SeqListPrint(&sl); //打印

	SeqListDestory(&sl); //销毁
}

void TestSeqList3() {
	SL sl;
	SeqListInit(&sl);

	SeqListPushBack(&sl, 1);
	SeqListPushBack(&sl, 2);
	SeqListPushBack(&sl, 3);
	SeqListPushBack(&sl, 4);
	SeqListPushBack(&sl, 5);
	SeqListPrint(&sl); //打印

	int ret = SeqListFind(&sl, 3);
	if (ret != -1)
		printf("找到了,下标为%d\n", ret);
	//else
		printf("没找到!\n");

	SeqListInsert(&sl, 2, 30);
	SeqListPrint(&sl); //打印

	int pos = SeqListFind(&sl, 4);
	if (pos != -1) {
		SeqListInsert(&sl, pos, 40);
	}
	SeqListPrint(&sl); //打印

	SeqListInsert(&sl, 0, -10);
	SeqListPrint(&sl); //打印

	SeqListInsert(&sl, 8, 80);
	SeqListPrint(&sl); //打印

	SeqListDestory(&sl);
}

void TestSeqList4() {
	SL sl;
	SeqListInit(&sl);
	SeqListPushBack(&sl, 1);
	SeqListPushBack(&sl, 2);
	SeqListPushBack(&sl, 3);
	SeqListPushBack(&sl, 4);
	SeqListPushBack(&sl, 5);
	SeqListPrint(&sl); //打印

	SeqListPushFront(&sl, 1);
	SeqListPushFront(&sl, 2);
	SeqListPushFront(&sl, 3);
	SeqListPushFront(&sl, 4);
	SeqListPushFront(&sl, 5);
	SeqListPrint(&sl); //打印

	SeqListEarse(&sl, 2);
	SeqListPrint(&sl); //打印

	SeqListPopBack(&sl);
	SeqListPopBack(&sl);
	SeqListPopFront(&sl);
	SeqListPopFront(&sl);
	SeqListPrint(&sl); //打印


	SeqListDestory(&sl);
}

int main() {
	// TestSeqList1();
	// TestSeqList2();
	// TestSeqList3();
	// TestSeqList4();

	return 0;
}
参考资料
Microsoft. MSDN(Microsoft Developer Network)[EB/OL]. []. .
百度百科[EB/OL]. []. https://baike.baidu.com/.
比特科技. 数据结构v5[EB/OL]. 2021[21]. .
📌 作者:王亦优
📃 更新: 2021.10.16
❌ 勘误: 无
📜 声明: 由于作者水平有限,本文有错误和不准确之处在所难免,本人也很想知道这些错误,恳望读者批评指正!
本章完。

- 点赞
- 收藏
- 关注作者
评论(0)