Qt-QML-ComboBox-自定义,实现状态表示,内容可以动态正价,使用ListModel
哎呀呀呀,
问:杀死一个程序员一个程序要需要进步?
答:改三次需求
我感觉我就要再这需求的变更中被杀死了。不管怎么说,总是要跟着需求走的的,客户才是第一么(要不是因为钱,我才不会了)
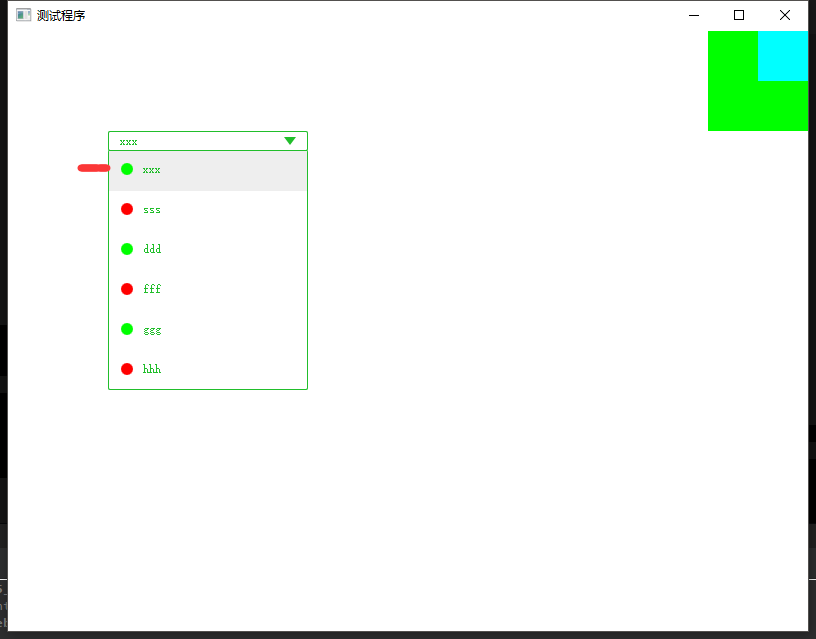
下面先上个效果

如图中显示一样,我需要再再这个Item前面用来显示一个我的当前设备的状态,这里的状态是有底层数据提供,这里试试做出相应的显示,
绿色标识可以设备可用,而红色表示设备故障,不能使用。
找啊找啊,最好还是找到了Qt的帮助文档,这里有自定义的ComboBox的Demo
先吧人家的源代码贴上来
import QtQuick 2.6
  import QtQuick.Controls 2.1

  ComboBox {
      id: control
      model: ["First", "Second", "Third"]

      delegate: ItemDelegate {
          width: control.width
          contentItem: Text {
              text: modelData
              color: "#21be2b"
              font: control.font
              elide: Text.ElideRight
              verticalAlignment: Text.AlignVCenter
          }
          highlighted: control.highlightedIndex == index
      }

      indicator: Canvas {
          id: canvas
          x: control.width - width - control.rightPadding
          y: control.topPadding + (control.availableHeight - height) / 2
          width: 12
          height: 8
          contextType: "2d"

          Connections {
              target: control
              onPressedChanged: canvas.requestPaint()
          }

          onPaint: {
              context.reset();
              context.moveTo(0, 0);
              context.lineTo(width, 0);
              context.lineTo(width / 2, height);
              context.closePath();
              context.fillStyle = control.pressed ? "#17a81a" : "#21be2b";
              context.fill();
          }
      }

      contentItem: Text {
          leftPadding: 0
          rightPadding: control.indicator.width + control.spacing

          text: control.displayText
          font: control.font
          color: control.pressed ? "#17a81a" : "#21be2b"
          horizontalAlignment: Text.AlignLeft
          verticalAlignment: Text.AlignVCenter
          elide: Text.ElideRight
      }

      background: Rectangle {
          implicitWidth: 120
          implicitHeight: 40
          border.color: control.pressed ? "#17a81a" : "#21be2b"
          border.width: control.visualFocus ? 2 : 1
          radius: 2
      }

      popup: Popup {
          y: control.height - 1
          width: control.width
          implicitHeight: listview.contentHeight
          padding: 1

          contentItem: ListView {
              id: listview
              clip: true
              model: control.popup.visible ? control.delegateModel : null
              currentIndex: control.highlightedIndex

              ScrollIndicator.vertical: ScrollIndicator { }
          }

          background: Rectangle {
              border.color: "#21be2b"
              radius: 2
          }
      }
  }
这里了,大家可以看到,这里的model就是一个简单的ListModel,这里我所卡住的难点就是这个“modelData”
这个之所以困扰我,就是因为再这里,我是没法当我自己定义自己的数据类型的时候,我第一个名字开始是没有想到MOdedata,我所想到的是吧text的内容设置成为这个内容,但是了,由于自己现在对QMl还是不怎么深入了解,所以也没法重新高太底层的,所以,好烦啊。
看到网友的启发,说默认的QStringList咋QLisview中,默认的键值就是modelData。所以,小脑瓜灵机一抖,把我的ListModel第一个参数就设置成为modelData,哈哈哈,是不是很聪明,就是这样,就可以实现我默认的功能了,而生下的功能就是自己加的的,后面就好实现了,当然,好实现是我心想的,但是实现起来,坑是必然的,所以我要接着去挖坑,天坑。。。。。。
下面附上我的自己的代码
import QtQuick 2.6
  import QtQuick.Controls 2.1

  ComboBox {
      id: control
//      model: ["First", "Second", "Third"]
      delegate: ItemDelegate {
          width: control.width
          contentItem: Rectangle
          {
              color:"transparent"
              Row
              {
                  spacing: 10
                  Rectangle
                  {
                      width: parent.height
                      height: parent.height
                      radius: parent.height/2
                      color:
                      {
                          if(model.value == "true")
                          {
                              "#00FF00"
                          }
                          else if(model.value == "false")
                          {
                              "#FF0000"
                          }
                      }
                  }

                  Text {
                  id:myText
                  text: modelData
                  color: "#21be2b"
                  font: control.font
                  elide: Text.ElideRight
                  verticalAlignment: Text.AlignVCenter
              }
              }
          }


          highlighted: control.highlightedIndex == index
      }

      indicator: Canvas {
          id: canvas
          x: control.width - width - control.rightPadding
          y: control.topPadding + (control.availableHeight - height) / 2
          width: 12
          height: 8
          contextType: "2d"

          Connections {
              target: control
              onPressedChanged: canvas.requestPaint()
          }

          onPaint: {
              context.reset();
              context.moveTo(0, 0);
              context.lineTo(width, 0);
              context.lineTo(width / 2, height);
              context.closePath();
              context.fillStyle = control.pressed ? "#17a81a" : "#21be2b";
              context.fill();
          }
      }

      contentItem: Text {
          leftPadding: 0
          rightPadding: control.indicator.width + control.spacing

          text: control.displayText
          font: control.font
          color: control.pressed ? "#17a81a" : "#21be2b"
          horizontalAlignment: Text.AlignLeft
          verticalAlignment: Text.AlignVCenter
          elide: Text.ElideRight
      }

      background: Rectangle {
          implicitWidth: 120
          implicitHeight: 40
          border.color: control.pressed ? "#17a81a" : "#21be2b"
          border.width: control.visualFocus ? 2 : 1
          radius: 2
      }

      popup: Popup {
          y: control.height - 1
          width: control.width
          implicitHeight: listview.contentHeight
          padding: 1

          contentItem: ListView {
              id: listview
              clip: true
              model: control.popup.visible ? control.delegateModel : null
              currentIndex: control.highlightedIndex

              ScrollIndicator.vertical: ScrollIndicator { }
          }

          background: Rectangle {
              border.color: "#21be2b"
              radius: 2
          }
      }
  }
调用部分
DLComboBox
    {
        x: 100
        y:100
        width: 200
        height: 20
        model: listmodel

    }


    ListModel
    {
        id:listmodel
        ListElement{modelData:"xxx";value:"true"}
        ListElement{modelData:"sss";value:"false"}
        ListElement{modelData:"ddd";value:"true"}
        ListElement{modelData:"fff";value:"false"}
        ListElement{modelData:"ggg";value:"true"}
        ListElement{modelData:"hhh";value:"false"}
    }
文章来源: dreamlife.blog.csdn.net,作者:DreamLife.,版权归原作者所有,如需转载,请联系作者。
原文链接:dreamlife.blog.csdn.net/article/details/73196172
- 点赞
- 收藏
- 关注作者


评论(0)