【第十九篇】Flowable中的动态表单

Flowable动态表单
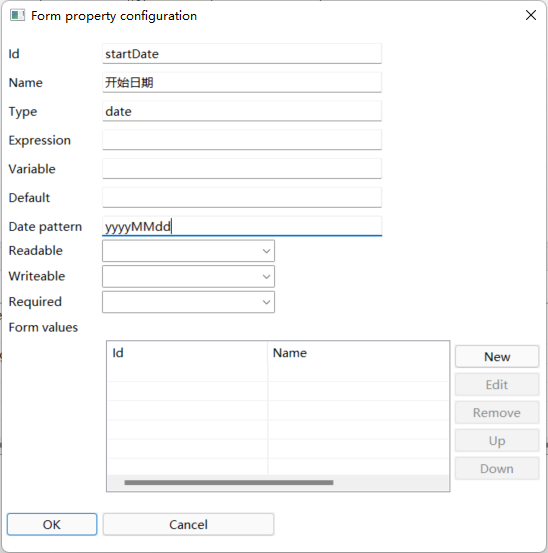
Flowable提供了一种简便灵活的方式,用来为业务流程中的人工步骤添加表单。 有两种使用表单的方法:使用(由表单设计器创建的)表单定义的内置表单渲染,以及外部表单渲染。 使用外部表单渲染时,可以使用(自Explorer web应用V5版本支持的)表单参数;也可以使用表单key定义,引用外部的、使用自定义代码解析的表单。
1.流程绘制
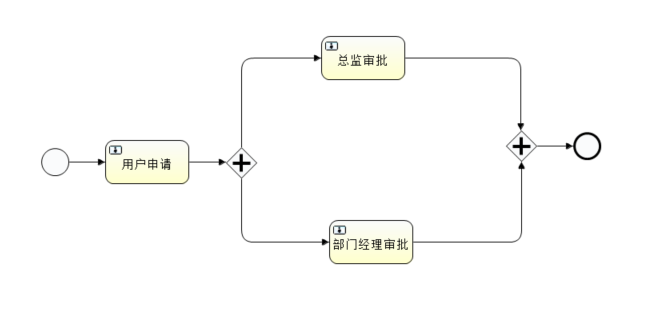
表单设计

2. 案例演示
2.1 部署流程
流程图绘制好之后我们就可以直接来部署这个流程了
/**
     * Deploy
     */
    @Test
    void testDeploy() throws Exception {
        Deployment deploy = repositoryService.createDeployment()
                .addClasspathResource("动态表单01.bpmn20.xml")
                .name("动态表单01")
                .deploy();
        System.out.println("deploy.getId() = " + deploy.getId());
        System.out.println("deploy.getName() = " + deploy.getName());
        System.out.println("部署开始的时间:" + new Date());
        //TimeUnit.MINUTES.sleep(3);
    }
- 1
- 2
- 3
- 4
- 5
- 6
- 7
- 8
- 9
- 10
- 11
- 12
- 13
- 14
2.2 查看流程关联的表单信息
我们部署了一个流程后,如果不清楚之前关联了什么表单,表单中有哪些字段,属性是什么?这时我们可以通过定义的流程查询出对应的form表单信息
    @Test
    public void getStartFromData(){
        String departemntId = "4da14de4-b313-11ec-882d-c03c59ad2248";
        ProcessDefinition processDefinition = repositoryService
                .createProcessDefinitionQuery()
                .deploymentId(departemntId)
                .singleResult();
        StartFormData startFormData = processEngine.getFormService()
                .getStartFormData(processDefinition.getId());
        List<FormProperty> formProperties = startFormData.getFormProperties();
        for (FormProperty formProperty : formProperties) {
            String id = formProperty.getId();
            String name = formProperty.getName();
            FormType type = formProperty.getType();
            System.out.println("id = " + id);
            System.out.println("name = " + name);
            System.out.println("type.getClass() = " + type.getClass());
        }
    }
- 1
- 2
- 3
- 4
- 5
- 6
- 7
- 8
- 9
- 10
- 11
- 12
- 13
- 14
- 15
- 16
- 17
- 18
- 19
2.3 启动流程
启动流程的方式有两种,一种是正常的通过RuntimeService来启动,还有一种就是通过FormService来启动,具体代码如下:
    /**
     * 正常的启动流程
     */
    @Test
    void startFlow() throws Exception{
        Map<String,Object> map = new HashMap<>();
        map.put("days","5");
        map.put("startDate","20220403");
        map.put("reason","想休息下");
        ProcessInstance processInstance = runtimeService
                .startProcessInstanceById("myProcess:5:4dd61987-b313-11ec-882d-c03c59ad2248",map);
    }


    /**
     * 通过FormService来启动一个表单流程
     * @throws Exception
     */
    @Test
    void startFormFlow() throws Exception{
        ProcessDefinition processDefinition = repositoryService.createProcessDefinitionQuery()
                .deploymentId("4da14de4-b313-11ec-882d-c03c59ad2248")
                .singleResult();
        Map<String,String> map = new HashMap<>();
        map.put("days","2");
        map.put("startDate","20220406");
        map.put("reason","出去玩玩");
        ProcessInstance processInstance = processEngine.getFormService().submitStartFormData(processDefinition.getId(), map);

    }
- 1
- 2
- 3
- 4
- 5
- 6
- 7
- 8
- 9
- 10
- 11
- 12
- 13
- 14
- 15
- 16
- 17
- 18
- 19
- 20
- 21
- 22
- 23
- 24
- 25
- 26
- 27
- 28
- 29
- 30
2.4 保存表单数据
在Task执行之前我们也可以保存表单数据到Task对应的Form表单中。
/**
 * 保存表单数据
 */
@Test
void saveFormData(){
    String taskId = "80efeb32-b313-11ec-a7ff-c03c59ad2248";
    Map<String,String> map = new HashMap<>();
    map.put("days","3");
    map.put("startDate","20220407");
    map.put("reason","出去玩玩11");
    processEngine.getFormService().saveFormData(taskId,map);
}
- 1
- 2
- 3
- 4
- 5
- 6
- 7
- 8
- 9
- 10
- 11
- 12
2.5 查看任务表单数据
/**
 * 根据Task编号来查看表单数据
 */
@Test
void getTaskFormData(){
    String taskId = "80efeb32-b313-11ec-a7ff-c03c59ad2248";
    TaskFormData taskFormData = processEngine.getFormService().getTaskFormData(taskId);
    List<FormProperty> formProperties = taskFormData.getFormProperties();
    for (FormProperty formProperty : formProperties) {
        System.out.println("formProperty.getId() = " + formProperty.getId());
        System.out.println("formProperty.getName() = " + formProperty.getName());
        System.out.println("formProperty.getValue() = " + formProperty.getValue());
    }
}
- 1
- 2
- 3
- 4
- 5
- 6
- 7
- 8
- 9
- 10
- 11
- 12
- 13
- 14
输出结果
formProperty.getId() = days
formProperty.getName() = 请假天数
formProperty.getValue() = 3
formProperty.getId() = reason
formProperty.getName() = 请假理由
formProperty.getValue() = 出去玩玩11
formProperty.getId() = startDate
formProperty.getName() = 开始日期
formProperty.getValue() = 20220407
- 1
- 2
- 3
- 4
- 5
- 6
- 7
- 8
- 9
2.6 完成任务
现在就可以通过指派人或者任务编号来完成当前任务,当然这时我们还是可以修改form表单中的数据
    /**
     * 保存表单数据并完成任务
     */
    @Test
    void submitTaskFormData(){
        String taskId = "80efeb32-b313-11ec-a7ff-c03c59ad2248";
        Map<String,String> map = new HashMap<>();
        map.put("days","4");
        map.put("startDate","20220408");
        map.put("reason","出去玩玩");
        processEngine.getFormService().submitTaskFormData(taskId,map);
    }
- 1
- 2
- 3
- 4
- 5
- 6
- 7
- 8
- 9
- 10
- 11
- 12
2.7 查看完成的Task的表单数据
一个Task完成后,如果我们想要查看之前的表单的历史数据可以通过如下的方法来实现
    /**
     * 查看已经完成的Task的表单数据
     */
    @Test
    void getHisTaskFormData(){
        String taskId = "80efeb32-b313-11ec-a7ff-c03c59ad2248";
        List<HistoricDetail> list = processEngine.getHistoryService()
                .createHistoricDetailQuery()
                .taskId(taskId)
                .formProperties()
                .list();
        for (HistoricDetail historicDetail : list) {
            HistoricFormPropertyEntityImpl his = (HistoricFormPropertyEntityImpl) historicDetail;
            System.out.println("his.getPropertyId() = " + his.getPropertyId());
            System.out.println("his.getPropertyValue() = " + his.getPropertyValue());
        }
    }
- 1
- 2
- 3
- 4
- 5
- 6
- 7
- 8
- 9
- 10
- 11
- 12
- 13
- 14
- 15
- 16
- 17
3.外置表单
我们会发现在上面的例子中通过内置的表单,我们需要在每个节点都设置一份表单数据,不是很灵活,这时我们可以单独创建一份表单,然后在对应的节点做应用就可以了。
3.1 创建表单
表单定义文件是以.form为后缀, 内容格式为Json格式
{
"key": "form1",
"name": "请假流程",
"fields": [
            {
            "id": "startTime",
            "name": "开始时间",
            "type": "date",
            "required": true,
            "placeholder": "empty"
            },
            {
            "id": "days",
            "name": "请假天数",
            "type": "string",
            "required": true,
            "placeholder": "empty"
            },
            {
            "id": "reason",
            "name": "请假原因",
            "type": "text",
            "required": true,
            "placeholder": "empty"
            }
    ]
}
- 1
- 2
- 3
- 4
- 5
- 6
- 7
- 8
- 9
- 10
- 11
- 12
- 13
- 14
- 15
- 16
- 17
- 18
- 19
- 20
- 21
- 22
- 23
- 24
- 25
- 26
- 27
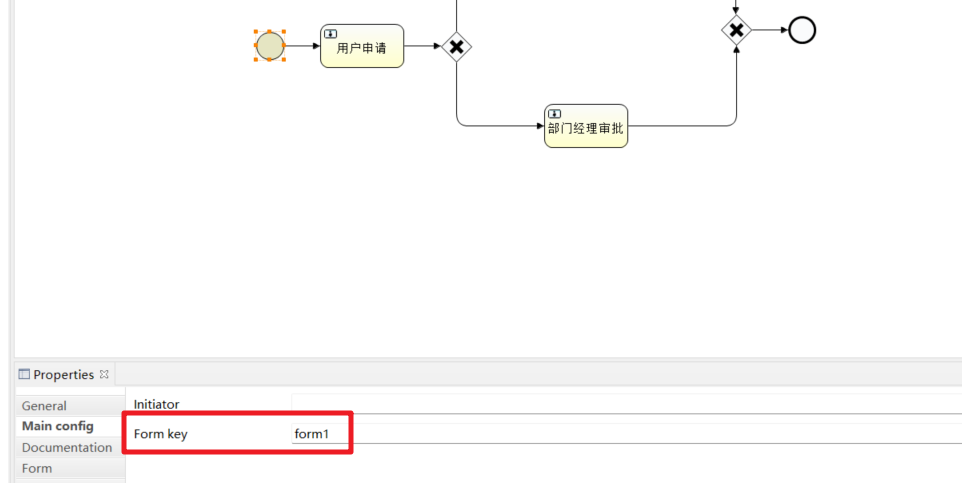
注意:上面文件中的key是唯一标识,我们在表单处理的时候是根据这个key来获取的哦,
3.2 然后创建流程文件
流程文件还是以我们上面的案例来演示,主要是对表单这块做了调整
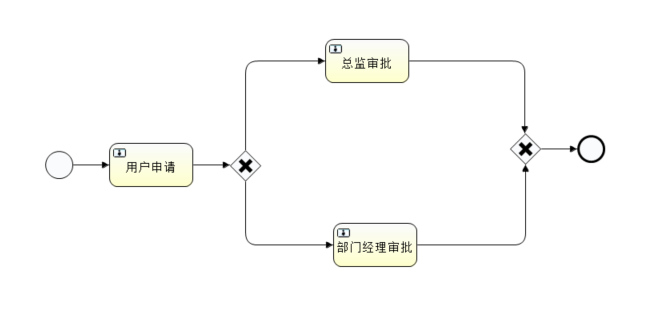
form表单通过引用来关联
完整的xml文件:
<?xml version="1.0" encoding="UTF-8"?>
<definitions xmlns="http://www.omg.org/spec/BPMN/20100524/MODEL" xmlns:xsi="http://www.w3.org/2001/XMLSchema-instance" xmlns:xsd="http://www.w3.org/2001/XMLSchema" xmlns:activiti="http://activiti.org/bpmn" xmlns:bpmndi="http://www.omg.org/spec/BPMN/20100524/DI" xmlns:omgdc="http://www.omg.org/spec/DD/20100524/DC" xmlns:omgdi="http://www.omg.org/spec/DD/20100524/DI" typeLanguage="http://www.w3.org/2001/XMLSchema" expressionLanguage="http://www.w3.org/1999/XPath" targetNamespace="http://www.activiti.org/test">
    <process id="myProcess" name="My process" isExecutable="true">
        <startEvent id="startevent1" name="Start" activiti:formKey="form1"></startEvent>
        <userTask id="usertask1" name="用户申请" activiti:assignee="zhangsan" activiti:formKey="form1"></userTask>
        <sequenceFlow id="flow1" sourceRef="startevent1" targetRef="usertask1"></sequenceFlow>
        <sequenceFlow id="flow2" sourceRef="usertask1" targetRef="exclusivegateway1"></sequenceFlow>
        <userTask id="usertask2" name="总监审批" activiti:assignee="lisi"></userTask>
        <sequenceFlow id="flow3" sourceRef="exclusivegateway1" targetRef="usertask2">
            <conditionExpression xsi:type="tFormalExpression"><![CDATA[${days>3}]]></conditionExpression>
        </sequenceFlow>
        <userTask id="usertask3" name="部门经理审批" activiti:assignee="wangwu"></userTask>
        <sequenceFlow id="flow4" sourceRef="exclusivegateway1" targetRef="usertask3">
            <conditionExpression xsi:type="tFormalExpression"><![CDATA[${days<=3}]]></conditionExpression>
        </sequenceFlow>
        <sequenceFlow id="flow5" sourceRef="usertask2" targetRef="exclusivegateway2"></sequenceFlow>
        <sequenceFlow id="flow6" sourceRef="usertask3" targetRef="exclusivegateway2"></sequenceFlow>
        <endEvent id="endevent1" name="End"></endEvent>
        <sequenceFlow id="flow7" sourceRef="exclusivegateway2" targetRef="endevent1"></sequenceFlow>
        <exclusiveGateway id="exclusivegateway1" name="Exclusive Gateway"></exclusiveGateway>
        <exclusiveGateway id="exclusivegateway2" name="Exclusive Gateway"></exclusiveGateway>
    </process>
    <bpmndi:BPMNDiagram id="BPMNDiagram_myProcess">
        <bpmndi:BPMNPlane bpmnElement="myProcess" id="BPMNPlane_myProcess">
            <bpmndi:BPMNShape bpmnElement="startevent1" id="BPMNShape_startevent1">
                <omgdc:Bounds height="35.0" width="35.0" x="300.0" y="280.0"></omgdc:Bounds>
            </bpmndi:BPMNShape>
            <bpmndi:BPMNShape bpmnElement="usertask1" id="BPMNShape_usertask1">
                <omgdc:Bounds height="55.0" width="105.0" x="380.0" y="270.0"></omgdc:Bounds>
            </bpmndi:BPMNShape>
            <bpmndi:BPMNShape bpmnElement="usertask2" id="BPMNShape_usertask2">
                <omgdc:Bounds height="55.0" width="105.0" x="650.0" y="140.0"></omgdc:Bounds>
            </bpmndi:BPMNShape>
            <bpmndi:BPMNShape bpmnElement="usertask3" id="BPMNShape_usertask3">
                <omgdc:Bounds height="55.0" width="105.0" x="660.0" y="370.0"></omgdc:Bounds>
            </bpmndi:BPMNShape>
            <bpmndi:BPMNShape bpmnElement="endevent1" id="BPMNShape_endevent1">
                <omgdc:Bounds height="35.0" width="35.0" x="965.0" y="260.0"></omgdc:Bounds>
            </bpmndi:BPMNShape>
            <bpmndi:BPMNShape bpmnElement="exclusivegateway1" id="BPMNShape_exclusivegateway1">
                <omgdc:Bounds height="40.0" width="40.0" x="530.0" y="278.0"></omgdc:Bounds>
            </bpmndi:BPMNShape>
            <bpmndi:BPMNShape bpmnElement="exclusivegateway2" id="BPMNShape_exclusivegateway2">
                <omgdc:Bounds height="40.0" width="40.0" x="880.0" y="257.0"></omgdc:Bounds>
            </bpmndi:BPMNShape>
            <bpmndi:BPMNEdge bpmnElement="flow1" id="BPMNEdge_flow1">
                <omgdi:waypoint x="335.0" y="297.0"></omgdi:waypoint>
                <omgdi:waypoint x="380.0" y="297.0"></omgdi:waypoint>
            </bpmndi:BPMNEdge>
            <bpmndi:BPMNEdge bpmnElement="flow2" id="BPMNEdge_flow2">
                <omgdi:waypoint x="485.0" y="297.0"></omgdi:waypoint>
                <omgdi:waypoint x="530.0" y="298.0"></omgdi:waypoint>
            </bpmndi:BPMNEdge>
            <bpmndi:BPMNEdge bpmnElement="flow3" id="BPMNEdge_flow3">
                <omgdi:waypoint x="550.0" y="278.0"></omgdi:waypoint>
                <omgdi:waypoint x="550.0" y="167.0"></omgdi:waypoint>
                <omgdi:waypoint x="650.0" y="167.0"></omgdi:waypoint>
            </bpmndi:BPMNEdge>
            <bpmndi:BPMNEdge bpmnElement="flow4" id="BPMNEdge_flow4">
                <omgdi:waypoint x="550.0" y="318.0"></omgdi:waypoint>
                <omgdi:waypoint x="550.0" y="397.0"></omgdi:waypoint>
                <omgdi:waypoint x="660.0" y="397.0"></omgdi:waypoint>
            </bpmndi:BPMNEdge>
            <bpmndi:BPMNEdge bpmnElement="flow5" id="BPMNEdge_flow5">
                <omgdi:waypoint x="755.0" y="167.0"></omgdi:waypoint>
                <omgdi:waypoint x="899.0" y="167.0"></omgdi:waypoint>
                <omgdi:waypoint x="900.0" y="257.0"></omgdi:waypoint>
            </bpmndi:BPMNEdge>
            <bpmndi:BPMNEdge bpmnElement="flow6" id="BPMNEdge_flow6">
                <omgdi:waypoint x="765.0" y="397.0"></omgdi:waypoint>
                <omgdi:waypoint x="900.0" y="397.0"></omgdi:waypoint>
                <omgdi:waypoint x="900.0" y="297.0"></omgdi:waypoint>
            </bpmndi:BPMNEdge>
            <bpmndi:BPMNEdge bpmnElement="flow7" id="BPMNEdge_flow7">
                <omgdi:waypoint x="920.0" y="277.0"></omgdi:waypoint>
                <omgdi:waypoint x="965.0" y="277.0"></omgdi:waypoint>
            </bpmndi:BPMNEdge>
        </bpmndi:BPMNPlane>
    </bpmndi:BPMNDiagram>
</definitions>
- 1
- 2
- 3
- 4
- 5
- 6
- 7
- 8
- 9
- 10
- 11
- 12
- 13
- 14
- 15
- 16
- 17
- 18
- 19
- 20
- 21
- 22
- 23
- 24
- 25
- 26
- 27
- 28
- 29
- 30
- 31
- 32
- 33
- 34
- 35
- 36
- 37
- 38
- 39
- 40
- 41
- 42
- 43
- 44
- 45
- 46
- 47
- 48
- 49
- 50
- 51
- 52
- 53
- 54
- 55
- 56
- 57
- 58
- 59
- 60
- 61
- 62
- 63
- 64
- 65
- 66
- 67
- 68
- 69
- 70
- 71
- 72
- 73
- 74
- 75
- 76
- 77
- 78
- 79
- 80
3.3 部署流程
接下来我们先部署流程
    /**
     * 部署流程:
     */
    @Test
    public void deploy(){
        Deployment deploy = repositoryService.createDeployment()
                .addClasspathResource("动态表单02.bpmn20.xml")
                .name("动态表单02")
                .deploy();
        System.out.println("deploy.getId() = " + deploy.getId());
        System.out.println("deploy.getName() = " + deploy.getName());
        System.out.println("部署开始的时间:" + new Date());
    }
- 1
- 2
- 3
- 4
- 5
- 6
- 7
- 8
- 9
- 10
- 11
- 12
- 13
3.4 部署表单
这个步骤很重要,我们需要单独把我们的form文件部署到流程中。
    @Autowired
    private FormRepositoryService formRepositoryService;

    /**
     * 部署form表单
     */
    @Test
    public void deployForm() throws Exception{

        FormDeployment formDeployment = formRepositoryService.createDeployment()
                .addClasspathResource("holiday.form")
                .name("test")
                .parentDeploymentId("1")
                .deploy();
        System.out.println("formDeployment.getId() = " + formDeployment.getId());
    }
- 1
- 2
- 3
- 4
- 5
- 6
- 7
- 8
- 9
- 10
- 11
- 12
- 13
- 14
- 15
- 16
我们需要通过FormRepositoryService来部署我们的form表单。对应的会在这几种表中生成对应的数据
Form部署表:

Form定义表:

Form资源表:

3.5 启动任务
带有外置Form表单的流程我们需要通过runtimeService.startProcessInstanceWithForm来启动
    /**
     * 启动流程实例,并且设置对应的值
     */
    @Test
    void startTask(){
        Map<String,Object> map = new HashMap<>();
        map.put("days","4");
        map.put("startTime","20220404");
        map.put("reason","出去玩玩");
        ProcessInstance processInstance = runtimeService.startProcessInstanceWithForm(
                "myProcess:1:4"
                , null
                , map
                , "请假流程");
        String id = processInstance.getId();
        System.out.println("id = " + id);

    }
- 1
- 2
- 3
- 4
- 5
- 6
- 7
- 8
- 9
- 10
- 11
- 12
- 13
- 14
- 15
- 16
- 17
- 18
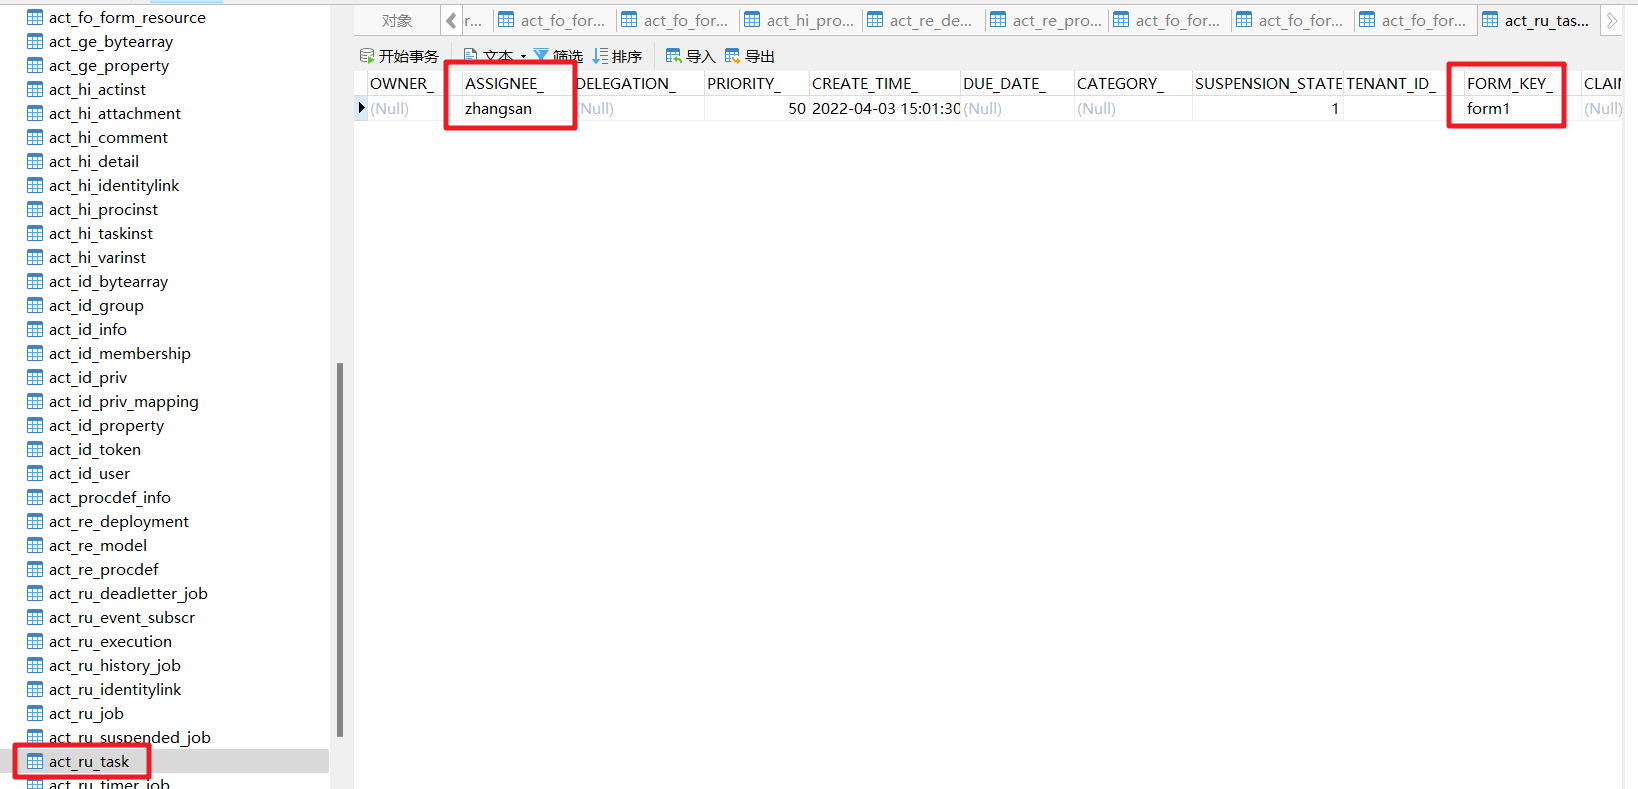
可以看到对应的任务
3.6 查看任务表单数据
在任务处理之前我们可以查看表单的对应信息。
    /**
     * 查看流程定义表单数据
     */
    @Test
    public void getTaskFormData1(){
        Task task = taskService.createTaskQuery()
                .processDefinitionId("myProcess:1:4")
                .taskAssignee("zhangsan")
                .singleResult();
        // FormInfo 表单的元数据信息
        FormInfo formInfo = runtimeService.getStartFormModel("myProcess:1:4", "5001");
        System.out.println("formInfo.getId() = " + formInfo.getId());
        System.out.println("formInfo.getName() = " + formInfo.getName());
        System.out.println("formInfo.getKey() = " + formInfo.getKey());
        // FormModel 表单中的具体信息 具体实现是 SimpleFormModel
        SimpleFormModel formModel = (SimpleFormModel) formInfo.getFormModel();
        List<FormField> fields = formModel.getFields();
        for (FormField field : fields) {
            System.out.println("field.getId() = " + field.getId());
            System.out.println("field.getName() = " + field.getName());
            System.out.println("field.getValue() = " + field.getValue());
        }
        System.out.println("formModel = " + formModel);
    }

	/**
	* 查看具体的Task的表单数据
	*/
    @Test
    void getTaskData(){
        FormInfo formInfo = taskService.getTaskFormModel("17505");
        System.out.println("formInfo.getId() = " + formInfo.getId());
        System.out.println("formInfo.getName() = " + formInfo.getName());
        System.out.println("formInfo.getKey() = " + formInfo.getKey());
        SimpleFormModel formModel = (SimpleFormModel) formInfo.getFormModel();
        List<FormField> fields = formModel.getFields();
        for (FormField field : fields) {
            System.out.println("field.getId() = " + field.getId());
            System.out.println("field.getName() = " + field.getName());
            System.out.println("field.getValue() = " + field.getValue());
        }
    }
- 1
- 2
- 3
- 4
- 5
- 6
- 7
- 8
- 9
- 10
- 11
- 12
- 13
- 14
- 15
- 16
- 17
- 18
- 19
- 20
- 21
- 22
- 23
- 24
- 25
- 26
- 27
- 28
- 29
- 30
- 31
- 32
- 33
- 34
- 35
- 36
- 37
- 38
- 39
- 40
- 41
- 42
3.7 完成任务
在外置表单的场景中我们需要通过taskService.completeTaskWithForm来完成表单的任务
    /**
     * 完成任务
     */
    @Test
    public void completeTaskForm(){
        Map<String,Object> map = new HashMap<>();
        map.put("days","4");
        map.put("startTime","20220404");
        map.put("reason","出去玩玩");
        String taskId = "5010";
        String formDefinitionId = "2503";
        String outcome = "波哥";
        taskService.completeTaskWithForm(taskId,formDefinitionId,outcome,map);
    }
- 1
- 2
- 3
- 4
- 5
- 6
- 7
- 8
- 9
- 10
- 11
- 12
- 13
- 14
然后任务就流转到了下一个节点来处理了

搞定~!
文章来源: dpb-bobokaoya-sm.blog.csdn.net,作者:波波烤鸭,版权归原作者所有,如需转载,请联系作者。
原文链接:dpb-bobokaoya-sm.blog.csdn.net/article/details/124141252
- 点赞
- 收藏
- 关注作者


评论(0)