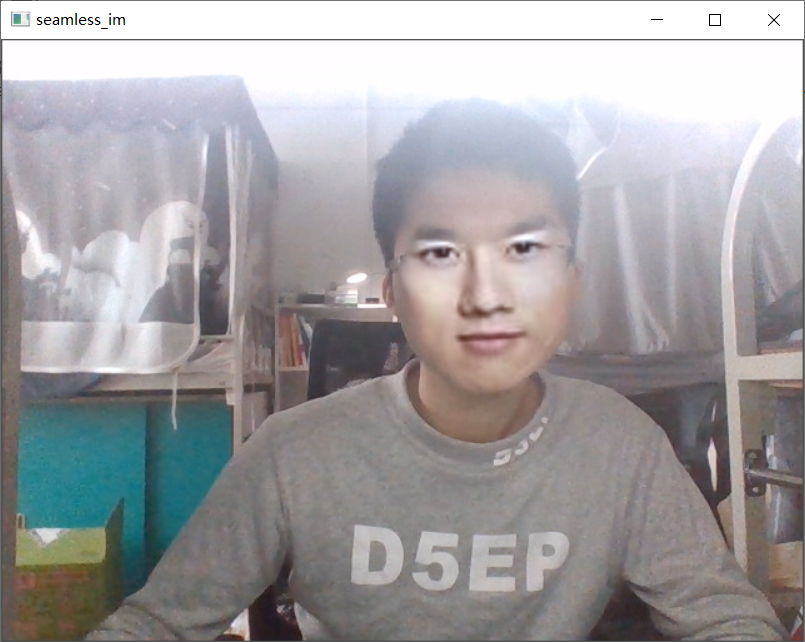
摄像头实时换脸,上网课老师都不认识我了,哈哈

【摘要】
环境与效果
python3.9.6pycharm 2021
库环境:
dlibopencv-python
视频图片效果如下:
摄像头实时换脸,老师都不认识我了!!
基本原理 ...
环境与效果
- python3.9.6
- pycharm 2021
库环境:
- dlib
- opencv-python
视频图片效果如下:
摄像头实时换脸,老师都不认识我了!!
基本原理
- 使用dlib的shape_predictor_68_face_landmarks.dat模型获取一张有正脸的图片(1.png)和摄像头的自己的68个人脸特征点。
- 根据人脸特征点获取分别获取人脸掩模
- 对第一个图片仿射变换使其脸部对准摄像头图片中的脸部得到新的图片
- 对人脸掩模执行相同的操作仿射
- 将两个性的得到图取并集(不能让别的地方空了)
- 用opencv对两上面操作,对仿射变换后的a图片和摄像头图片进行泊松融合
完整源码
# -*- coding: utf-8 -*-

import cv2
import dlib
import numpy as np

detector = dlib.get_frontal_face_detector()  # dlib的正向人脸检测器
predictor = dlib.shape_predictor(r'shape_predictor_68_face_landmarks.dat')  # dlib的人脸形状检测器


def get_image_size(image):
    """
    获取图片大小(高度,宽度)
    :param image: image
    :return: (高度,宽度)
    """
    image_size = (image.shape[0], image.shape[1])
    return image_size


def get_face_landmarks(image, face_detector, shape_predictor):
    """
    获取人脸标志,68个特征点
    :param image: image
    :param face_detector: dlib.get_frontal_face_detector
    :param shape_predictor: dlib.shape_predictor
    :return: np.array([[],[]]), 68个特征点
    """
    dets = face_detector(image, 1)

    shape = shape_predictor(image, dets[0])
    face_landmarks = np.array([[p.x, p.y] for p in shape.parts()])
    return face_landmarks


def get_face_mask(image_size, face_landmarks):
    """
    获取人脸掩模
    :param image_size: 图片大小
    :param face_landmarks: 68个特征点
    :return: image_mask, 掩模图片
    """
    mask = np.zeros(image_size, dtype=np.uint8)
    points = np.concatenate([face_landmarks[0:16], face_landmarks[26:17:-1]])
    cv2.fillPoly(img=mask, pts=[points], color=255)
    return mask


def get_affine_image(image1, image2, face_landmarks1, face_landmarks2):
    """
    获取图片1仿射变换后的图片
    :param image1: 图片1, 要进行仿射变换的图片
    :param image2: 图片2, 只要用来获取图片大小,生成与之大小相同的仿射变换图片
    :param face_landmarks1: 图片1的人脸特征点
    :param face_landmarks2: 图片2的人脸特征点
    :return: 仿射变换后的图片
    """
    three_points_index = [18, 8, 25]
    M = cv2.getAffineTransform(face_landmarks1[three_points_index].astype(np.float32),
                               face_landmarks2[three_points_index].astype(np.float32))
    dsize = (image2.shape[1], image2.shape[0])
    affine_image = cv2.warpAffine(image1, M, dsize)
    return affine_image.astype(np.uint8)


def get_mask_center_point(image_mask):
    """
    获取掩模的中心点坐标
    :param image_mask: 掩模图片
    :return: 掩模中心
    """
    image_mask_index = np.argwhere(image_mask > 0)
    miny, minx = np.min(image_mask_index, axis=0)
    maxy, maxx = np.max(image_mask_index, axis=0)
    center_point = ((maxx + minx) // 2, (maxy + miny) // 2)
    return center_point


def get_mask_union(mask1, mask2):
    """
    获取两个掩模掩盖部分的并集
    :param mask1: mask_image, 掩模1
    :param mask2: mask_image, 掩模2
    :return: 两个掩模掩盖部分的并集
    """
    mask = np.min([mask1, mask2], axis=0)  # 掩盖部分并集
    mask = ((cv2.blur(mask, (5, 5)) == 255) * 255).astype(np.uint8)  # 缩小掩模大小
    mask = cv2.blur(mask, (3, 3)).astype(np.uint8)  # 模糊掩模
    return mask


def skin_color_adjustment(im1, im2, mask=None):
    """
    肤色调整
    :param im1: 图片1
    :param im2: 图片2
    :param mask: 人脸 mask. 如果存在,使用人脸部分均值来求肤色变换系数;否则,使用高斯模糊来求肤色变换系数
    :return: 根据图片2的颜色调整的图片1
    """
    if mask is None:
        im1_ksize = 55
        im2_ksize = 55
        im1_factor = cv2.GaussianBlur(im1, (im1_ksize, im1_ksize), 0).astype(np.float)
        im2_factor = cv2.GaussianBlur(im2, (im2_ksize, im2_ksize), 0).astype(np.float)
    else:
        im1_face_image = cv2.bitwise_and(im1, im1, mask=mask)
        im2_face_image = cv2.bitwise_and(im2, im2, mask=mask)
        im1_factor = np.mean(im1_face_image, axis=(0, 1))
        im2_factor = np.mean(im2_face_image, axis=(0, 1))

    im1 = np.clip((im1.astype(np.float) * im2_factor / np.clip(im1_factor, 1e-6, None)), 0, 255).astype(np.uint8)
    return im1


def main():
    im1 = cv2.imread('1.png')  # face_image
    im1 = cv2.resize(im1, (600, im1.shape[0] * 600 // im1.shape[1]))
    landmarks1 = get_face_landmarks(im1, detector, predictor)  # 68_face_landmarks
    if landmarks1 is None:
        print('{}:检测不到人脸'.format(image_face_path))
        exit(1)
    im1_size = get_image_size(im1)  # 脸图大小
    im1_mask = get_face_mask(im1_size, landmarks1)  # 脸图人脸掩模

    cam = cv2.VideoCapture(0)
    while True:
        ret_val, im2 = cam.read()  # camera_image
        landmarks2 = get_face_landmarks(im2, detector, predictor)  # 68_face_landmarks
        if landmarks2 is not None:
            im2_size = get_image_size(im2)  # 摄像头图片大小
            im2_mask = get_face_mask(im2_size, landmarks2)  # 摄像头图片人脸掩模

            affine_im1 = get_affine_image(im1, im2, landmarks1, landmarks2)  # im1(脸图)仿射变换后的图片
            affine_im1_mask = get_affine_image(im1_mask, im2, landmarks1, landmarks2)  # im1(脸图)仿射变换后的图片的人脸掩模

            union_mask = get_mask_union(im2_mask, affine_im1_mask)  # 掩模合并

            affine_im1 = skin_color_adjustment(affine_im1, im2, mask=union_mask)  # 肤色调整
            point = get_mask_center_point(affine_im1_mask)  # im1(脸图)仿射变换后的图片的人脸掩模的中心点
            seamless_im = cv2.seamlessClone(affine_im1, im2, mask=union_mask, p=point, flags=cv2.NORMAL_CLONE)  # 进行泊松融合

            cv2.imshow('seamless_im', seamless_im)
        else:
            cv2.imshow('seamless_im', im2)
        if cv2.waitKey(1) == 27:  # 按Esc退出
            break
    cv2.destroyAllWindows()


if __name__ == '__main__':
    main()
- 1
- 2
- 3
- 4
- 5
- 6
- 7
- 8
- 9
- 10
- 11
- 12
- 13
- 14
- 15
- 16
- 17
- 18
- 19
- 20
- 21
- 22
- 23
- 24
- 25
- 26
- 27
- 28
- 29
- 30
- 31
- 32
- 33
- 34
- 35
- 36
- 37
- 38
- 39
- 40
- 41
- 42
- 43
- 44
- 45
- 46
- 47
- 48
- 49
- 50
- 51
- 52
- 53
- 54
- 55
- 56
- 57
- 58
- 59
- 60
- 61
- 62
- 63
- 64
- 65
- 66
- 67
- 68
- 69
- 70
- 71
- 72
- 73
- 74
- 75
- 76
- 77
- 78
- 79
- 80
- 81
- 82
- 83
- 84
- 85
- 86
- 87
- 88
- 89
- 90
- 91
- 92
- 93
- 94
- 95
- 96
- 97
- 98
- 99
- 100
- 101
- 102
- 103
- 104
- 105
- 106
- 107
- 108
- 109
- 110
- 111
- 112
- 113
- 114
- 115
- 116
- 117
- 118
- 119
- 120
- 121
- 122
- 123
- 124
- 125
- 126
- 127
- 128
- 129
- 130
- 131
- 132
- 133
- 134
- 135
- 136
- 137
- 138
- 139
- 140
- 141
- 142
- 143
- 144
- 145
- 146
- 147
- 148
- 149
- 150
- 151
- 152
完整项目文件请看b站评论区置顶:换脸了!
文章来源: chuanchuan.blog.csdn.net,作者:川川菜鸟,版权归原作者所有,如需转载,请联系作者。
原文链接:chuanchuan.blog.csdn.net/article/details/123471039

【版权声明】本文为华为云社区用户转载文章,如果您发现本社区中有涉嫌抄袭的内容,欢迎发送邮件进行举报,并提供相关证据,一经查实,本社区将立刻删除涉嫌侵权内容,举报邮箱:
cloudbbs@huaweicloud.com
- 点赞
- 收藏
- 关注作者
评论(0)