程序员必备技能之SpringBoot的自动装配原理,很详细,建议收藏!!!
SpringBoot应该是每个Java程序猿都会使用的基础框架了,对于SpringBoot的核心内容自动装配原理的掌握就显得非常重要了。

自动装配原理分析
1 理论介绍
SpringBoot通过自动装配实现了第三方框架系统对象的注入。这种实现机制和我们前面介绍的SPI(服务扩展机制)很相似。
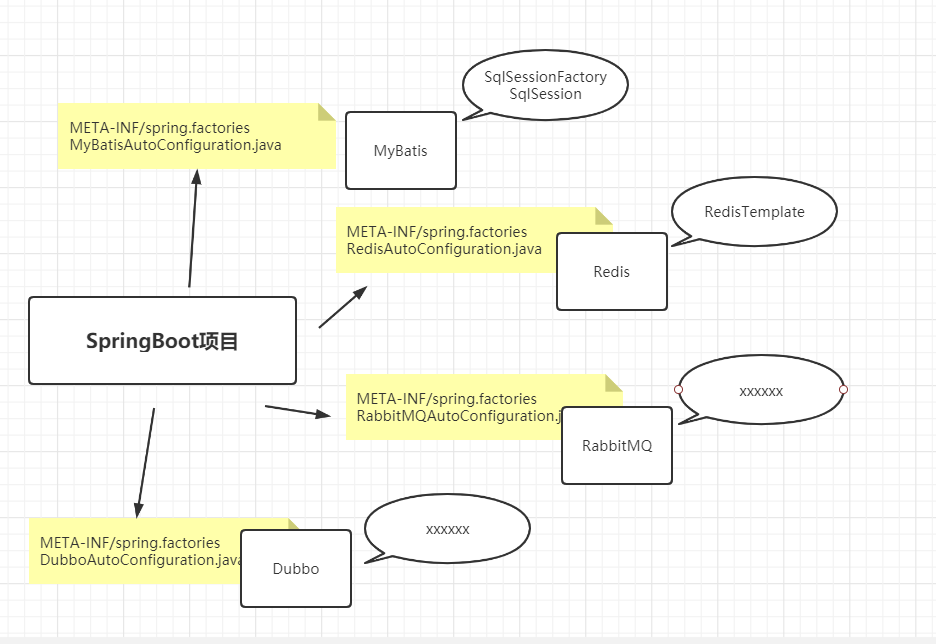
2 源码分析
2.1 Spring的IoC
SpringBoot的本质是SpringFramework【IoC,AOP】的再次封装的上层应用框架。
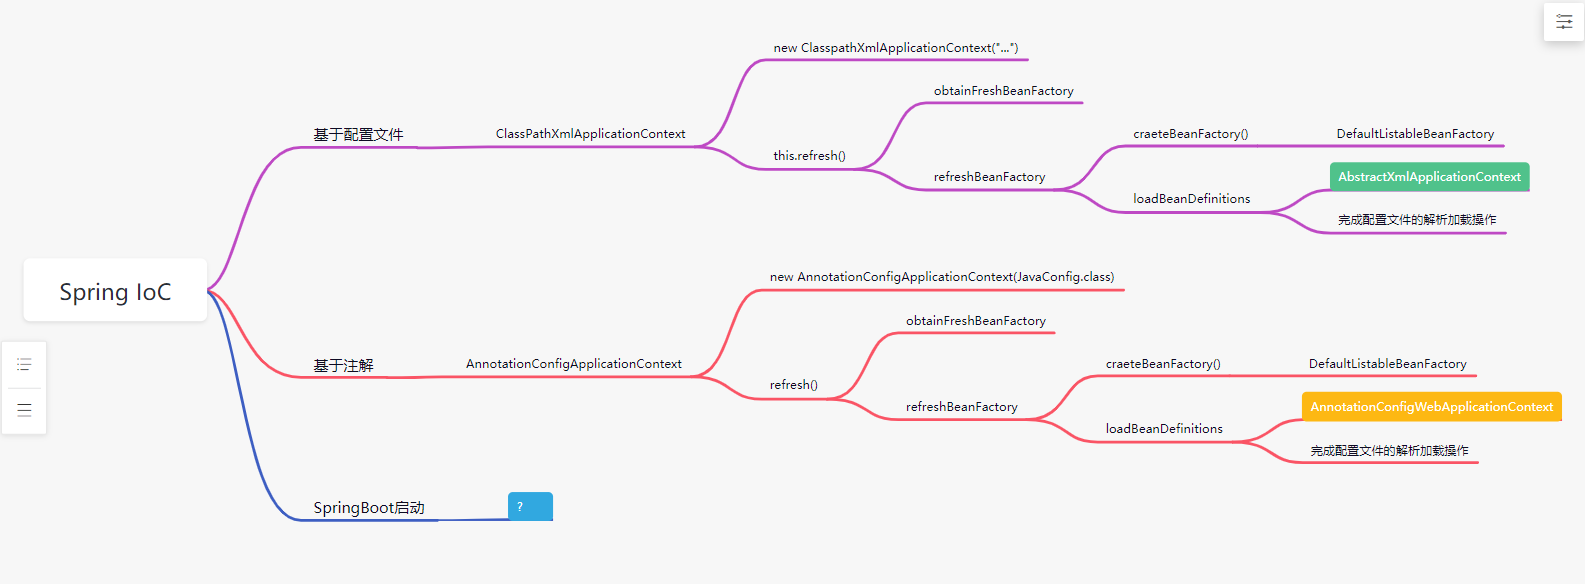
2.2 run方法
我们启动一个SpringBoot项目,本质上就是执行了启动类中的主方法,然后调用执行了run方法,那么run方法到底做了什么操作呢?我们可以先来分析下:
@SpringBootApplication
@MapperScan("com.bobo.mapper")
public class SpringBootVipDemoApplication {
    public static void main(String[] args) {
        // 基于配置文件的方式
        ApplicationContext ac1 = new ClassPathXmlApplicationContext("");
        // 基于Java配置类的方式
        ApplicationContext ac2 = new AnnotationConfigApplicationContext(SpringBootVipDemoApplication.class);
		// run 方法的返回对象是 ConfigurableApplicationContext 对象
        ConfigurableApplicationContext ac3 = SpringApplication.run(SpringBootVipDemoApplication.class, args);
    }
}
- 1
- 2
- 3
- 4
- 5
- 6
- 7
- 8
- 9
- 10
- 11
- 12
ConfigurableApplicationContext这个对象其实是 ApplicationContext接口的一个子接口
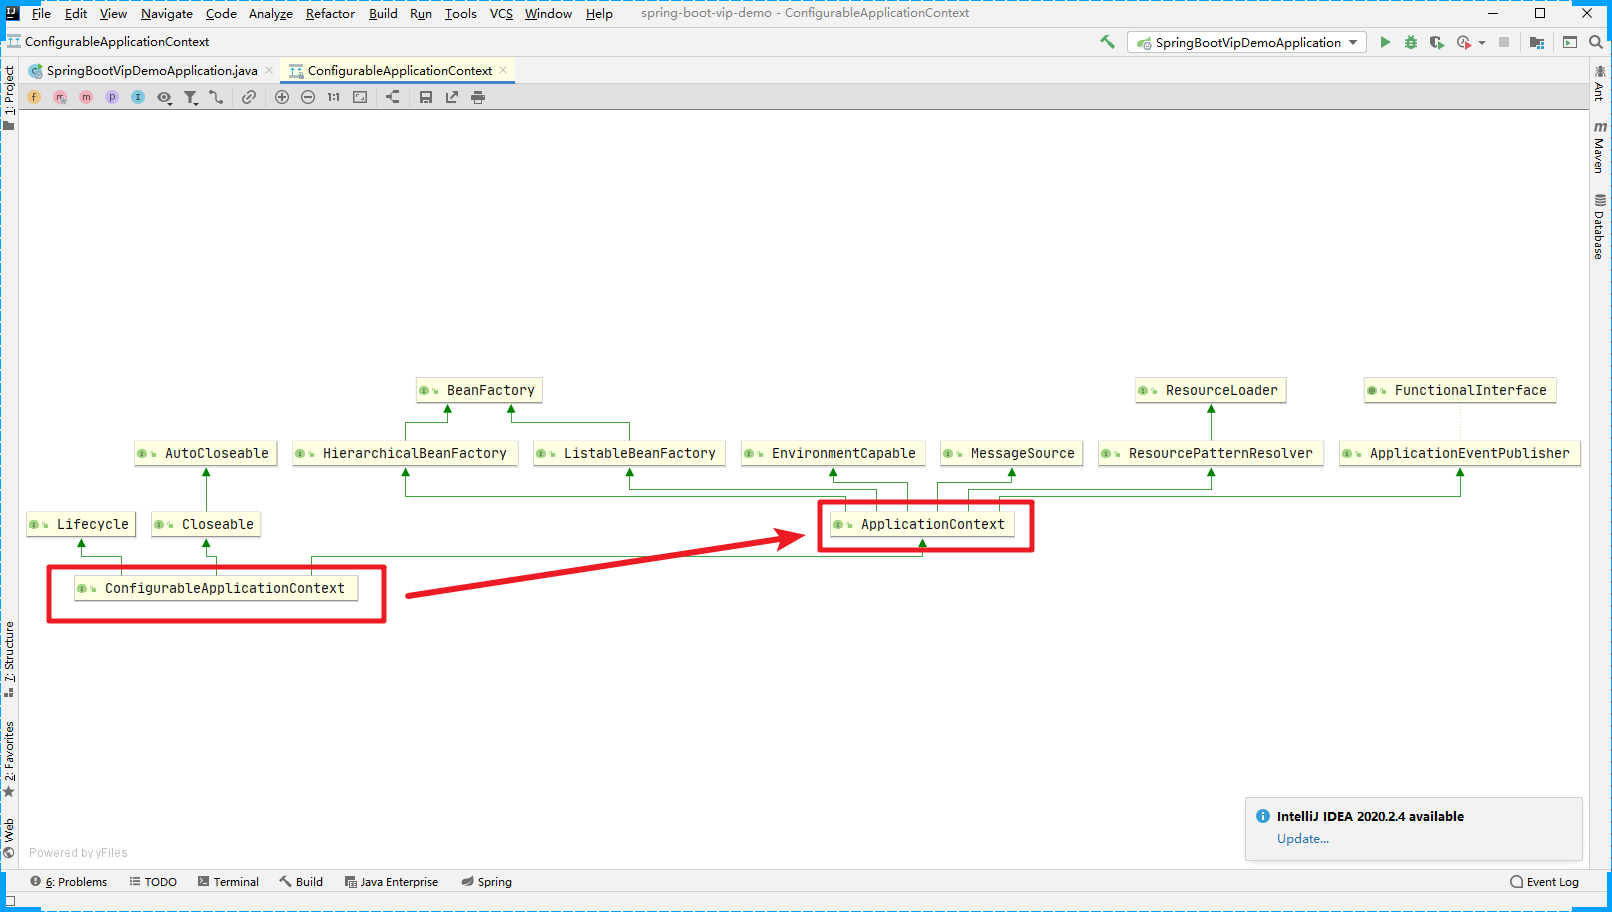
那么上面的代码可以调整为
@SpringBootApplication
@MapperScan("com.bobo.mapper")
public class SpringBootVipDemoApplication {

    public static void main(String[] args) {
        // 基于配置文件的方式
        ApplicationContext ac1 = new ClassPathXmlApplicationContext("");
        // 基于Java配置类的方式
        ApplicationContext ac2 = new AnnotationConfigApplicationContext(SpringBootVipDemoApplication.class);
        // run 方法执行完成后返回的是一个 ApplicationContext 对象
        // 到这儿我们是不是可以猜测 run 方法的执行 其实就是Spring的初始化操作[IoC]
        ApplicationContext ac3 = SpringApplication.run(SpringBootVipDemoApplication.class, args);
    }

}
- 1
- 2
- 3
- 4
- 5
- 6
- 7
- 8
- 9
- 10
- 11
- 12
- 13
- 14
- 15
根据返回结果,我们猜测SpringBoot项目的启动其实就是Spring的初始化操作【IoC】。
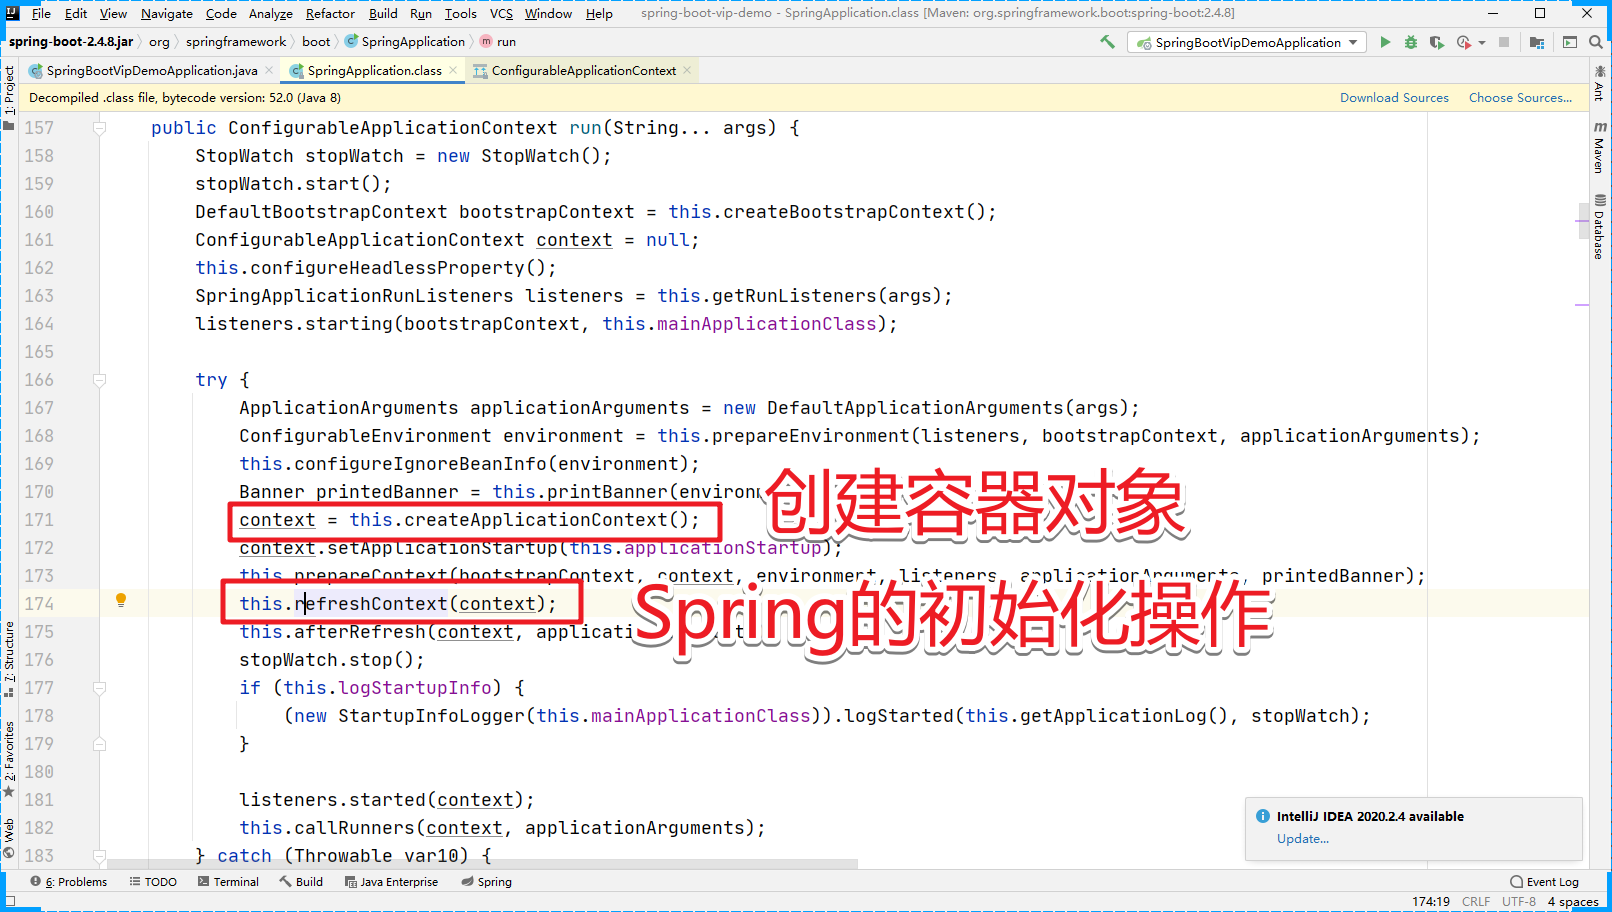
下一步:

下一步:

直接调用:

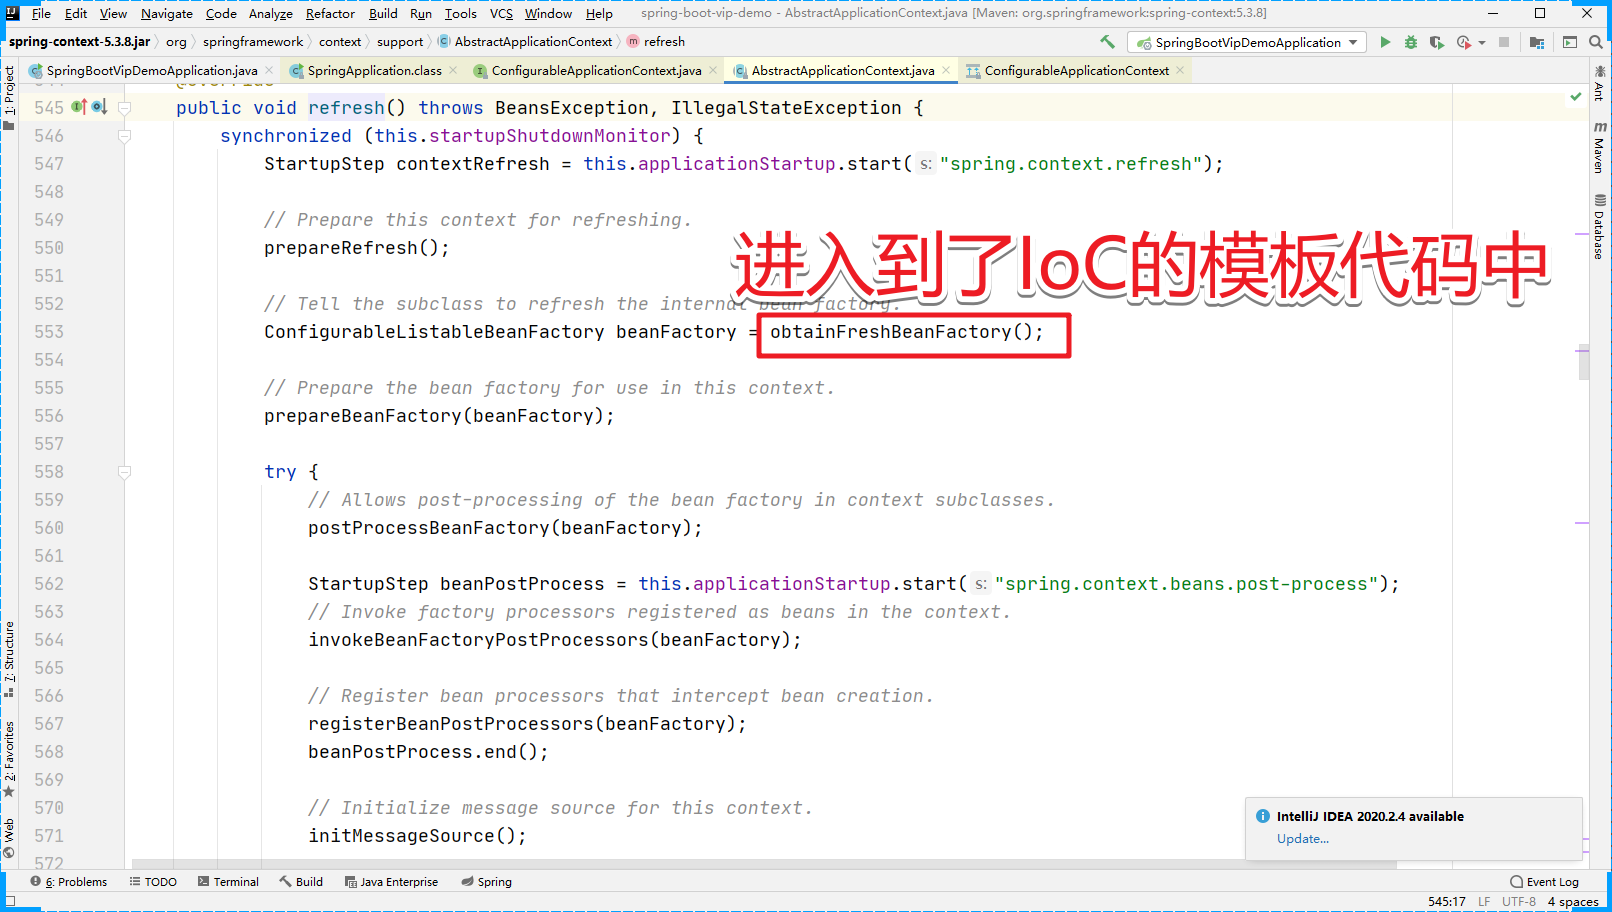
到这儿,其实我们就可以发现SpringBoot项目的启动,本质上就是Spring的初始化操作。但是并没有涉及到SpringBoot的核心装配。
2.3 @SpringBootApplication
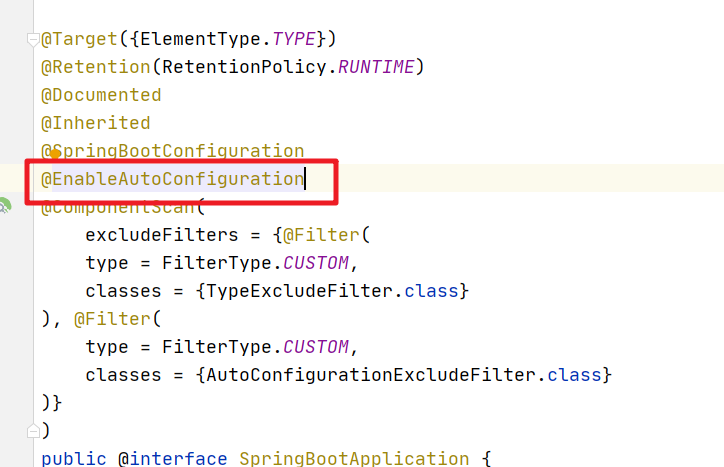
@SpringBootApplication点开后我们能够发现@SpringBootApplication这个注解其实是一个组合注解
@Target({ElementType.TYPE})
@Retention(RetentionPolicy.RUNTIME)
@Documented
@Inherited
@SpringBootConfiguration
@EnableAutoConfiguration
@ComponentScan(
    excludeFilters = {@Filter(
    type = FilterType.CUSTOM,
    classes = {TypeExcludeFilter.class}
), @Filter(
    type = FilterType.CUSTOM,
    classes = {AutoConfigurationExcludeFilter.class}
)}
)
- 1
- 2
- 3
- 4
- 5
- 6
- 7
- 8
- 9
- 10
- 11
- 12
- 13
- 14
- 15
我们发现@SpringBootApplication注解的前面四个注解是JDK中自动的元注解 (用来修饰注解的注解)
@Target({ElementType.TYPE}) // 表明 修饰的注解的位置 TYPE 表示只能修饰类
@Retention(RetentionPolicy.RUNTIME) // 表明注解的作用域
@Documented // API 文档抽取的时候会将该注解 抽取到API文档中
@Inherited  // 表示注解的继承
- 1
- 2
- 3
- 4
还有就是@ComponentScan注解,该注解的作用是用来指定扫描路径的,如果不指定特定的扫描路径的话,扫描的路径是当前修饰的类所在的包及其子包。
@SpringBootConfiguration这个注解的本质其实是@Configuration注解。
@Target({ElementType.TYPE})
@Retention(RetentionPolicy.RUNTIME)
@Documented
// 上面是3个元注解
// @Configuration 注解修饰的Java类是一个配置类
@Configuration
// @Indexed
@Indexed
public @interface SpringBootConfiguration {
    @AliasFor(
        annotation = Configuration.class
    )
    boolean proxyBeanMethods() default true;
}
- 1
- 2
- 3
- 4
- 5
- 6
- 7
- 8
- 9
- 10
- 11
- 12
- 13
- 14
这样一来7个注解,咱们清楚了其中的6个注解的作用,而且这6个注解都和SpringBoot的自动装配是没有关系的。
2.4 @EnableAutoConfiguration
@EnableAutoConfiguration这个注解就是SpringBoot自动装配的关键。
@Target({ElementType.TYPE})
@Retention(RetentionPolicy.RUNTIME)
@Documented
@Inherited
@AutoConfigurationPackage
@Import({AutoConfigurationImportSelector.class})
public @interface EnableAutoConfiguration {
    String ENABLED_OVERRIDE_PROPERTY = "spring.boot.enableautoconfiguration";

    Class<?>[] exclude() default {};

    String[] excludeName() default {};
}
- 1
- 2
- 3
- 4
- 5
- 6
- 7
- 8
- 9
- 10
- 11
- 12
- 13
我们发现要搞清楚EnableAutoConfiguration注解的关键是要弄清楚@Import注解。这个内容我们前面在注解编程发展中有详细的介绍。AutoConfigurationImportSelector实现了ImportSelector接口,那么我们清楚只需要关注selectImports方法的返回结果即可
    public String[] selectImports(AnnotationMetadata annotationMetadata) {
        if (!this.isEnabled(annotationMetadata)) {
            return NO_IMPORTS;
        } else {
            AutoConfigurationImportSelector.AutoConfigurationEntry autoConfigurationEntry = this.getAutoConfigurationEntry(annotationMetadata);
            // 返回的就是需要注册到IoC容器中的对象对应的类型的全类路径名称的字符串数组
            // ["com.bobo.pojo.User","com.bobo.pojo.Person", ....]
            return StringUtils.toStringArray(autoConfigurationEntry.getConfigurations());
        }
    }
- 1
- 2
- 3
- 4
- 5
- 6
- 7
- 8
- 9
- 10
我们清楚了该方法的作用就是要返回需要注册到IoC容器中的对象对应的类型的全类路径名称的字符串数组。那么我接下来分析的关键是返回的数据是哪来的?所以呢进入getAutoConfigurationEntry方法中。
    protected AutoConfigurationImportSelector.AutoConfigurationEntry getAutoConfigurationEntry(AnnotationMetadata annotationMetadata) {
        if (!this.isEnabled(annotationMetadata)) {
            return EMPTY_ENTRY;
        } else {
            // 获取注解的属性信息
            AnnotationAttributes attributes = this.getAttributes(annotationMetadata);
            // 获取候选配置信息 加载的是 当前项目的classpath目录下的 所有的 spring.factories 文件中的 key 为
            // org.springframework.boot.autoconfigure.EnableAutoConfiguration 的信息
            List<String> configurations = this.getCandidateConfigurations(annotationMetadata, attributes);
            configurations = this.removeDuplicates(configurations);
            Set<String> exclusions = this.getExclusions(annotationMetadata, attributes);
            this.checkExcludedClasses(configurations, exclusions);
            configurations.removeAll(exclusions);
            configurations = this.getConfigurationClassFilter().filter(configurations);
            this.fireAutoConfigurationImportEvents(configurations, exclusions);
            return new AutoConfigurationImportSelector.AutoConfigurationEntry(configurations, exclusions);
        }
    }
- 1
- 2
- 3
- 4
- 5
- 6
- 7
- 8
- 9
- 10
- 11
- 12
- 13
- 14
- 15
- 16
- 17
- 18
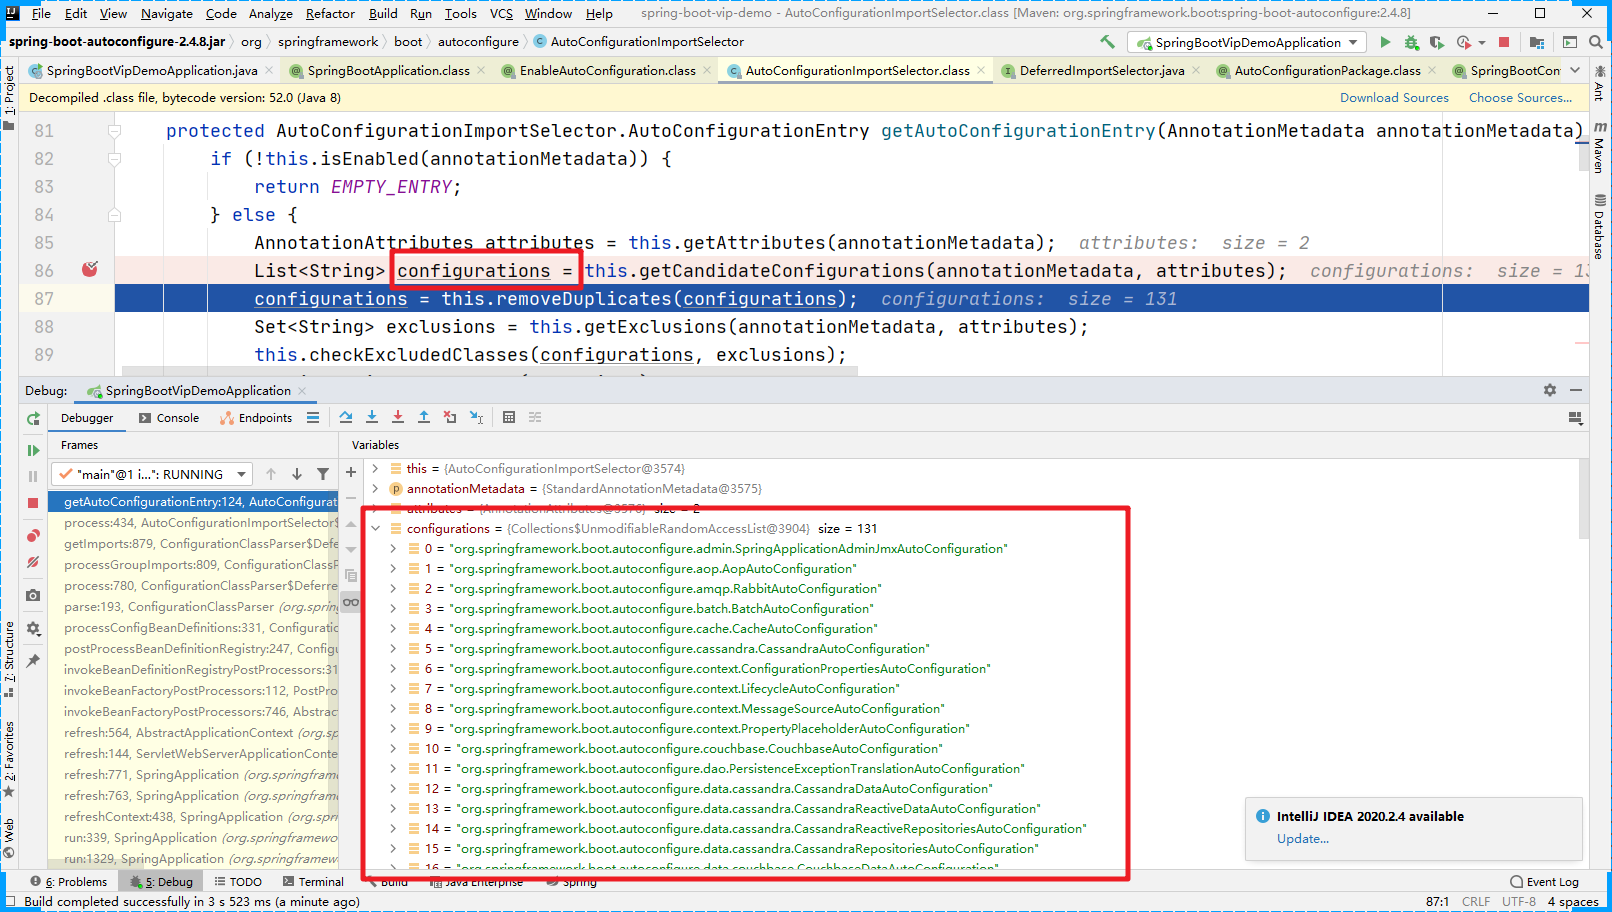
先不进入代码,直接DEBUG调试到 候选配置信息这步。我们发现里面有很多个Java类。
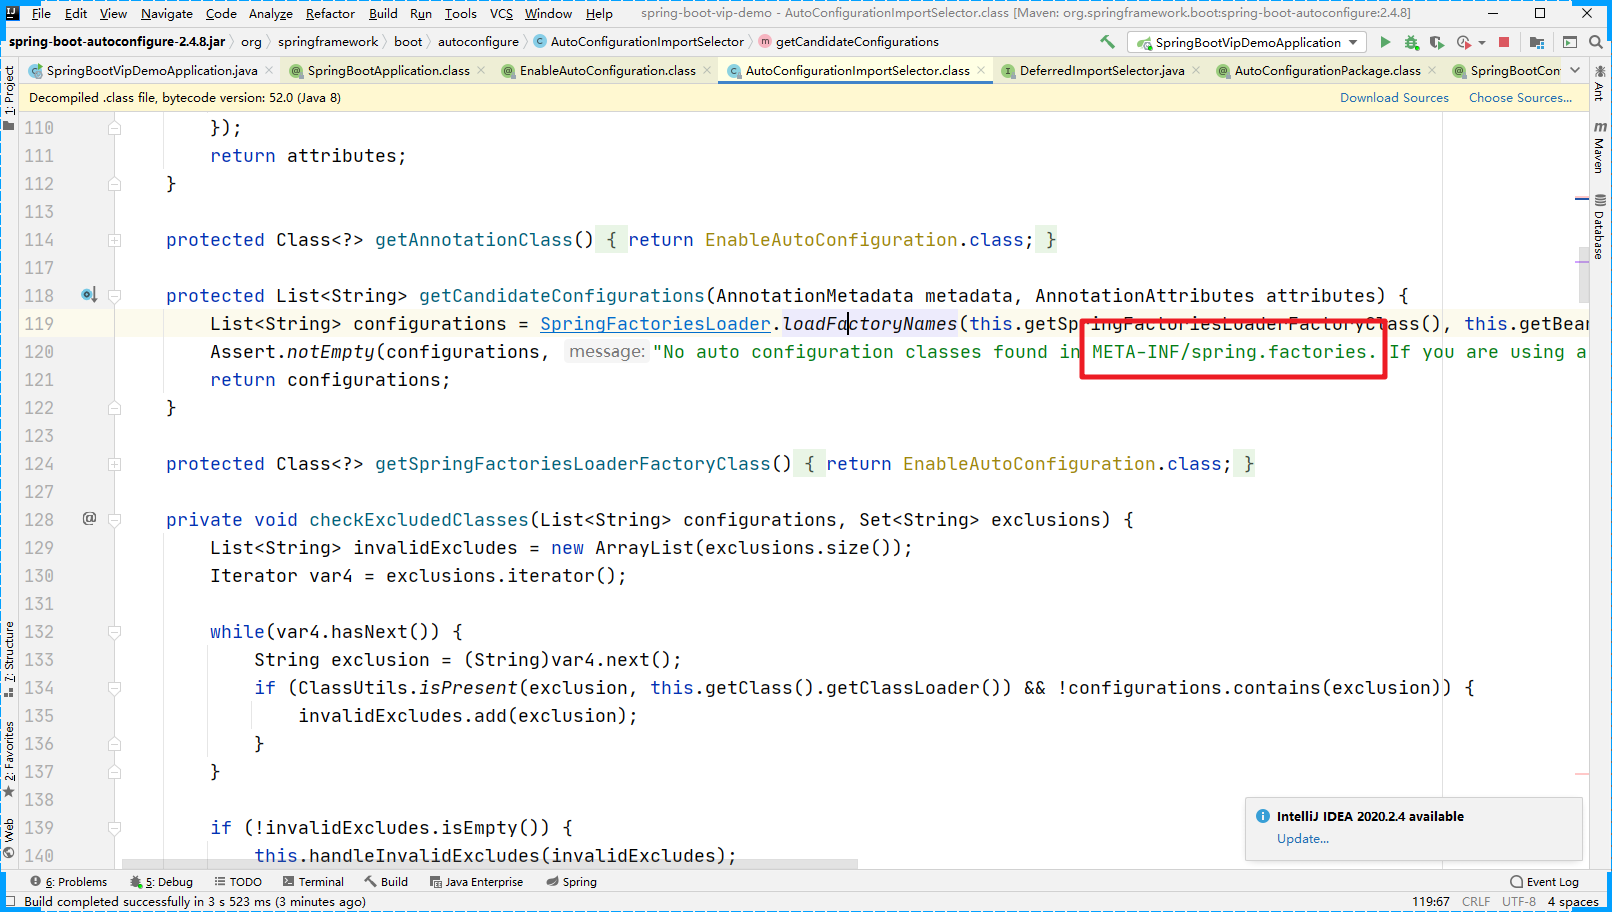
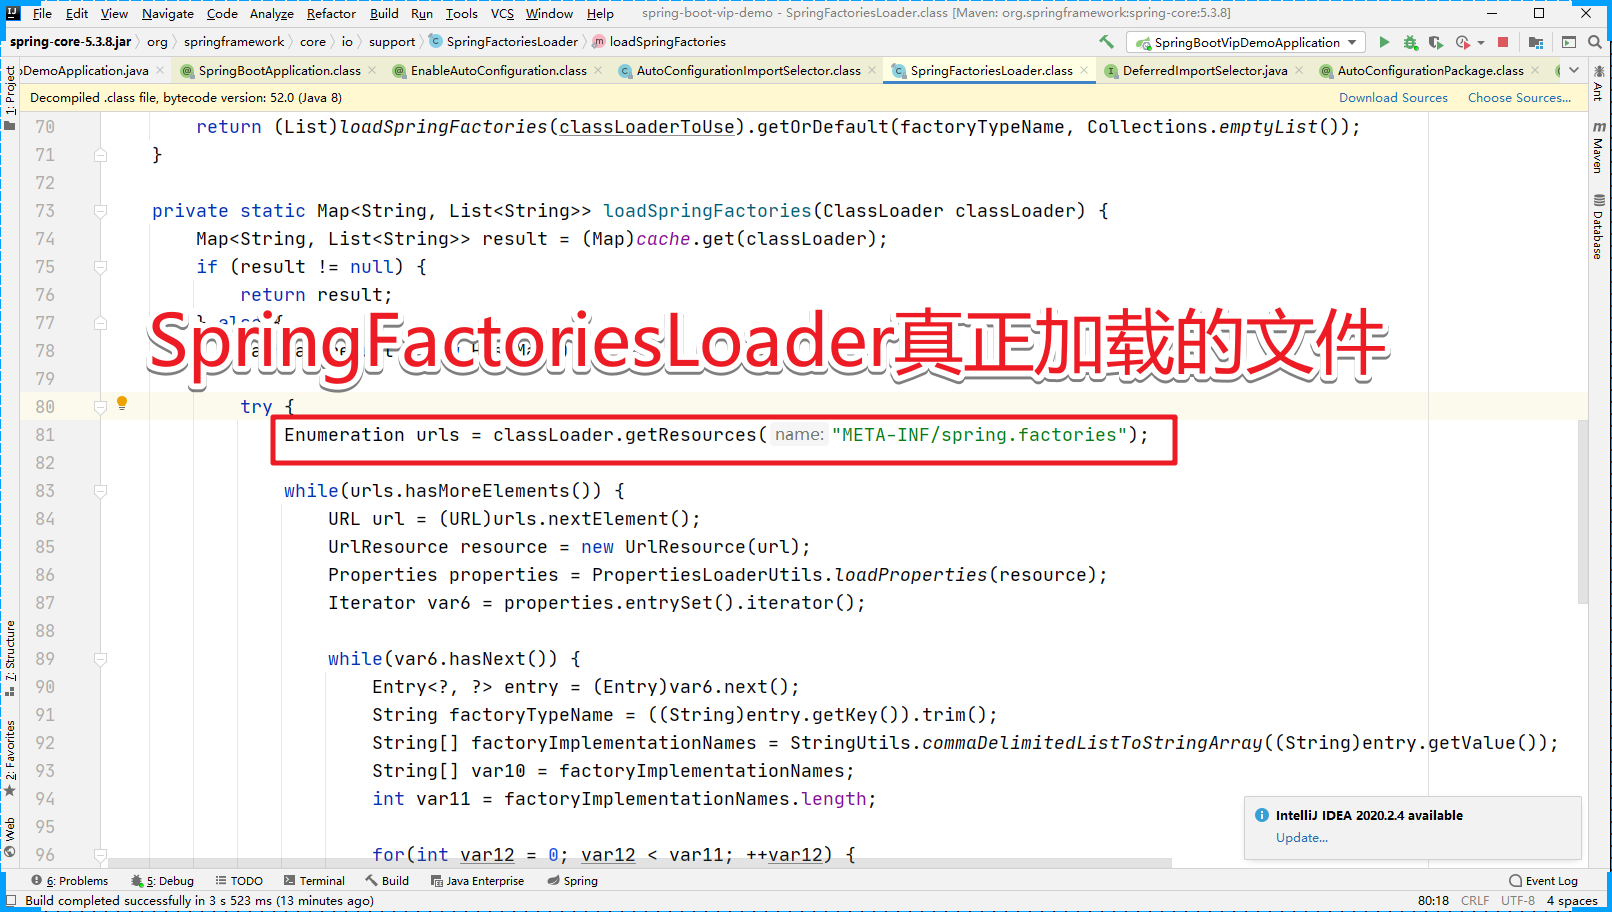
然后进入getCandidateConfiguration方法中,我们可以发现加载的是 META-INF/spring.factories 文件中的配置信息
然后我们可以验证,进入到具体的META-INF目录下查看文件。
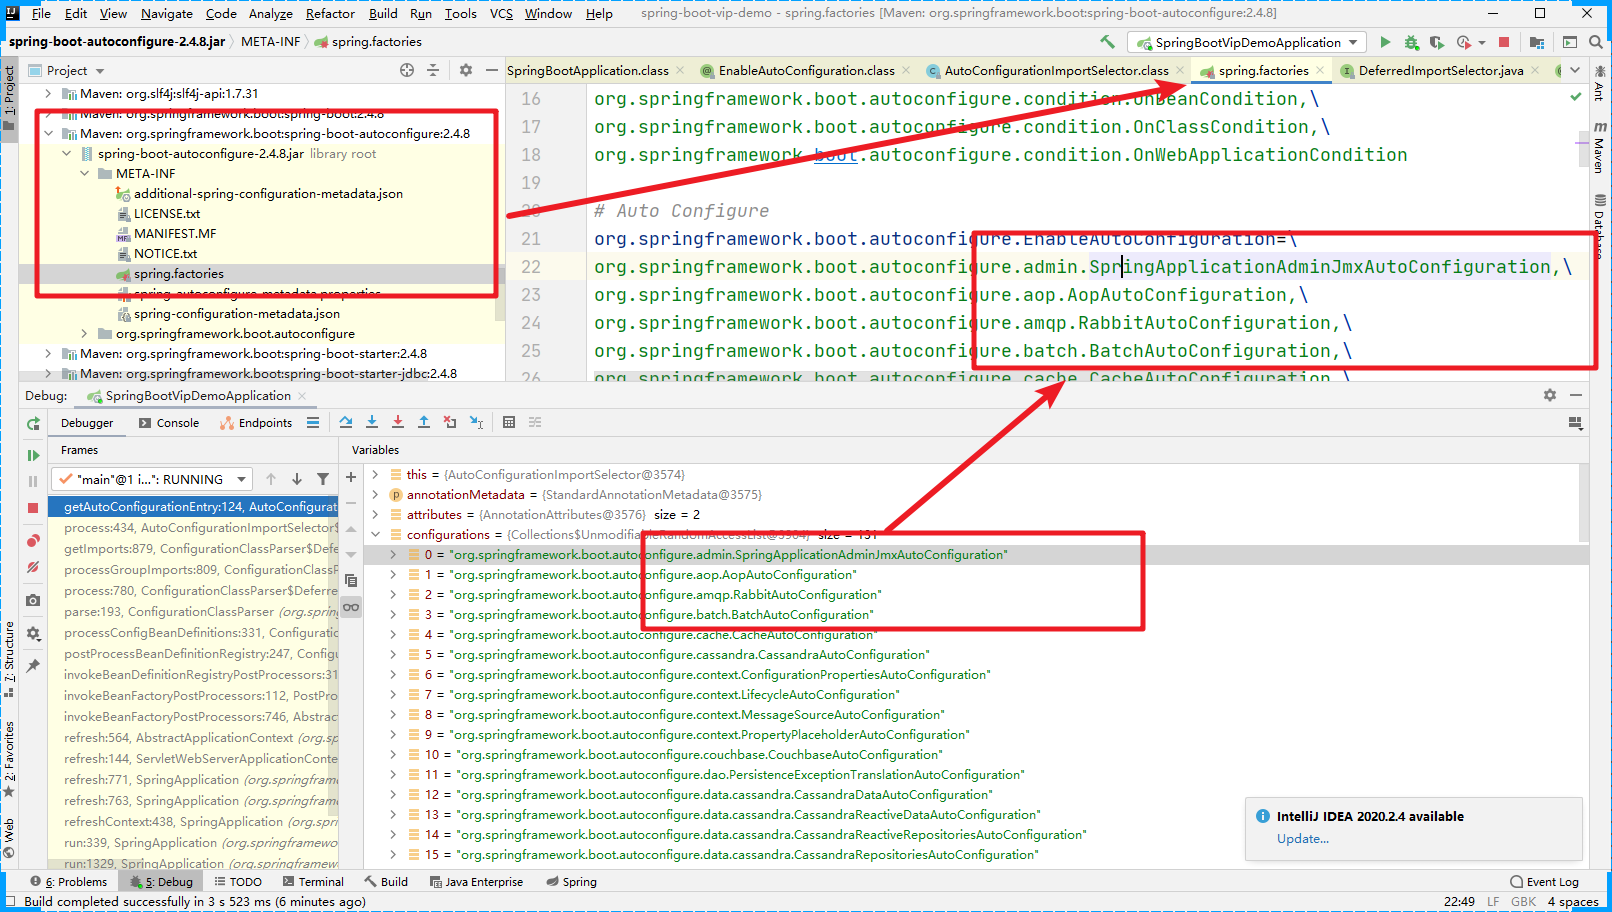
最后几个
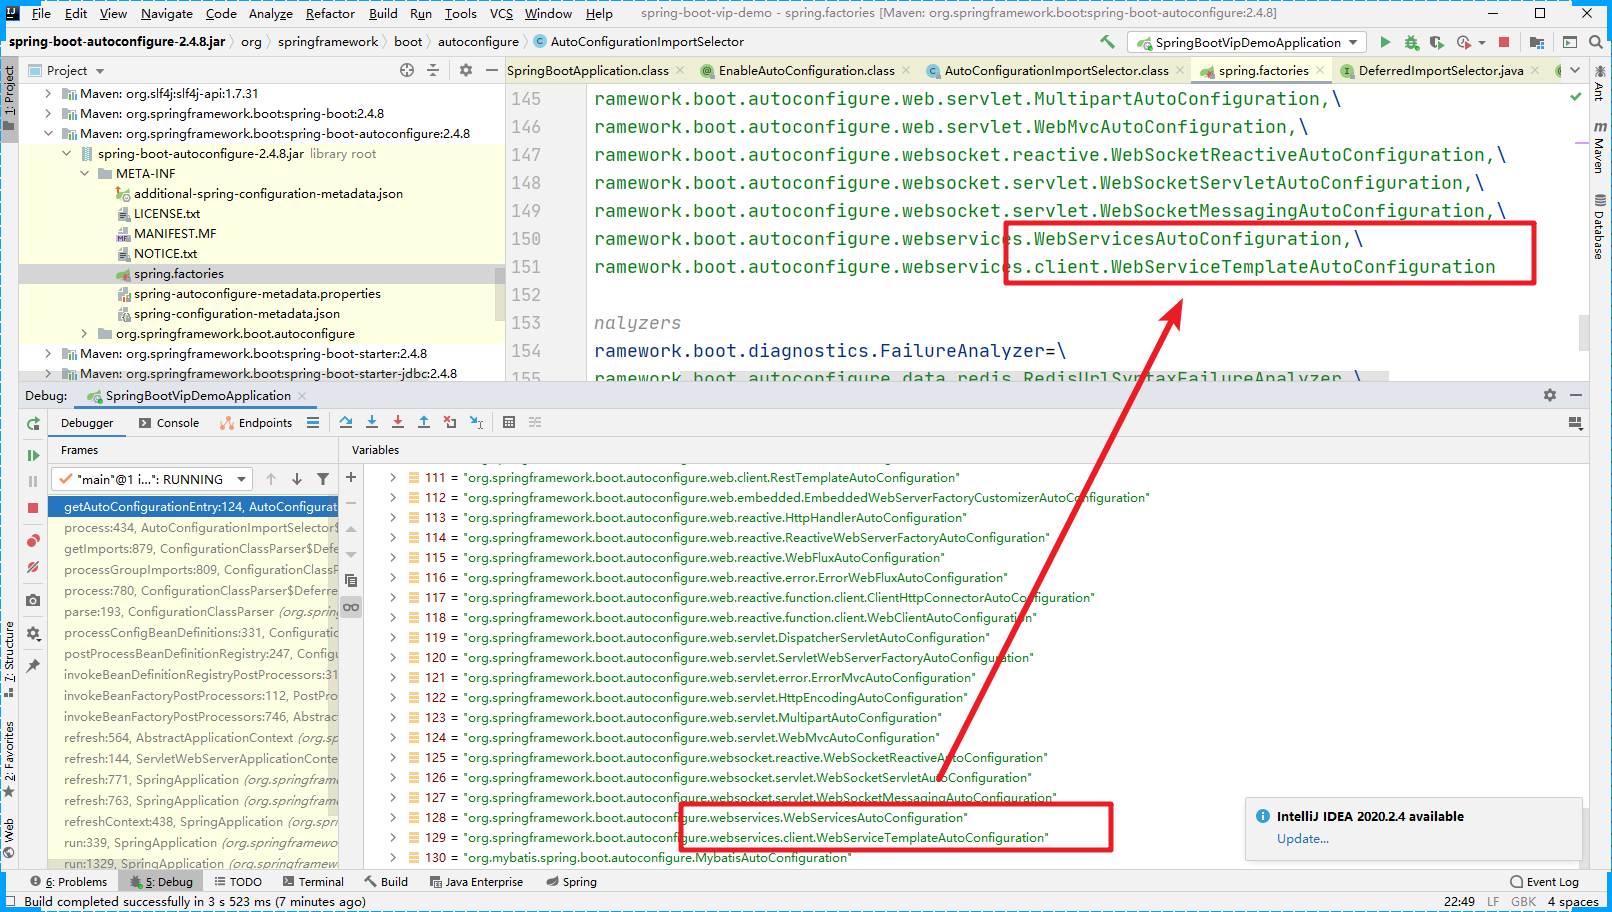
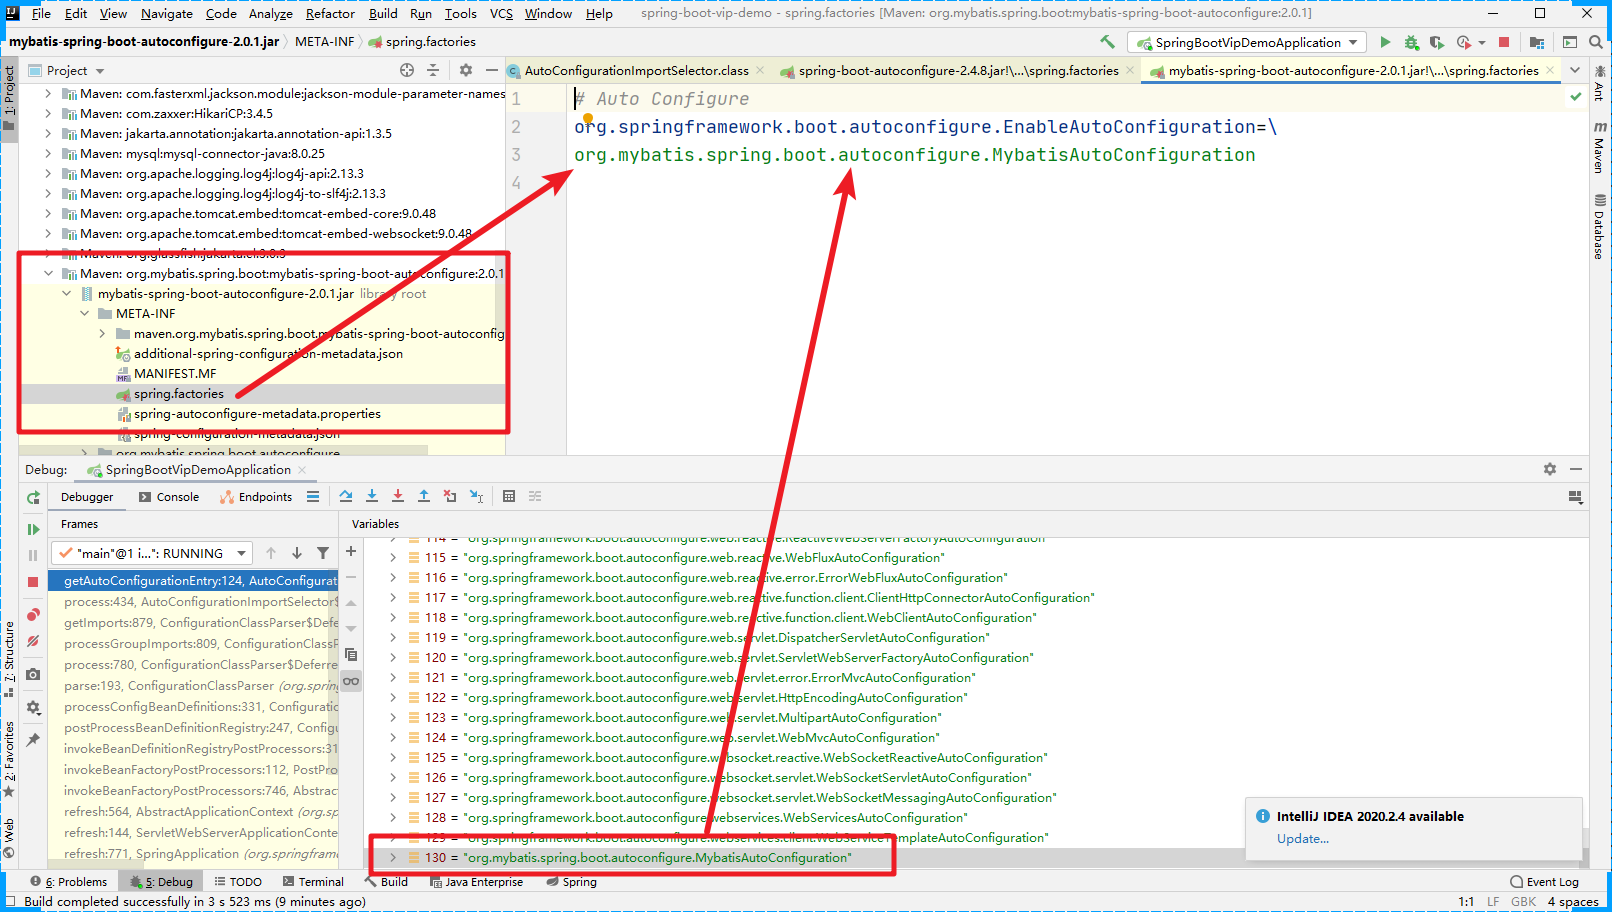
在我们的Debug中还有一个配置文件(MyBatisAutoConfiguration)是哪来的呢?
深入源码也可以看到真正加载的文件
然后我们继续往下看源码
    protected AutoConfigurationImportSelector.AutoConfigurationEntry getAutoConfigurationEntry(AnnotationMetadata annotationMetadata) {
        if (!this.isEnabled(annotationMetadata)) {
            return EMPTY_ENTRY;
        } else {
            AnnotationAttributes attributes = this.getAttributes(annotationMetadata);
            List<String> configurations = this.getCandidateConfigurations(annotationMetadata, attributes);
            // 因为会加载多个 spring.factories 文件,那么就有可能存在同名的,
            // removeDuplicates方法的作用是 移除同名的
            configurations = this.removeDuplicates(configurations);
            // 获取我们配置的 exclude 信息
            // @SpringBootApplication(exclude = {RabbitAutoConfiguration.class})
            // 显示的指定不要加载那个配置类
            Set<String> exclusions = this.getExclusions(annotationMetadata, attributes);
            this.checkExcludedClasses(configurations, exclusions);
            configurations.removeAll(exclusions);
            // filter的作用是 过滤掉咱们不需要使用的配置类。
            configurations = this.getConfigurationClassFilter().filter(configurations);
            this.fireAutoConfigurationImportEvents(configurations, exclusions);
            return new AutoConfigurationImportSelector.AutoConfigurationEntry(configurations, exclusions);
        }
    }
- 1
- 2
- 3
- 4
- 5
- 6
- 7
- 8
- 9
- 10
- 11
- 12
- 13
- 14
- 15
- 16
- 17
- 18
- 19
- 20
- 21
先来看过滤的效果:
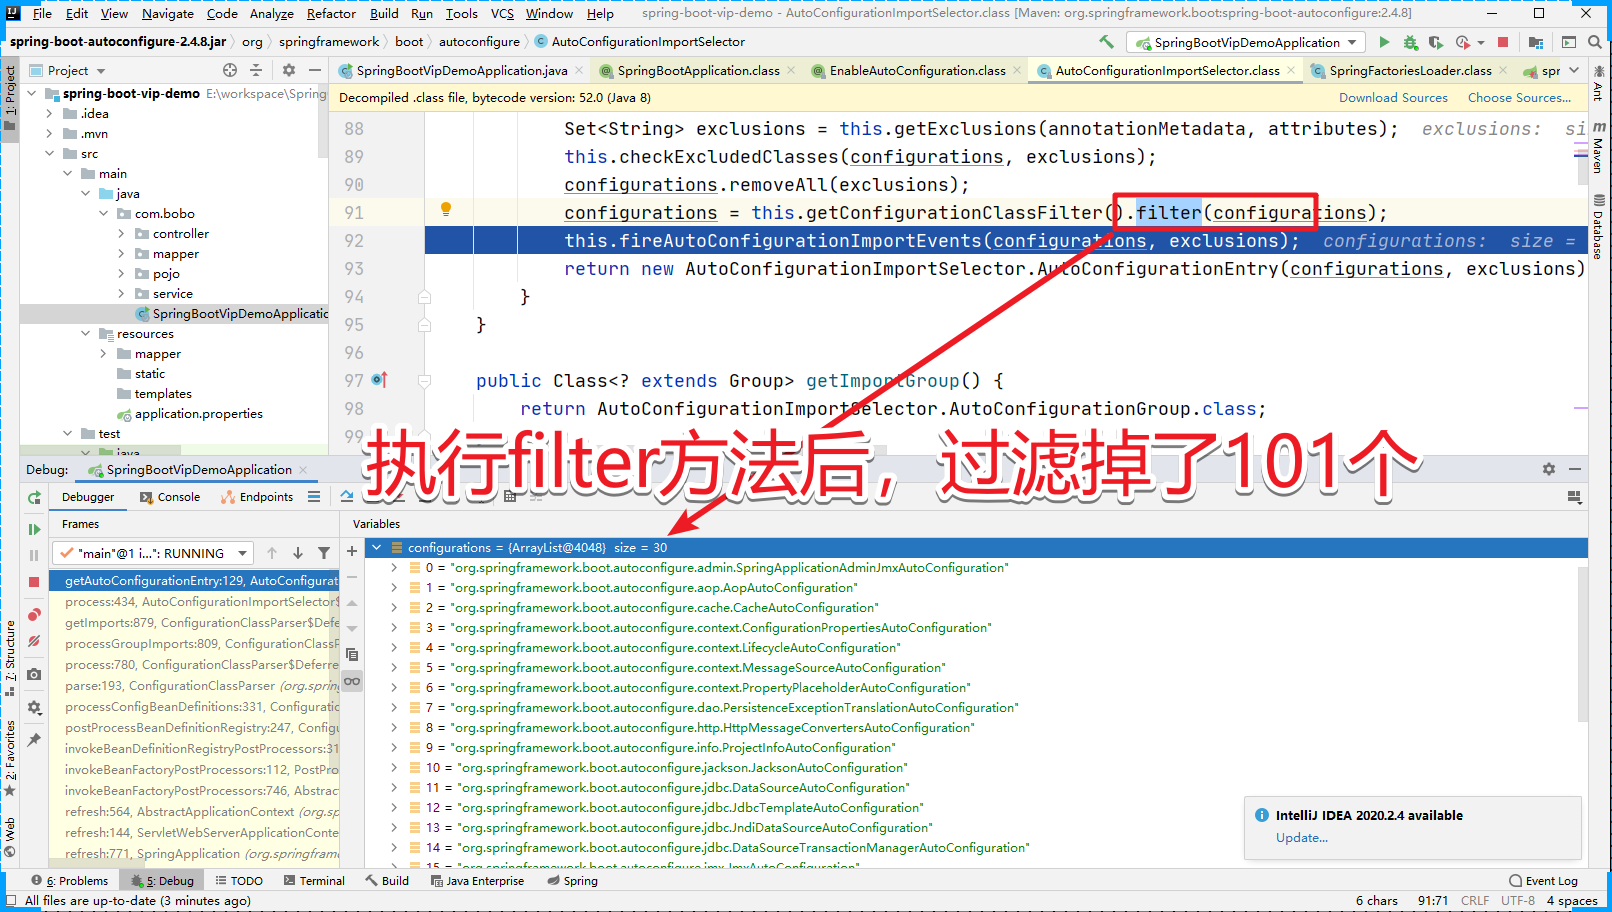
那么我们需要考虑这个过滤到底是怎么实现的呢?进入filter方法
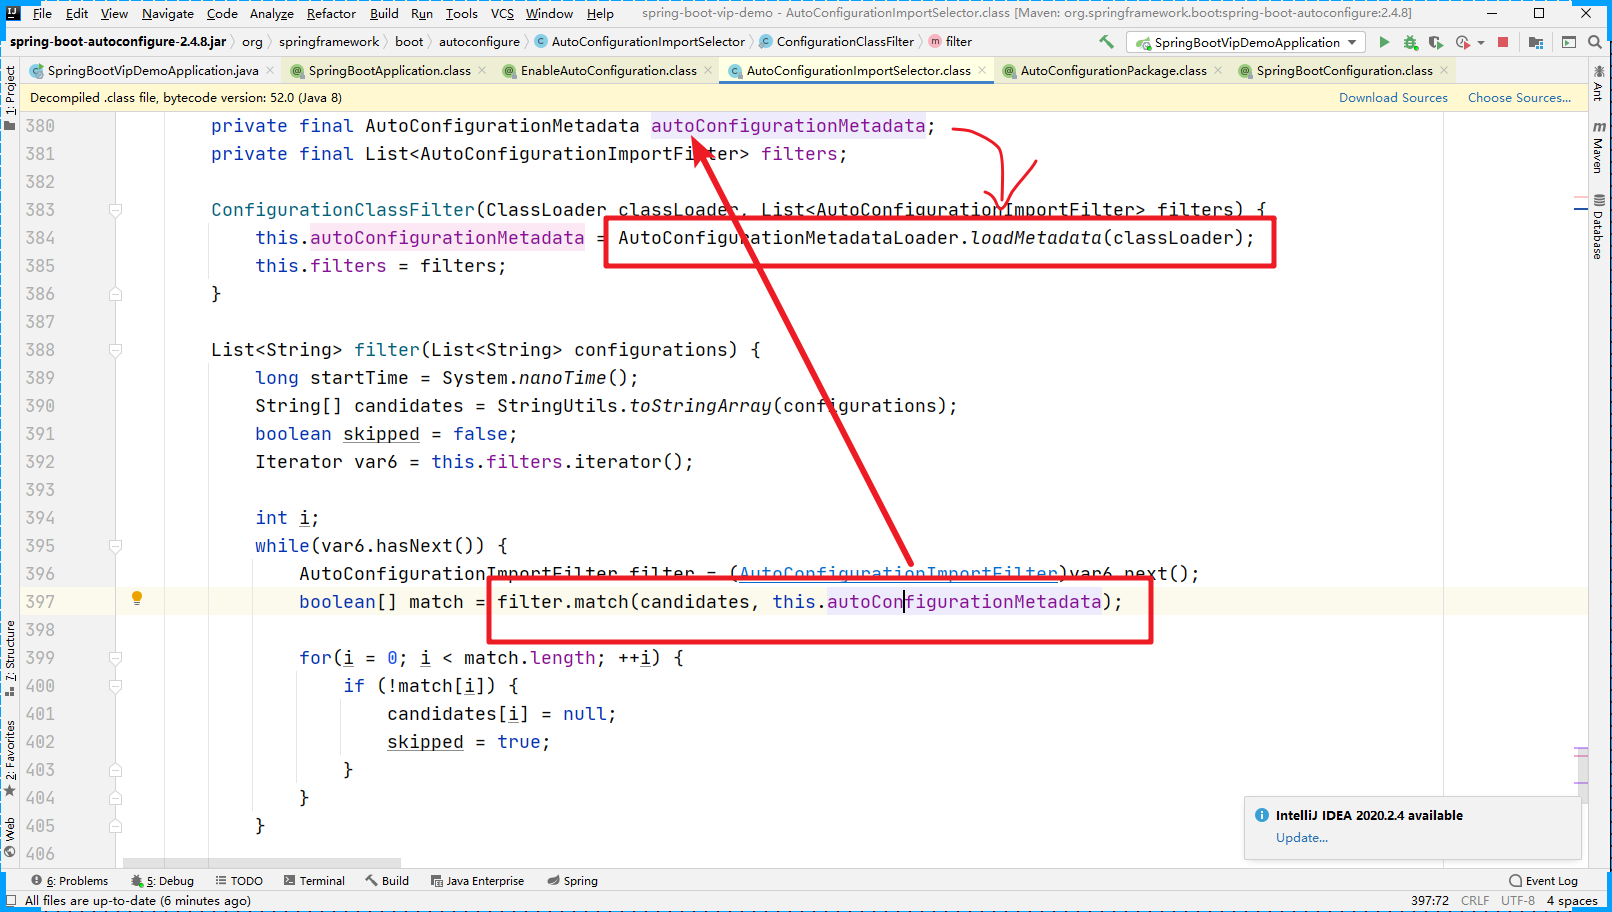
我们可以看到有具体的匹配方法 match。里面有个关键的属性是 autoConfigurationMetadata,的本质是 加载的 META-INF/spring-autoconfigure-metadata.properties 的文件中的内容。我们以 RedisAutoConfiguration 为例:
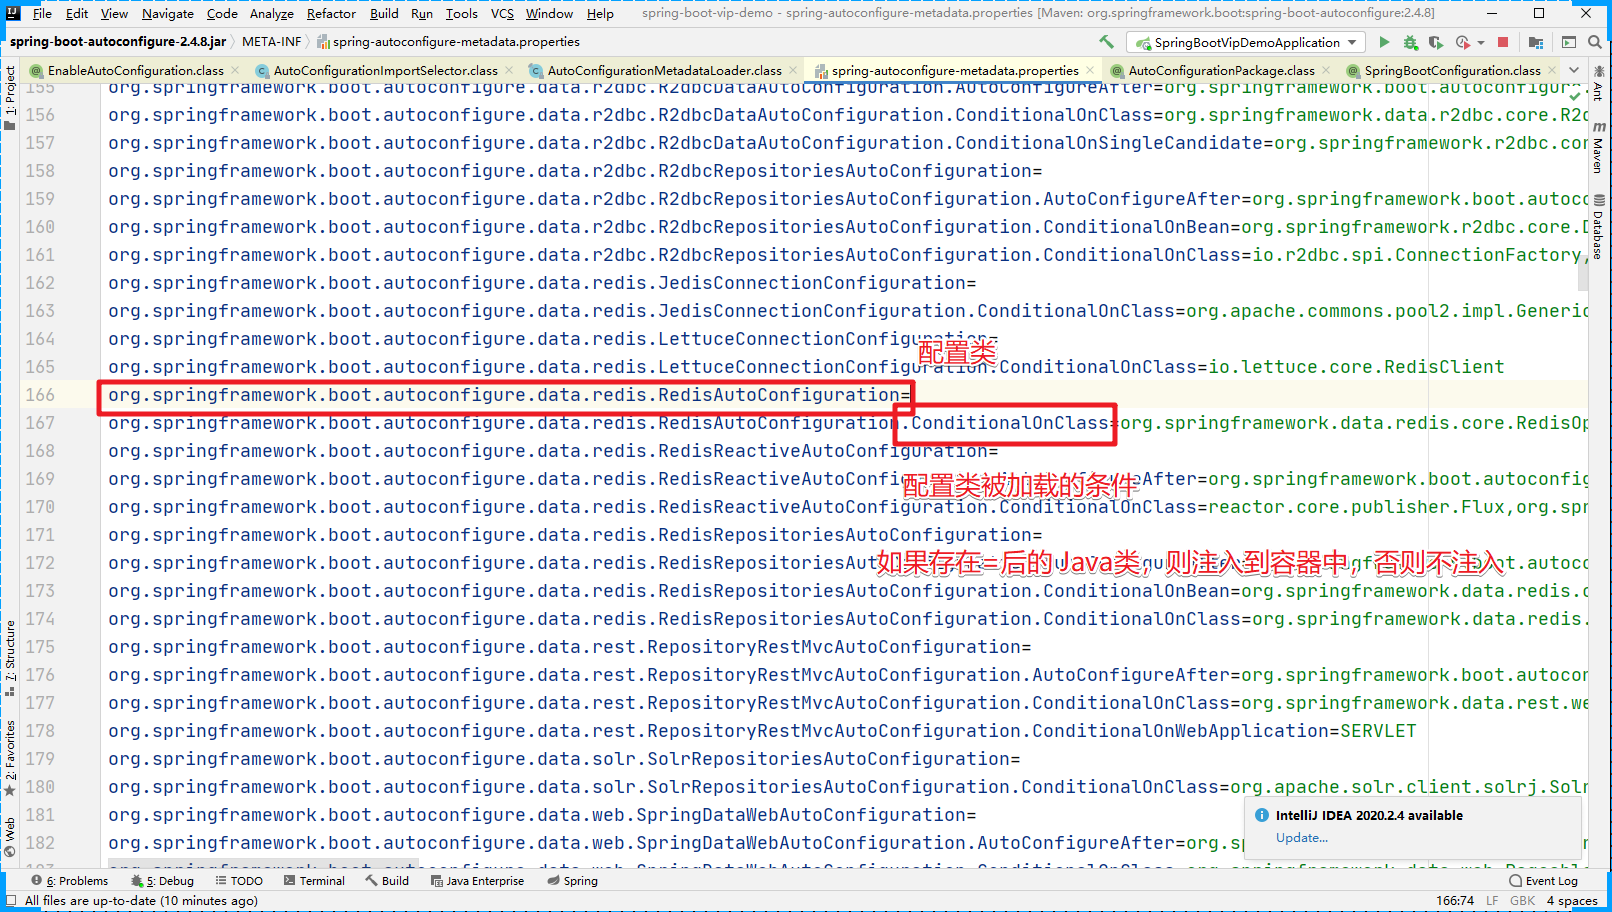
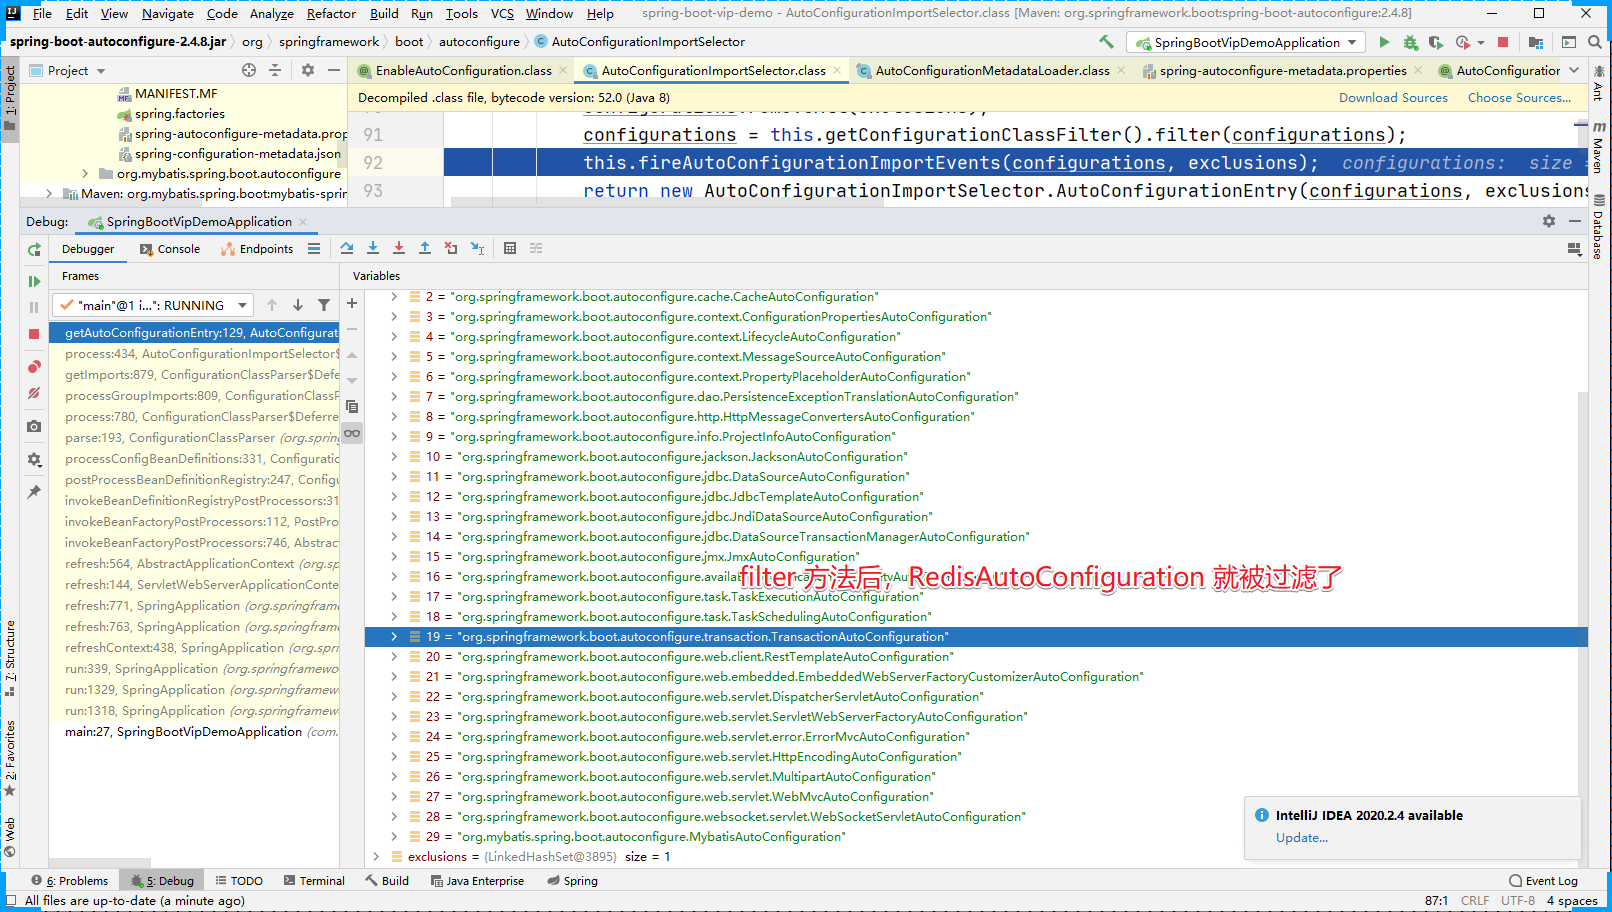
通过上面的配置文件,我们发现RedisAutoConfiguration 被注入到IoC中的条件是系统中要存在 org.springframework.data.redis.core.RedisOperations 这个class文件。首先系统中不存在 RedisOperations 这个class文件。
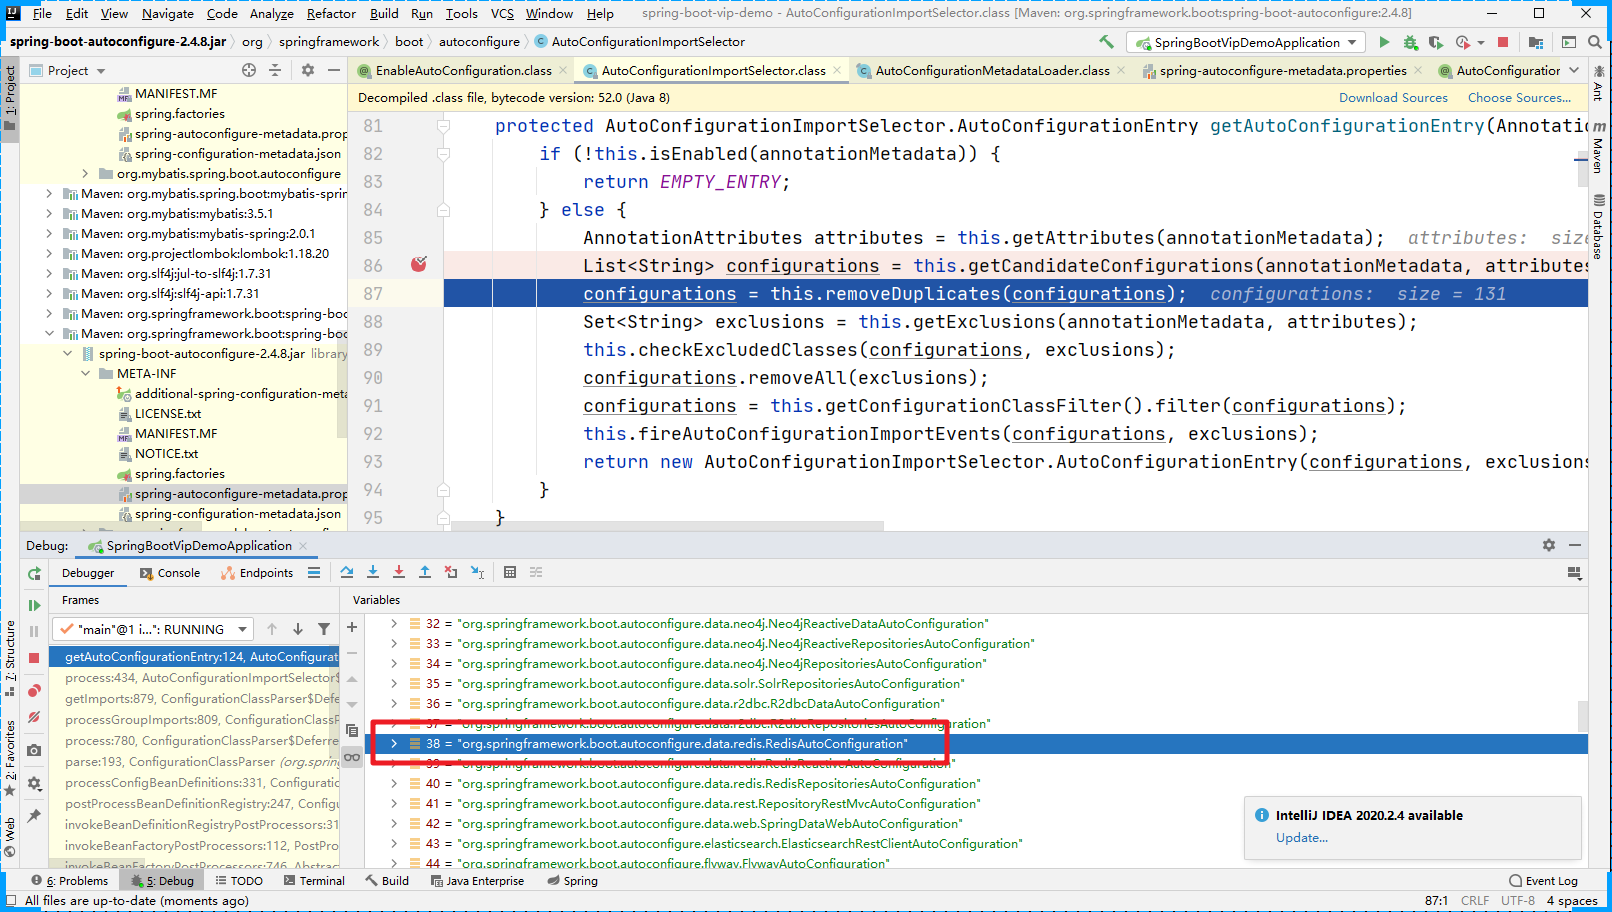
过滤后,我们发现 RedisAutoConfiguration 就不存在了。
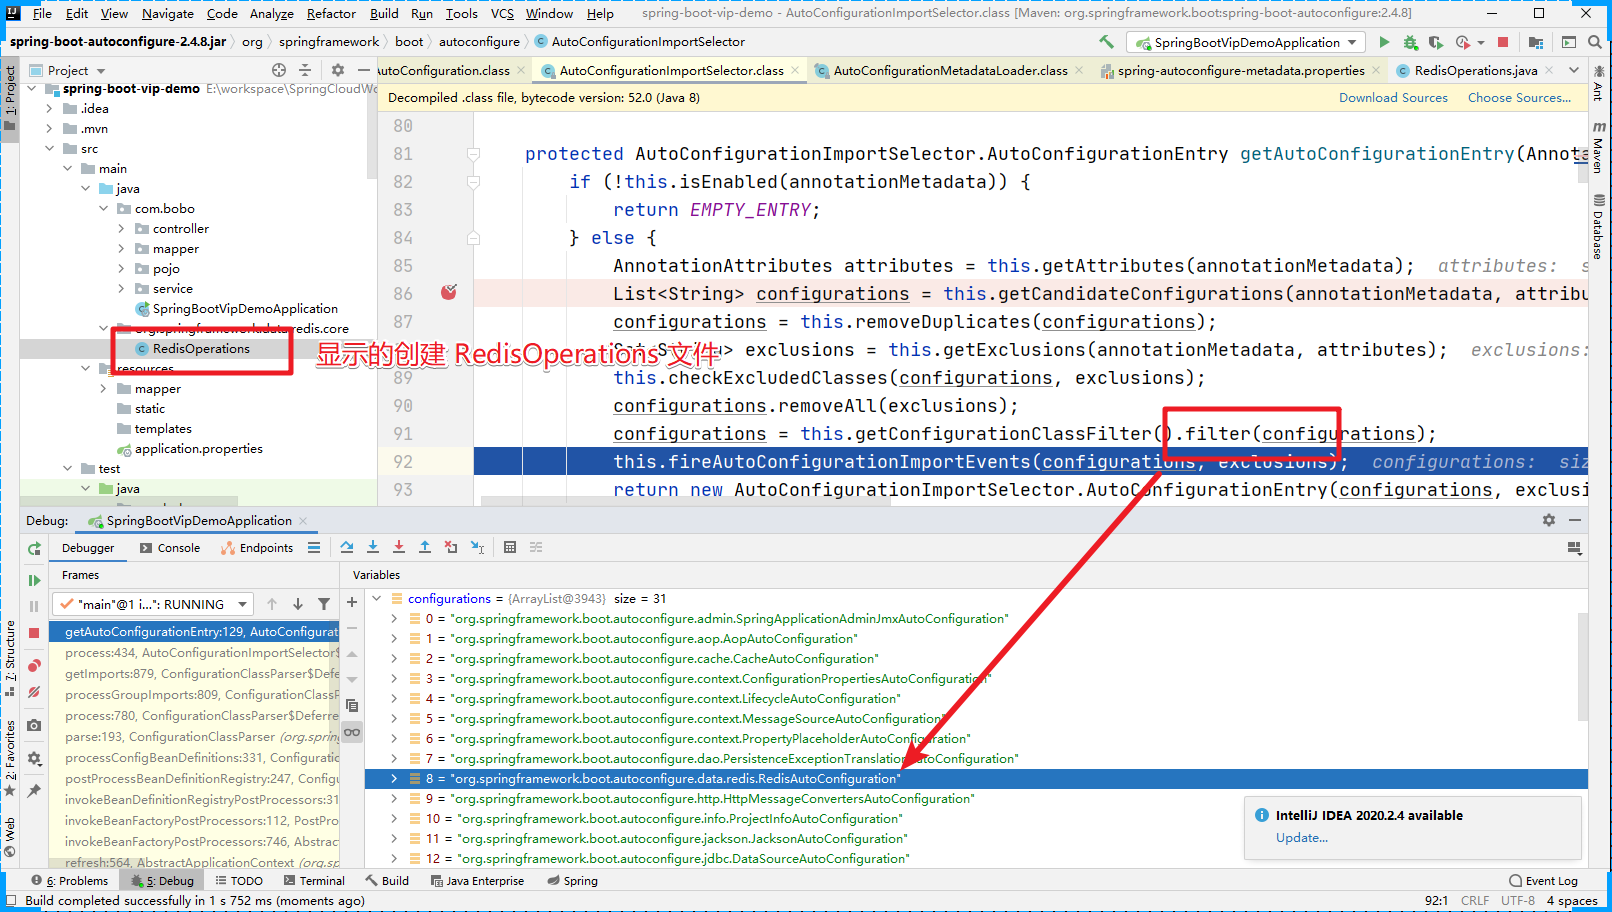
但是当我们在系统中显示的创建 RedisOperations Java类后,filter就不会过滤 RedisAutoConfiguration 配置文件了。
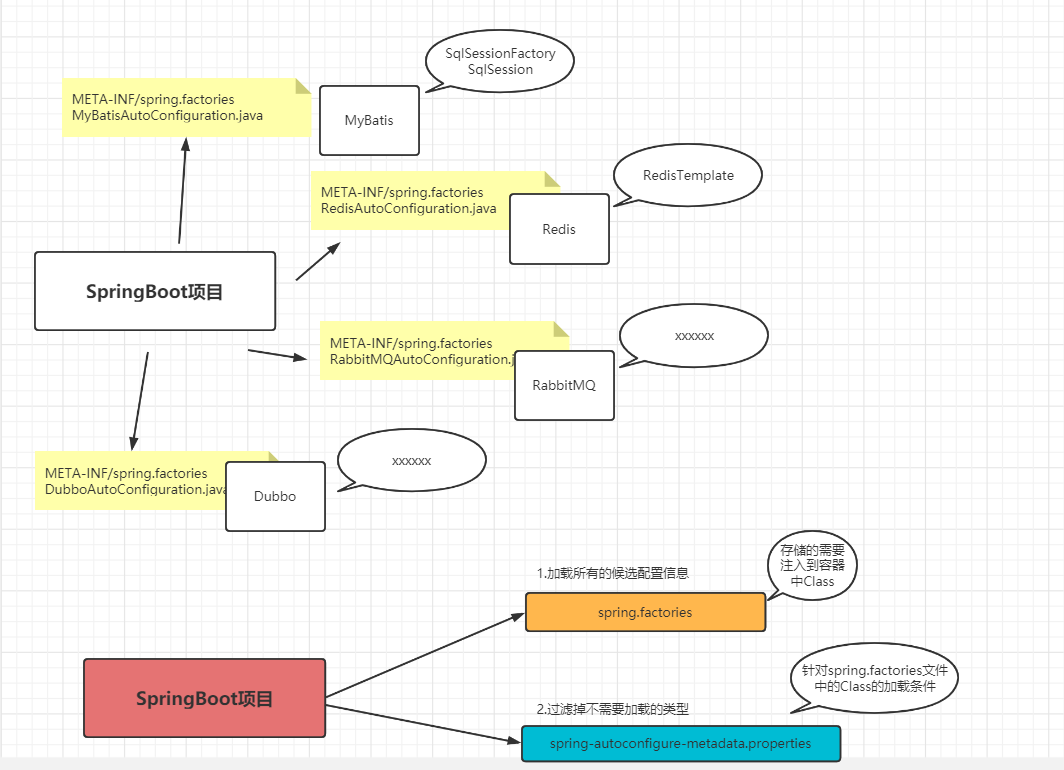
到这其实我们就已经给大家介绍完了SpringBoot的自动装配原理。
~好了,本文就给大家介绍到这里,感觉有帮助的,欢迎一键三连哦!!!

文章来源: dpb-bobokaoya-sm.blog.csdn.net,作者:波波烤鸭,版权归原作者所有,如需转载,请联系作者。
原文链接:dpb-bobokaoya-sm.blog.csdn.net/article/details/118969101
- 点赞
- 收藏
- 关注作者


评论(0)