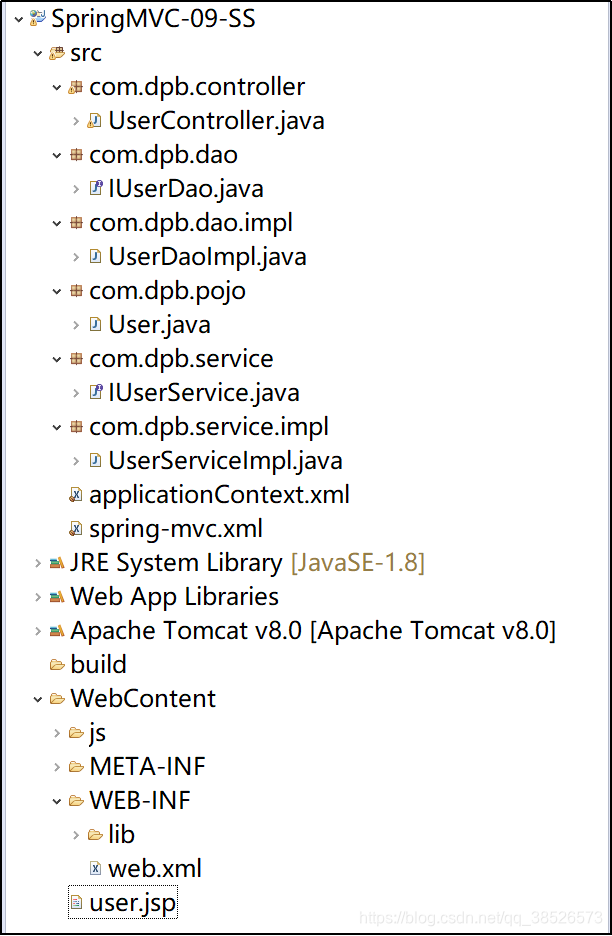
整合Spring和SpringMVC
【摘要】
1.Spring容器和SpringMVC容器的关系
Spring容器是一个父容器,SpringMVC容器是一个子容器,它继承自Spring容器。因此,在SpringMVC容器中,可以访问到Sprin...
1.Spring容器和SpringMVC容器的关系
Spring容器是一个父容器,SpringMVC容器是一个子容器,它继承自Spring容器。因此,在SpringMVC容器中,可以访问到Spring容器中定义的Bean,而在Spring容器中,无法访问SpringMVC容器中定义的Bean。在Web开发中,Controller全部在SpringMVC中扫描,除了Controller之外的Bean,全部在Spring容器中扫描(Service、Dao),按这种方式扫描,扫描完完成后,Controller可以访问到Service。
- 为什么不全部都在Spring中扫描
因为处理器映射器只会去SpringMVC中查找到Controller,如果没有,就找不到,不会去Spring中找,这就决定了,Controller必须在SpringMVC中扫描。 - 为什么不全部在SpringMVC中扫描
在SSM整合或者Spring+SpringMVC+JdbcTemplate中,可以全部在SpringMVC中扫描,但是,在SSH整合中,这种方式不允许。
最佳实践:
- Controller在SpringMVC中扫描,视图解析器等在SpringMVC容器中配置
- Spring中扫描Service、Dao已经其他组件,事务定义、数据源定义都在Spring容器中配置
2.SpringMVC的配置文件
<?xml version="1.0" encoding="UTF-8"?>
<beans xmlns="http://www.springframework.org/schema/beans"
	xmlns:xsi="http://www.w3.org/2001/XMLSchema-instance" xmlns:context="http://www.springframework.org/schema/context"
	xmlns:mvc="http://www.springframework.org/schema/mvc"
	xsi:schemaLocation="http://www.springframework.org/schema/beans http://www.springframework.org/schema/beans/spring-beans.xsd http://www.springframework.org/schema/context http://www.springframework.org/schema/context/spring-context.xsd http://www.springframework.org/schema/mvc http://www.springframework.org/schema/mvc/spring-mvc.xsd">
	  <!-- SpringMVC容器只扫描Controller -->
	<context:component-scan base-package="com.dpb"
		use-default-filters="false">
		<context:include-filter type="annotation"
			expression="org.springframework.stereotype.Controller" />
	</context:component-scan>
	<mvc:annotation-driven />
</beans>
- 1
- 2
- 3
- 4
- 5
- 6
- 7
- 8
- 9
- 10
- 11
- 12
- 13
3.Spring的配置文件
<?xml version="1.0" encoding="UTF-8"?>
<beans xmlns="http://www.springframework.org/schema/beans"
	xmlns:xsi="http://www.w3.org/2001/XMLSchema-instance" xmlns:context="http://www.springframework.org/schema/context"
	xsi:schemaLocation="http://www.springframework.org/schema/beans http://www.springframework.org/schema/beans/spring-beans.xsd http://www.springframework.org/schema/context http://www.springframework.org/schema/context/spring-context.xsd">
	 <!-- 在Spring容器中,扫描除了Controller之外的其他组件 -->
	<context:component-scan base-package="com.dpb"
		use-default-filters="true">
		<context:exclude-filter type="annotation"
			expression="org.springframework.stereotype.Controller" />
	</context:component-scan>
</beans>
- 1
- 2
- 3
- 4
- 5
- 6
- 7
- 8
- 9
- 10
- 11
4.web.xml文件中
分别加载spring和SpringMVC的配置
<?xml version="1.0" encoding="UTF-8"?>
<web-app xmlns:xsi="http://www.w3.org/2001/XMLSchema-instance"
	xmlns="http://java.sun.com/xml/ns/javaee"
	xsi:schemaLocation="http://java.sun.com/xml/ns/javaee http://java.sun.com/xml/ns/javaee/web-app_3_0.xsd"
	id="WebApp_ID" version="3.0">
	<display-name>test</display-name>
	<!-- 这里配置Spring配置文件的位置,param-name是固定的,
	param-value是文件位置 这个配置可以省略,如果省略,
	系统默认去/WEB-INF/目录下查找applicationContext.xml作为Spring的配置文件 -->
	<context-param>
		<param-name>contextConfigLocation</param-name>
		<param-value>classpath:applicationContext.xml</param-value>
	</context-param>
	<listener>
		<listener-class>org.springframework.web.context.ContextLoaderListener</listener-class>
	</listener>
	<servlet>
		<servlet-name>springmvc</servlet-name>
		<servlet-class>org.springframework.web.servlet.DispatcherServlet</servlet-class>
		<init-param>
			<param-name>contextConfigLocation</param-name>
			<param-value>classpath:spring-servlet.xml</param-value>
		</init-param>
	</servlet>
	<servlet-mapping>
		<servlet-name>springmvc</servlet-name>
		<url-pattern>/</url-pattern>
	</servlet-mapping>
	<filter>
		<filter-name>encoding</filter-name>
		<filter-class>org.springframework.web.filter.CharacterEncodingFilter</filter-class>
		<init-param>
			<param-name>encoding</param-name>
			<param-value>UTF-8</param-value>
		</init-param>
		<init-param>
			<param-name>forceRequestEncoding</param-name>
			<param-value>true</param-value>
		</init-param>
		<init-param>
			<param-name>forceResponseEncoding</param-name>
			<param-value>true</param-value>
		</init-param>
	</filter>
	<filter-mapping>
		<filter-name>encoding</filter-name>
		<url-pattern>/*</url-pattern>
	</filter-mapping>
</web-app>
- 1
- 2
- 3
- 4
- 5
- 6
- 7
- 8
- 9
- 10
- 11
- 12
- 13
- 14
- 15
- 16
- 17
- 18
- 19
- 20
- 21
- 22
- 23
- 24
- 25
- 26
- 27
- 28
- 29
- 30
- 31
- 32
- 33
- 34
- 35
- 36
- 37
- 38
- 39
- 40
- 41
- 42
- 43
- 44
- 45
- 46
- 47
- 48
- 49
5.案例实现


Spring配置文件
<beans xmlns="http://www.springframework.org/schema/beans"
	xmlns:xsi="http://www.w3.org/2001/XMLSchema-instance" xmlns:context="http://www.springframework.org/schema/context"
	xsi:schemaLocation="http://www.springframework.org/schema/beans http://www.springframework.org/schema/beans/spring-beans.xsd http://www.springframework.org/schema/context http://www.springframework.org/schema/context/spring-context.xsd">

	<!-- 在Spring容器中,扫描除了Controller之外的其他组件 -->
	<context:component-scan base-package="com.dpb"
		use-default-filters="true">
		<!-- 不扫描Controller注解 -->
		<context:exclude-filter type="annotation" expression="org.springframework.stereotype.Controller" />
	</context:component-scan>

	<!-- 配置一个数据源 -->
	<bean class="org.springframework.jdbc.datasource.DriverManagerDataSource" id="ds">
		<property name="url" value="jdbc:oracle:thin:@localhost:1521:orcl"/>
		<property name="driverClassName" value="oracle.jdbc.driver.OracleDriver"/>
		<property name="username" value="pms"/>
		<property name="password" value="pms"/>
	</bean>

	<!-- 配置JdbcTemplate实例 -->
	<bean class="org.springframework.jdbc.core.JdbcTemplate" id="jdbcTemplate">
		<!-- 通过构造注入的方式关联数据源 -->
		<constructor-arg name="dataSource" ref="ds"/>
	</bean>
</beans>
- 1
- 2
- 3
- 4
- 5
- 6
- 7
- 8
- 9
- 10
- 11
- 12
- 13
- 14
- 15
- 16
- 17
- 18
- 19
- 20
- 21
- 22
- 23
- 24
- 25
SpringMVC配置文件
<beans xmlns="http://www.springframework.org/schema/beans"
	xmlns:xsi="http://www.w3.org/2001/XMLSchema-instance" xmlns:context="http://www.springframework.org/schema/context"
	xmlns:mvc="http://www.springframework.org/schema/mvc"
	xsi:schemaLocation="http://www.springframework.org/schema/mvc http://www.springframework.org/schema/mvc/spring-mvc-4.3.xsd
		http://www.springframework.org/schema/beans http://www.springframework.org/schema/beans/spring-beans.xsd
		http://www.springframework.org/schema/context http://www.springframework.org/schema/context/spring-context-4.3.xsd">
	<!-- 开启注解 -->
	<mvc:annotation-driven></mvc:annotation-driven>
	<!-- 开启扫描 -->
	<context:component-scan base-package="com.dpb.*">
		<!-- 只扫描特定的注解 -->
		<context:include-filter type="annotation" expression="org.springframework.stereotype.Controller"/>
	</context:component-scan>
</beans>
- 1
- 2
- 3
- 4
- 5
- 6
- 7
- 8
- 9
- 10
- 11
- 12
- 13
- 14
web.xml文件
<?xml version="1.0" encoding="UTF-8"?>
<web-app xmlns:xsi="http://www.w3.org/2001/XMLSchema-instance"
	xmlns="http://java.sun.com/xml/ns/javaee"
	xsi:schemaLocation="http://java.sun.com/xml/ns/javaee http://java.sun.com/xml/ns/javaee/web-app_3_0.xsd"
	id="WebApp_ID" version="3.0">
	<display-name>test</display-name>
	<welcome-file-list>
		<welcome-file>index.html</welcome-file>
		<welcome-file>index.htm</welcome-file>
		<welcome-file>index.jsp</welcome-file>
		<welcome-file>default.html</welcome-file>
		<welcome-file>default.htm</welcome-file>
		<welcome-file>default.jsp</welcome-file>
	</welcome-file-list>

	<!-- 这里配置Spring配置文件的位置,param-name是固定的,
		param-value是文件位置 这个配置可以省略,如果省略,
		系统默认去/WEB-INF/目录下查找applicationContext.xml作为Spring的配置文件
	-->
	<context-param>
		<param-name>contextConfigLocation</param-name>
		<param-value>classpath:applicationContext.xml</param-value>
	</context-param>
	<listener>
		<listener-class>org.springframework.web.context.ContextLoaderListener</listener-class>
	</listener>

	<!-- 配置前端控制器 -->
	<!-- contextConfigLocation配置springmvc加载的配置文件(配置处理器映射器、适配器等等) 如果不配置contextConfigLocation,
		默认加载的是/WEB-INF/servlet名称-serlvet.xml(springmvc-servlet.xml) -->
	<servlet>
		<servlet-name>springmvc</servlet-name>
		<servlet-class>org.springframework.web.servlet.DispatcherServlet</servlet-class>
		<init-param>
			<param-name>contextConfigLocation</param-name>
			<param-value>classpath:spring-mvc.xml</param-value>
		</init-param>
	</servlet>

	<servlet-mapping>
		<servlet-name>springmvc</servlet-name>
		<url-pattern>/</url-pattern>
	</servlet-mapping>

	<!-- 防止资源文件被spring MVC拦截 -->
	<servlet-mapping>
		<servlet-name>default</servlet-name>
		<url-pattern>*.jpg</url-pattern>
	</servlet-mapping>
	<servlet-mapping>
		<servlet-name>default</servlet-name>
		<url-pattern>*.js</url-pattern>
	</servlet-mapping>
	<servlet-mapping>
		<servlet-name>default</servlet-name>
		<url-pattern>*.css</url-pattern>
	</servlet-mapping>
</web-app>
- 1
- 2
- 3
- 4
- 5
- 6
- 7
- 8
- 9
- 10
- 11
- 12
- 13
- 14
- 15
- 16
- 17
- 18
- 19
- 20
- 21
- 22
- 23
- 24
- 25
- 26
- 27
- 28
- 29
- 30
- 31
- 32
- 33
- 34
- 35
- 36
- 37
- 38
- 39
- 40
- 41
- 42
- 43
- 44
- 45
- 46
- 47
- 48
- 49
- 50
- 51
- 52
- 53
- 54
- 55
- 56
- 57
- 58
Dao代码
/**
 *
 * @author dpb【波波烤鸭】
 *
 */
public interface IUserDao {

	public List<User> query();
}
- 1
- 2
- 3
- 4
- 5
- 6
- 7
- 8
- 9
/**
 * dao层实现
 * @author dpb【波波烤鸭】
 *
 */
@Repository
public class UserDaoImpl implements IUserDao {

	@Resource
	JdbcTemplate jdbcTemplate;

	@Override
	public List<User> query() {
		String sql = "select * from t_sysuser ";
		return jdbcTemplate.query(sql, new BeanPropertyRowMapper<User>(User.class));
	}
}
- 1
- 2
- 3
- 4
- 5
- 6
- 7
- 8
- 9
- 10
- 11
- 12
- 13
- 14
- 15
- 16
- 17
- 18
Service代码
/**
 *
 * @author dpb【波波烤鸭】
 *
 */
public interface IUserService {

	public List<User> query();
}
- 1
- 2
- 3
- 4
- 5
- 6
- 7
- 8
- 9
/**
 *
 * @author dpb【波波烤鸭】
 *
 */
@Service
public class UserServiceImpl implements IUserService {

	@Resource
	private IUserDao dao;

	@Override
	public List<User> query() {
		// TODO Auto-generated method stub
		return dao.query();
	}
}
- 1
- 2
- 3
- 4
- 5
- 6
- 7
- 8
- 9
- 10
- 11
- 12
- 13
- 14
- 15
- 16
- 17
- 18
controller代码
/**
 * 案例
 *
 * @author dpb【波波烤鸭】
 *
 */
@Controller
public class UserController {

	@Resource
	private IUserService userService;

	@RequestMapping("/query")
	public String query(Model model){
		List<User> list = userService.query();
		model.addAttribute("list", list);
		return "/user.jsp";
	}

}
- 1
- 2
- 3
- 4
- 5
- 6
- 7
- 8
- 9
- 10
- 11
- 12
- 13
- 14
- 15
- 16
- 17
- 18
- 19
- 20
- 21
jsp页面代码
<%@ taglib uri="http://java.sun.com/jsp/jstl/core" prefix="c"%>
<!DOCTYPE html PUBLIC "-//W3C//DTD HTML 4.01 Transitional//EN" "http://www.w3.org/TR/html4/loose.dtd">
<html>
<head>
<meta http-equiv="Content-Type" content="text/html; charset=UTF-8">
<title>Insert title here</title>
</head>
<body>

	<c:forEach items="${list }" var="user">
		${user.id }--${user.uname }--${user.nickname }<br>
	</c:forEach>
</body>
</html>
- 1
- 2
- 3
- 4
- 5
- 6
- 7
- 8
- 9
- 10
- 11
- 12
- 13
- 14
查询结果
 案例代码:链接:https://pan.baidu.com/s/1J26hh7FL1s2HuJJnxkUIaw
提取码:l1cs
上一篇:SpringMVC教程4
文章来源: dpb-bobokaoya-sm.blog.csdn.net,作者:波波烤鸭,版权归原作者所有,如需转载,请联系作者。
原文链接:dpb-bobokaoya-sm.blog.csdn.net/article/details/86521981
【版权声明】本文为华为云社区用户转载文章,如果您发现本社区中有涉嫌抄袭的内容,欢迎发送邮件进行举报,并提供相关证据,一经查实,本社区将立刻删除涉嫌侵权内容,举报邮箱:
cloudbbs@huaweicloud.com
- 点赞
- 收藏
- 关注作者


评论(0)