IntelliJ IDEA(2019)Maven聚合工程实现dubbo入门案例
【摘要】
文章目录
项目创建创建父工程创建公共模块创建服务提供者创建消费者
dubbo案例公共模块操作服务提供者1.添加依赖2.接口实现3.相关配置4.添加日志文件5.启动服务
服务消费者1.添加...
dubbo-parent  --父工程
	|-- dubbo-commons -- 公共模块
	|-- dubbo-provider   -- 服务提供者
	|-- dubbo-consumer --服务消费者
- 1
- 2
- 3
- 4
项目创建
创建父工程
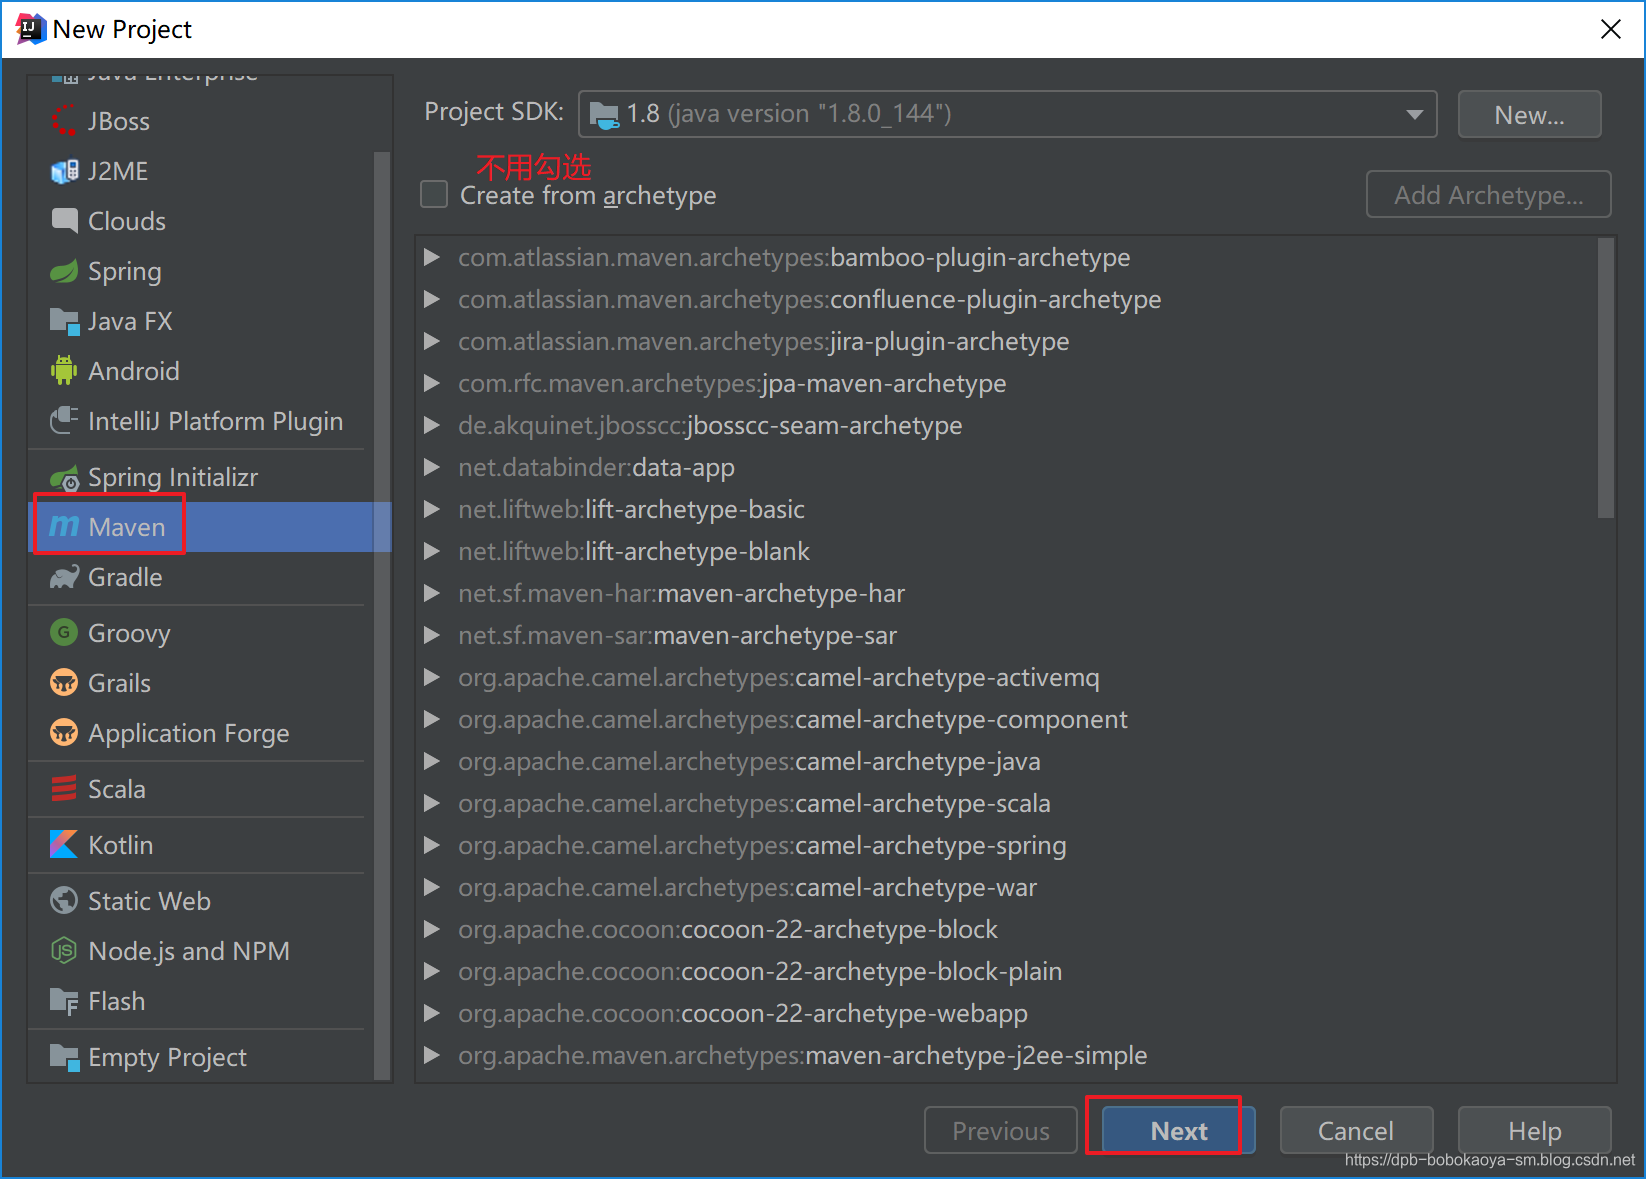
创建父工程,不用选择模板。

指定坐标信息


创建完成

创建公共模块
创建公共模块,如下:

继续maven构建,不用勾选模板。


创建成功

创建服务提供者
相同的步骤创建服务提供者

创建消费者
相同的步骤创建服务提供者

dubbo案例
公共模块操作
创建公共接口,就这一个功能
/**
 * 接口:定义相关的行为
 */
public interface UserService {

    public String sayHello(String msg);
}
- 1
- 2
- 3
- 4
- 5
- 6
- 7

服务提供者
1.添加依赖
服务提供者需要依赖dubbo,zookeeper,spring和commons等,具体如下:
<dependencies>
	 <!-- 依赖公共模块 -->
        <dependency>
            <groupId>com.dpb</groupId>
            <artifactId>dubbo-commos</artifactId>
            <version>1.0-SNAPSHOT</version>
        </dependency>
	<!-- 引入Spring的依赖 -->
	<dependency>
		<groupId>org.springframework</groupId>
		<artifactId>spring-context</artifactId>
		<version>4.3.21.RELEASE</version>
	</dependency>
	<!-- 引入日志的依赖 -->
  	<dependency>
  		<groupId>org.slf4j</groupId>
  		<artifactId>slf4j-log4j12</artifactId>
  		<version>1.7.25</version>
  	</dependency>
 		<!-- 引入dubbo框架(服务端、客户端通用) -->
       <dependency>
           <groupId>com.alibaba</groupId>
           <artifactId>dubbo</artifactId>
           <version>2.5.3</version>
           <exclusions>
               <exclusion>
                   <artifactId>spring</artifactId>
                   <groupId>org.springframework</groupId>
               </exclusion>
           </exclusions>
       </dependency>
       <!-- 因为dubbo服务端需要注册服务到zk中,因此依赖zkClient包 -->
       <dependency>
           <groupId>com.github.sgroschupf</groupId>
           <artifactId>zkclient</artifactId>
           <version>0.1</version>
       </dependency>
 </dependencies>
- 1
- 2
- 3
- 4
- 5
- 6
- 7
- 8
- 9
- 10
- 11
- 12
- 13
- 14
- 15
- 16
- 17
- 18
- 19
- 20
- 21
- 22
- 23
- 24
- 25
- 26
- 27
- 28
- 29
- 30
- 31
- 32
- 33
- 34
- 35
- 36
- 37
- 38
2.接口实现
引入了commons模块的依赖,我们就可以创建公共接口的实现类了,具体如下:
/**
 * @program: dubbo-parent
 * @description: 公共接口的实现类
 * @author: 波波烤鸭
 * @create: 2019-05-13 20:34
 */
public class UserServiceImpl implements UserService {
    @Override
    public String sayHello(String msg) {
        System.out.println("服务端接收:"+msg);
        return "你好啊";
    }
}
- 1
- 2
- 3
- 4
- 5
- 6
- 7
- 8
- 9
- 10
- 11
- 12
- 13
3.相关配置
创建spring的配置文件,如下:
<?xml version="1.0" encoding="UTF-8"?>
<beans xmlns="http://www.springframework.org/schema/beans"
       xmlns:xsi="http://www.w3.org/2001/XMLSchema-instance" xmlns:context="http://www.springframework.org/schema/context"
       xmlns:dubbo="http://code.alibabatech.com/schema/dubbo"
       xsi:schemaLocation="http://www.springframework.org/schema/beans
    http://www.springframework.org/schema/beans/spring-beans.xsd
    http://www.springframework.org/schema/context
    http://www.springframework.org/schema/context/spring-context-4.0.xsd
    http://code.alibabatech.com/schema/dubbo
    http://code.alibabatech.com/schema/dubbo/dubbo.xsd">

    <!-- 提供方应用信息,用于计算依赖关系 -->
    <dubbo:application name="dubboProvider" />

    <!-- 使用zookeeper注册中心暴露服务地址 -->
    <dubbo:registry protocol="zookeeper"
                    address="zk00:2181,zk01:2181,zk02:2181"  />

    <!-- 用dubbo协议在20880端口暴露服务 -->
    <dubbo:protocol name="dubbo" port="20880" />
    <!-- 启用monitor模块 -->
    <dubbo:monitor protocol="registry" />

    <bean id="userService" class="com.dpb.service.impl.UserServiceImpl" />

    <!-- 声明需要暴露的服务接口 -->
    <dubbo:service interface="com.dpb.service.UserService" ref="userService"
                   group="dubbo"  version="1.0.0" timeout="3000"/>
</beans>
- 1
- 2
- 3
- 4
- 5
- 6
- 7
- 8
- 9
- 10
- 11
- 12
- 13
- 14
- 15
- 16
- 17
- 18
- 19
- 20
- 21
- 22
- 23
- 24
- 25
- 26
- 27
- 28
- 29
4.添加日志文件
添加一个log4j.properties文件,内容如下:
log4j.rootLogger=INFO,A1
log4j.appender.A1=org.apache.log4j.ConsoleAppender
log4j.appender.A1.layout=org.apache.log4j.PatternLayout
- 1
- 2
- 3
5.启动服务
创建启动程序,如下:
/**
 * @program: dubbo-parent
 * @description: 主方法
 * @author: 波波烤鸭
 * @create: 2019-05-13 20:39
 */
public class App {

    public static void main(String[] args) throws Exception{
        ApplicationContext ac = new ClassPathXmlApplicationContext("applicationContext.xml");
        //挂起当前线程,如果没有改行代码,服务提供者进程会消亡,服务消费者就发现不了提供者了
        Thread.currentThread().join();

    }
}
- 1
- 2
- 3
- 4
- 5
- 6
- 7
- 8
- 9
- 10
- 11
- 12
- 13
- 14
- 15
完成目录结构

启动程序

服务端启动成功~
zookeeper中也可以查看到相关信息


服务消费者
1.添加相关依赖
依赖和provider差不多,具体如下:
<dependencies>
     <!-- 依赖公共模块 -->
     <dependency>
         <groupId>com.dpb</groupId>
         <artifactId>dubbo-commos</artifactId>
         <version>1.0-SNAPSHOT</version>
     </dependency>
     <!-- 依赖Spring -->
     <dependency>
         <groupId>org.springframework</groupId>
         <artifactId>spring-context</artifactId>
         <version>4.3.21.RELEASE</version>
     </dependency>
     <!-- log4j的依赖 -->
     <dependency>
         <groupId>org.slf4j</groupId>
         <artifactId>slf4j-log4j12</artifactId>
         <version>1.7.25</version>
     </dependency>
     <!-- 引入dubbo框架(服务端、客户端通用) -->
     <dependency>
         <groupId>com.alibaba</groupId>
         <artifactId>dubbo</artifactId>
         <version>2.5.3</version>
         <exclusions>
             <exclusion>
                 <artifactId>spring</artifactId>
                 <groupId>org.springframework</groupId>
             </exclusion>
         </exclusions>
     </dependency>
     <!-- 因为dubbo服务端需要注册服务到zk中,因此依赖zkClient包 -->
     <dependency>
         <groupId>com.github.sgroschupf</groupId>
         <artifactId>zkclient</artifactId>
         <version>0.1</version>
     </dependency>
 </dependencies>
- 1
- 2
- 3
- 4
- 5
- 6
- 7
- 8
- 9
- 10
- 11
- 12
- 13
- 14
- 15
- 16
- 17
- 18
- 19
- 20
- 21
- 22
- 23
- 24
- 25
- 26
- 27
- 28
- 29
- 30
- 31
- 32
- 33
- 34
- 35
- 36
- 37
- 38
2.配置配置文件
添加spring的配置文件,配置dubbo消费者的相关信息
<beans xmlns="http://www.springframework.org/schema/beans"
       xmlns:xsi="http://www.w3.org/2001/XMLSchema-instance"
       xmlns:context="http://www.springframework.org/schema/context"
       xmlns:dubbo="http://code.alibabatech.com/schema/dubbo"
       xsi:schemaLocation="http://www.springframework.org/schema/beans
    http://www.springframework.org/schema/beans/spring-beans.xsd
    http://www.springframework.org/schema/context
    http://www.springframework.org/schema/context/spring-context-4.0.xsd
    http://code.alibabatech.com/schema/dubbo
    http://code.alibabatech.com/schema/dubbo/dubbo.xsd">

    <!-- 消费方应用名,用于计算依赖关系,不是匹配条件,不要与提供方一样 -->
    <dubbo:application name="dubboConsumer" />
    <!-- 使用zookeeper注册中心暴露发现服务地址 -->
    <dubbo:registry  protocol="zookeeper"
                     address="zk00:2181,zk01:2181,zk02:2181" />
    <!-- 启动monitor-->
    <dubbo:monitor protocol="registry" />
    <!-- 生成远程服务代理,可以和本地bean一样使用demoService -->
    <dubbo:reference id="userService" interface="com.dpb.service.UserService"
                     group="dubbo" version="1.0.0" timeout="3000"/>
</beans>
- 1
- 2
- 3
- 4
- 5
- 6
- 7
- 8
- 9
- 10
- 11
- 12
- 13
- 14
- 15
- 16
- 17
- 18
- 19
- 20
- 21
- 22
- 23
3.添加日志文件
添加一个log4j.properties文件,内容如下:
log4j.rootLogger=INFO,A1
log4j.appender.A1=org.apache.log4j.ConsoleAppender
log4j.appender.A1.layout=org.apache.log4j.PatternLayout
- 1
- 2
- 3
4.访问服务
创建启动程序,访问服务
/**
 * @program: dubbo-parent
 * @description: consumer测试代码
 * @author: 波波烤鸭
 * @create: 2019-05-13 20:50
 */
public class TestConsumer {
    public static void main(String[] args) {
        ApplicationContext ac = new ClassPathXmlApplicationContext("applicationContext.xml");
        UserService service = ac.getBean(UserService.class);
        System.out.println(service.sayHello("hello provider"));
    }
}
- 1
- 2
- 3
- 4
- 5
- 6
- 7
- 8
- 9
- 10
- 11
- 12
- 13
启动访问,查看输出:
服务提供者输出:

服务消费者输出:

ok~到此实现了IDEA中通过maven聚合工程实现dubbo的简单入门案例!
文章来源: dpb-bobokaoya-sm.blog.csdn.net,作者:波波烤鸭,版权归原作者所有,如需转载,请联系作者。
原文链接:dpb-bobokaoya-sm.blog.csdn.net/article/details/90180610
【版权声明】本文为华为云社区用户转载文章,如果您发现本社区中有涉嫌抄袭的内容,欢迎发送邮件进行举报,并提供相关证据,一经查实,本社区将立刻删除涉嫌侵权内容,举报邮箱:
cloudbbs@huaweicloud.com
- 点赞
- 收藏
- 关注作者


评论(0)