jQuery入口函数详解(JavaScript基础)

【辰兮要努力】:hello你好我是辰兮,很高兴你能来阅读,昵称是希望自己能不断精进,向着优秀程序员前行!
博客来源于项目以及编程中遇到的问题总结,偶尔会有读书分享,我会陆续更新Java前端、后台、数据库、项目案例等相关知识点总结,感谢你的阅读和关注,希望我的博客能帮助到更多的人,分享获取新知,大家一起进步!
吾等采石之人,应怀大教堂之心,愿你们奔赴在各自的热爱中…
一、基础入门
最近一段时间会陆续整理前端相关的基础知识,分享给初学者,也供自己学习,感兴趣的可以参考:JavaScript前端专栏

先简单的学习一下原生的JavaScript方法获取我们dom元素以及执行相关方法
window.onload的意思是:事件会在页面加载完成后触发
     // 1.原生JS的固定写法
        window.onload = function (ev) {
            alert("HelloWorld -- 原生JS的固定写法");
        }
- 1
- 2
- 3
- 4
jQuery中采用如下的方式代替上述的方法
     // 2.jQuery的固定写法
        $(document).ready(function () {
            alert("HelloWorld --jQuery的固定写法");
        });
- 1
- 2
- 3
- 4
代码案例
<!DOCTYPE html>
<html lang="en">
<head>
    <meta charset="UTF-8">
    <title>jQuery-HelloWorld</title>
    <script src="js/jquery-1.12.4.js"></script>
    <script>
        // 1.原生JS的固定写法
        window.onload = function (ev) {
            alert("HelloWorld -- 原生JS的固定写法");
        }

        // 2.jQuery的固定写法
        $(document).ready(function () {
            alert("HelloWorld --jQuery的固定写法");
        });
    </script>
</head>
<body>

</body>
</html>

- 1
- 2
- 3
- 4
- 5
- 6
- 7
- 8
- 9
- 10
- 11
- 12
- 13
- 14
- 15
- 16
- 17
- 18
- 19
- 20
- 21
- 22
如果把两个写一起的话,代码如上,弹框出来的顺序是如下

原生的JS入口函数可以拿到DOM元素,然后获取对应的宽高
<!DOCTYPE html>
<html lang="en">
<head>
    <meta charset="UTF-8">
    <title>jQuery和JS入口函数的区别</title>
    <script src="js/jquery-1.12.4.js"></script>
    <script>

        window.onload = function (ev) {
            // 1.通过原生的JS入口函数可以拿到DOM元素
            var images = document.getElementsByTagName("img")[0];
            console.log(images);
            // 2.通过原生的JS入口函数可以拿到DOM元素的宽高
            var width = window.getComputedStyle(images).width;
            console.log("onload-width", width);
            var height = window.getComputedStyle(images).height;
            console.log("onload-height", height);
        }
    </script>
</head>
<body>
<img src="https://img.alicdn.com/tfs/TB1MaLKRXXXXXaWXFXXXXXXXXXX-480-260.png" alt="">
</body>
</html>
- 1
- 2
- 3
- 4
- 5
- 6
- 7
- 8
- 9
- 10
- 11
- 12
- 13
- 14
- 15
- 16
- 17
- 18
- 19
- 20
- 21
- 22
- 23
- 24
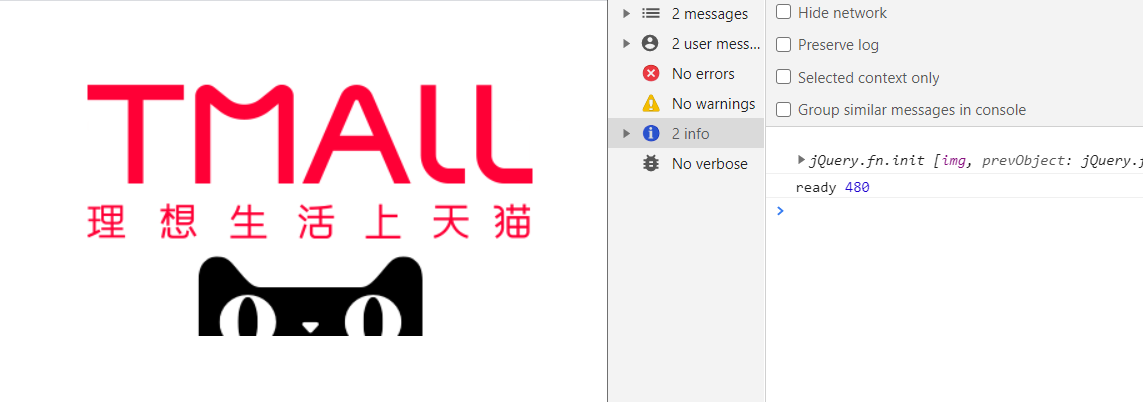
控制台输出如下

getComputedStyle() 用法
getComputedStyle是一个可以获取当前元素所有最终使用的CSS属性值。
返回的是一个CSS样式声明对象([object CSSStyleDeclaration]),只读。
二、函数使用
现在我们来学习jQuery如何进行上述操作的
jQuery函数获取DOM元素,拿到DOM元素的宽高
<!DOCTYPE html>
<html lang="en">
<head>
    <meta charset="UTF-8">
    <title>jQuery和JS入口函数的区别</title>
    <script src="js/jquery-1.12.4.js"></script>
    <script>

        /*
        * 1.原生JS和jQuery入口函数的加载模式不同
        * 原生JS会等到DOM元素加载完毕,并且图片也加载完毕才会执行
        * jQuery会等到DOM元素加载完毕,但不会等到图片也加载完毕就会执行
        * */

        $(document).ready(function () {
            // 1.通过jQuery入口函数可以拿到DOM元素
            var $images = $("img");
            console.log($images);
            // 2.通过jQuery入口函数不可以拿到DOM元素的宽高
            var $width = $images.width();
            console.log("ready", $width);
        });

    </script>
</head>
<body>
<img src="https://img.alicdn.com/tfs/TB1MaLKRXXXXXaWXFXXXXXXXXXX-480-260.png" alt="">
</body>
</html>
- 1
- 2
- 3
- 4
- 5
- 6
- 7
- 8
- 9
- 10
- 11
- 12
- 13
- 14
- 15
- 16
- 17
- 18
- 19
- 20
- 21
- 22
- 23
- 24
- 25
- 26
- 27
- 28
- 29
拓展:使用jQuery返回是一个jQuery对象
jQuery和JS入口函数的区别
<!DOCTYPE html>
<html lang="en">
<head>
    <meta charset="UTF-8">
    <title>jQuery和JS入口函数的区别</title>
    <script src="js/jquery-1.12.4.js"></script>
    <script>

        /*
        1.原生的JS如果编写了多个入口函数,后面编写的会覆盖前面编写的
        2.jQuery中编写多个入口函数,后面的不会覆盖前面的
        */
        window.onload = function (ev) {
            alert("hello test1");
        }
        window.onload = function (ev) {
            alert("hello test2");
        }

        //先测试上面原生的js,然后测试如下的
        // $(document).ready(function () {
        //     alert("hello jQuery1");
        // });
        // $(document).ready(function () {
        //     alert("hello jQuery2");
        // });
    </script>
</head>
<body>
<img src="https://img.alicdn.com/tfs/TB1MaLKRXXXXXaWXFXXXXXXXXXX-480-260.png" alt="">
</body>
</html>
- 1
- 2
- 3
- 4
- 5
- 6
- 7
- 8
- 9
- 10
- 11
- 12
- 13
- 14
- 15
- 16
- 17
- 18
- 19
- 20
- 21
- 22
- 23
- 24
- 25
- 26
- 27
- 28
- 29
- 30
- 31
- 32
如果仅仅使用上面原生的JS如果编写了多个入口函数,后面编写的会覆盖前面编写的,就只弹出test2
     window.onload = function (ev) {
            alert("hello test1");
        }
        window.onload = function (ev) {
            alert("hello test2");
        }
- 1
- 2
- 3
- 4
- 5
- 6
弹框如下
     $(document).ready(function () {
            alert("hello jQuery1");
        });
        $(document).ready(function () {
            alert("hello jQuery2");
        });
- 1
- 2
- 3
- 4
- 5
- 6
jQuery中编写多个入口函数,后面的不会覆盖前面的
实践案例如下,会按顺序弹出
小结
1、原生的JS如果编写了多个入口函数,后面编写的会覆盖前面编写的
2、jQuery中编写多个入口函数,后面的不会覆盖前面的
jQuery入口函数的其它写法
<!DOCTYPE html>
<html lang="en">
<head>
    <meta charset="UTF-8">
    <title>jQuery入口函数的其它写法</title>
    <script src="js/jquery-1.12.4.js"></script>
    <script>
        // 1.第一种写法
        $(document).ready(function () {
            // alert("hello world");
        });

        // 2.第二种写法
        jQuery(document).ready(function () {
            // alert("hello world");
        });

        // 3.第三种写法(推荐)
        $(function () {
            // alert("hello world");
        });

        // 4.第四种写法
        jQuery(function () {
            alert("hello world");
        });
    </script>
</head>
<body>

</body>
</html>
- 1
- 2
- 3
- 4
- 5
- 6
- 7
- 8
- 9
- 10
- 11
- 12
- 13
- 14
- 15
- 16
- 17
- 18
- 19
- 20
- 21
- 22
- 23
- 24
- 25
- 26
- 27
- 28
- 29
- 30
- 31
- 32
页面显示效果
这里我们推荐使用第三种方式!
非常感谢你阅读到这里,如果这篇文章对你有帮助,希望能留下你的点赞👍 关注❤️ 分享👥 留言💬thanks!!!
2021年3月7日22:14:39 愿你们奔赴在自己的热爱里!
文章来源: blessing.blog.csdn.net,作者:辰兮要努力,版权归原作者所有,如需转载,请联系作者。
原文链接:blessing.blog.csdn.net/article/details/114501059

- 点赞
- 收藏
- 关注作者
评论(0)