uniCloud云函数 云对象简单使用
【摘要】
云对象简单使用
今天看了下文档 发现多了个 云对象
目前需要下载 3.4.0及以上版本 目前为 alpha版本
个人觉得云对象 让我们更加的能 贴近面向对象
https://www.dcloud....
云对象简单使用
今天看了下文档 发现多了个 云对象
目前需要下载 3.4.0及以上版本 目前为 alpha版本
个人觉得云对象 让我们更加的能 贴近面向对象
https://www.dcloud.io/hbuilderx.html
视频见 https://www.bilibili.com/video/BV1u34y1z71d?p=12
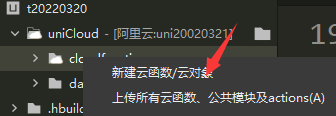
创建云对象


编写云对象逻辑
实现加减乘除
我们也可以写一些属性
// 开发文档: https://uniapp.dcloud.net.cn/uniCloud/cloud-obj
module.exports = {
	introduce: "maths",
	intro(){
		return this.introduce
	},
	add(num1, num2) {
		return num1 + num2;
	},
	mul(num1, num2) {
		return num1 * num2
	},
	reduce(num1, num2) {
		return num1 - num2
	},
	division(num1, num2) {
		if(num2===0){
			return {
				msg:"被除数不可以为0"
			}
		}
		return num1/num2
	}
}
- 1
- 2
- 3
- 4
- 5
- 6
- 7
- 8
- 9
- 10
- 11
- 12
- 13
- 14
- 15
- 16
- 17
- 18
- 19
- 20
- 21
- 22
- 23
- 24
- 25
调用
其实我们如果直接打印 我们引入的对象 会发现 他是一个 peoxy对象
客户端使用 uniCloud.importObject(‘云对象名称’);
是不是感觉很简单
<template>
	<view class="content">
		<button @click="hello">调用云函数</button>
		<input type="number" v-model="num1" />
		<input type="number" v-model="num2" />

		<button v-for="(item,index) in mathDels" @click="maths(item)" :key="index">{{item}}</button>

		<text>{{result}}</text>
		<text>云函数介绍{{introduce}}</text>
	</view>
</template>

<script>
	export default {
		data() {
			return {
				num1:0,
				num2:0,
				result:0,
				mathDels:['add','reduce','mul','division'],
				introduce:""
			}
		},
		onLoad() {

		},
		methods: {
			async maths(type){
				const maths = uniCloud.importObject('maths');
				this.introduce = await maths.intro()
				let res = await maths[type](parseInt(this.num1),parseInt(this.num2))
				this.result = res
			}
		}
	}
</script>

<style>
	.content {
		display: flex;
		flex-direction: column;
		align-items: center;
		justify-content: center;
	}

	.logo {
		height: 200rpx;
		width: 200rpx;
		margin-top: 200rpx;
		margin-left: auto;
		margin-right: auto;
		margin-bottom: 50rpx;
	}

	.text-area {
		display: flex;
		justify-content: center;
	}

	.title {
		font-size: 36rpx;
		color: #8f8f94;
	}

	.map-mine {
		width: 100%;
		height: 50vh;
	}
</style>
- 1
- 2
- 3
- 4
- 5
- 6
- 7
- 8
- 9
- 10
- 11
- 12
- 13
- 14
- 15
- 16
- 17
- 18
- 19
- 20
- 21
- 22
- 23
- 24
- 25
- 26
- 27
- 28
- 29
- 30
- 31
- 32
- 33
- 34
- 35
- 36
- 37
- 38
- 39
- 40
- 41
- 42
- 43
- 44
- 45
- 46
- 47
- 48
- 49
- 50
- 51
- 52
- 53
- 54
- 55
- 56
- 57
- 58
- 59
- 60
- 61
- 62
- 63
- 64
- 65
- 66
- 67
- 68
- 69
- 70
- 71
- 72
拓展
我们可以如编写一个 类似于实例化的 微信支付
客户端调用 更加易用
文章来源: dmhsq.blog.csdn.net,作者:代码哈士奇,版权归原作者所有,如需转载,请联系作者。
原文链接:dmhsq.blog.csdn.net/article/details/123649270
【版权声明】本文为华为云社区用户转载文章,如果您发现本社区中有涉嫌抄袭的内容,欢迎发送邮件进行举报,并提供相关证据,一经查实,本社区将立刻删除涉嫌侵权内容,举报邮箱:
cloudbbs@huaweicloud.com
- 点赞
- 收藏
- 关注作者


评论(0)