【愚公系列】2022年03月 微信小程序-视图容器
前言
视图容器
| 名称 | 功能说明 |
|---|---|
| cover-image | 覆盖在原生组件之上的图片视图 |
| cover-view | 覆盖在原生组件之上的文本视图 |
| match-media | media query 匹配检测节点 |
| movable-area | movable-view的可移动区域 |
| movable-view | 可移动的视图容器,在页面中可以拖拽滑动 |
| page-container | 页面容器 |
| scroll-view | 可滚动视图区域 |
| share-element | 共享元素 |
| swiper | 滑块视图容器 |
| swiper-item | 仅可放置在swiper组件中,宽高自动设置为100% |
| view | 视图容器 |
一、cover-image
覆盖在原生组件之上的图片视图。可覆盖的原生组件同cover-view,支持嵌套在cover-view里。
<cover-image src="图标路径,支持临时路径、网络地址、云文件ID" bindload="图片加载成功时触发" binderror="图片加载失败时触发">
二、cover-view
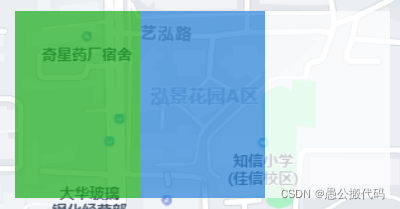
覆盖在原生组件之上的文本视图
可覆盖的原生组件包括 map、video、canvas、camera、live-player、live-pusher
Page({
  onShareAppMessage() {
    return {
      title: 'cover-view',
      path: 'page/component/pages/cover-view/cover-view'
    }
  },

  data: {
    latitude: 23.099994,
    longitude: 113.324520,
  }
})
<view class="container">
  <view class="page-body">
    <view class="page-section page-section-gap">
      <map
        style="width: 100%; height: 300px;"
        latitude="{{latitude}}"
        longitude="{{longitude}}"
      >
        <cover-view class="cover-view">
          <cover-view class="container">
            <cover-view class="flex-wrp" style="flex-direction:row;">
              <cover-view class="flex-item demo-text-1"></cover-view>
              <cover-view class="flex-item demo-text-2"></cover-view>
              <cover-view class="flex-item demo-text-3"></cover-view>
            </cover-view>
          </cover-view>
        </cover-view>
      </map>
    </view>
  </view>
</view>
.cover-view {
  position: absolute;
  top: calc(50% - 150rpx);
  left: calc(50% - 300rpx);
  /* opacity: .7; */
}

.flex-wrp{
  display:flex;
}

.flex-item{
  width: 200rpx;
  height: 300rpx;
  font-size: 26rpx;
}

.demo-text-1 {
  background: rgba(26, 173, 25, 0.7);
}

.demo-text-2 {
  background: rgba(39, 130, 215, 0.7);
}

.demo-text-3 {
  background: rgba(255, 255, 255, 0.7);
}

三、match-media
media query 匹配检测节点。可以指定一组 media query 规则,满足时,这个节点才会被展示。
<match-media min-width="300" max-width="600">
  <view>当页面宽度在 300 ~ 500 px 之间时展示这里</view>
</match-media>

<match-media min-height="400" orientation="landscape">
  <view>当页面高度不小于 400 px 且屏幕方向为纵向时展示这里</view>
</match-media>
四、movable-area和movable-view
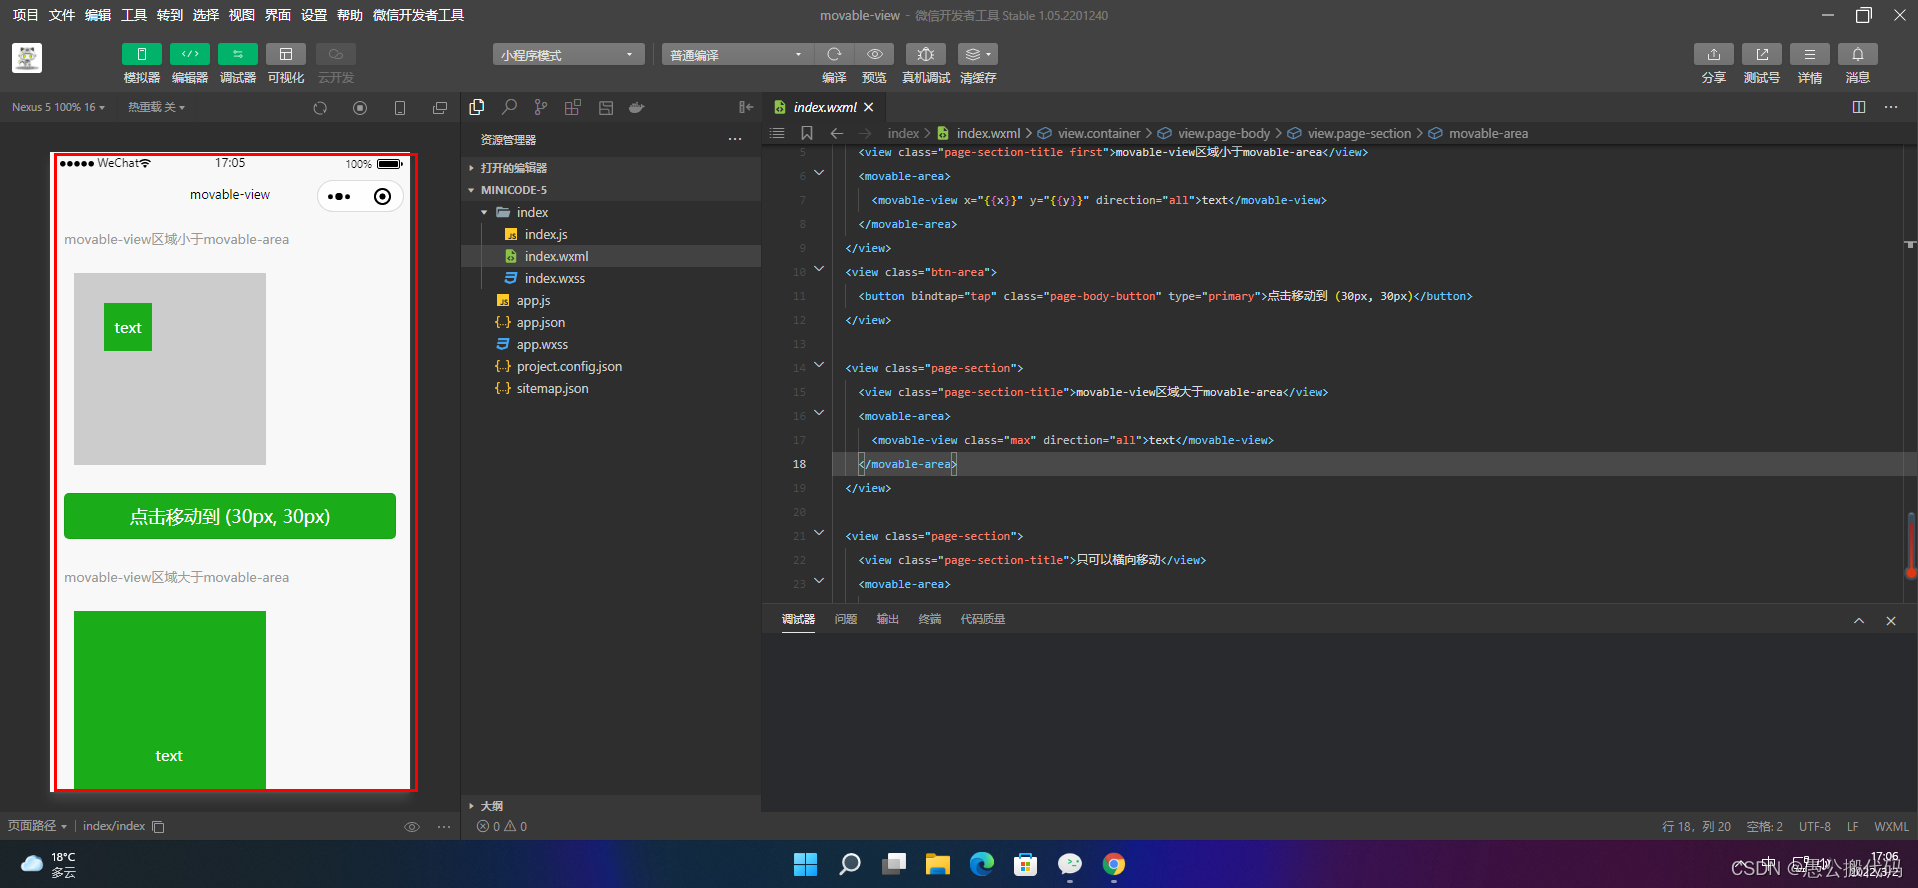
movable-area和movable-view的可移动区域。
Page({
  onShareAppMessage() {
    return {
      title: 'movable-view',
      path: 'page/component/pages/movable-view/movable-view'
    }
  },

  data: {
    x: 0,
    y: 0,
    scale: 2,
  },

  tap() {
    this.setData({
      x: 30,
      y: 30
    })
  },

  tap2() {
    this.setData({
      scale: 3
    })
  },

  onChange(e) {
    console.log(e.detail)
  },

  onScale(e) {
    console.log(e.detail)
  }
})
<view class="container">

  <view class="page-body">
    <view class="page-section">
      <view class="page-section-title first">movable-view区域小于movable-area</view>
      <movable-area>
        <movable-view x="{{x}}" y="{{y}}" direction="all">text</movable-view>
      </movable-area>
    </view>
    <view class="btn-area">
      <button bindtap="tap" class="page-body-button" type="primary">点击移动到 (30px, 30px)</button>
    </view>

    <view class="page-section">
      <view class="page-section-title">movable-view区域大于movable-area</view>
      <movable-area>
        <movable-view class="max" direction="all">text</movable-view>
      </movable-area>
    </view>

    <view class="page-section">
      <view class="page-section-title">只可以横向移动</view>
      <movable-area>
        <movable-view direction="horizontal">text</movable-view>
      </movable-area>
    </view>

    <view class="page-section">
      <view class="page-section-title">只可以纵向移动</view>
      <movable-area>
        <movable-view direction="vertical">text</movable-view>
      </movable-area>
    </view>

    <view class="page-section">
      <view class="page-section-title">可超出边界</view>
      <movable-area>
        <movable-view direction="all" out-of-bounds>text</movable-view>
      </movable-area>
    </view>

    <view class="page-section">
      <view class="page-section-title">带有惯性</view>
      <movable-area>
        <movable-view direction="all" inertia>text</movable-view>
      </movable-area>
    </view>

    <view class="page-section">
      <view class="page-section-title">可放缩</view>
      <movable-area scale-area>
        <movable-view direction="all" bindchange="onChange" bindscale="onScale" scale scale-min="0.5" scale-max="4" scale-value="{{scale}}">text</movable-view>
      </movable-area>
    </view>

    <view class="btn-area">
      <button bindtap="tap2" class="page-body-button" type="primary">点击放大3倍</button>
    </view>
  </view>

</view>

五、page-container
页面容器。
小程序如果在页面内进行复杂的界面设计(如在页面内弹出半屏的弹窗、在页面内加载一个全屏的子页面等),用户进行返回操作会直接离开当前页面,不符合用户预期,预期应为关闭当前弹出的组件。 为此提供“假页”容器组件,效果类似于 popup 弹出层,页面内存在该容器时,当用户进行返回操作,关闭该容器不关闭页面。返回操作包括三种情形,右滑手势、安卓物理返回键和调用 navigateBack 接口。
page {
  background-color: #f7f8fa;
  color: #323232;
  width: 100%;
  height: 100%;
}

.box {
  margin: 0 12px;
}

.title {
  margin: 0;
  padding: 32px 16px 16px;
  color: rgba(69, 90, 100, 0.6);
  font-weight: normal;
  font-size: 18px;
  line-height: 20px;
  text-align: center;
}

.btn {
  display: block;
  width: 100%;
  margin: 10px 0;
  background-color: #fff;
}

.detail-page {
  width: 100%;
  height: 100%;
  min-height: 300px;
  display: flex;
  align-items: center;
  justify-content: center;
}
const app = getApp()

Page({
  data: {
    show: false,
    duration: 300,
    position: 'right',
    round: false,
    overlay: true,
    customStyle: '',
    overlayStyle: ''
  },
  onLoad: function () {
    console.log('代码片段是一种迷你、可分享的小程序或小游戏项目,可用于分享小程序和小游戏的开发经验、展示组件和 API 的使用、复现开发问题和 Bug 等。可点击以下链接查看代码片段的详细文档:')
    console.log('https://mp.weixin.qq.com/debug/wxadoc/dev/devtools/devtools.html')


  },
  onShow() {

  },

  popup(e) {
    const position = e.currentTarget.dataset.position
    let customStyle = ''
    let duration = this.data.duration
    switch(position) {
      case 'top':
      case 'bottom':
        customStyle = 'height: 30%;'
        break
      case 'right':
        break
    }
    this.setData({
      position,
      show: true,
      customStyle,
      duration
    })
  },

  changeRound() {
    this.setData({round: !this.data.round})
  },

  changeOverlay() {
    this.setData({overlay: !this.data.overlay, show: true})
  },

  changeOverlayStyle(e) {
    let overlayStyle = ''
    const type = e.currentTarget.dataset.type
    switch(type) {
      case 'black':
        overlayStyle = 'background-color: rgba(0, 0, 0, 0.7)'
        break
      case 'white':
        overlayStyle = 'background-color: rgba(255, 255, 255, 0.7)'
        break
      case 'blur':
        overlayStyle = 'background-color: rgba(0, 0, 0, 0.7); filter: blur(4px);'
    }
    this.setData({overlayStyle, show: true})

  },

  exit() {
    this.setData({show: false})
    // wx.navigateBack()
  },

  goTo(e) {
    wx.navigateTo({url: `../shareElement/index`})
  },

  onBeforeEnter(res) {
    console.log(res)
  },
  onEnter(res) {
    console.log(res)
  },
  onAfterEnter(res) {
    console.log(res)
  },
  onBeforeLeave(res) {
    console.log(res)
  },
  onLeave(res) {
    console.log(res)
  },
  onAfterLeave(res) {
    console.log(res)
  },

  onClickOverlay(res) {
    console.log(res)
  }
})
<view class="title">弹出位置</view>
<view class="box">
  <button class="btn" bindtap="popup" data-position="right">右侧弹出</button>
  <button class="btn" bindtap="popup" data-position="top">顶部弹出</button>
  <button class="btn" bindtap="popup" data-position="bottom">底部弹出</button>
  <button class="btn" bindtap="popup" data-position="center">中央弹出</button>
</view>


<view class="title">弹窗圆角</view>
<view class="box">
  <button class="btn" bindtap="changeRound">设置{{round ? '直角' : '圆角'}}</button>
</view>

<view class="title">遮罩层</view>
<view class="box">
  <button class="btn" bindtap="changeOverlay">设置{{overlay ? '无' : '有'}}遮罩</button>
  <button class="btn" bindtap="changeOverlayStyle" data-type="black">黑色半透明遮罩</button>
  <button class="btn" bindtap="changeOverlayStyle" data-type="white">白色半透明遮罩</button>
  <button class="btn" bindtap="changeOverlayStyle" data-type="blur">模糊遮罩</button>

</view>


<page-container
  show="{{show}}"
  round="{{round}}"
  overlay="{{overlay}}"
  duration="{{duration}}"
  position="{{position}}"
  close-on-slide-down="{{false}}"
  bindbeforeenter="onBeforeEnter"
  bindenter="onEnter"
  bindafterenter="onAfterEnter"
  bindbeforeleave="onBeforeLeave"
  bindleave="onLeave"
  bindafterleave="onAfterLeave"
  bindclickoverlay="onClickOverlay"
  custom-style="{{customStyle}}"
  overlay-style="{{overlayStyle}}"
>
  <view class="detail-page">
    <button type="primary" bindtap="exit">推出</button>
  </view>
</page-container>

六、scroll-view
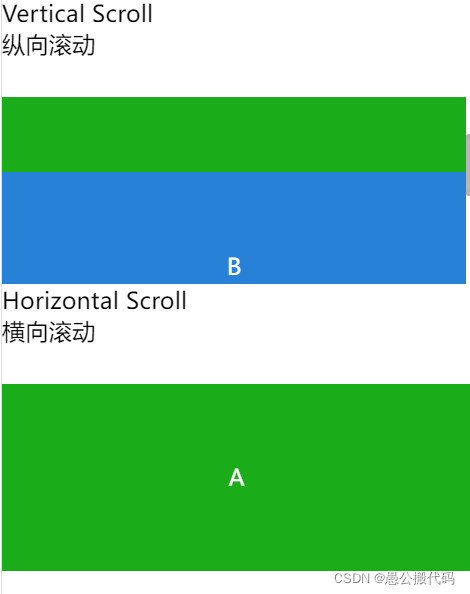
可滚动视图区域。使用竖向滚动时,需要给scroll-view一个固定高度,通过 WXSS 设置 height。组件属性的长度单位默认为px
const order = ['demo1', 'demo2', 'demo3']

Page({
  onShareAppMessage() {
    return {
      title: 'scroll-view',
      path: 'page/component/pages/scroll-view/scroll-view'
    }
  },

  data: {
    toView: 'green'
  },

  upper(e) {
    console.log(e)
  },

  lower(e) {
    console.log(e)
  },

  scroll(e) {
    console.log(e)
  },

  scrollToTop() {
    this.setAction({
      scrollTop: 0
    })
  },

  tap() {
    for (let i = 0; i < order.length; ++i) {
      if (order[i] === this.data.toView) {
        this.setData({
          toView: order[i + 1],
          scrollTop: (i + 1) * 200
        })
        break
      }
    }
  },

  tapMove() {
    this.setData({
      scrollTop: this.data.scrollTop + 10
    })
  }
})
<view class="container">
  <view class="page-body">
    <view class="page-section">
      <view class="page-section-title">
        <text>Vertical Scroll\n纵向滚动</text>
      </view>
      <view class="page-section-spacing">
        <scroll-view scroll-y="true" style="height: 300rpx;" bindscrolltoupper="upper" bindscrolltolower="lower" bindscroll="scroll" scroll-into-view="{{toView}}" scroll-top="{{scrollTop}}">
          <view id="demo1" class="scroll-view-item demo-text-1"></view>
          <view id="demo2"  class="scroll-view-item demo-text-2"></view>
          <view id="demo3" class="scroll-view-item demo-text-3"></view>
        </scroll-view>
      </view>
    </view>
    <view class="page-section">
      <view class="page-section-title">
        <text>Horizontal Scroll\n横向滚动</text>
      </view>
      <view class="page-section-spacing">
        <scroll-view class="scroll-view_H" scroll-x="true" bindscroll="scroll" style="width: 100%">
          <view id="demo1" class="scroll-view-item_H demo-text-1"></view>
          <view id="demo2"  class="scroll-view-item_H demo-text-2"></view>
          <view id="demo3" class="scroll-view-item_H demo-text-3"></view>
        </scroll-view>
      </view>
    </view>
  </view>
</view>
.page-section-spacing{
  margin-top: 60rpx;
}
.scroll-view_H{
  white-space: nowrap;
}
.scroll-view-item{
  height: 300rpx;
}
.scroll-view-item_H{
  display: inline-block;
  width: 100%;
  height: 300rpx;
}

七、share-element
共享元素。
共享元素是一种动画形式,类似于 flutter Hero动画,表现为元素像是在页面间穿越一样。该组件需与 page-container 组件结合使用。
使用时需在当前页放置 share-element 组件,同时在 page-container 容器中放置对应的 share-element 组件,对应关系通过属性值 key 映射。当设置 page-container 显示时,transform 属性为 true 的共享元素会产生动画。当前页面容器退出时,会产生返回动画。
<view>
	<view class="screen screen1">
		<block wx:for="{{contacts}}" wx:key="id" wx:for-item="contact">
			<view class="contact" bindtap="showNext" data-idx="{{index}}">
				<share-element class="avatar" key="avatar" duration="{{duration}}" transform="{{transformIdx === index}}">
					<image style="width: 40px;" mode="widthFix" src="../images/{{contact.img}}"></image>
				</share-element>
				<share-element duration="{{duration}}" class="name" key="name" transform="{{transformIdx === index}}">
					{{contact.name}}
				</share-element>
				<view class="list">
					<view>Phone: {{contact.phone}}</view>
					<view>Mobile: {{contact.mobile}}</view>
					<view>Email: {{contact.email}}</view>
				</view>
			</view>
		</block>
	</view>
</view>

<page-container
	show="{{show}}"
	overlay="{{overlay}}"
	close-on-slide-down
  duration="{{duration}}"
  position="{{position}}"
  bindbeforeenter="onBeforeEnter"
  bindenter="onEnter"
  bindafterenter="onAfterEnter"
  bindbeforeleave="onBeforeLeave"
  bindleave="onLeave"
  bindafterleave="onAfterLeave"
  bindclickoverlay="onClickOverlay"
>
	<view class="screen screen2">
		<view class="contact">
			<share-element class="avatar" duration="{{duration}}" key="avatar" transform>
				<image style="width: 40px;" mode="widthFix" src="../images/{{contact.img}}" />
			</share-element>
			<share-element class="name" key="name" duration="{{duration}}" transform>
				{{contact.name}}
			</share-element>
			<view class="paragraph {{show ? 'enter' : ''}}">
				Lorem ipsum dolor sit amet, consectetur adipiscing elit. Vivamus nisl enim, sodales non augue efficitur, sagittis
				varius neque. Fusce dolor turpis, maximus eu volutpat quis, pellentesque et ligula. Ut vehicula metus in nibh
				mollis ornare. Etiam aliquam lacinia malesuada. Vestibulum dignissim mollis quam a tristique. Maecenas neque
				mauris, malesuada vitae magna eu, congue consectetur risus. Etiam vitae pulvinar ex. Maecenas suscipit mi ac
				imperdiet pretium. Aliquam velit mauris, euismod quis elementum sed, malesuada non dui. Nunc rutrum sagittis
				ligula in dapibus. Cras suscipit ut augue eget mollis. Donec auctor feugiat ipsum id viverra. Vestibulum eu nisi
				risus. Vestibulum eleifend dignissim.

			</view>
			<button class="screen2-button" bindtap="showPrev" hidden="{{!show}}" hover-class="none">Click Me</button>
		</view>
	</view>
</page-container>
import {contacts} from '../data/contact'

Page({

  /**
   * 页面的初始数据
   */
  data: {
    contacts,
    contact: contacts[0],
    transformIdx: 0,
    position: 'center',
    duration: 300,
    show: false,
    overlay: false
  },

  showNext(e) {
    const idx = e.currentTarget.dataset.idx
    this.setData({
      show: true,
      contact: contacts[idx],
      transformIdx: idx
    })
  },

  showPrev() {
    this.setData({
      show: false
    })
  },

  onBeforeEnter(res) {
    console.log(res)
  },
  onEnter(res) {
    console.log(res)
  },
  onAfterEnter(res) {
    console.log(res)
  },
  onBeforeLeave(res) {
    console.log(res)
  },
  onLeave(res) {
    console.log(res)
  },
  onAfterLeave(res) {
    console.log(res)
  },

  /**
   * 生命周期函数--监听页面加载
   */
  onLoad: function (options) {

  },

  /**
   * 生命周期函数--监听页面初次渲染完成
   */
  onReady: function () {

  },

  /**
   * 生命周期函数--监听页面显示
   */
  onShow: function () {

  },

  /**
   * 生命周期函数--监听页面隐藏
   */
  onHide: function () {

  },

  /**
   * 生命周期函数--监听页面卸载
   */
  onUnload: function () {

  },

  /**
   * 页面相关事件处理函数--监听用户下拉动作
   */
  onPullDownRefresh: function () {

  },

  /**
   * 页面上拉触底事件的处理函数
   */
  onReachBottom: function () {

  },

  /**
   * 用户点击右上角分享
   */
  onShareAppMessage: function () {

  }
})
/* app css stylesheet */

page {
  color: #333;
  background-color: #ddd;
  overflow: hidden;
}

button {
  border: 0 solid #0010ae;
  background-color: #1f2afe;
  color: #fff;
  font-size: 120%;
  padding: 8px 16px;
  outline-width: 0;
  -webkit-appearance: none;
  box-shadow: 0 8px 17px rgba(0, 0, 0, 0.2);
}

.screen {
  position: absolute;
  top: 0;
  bottom: 0;
  left: 0;
  right: 0;
  padding: 16px;
  -webkit-overflow-scrolling: touch;
}

.contact {
  position: relative;
  padding: 16px;
  background-color: #fff;
  width: 100%;
  height: 100%;
  box-sizing: border-box;
}

.avatar {
  position: absolute;
  top: 16px;
  left: 16px;
  font-size: 0;
}

.name {
  height: 65px;
  font-size: 2em;
  font-weight: bold;
  text-align: center;
  margin: 10px 0;
}

.list {
  padding-top: 8px;
  padding-left: 32px;
}

.screen1 {
  overflow-y: scroll;
  padding: 0;
}

.screen1 .contact {
  margin: 16px;
  height: auto;
  width: auto;
  box-shadow: 0 2px 5px 0 rgba(0, 0, 0, 0.2);
}

.screen2-button {
  display: block;
  margin: 24px auto;
}

.paragraph {
  -webkit-transition: transform ease-in-out 300ms;
  transition: transform ease-in-out 300ms;
  -webkit-transform: scale(0.6);
  transform: scale(0.6);
}

.enter.paragraph {
  transform: none;
}

八、swiper和swiper-item
滑块视图容器。其中只可放置swiper-item组件,否则会导致未定义的行为。
Page({
  onShareAppMessage() {
    return {
      title: 'swiper',
      path: 'page/component/pages/swiper/swiper'
    }
  },

  data: {
    background: ['demo-text-1', 'demo-text-2', 'demo-text-3'],
    indicatorDots: true,
    vertical: false,
    autoplay: false,
    interval: 2000,
    duration: 500
  },

  changeIndicatorDots() {
    this.setData({
      indicatorDots: !this.data.indicatorDots
    })
  },

  changeAutoplay() {
    this.setData({
      autoplay: !this.data.autoplay
    })
  },

  intervalChange(e) {
    this.setData({
      interval: e.detail.value
    })
  },

  durationChange(e) {
    this.setData({
      duration: e.detail.value
    })
  }
})
<view class="container">
  <view class="page-body">
    <view class="page-section page-section-spacing swiper">
      <swiper indicator-dots="{{indicatorDots}}"
        autoplay="{{autoplay}}" interval="{{interval}}" duration="{{duration}}">
        <block wx:for="{{background}}" wx:key="*this">
          <swiper-item>
            <view class="swiper-item {{item}}"></view>
          </swiper-item>
        </block>
      </swiper>
    </view>
    <view class="page-section" style="margin-top: 40rpx;margin-bottom: 0;">
      <view class="weui-cells weui-cells_after-title">
        <view class="weui-cell weui-cell_switch">
          <view class="weui-cell__bd">指示点</view>
          <view class="weui-cell__ft">
            <switch checked="{{indicatorDots}}" bindchange="changeIndicatorDots" />
          </view>
        </view>
        <view class="weui-cell weui-cell_switch">
          <view class="weui-cell__bd">自动播放</view>
          <view class="weui-cell__ft">
            <switch checked="{{autoplay}}" bindchange="changeAutoplay" />
          </view>
        </view>
      </view>
    </view>

    <view class="page-section page-section-spacing">
      <view class="page-section-title">
        <text>幻灯片切换时长(ms)</text>
        <text class="info">{{duration}}</text>
      </view>
      <slider bindchange="durationChange" value="{{duration}}" min="500" max="2000"/>
      <view class="page-section-title">
        <text>自动播放间隔时长(ms)</text>
        <text class="info">{{interval}}</text>
      </view>
      <slider bindchange="intervalChange" value="{{interval}}" min="2000" max="10000"/>
    </view>
  </view>
</view>

- 点赞
- 收藏
- 关注作者


评论(0)