CloudIFY

一 概述
连接,控制和自动化从核心到边缘:无限的位置,云和设备。
Cloudify:一个单一的开源端到端平台,旨在转换网络服务和应用,连接分支机构,部署和管理多接入边缘和物联网设备,打破孤岛并按需提供所有服务 - 大规模自动化。
1.1 什么是cloudify
- 应用程序建模
应用程序建模使您能够以通用的描述方式描述应用程序及其所有资源(基础结构,中间件,应用程序代码,脚本,工具配置,度量标准和日志)。Cloudify DSL基于TOSCA。
- 编排
Orchestration使您可以维护和运行应用程序。除了实例化之外,您还可以执行持续操作,例如伸缩,修复和维护。
- 可插拔
是Cloudify的核心,独特功能之一。它为系统提供可重用的组件抽象。您可以使用描述性语言对所需的任何内容进行建模,例如IaaS,云,配置管理工具,SDN组件,NFV组件等。Cloudify包含许多官方支持的开箱即用插件,但您也可以构建自己的插件。
- 安全
在Cloudify Manager环境中,安全性意味着保护与Cloudify Manager的通信,并控制谁有权使用它来执行各种操作。使用SSL实现安全通信,使客户端能够验证Cloudify Manager的真实性,并确保发送给它的数据是加密的。
1.2 cloudify管理
-
部署应用程序方式:
- cli管理工具
- cloudify 管理平台
-
功能
- 利用插件(如Docker,Script,Chef和Puppet插件)来管理应用程序主机
- 保留您的蓝图目录为每个蓝图
- 创建多个部署并安装它们在已安装的应用程序上
- 执行修复,缩放和其他自定义工作流同时
- 运行多个工作流程
- 使用Cloudify Web UI查看应用程序的拓扑并执行不同的任务
- 查看指标
- 搜索日志
-
其他功能
- 通过多种身份验证机制和可自定义的授权为管理应用程序提供安全的环境
- 保留指标和事件的历史记录
- 管理在应用程序主机上运行的代理程序
1.3 快速开始
通过部署一个简单的hello world的web服务器,
先决条件:git/cfy/确保8000端口开放
- 下载并解压blueprint
git clone https://github.com/cloudify-examples/local-simple-python-webserver-blueprint.git
- 安装blueprint
cd local-simple-python-webserver-blueprint
cfy install blueprint.yaml
- 检查应用是否正常工作
curl http://localhost:8000

- 可选:检索节点实例
应用程序中在蓝图中定义的每个逻辑实体都称为节点。创建部署后,每个逻辑节点将成为一个或多个节点实例的集合,这些节点实例是该节点的实例。节点可以具有多个节点实例,例如多个虚拟机。
- 可选:检索安装输出
使用Cloudify安装蓝图时,会创建部署。部署是应用程序的模型,将在应用程序生命周期中进行修改,包括所有节点实例及其运行时属性。部署还具有输出,可以是在Cloudify工作流期间生成的IP地址,端口或其他运行时属性,您希望在其他位置使用和使用。运行以下命令以检索输出:
cfy deployments outputs -b local-simple-python-webserver-blueprint
- 卸载已部署的蓝图
cfy uninstall
二 架构
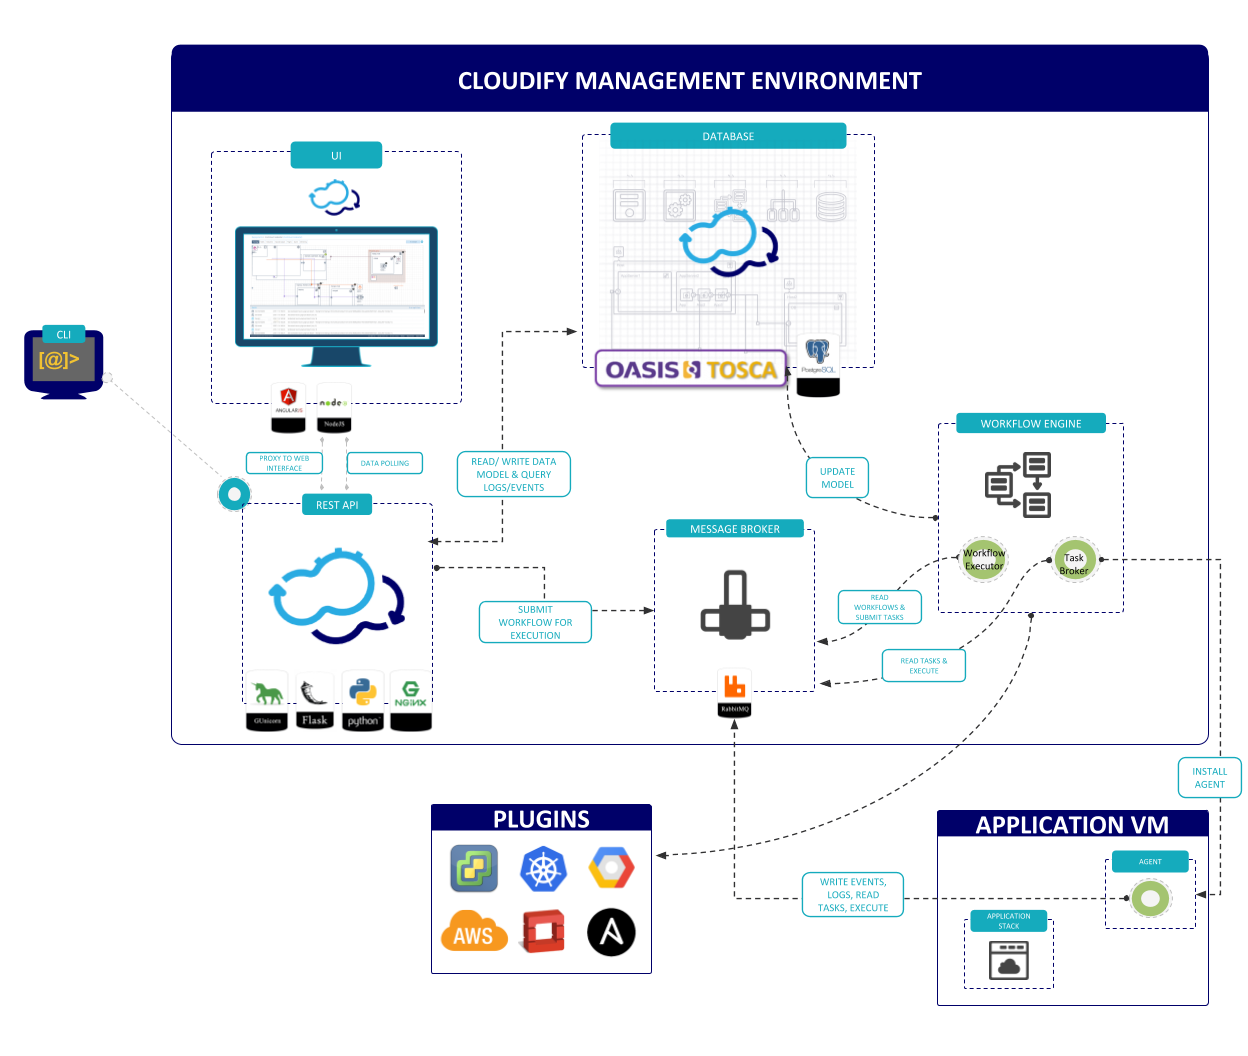
2.1 架构图
2.2 依赖组件
2.3 上传蓝图工作流

2.4 创建部署工作流

2.5 执行工作流

2.6 日志/事件工作流

三 安装维护
3.1 cloudify 管理端
3.1.1 先决条件
- 资源

- 系统
64-bit host with RHEL/CentOS 7.4
- 部署方式
物理服务器部署/Docker images available at Cloudify downloads.
- 网络
两个网络接口:公网/私网
端口:

3.1.2 cloudify管理平台集群安装
- 集群架构图

- 生成证书
cat > conffile <<EOF
[req]
distinguished_name = req_distinguished_name
x509_extensions = v3_ext
[ req_distinguished_name ]
commonName = _common_name # ignored, _default is used instead
commonName_default = myhost
[ v3_ext ]
basicConstraints=CA:false
authorityKeyIdentifier=keyid:true
subjectKeyIdentifier=hash
subjectAltName=DNS:myhost,DNS:127.0.0.1,DNS:1.1.1.2,DNS:localhost,IP:127.0.0.1,IP:1.1.1.2
EOF

sudo openssl req -newkey rsa:2048 -nodes -batch -sha256 -config conffile -out myhost.crt.csr -keyout myhost.key
sudo openssl x509 -days 3650 -sha256 -req -in myhost.crt.csr -out myhost.crt -extensions v3_ext -extfile conffile -CA ca.crt -CAkey ca.key -CAcreateserial
- 安装PostgreSSQL
yum install -y https://download.postgresql.org/pub/repos/yum/11/redhat/rhel-7-x86_64/pgdg-centos11-11-2.noarch.rpm

yum install -y postgresql11 postgresql11-server

# 自启
/usr/pgsql-11/bin/postgresql-11-setup initdb
systemctl enable postgresql-11
systemctl start postgresql-11
修改配置文件/etc/cloudify/config.yaml
postgresql_server:
  enable_remote_connections: true
  ssl_enabled: true
  postgres_password: "<select a password>"

  # Optional, make Postgres server verify client certificate
  ssl_client_verification: false
  # Optional, accept SSL connections only
  ssl_only_connections: false

ssl_inputs:
  postgresql_server_cert_path: "<path to server crt file>"
  postgresql_server_key_path: "<path to server key file>"
  postgresql_ca_cert_path: "<path to CA crt file>"


services_to_install:
# keep only database_service in the list of services to install
- database_service
#- queue_service
#- manager_service
cfy_manager install [--private-ip <PRIVATE_IP>] [--public-ip <PUBLIC_IP>] [-v]
安装rabbitmq
修改配置文件/etc/cloudify/config.yaml
rabbitmq:
  ca_path: "<path to the CA crt file>"
  cert_path: "<path to the host's crt file>"
  key_path: "<path to the hosts's key file>"
  nodename: "<the hostname>"

  # Generate a random string, for example: 7f3e952a-10b4-4e6b-8322-420ae768ab3f
  # use the same cookie in all RabbitMQ instances' installations
  erlang_cookie: "<generate a random string>"

  # List all known RabbitMQ instances,
  # for each instance, provide the default IP address
  # and list all other networks
  cluster_members:
    <hostname1>:
      default: "<host1 IP>"
      <additional network name>: "<additional network IP>"
    <hostname2>:
      default: "<host2 IP>"

  # On first RabbitMQ instance, leave empty
  # on other RabbitMQ instances, enter the first hostname
  join_cluster: "<host1>"


services_to_install:
# keep only queue_service in the list of services to install
#- database_service
- queue_service
#- manager_service
cfy_manager install [--private-ip <PRIVATE_IP>] [--public-ip <PUBLIC_IP>] [-v]
在一个管理工作节点运行
cfy cluster brokers add <new broker name> <new broker address>
移除rabiitmq
在rabbitmq集群节点执行
Removing RabbitMQ instances from a Cloudify Cluster
在管理工作集群节点执行
cfy_manager brokers-remove -r <name of node to remove>
校验rabbitmq集群
在rabbitmq集群节点执行
cfy_manager brokers-list
管理工作集群节点
cfy cluster brokers list
- 配置管理worker
修改配置文件/etc/cloudify/config.yaml
manager:

  # Must be set when installing the first node of a cluster.
  # Must not use when joining a cluster.
  cloudify_license_path: "<path to license file>"

  security:
    # Password for the admin user
    # must be the same on all cluster nodes
    admin_password: "<admin user password>"

rabbitmq:
  ca_path: "<path to the CA crt file>"

  # List all known RabbitMQ instances,
  # for each instance, provide the default IP address
  # and list all other networks
  cluster_members:
    <hostname1>:
      default: "<host1 IP>"
      <additional network name>: "<additional network IP>"
    <hostname2>:
      default: "<host2 IP>"

postgresql_client:
  host: "<DB host IP>"
  ssl_enabled: true

  # Optional, make Postgres server verify client certificate
  # use only if set during PostgreSQL server installation
  ssl_client_verification: false

  # Enter same password used in postgres_password when installing the PostgreSQL server
  postgres_password: "<postgresql password>"


ssl_inputs:

  # Optional, required if using ssl_client_verification
  postgresql_client_cert_path: ''
  postgresql_client_key_path: ''

  postgresql_ca_cert_path: "<path to CA crt file>"


services_to_install:
# keep only manager_service in the list of services to install
#- database_service
#- queue_service
- manager_service
Execute:
cfy_manager install [--private-ip <PRIVATE_IP>] [--public-ip <PUBLIC_IP>] [-v]
移除管理工作节点
在管理工作节点执行
cfy cluster remove <host name of node to remove>
3.2 agents
3.3 cloudify cli安装
# 申请下载rpm包

sudo rpm -i <pkg.rpm>

- 点赞
- 收藏
- 关注作者
评论(0)