MySQL高可用之MHA

一、MHA简介和架构
1.1 MHA简介
MHA(Master High Availability Manager and tools for MySQL)目前在MySQL高可用方面是一个相对成熟的解决方案,它是由日本人youshimaton采用Perl语言编写的一个脚本管理工具。MHA是一套优秀的作为MySQL高可用性环境下故障切换和主从提升的高可用软件。MHA仅适用于MySQL Replication环境,目的在于维持Master主库的高可用性。在MySQL故障切换过程中,MHA能做到0~30秒之内自动完成数据库的故障切换操作,并且在进行故障切换的过程中,MHA能最大程度上保证数据库的一致性,以达到真正意义上的高可用。
目前MHA主要支持一主多从的架构,要搭建MHA,要求一个复制集群必须最少有3台数据库服务器,一主二从,即一台充当Master,一台充当备用Master,另一台充当从库。
1.2 MHA工具包的组成
MHA由两部分组成:MHA Manager(管理节点)和MHA Node(数据节点)。MHA Manager可以独立部署在一台独立的机器上管理多个Master-Slave集群,也可以部署在一台Slave上。MHA Node运行在每台MySQL服务器上,MHA Manager会定时探测集群中Master节点。当Master出现故障时,它可以自动将具有最新数据的Slave提升为新的Master,然后将所有其他的Slave重新指向新的Master。整个故障转移过程对应用程序是完全透明的。MHA node运行在每台MySQL服务器上,它通过监控具备解析和清理logs功能的脚本来加快故障转移的。
Manager工具包情况如下:
- masterha_check_ssh:检查MHA的SSH配置情况。
- masterha_check_repl:检查MySQL复制状况。
- masterha_manager:启动MHA。
- masterha_check_status:检测当前MHA运行状态。
- masterha_master_monitor:检测Master是否宕机。
- masterha_master_switch:控制故障转移(自动或手动)。
- masterha_conf_host:添加或删除配置的server信息。
Node工具包(通常由MHA Manager的脚本触发,无需人工操作)情况如下:l
- save_binary_logs:保存和复制Master的binlog日志。
- apply_diff_relay_logs:识别差异的中级日志时间并将其应用到其他Slave。
- filter_mysqlbinlog:去除不必要的ROOLBACK事件(已经废弃)
- purge_relay_logs:清除中继日志(不阻塞SQL线程)
1.3 MHA架构
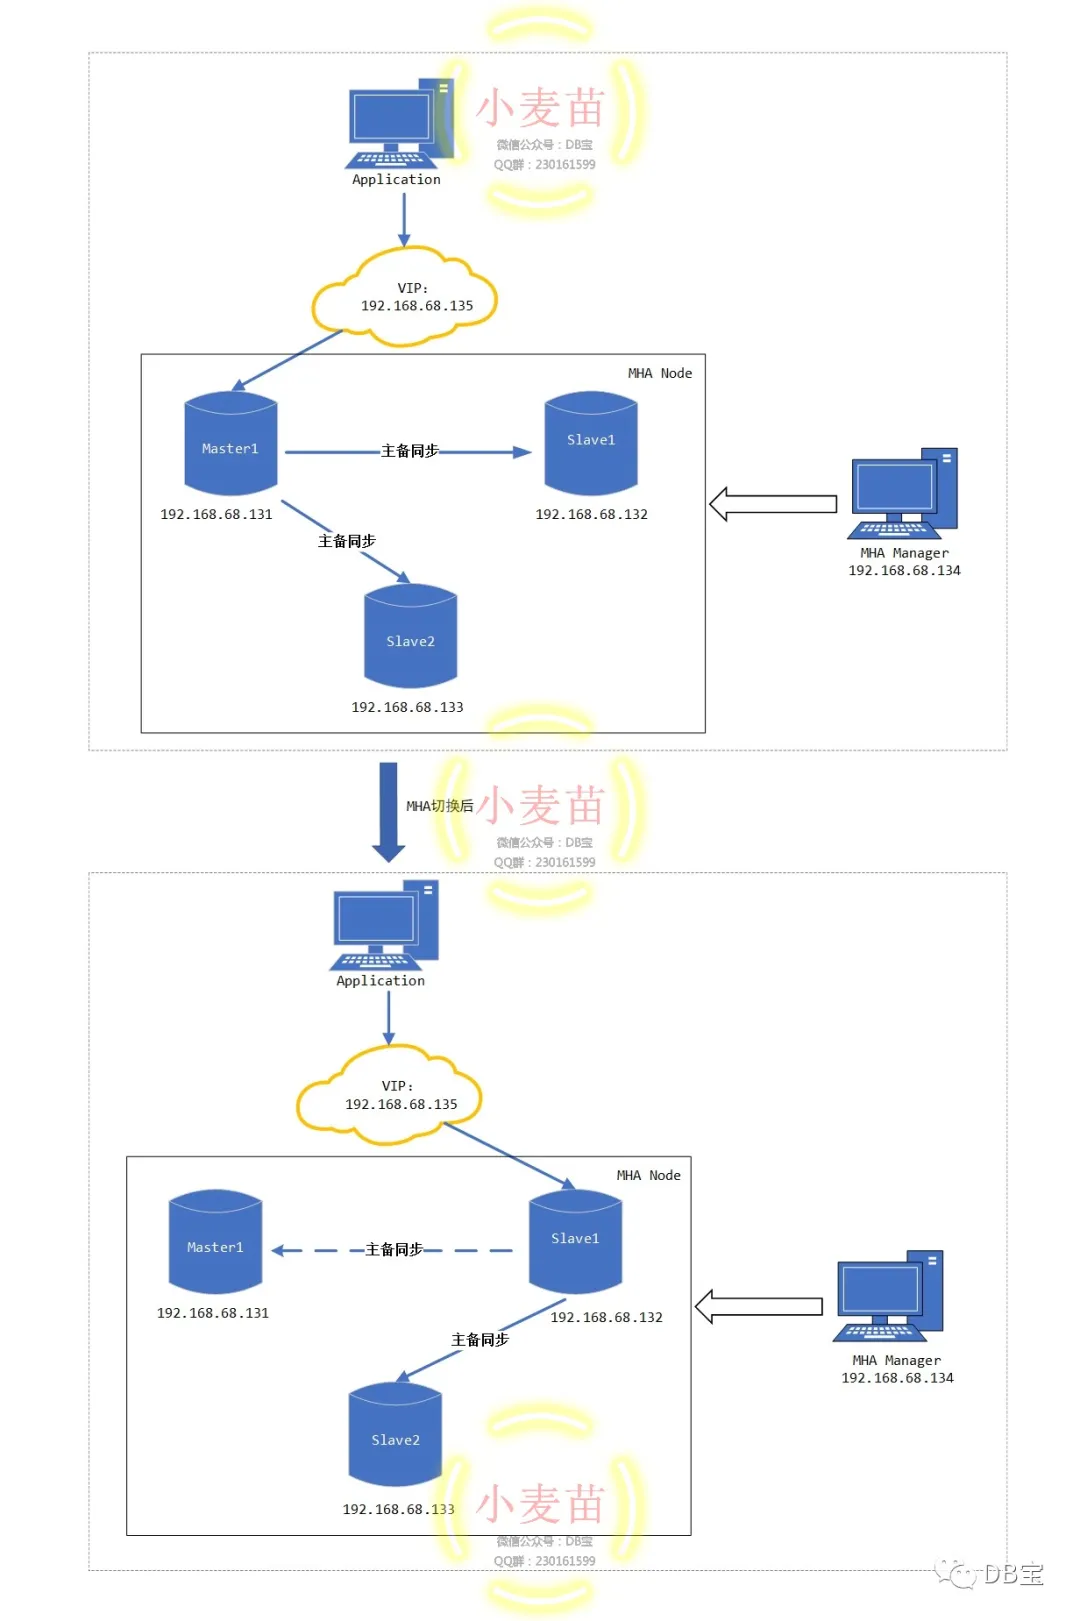
本文所使用的MHA架构规划如下表:
| IP | 主机名 | 作用 | Server ID | Port | 类型 | 备注 |
|---|---|---|---|---|---|---|
| 192.168.68.131 | MHA-LHR-Master1-ip131 | master node | 573306131 | 3306 | 写入 | 对外提供写服务 |
| 192.168.68.132 | MHA-LHR-Slave1-ip132 | slave node1 (Candicate Master) | 573306132 | 读 | 备选Master提供读服务 | |
| 192.168.68.133 | MHA-LHR-Slave2-ip133 | slave node2 | 573306133 | 读 | 提供读服务 | |
| 192.168.68.134 | MHA-LHR-Monitor-ip134 | Monitor host | 监控其它机器,一旦Mater宕机,将会把备选Master提升为新的Master,而将Slave指向新的Master | |||
| 192.168.68.135 | VIP | 在131和132之间进行浮动漂移 | ||||
| MySQL数据库版本:MySQL 5.7.30,MySQL节点端口都是3306,各自的server_id不一样 |
MHA切换前和切换后的架构图:

二、准备MHA环境
2.1 下载MHA镜像
- 小麦苗的Docker Hub的地址:https://hub.docker.com/u/lhrbest
# 下载镜像
docker pull registry.cn-hangzhou.aliyuncs.com/lhrbest/mha-lhr-master1-ip131
docker pull registry.cn-hangzhou.aliyuncs.com/lhrbest/mha-lhr-slave1-ip132
docker pull registry.cn-hangzhou.aliyuncs.com/lhrbest/mha-lhr-slave2-ip133
docker pull registry.cn-hangzhou.aliyuncs.com/lhrbest/mha-lhr-monitor-ip134

# 重命名镜像
docker tag 	registry.cn-hangzhou.aliyuncs.com/lhrbest/mha-lhr-master1-ip131  lhrbest/mha-lhr-master1-ip131
docker tag	registry.cn-hangzhou.aliyuncs.com/lhrbest/mha-lhr-slave1-ip132   lhrbest/mha-lhr-slave1-ip132
docker tag	registry.cn-hangzhou.aliyuncs.com/lhrbest/mha-lhr-slave2-ip133   lhrbest/mha-lhr-slave2-ip133
docker tag	registry.cn-hangzhou.aliyuncs.com/lhrbest/mha-lhr-monitor-ip134  lhrbest/mha-lhr-monitor-ip134
一共4个镜像,3个MHA Node,一个MHA Manager,压缩包大概3G,下载完成后:
[root@lhrdocker ~]# docker images | grep mha
registry.cn-hangzhou.aliyuncs.com/lhrbest/mha-lhr-monitor-ip134          latest              7d29597dc997        14 hours ago        1.53GB
registry.cn-hangzhou.aliyuncs.com/lhrbest/mha-lhr-slave2-ip133           latest              d3717794e93a        40 hours ago        4.56GB
registry.cn-hangzhou.aliyuncs.com/lhrbest/mha-lhr-slave1-ip132           latest              f62ee813e487        40 hours ago        4.56GB
registry.cn-hangzhou.aliyuncs.com/lhrbest/mha-lhr-master1-ip131          latest              ae7be48d83dc        40 hours ago        4.56GB
2.2 编辑yml文件,创建MHA相关容器
编辑yml文件,使用docker-compose来创建MHA相关容器,注意docker-compose.yml文件的格式,对空格、缩进、对齐都有严格要求:
# 创建存放yml文件的路径
mkdir -p /root/mha

# 编辑文件/root/mha/docker-compose.yml
cat > /root/mha/docker-compose.yml <<"EOF"
version: '3.8'

services:
  MHA-LHR-Master1-ip131:
    container_name: "MHA-LHR-Master1-ip131"
    restart: "always"
    hostname: MHA-LHR-Master1-ip131
    privileged: true
    image: lhrbest/mha-lhr-master1-ip131
    ports:
      - "33061:3306"
      - "2201:22"
    networks:
      mhalhr:
        ipv4_address: 192.168.68.131

  MHA-LHR-Slave1-ip132:
    container_name: "MHA-LHR-Slave1-ip132"
    restart: "always"
    hostname: MHA-LHR-Slave1-ip132
    privileged: true
    image: lhrbest/mha-lhr-slave1-ip132
    ports:
      - "33062:3306"
      - "2202:22"
    networks:
      mhalhr:
        ipv4_address: 192.168.68.132

  MHA-LHR-Slave2-ip133:
    container_name: "MHA-LHR-Slave2-ip133"
    restart: "always"
    hostname: MHA-LHR-Slave2-ip133
    privileged: true
    image: lhrbest/mha-lhr-slave2-ip133
    ports:
      - "33063:3306"
      - "2203:22"
    networks:
      mhalhr:
        ipv4_address: 192.168.68.133

  MHA-LHR-Monitor-ip134:
    container_name: "MHA-LHR-Monitor-ip134"
    restart: "always"
    hostname: MHA-LHR-Monitor-ip134
    privileged: true
    image: lhrbest/mha-lhr-monitor-ip134
    ports:
      - "33064:3306"
      - "2204:22"
    networks:
      mhalhr:
        ipv4_address: 192.168.68.134

networks:
  mhalhr:
    name: mhalhr
    ipam:
      config:
         - subnet: "192.168.68.0/16"

EOF
2.3 安装docker-compose软件(若已安装,可忽略)
-
安装 Docker Compose官方文档:https://docs.docker.com/compose/
-
编辑docker-compose.yml文件官方文档:https://docs.docker.com/compose/compose-file/
[root@lhrdocker ~]# curl --insecure -L https://github.com/docker/compose/releases/download/1.26.2/docker-compose-Linux-x86_64 -o /usr/local/bin/docker-compose
  % Total    % Received % Xferd  Average Speed   Time    Time     Time  Current
                                 Dload  Upload   Total   Spent    Left  Speed
100   638  100   638    0     0    530      0  0:00:01  0:00:01 --:--:--   531
100 11.6M  100 11.6M    0     0  1994k      0  0:00:06  0:00:06 --:--:-- 2943k
[root@lhrdocker ~]# chmod +x /usr/local/bin/docker-compose
[root@lhrdocker ~]# docker-compose -v
docker-compose version 1.26.2, build eefe0d31
2.4 创建MHA容器
# 启动mha环境的容器,一定要进入文件夹/root/mha/后再操作
[root@lhrdocker ~]# cd /root/mha/
[root@lhrdocker mha]#
[root@lhrdocker mha]# docker-compose up -d
Creating network "mhalhr" with the default driver
Creating MHA-LHR-Monitor-ip134 ... done
Creating MHA-LHR-Slave2-ip133  ... done
Creating MHA-LHR-Master1-ip131 ... done
Creating MHA-LHR-Slave1-ip132  ... done
[root@lhrdocker mha]# docker ps
CONTAINER ID        IMAGE                           COMMAND             CREATED             STATUS              PORTS                                                            NAMES
d5b1af2ca979        lhrbest/mha-lhr-slave1-ip132    "/usr/sbin/init"    12 seconds ago      Up 9 seconds        16500-16599/tcp, 0.0.0.0:2202->22/tcp, 0.0.0.0:33062->3306/tcp   MHA-LHR-Slave1-ip132
8fa79f476aaa        lhrbest/mha-lhr-master1-ip131   "/usr/sbin/init"    12 seconds ago      Up 10 seconds       16500-16599/tcp, 0.0.0.0:2201->22/tcp, 0.0.0.0:33061->3306/tcp   MHA-LHR-Master1-ip131
74407b9df567        lhrbest/mha-lhr-slave2-ip133    "/usr/sbin/init"    12 seconds ago      Up 10 seconds       16500-16599/tcp, 0.0.0.0:2203->22/tcp, 0.0.0.0:33063->3306/tcp   MHA-LHR-Slave2-ip133
83f1cab03c9b        lhrbest/mha-lhr-monitor-ip134   "/usr/sbin/init"    12 seconds ago      Up 10 seconds       0.0.0.0:2204->22/tcp, 0.0.0.0:33064->3306/tcp                    MHA-LHR-Monitor-ip134
[root@lhrdocker mha]#
2.5 初始化MHA环境
2.5.1 添加网卡
# 给MHA加入默认的网卡
docker network connect bridge MHA-LHR-Master1-ip131
docker network connect bridge MHA-LHR-Slave1-ip132
docker network connect bridge MHA-LHR-Slave2-ip133
docker network connect bridge MHA-LHR-Monitor-ip134
注意:请确保这4个节点的eth0都是192.168.68.0网段,否则后续的MHA切换可能会出问题。如果不一致,那么可以使用如下命令修改:
# 删除网卡
docker network disconnect bridge MHA-LHR-Master1-ip131
docker network disconnect mhalhr MHA-LHR-Master1-ip131

# 重启容器
docker restart MHA-LHR-Master1-ip131

# 添加网卡
docker network connect mhalhr MHA-LHR-Master1-ip131 --ip 192.168.68.131
docker network connect bridge MHA-LHR-Master1-ip131
2.5.2 修改Manager节点的hosts文件
# 进入管理节点134
docker exec -it MHA-LHR-Monitor-ip134 bash

# 修改/etc/hosts文件
cat >> /etc/hosts << EOF
192.168.68.131  MHA-LHR-Master1-ip131
192.168.68.132  MHA-LHR-Slave1-ip132
192.168.68.133  MHA-LHR-Slave2-ip133
192.168.68.134  MHA-LHR-Monitor-ip134
EOF
2.5.3 主库131添加VIP
# 进入主库131
docker exec -it MHA-LHR-Master1-ip131 bash

# 添加VIP135
/sbin/ifconfig eth0:1 192.168.68.135/24
ifconfig
添加完成后:
[root@MHA-LHR-Master1-ip131 /]# ifconfig
eth0: flags=4163<UP,BROADCAST,RUNNING,MULTICAST>  mtu 1500
        inet 192.168.68.131  netmask 255.255.0.0  broadcast 192.168.255.255
        ether 02:42:c0:a8:44:83  txqueuelen 0  (Ethernet)
        RX packets 220  bytes 15883 (15.5 KiB)
        RX errors 0  dropped 0  overruns 0  frame 0
        TX packets 189  bytes 17524 (17.1 KiB)
        TX errors 0  dropped 0 overruns 0  carrier 0  collisions 0

eth0:1: flags=4163<UP,BROADCAST,RUNNING,MULTICAST>  mtu 1500
        inet 192.168.68.135  netmask 255.255.255.0  broadcast 192.168.68.255
        ether 02:42:c0:a8:44:83  txqueuelen 0  (Ethernet)

eth1: flags=4163<UP,BROADCAST,RUNNING,MULTICAST>  mtu 1500
        inet 172.17.0.2  netmask 255.255.0.0  broadcast 172.17.255.255
        ether 02:42:ac:11:00:02  txqueuelen 0  (Ethernet)
        RX packets 31  bytes 2697 (2.6 KiB)
        RX errors 0  dropped 0  overruns 0  frame 0
        TX packets 14  bytes 3317 (3.2 KiB)
        TX errors 0  dropped 0 overruns 0  carrier 0  collisions 0

lo: flags=73<UP,LOOPBACK,RUNNING>  mtu 65536
        inet 127.0.0.1  netmask 255.0.0.0
        loop  txqueuelen 1000  (Local Loopback)
        RX packets 5  bytes 400 (400.0 B)
        RX errors 0  dropped 0  overruns 0  frame 0
        TX packets 5  bytes 400 (400.0 B)
        TX errors 0  dropped 0 overruns 0  carrier 0  collisions 0

# 管理节点已经可以ping通VIP了
[root@MHA-LHR-Monitor-ip134 /]# ping 192.168.68.135
PING 192.168.68.135 (192.168.68.135) 56(84) bytes of data.
64 bytes from 192.168.68.135: icmp_seq=1 ttl=64 time=0.172 ms
64 bytes from 192.168.68.135: icmp_seq=2 ttl=64 time=0.076 ms
^C
--- 192.168.68.135 ping statistics ---
2 packets transmitted, 2 received, 0% packet loss, time 1000ms
rtt min/avg/max/mdev = 0.076/0.124/0.172/0.048 ms
2.5.4 分别进入132和133启动复制进程
-- 132节点
mysql -h192.168.59.220 -uroot -plhr -P33062
reset slave;
start slave;
show slave status \G

-- 133节点
mysql -h192.168.59.220 -uroot -plhr -P33063
reset slave;
start slave;
show slave status \G
结果:
C:\Users\lhrxxt>mysql -h192.168.59.220 -uroot -plhr -P33062
mysql: [Warning] Using a password on the command line interface can be insecure.
Welcome to the MySQL monitor.  Commands end with ; or \g.
Your MySQL connection id is 2
Server version: 5.7.30-log MySQL Community Server (GPL)

Copyright (c) 2000, 2019, Oracle and/or its affiliates. All rights reserved.

Oracle is a registered trademark of Oracle Corporation and/or its
affiliates. Other names may be trademarks of their respective
owners.

Type 'help;' or '\h' for help. Type '\c' to clear the current input statement.

MySQL [(none)]> start slave;
ERROR 1872 (HY000): Slave failed to initialize relay log info structure from the repository

MySQL [(none)]> reset slave;
Query OK, 0 rows affected (0.02 sec)

MySQL [(none)]> start slave;
Query OK, 0 rows affected (0.01 sec)

MySQL [(none)]> show slave status \G
*************************** 1. row ***************************
               Slave_IO_State: Waiting for master to send event
                  Master_Host: 192.168.68.131
                  Master_User: repl
                  Master_Port: 3306
                Connect_Retry: 60
              Master_Log_File: MHA-LHR-Master1-ip131-bin.000011
          Read_Master_Log_Pos: 234
               Relay_Log_File: MHA-LHR-Master1-ip131-relay-bin.000003
                Relay_Log_Pos: 399
        Relay_Master_Log_File: MHA-LHR-Master1-ip131-bin.000011
             Slave_IO_Running: Yes
            Slave_SQL_Running: Yes
              Replicate_Do_DB:
          Replicate_Ignore_DB: information_schema,performance_schema,mysql,sys
           Replicate_Do_Table:
       Replicate_Ignore_Table:
      Replicate_Wild_Do_Table:
  Replicate_Wild_Ignore_Table:
                   Last_Errno: 0
                   Last_Error:
                 Skip_Counter: 0
          Exec_Master_Log_Pos: 234
              Relay_Log_Space: 799
              Until_Condition: None
               Until_Log_File:
                Until_Log_Pos: 0
           Master_SSL_Allowed: No
           Master_SSL_CA_File:
           Master_SSL_CA_Path:
              Master_SSL_Cert:
            Master_SSL_Cipher:
               Master_SSL_Key:
        Seconds_Behind_Master: 0
Master_SSL_Verify_Server_Cert: No
                Last_IO_Errno: 0
                Last_IO_Error:
               Last_SQL_Errno: 0
               Last_SQL_Error:
  Replicate_Ignore_Server_Ids:
             Master_Server_Id: 573306131
                  Master_UUID: c8ca4f1d-aec3-11ea-942b-0242c0a84483
             Master_Info_File: /usr/local/mysql-5.7.30-linux-glibc2.12-x86_64/data/master.info
                    SQL_Delay: 0
          SQL_Remaining_Delay: NULL
      Slave_SQL_Running_State: Slave has read all relay log; waiting for more updates
           Master_Retry_Count: 86400
                  Master_Bind:
      Last_IO_Error_Timestamp:
     Last_SQL_Error_Timestamp:
               Master_SSL_Crl:
           Master_SSL_Crlpath:
           Retrieved_Gtid_Set:
            Executed_Gtid_Set: c8ca4f1d-aec3-11ea-942b-0242c0a84483:1-11,
d24a77d1-aec3-11ea-9399-0242c0a84484:1-3
                Auto_Position: 1
         Replicate_Rewrite_DB:
                 Channel_Name:
           Master_TLS_Version:
1 row in set (0.00 sec)
至此,我们就把MHA环境准备好了,接下来就开始测试MHA的各项功能。
三、测试MHA相关功能
在正式测试之前,我们要保证MHA环境已经配置正确,且MHA管理进程已经启动。
3.1 检查MHA环境的配置
在Manager节点检查SSH、复制及MHA的状态。
3.1.1 检查SSH情况:
[root@MHA-LHR-Monitor-ip134 /]# masterha_check_ssh --conf=/etc/mha/mha.cnf
Sat Aug  8 09:57:42 2020 - [warning] Global configuration file /etc/masterha_default.cnf not found. Skipping.
Sat Aug  8 09:57:42 2020 - [info] Reading application default configuration from /etc/mha/mha.cnf..
Sat Aug  8 09:57:42 2020 - [info] Reading server configuration from /etc/mha/mha.cnf..
Sat Aug  8 09:57:42 2020 - [info] Starting SSH connection tests..
Sat Aug  8 09:57:43 2020 - [debug]
Sat Aug  8 09:57:42 2020 - [debug]  Connecting via SSH from root@192.168.68.131(192.168.68.131:22) to root@192.168.68.132(192.168.68.132:22)..
Sat Aug  8 09:57:42 2020 - [debug]   ok.
Sat Aug  8 09:57:42 2020 - [debug]  Connecting via SSH from root@192.168.68.131(192.168.68.131:22) to root@192.168.68.133(192.168.68.133:22)..
Sat Aug  8 09:57:42 2020 - [debug]   ok.
Sat Aug  8 09:57:43 2020 - [debug]
Sat Aug  8 09:57:42 2020 - [debug]  Connecting via SSH from root@192.168.68.132(192.168.68.132:22) to root@192.168.68.131(192.168.68.131:22)..
Sat Aug  8 09:57:42 2020 - [debug]   ok.
Sat Aug  8 09:57:42 2020 - [debug]  Connecting via SSH from root@192.168.68.132(192.168.68.132:22) to root@192.168.68.133(192.168.68.133:22)..
Sat Aug  8 09:57:43 2020 - [debug]   ok.
Sat Aug  8 09:57:44 2020 - [debug]
Sat Aug  8 09:57:43 2020 - [debug]  Connecting via SSH from root@192.168.68.133(192.168.68.133:22) to root@192.168.68.131(192.168.68.131:22)..
Sat Aug  8 09:57:43 2020 - [debug]   ok.
Sat Aug  8 09:57:43 2020 - [debug]  Connecting via SSH from root@192.168.68.133(192.168.68.133:22) to root@192.168.68.132(192.168.68.132:22)..
Sat Aug  8 09:57:43 2020 - [debug]   ok.
Sat Aug  8 09:57:44 2020 - [info] All SSH connection tests passed successfully.
结果“All SSH connection tests passed successfully.”表示MHA的3个数据节点之间的SSH是正常的。
3.1.2 检查复制情况:
[root@MHA-LHR-Monitor-ip134 /]# masterha_check_repl --conf=/etc/mha/mha.cnf
Sat Aug  8 09:59:31 2020 - [warning] Global configuration file /etc/masterha_default.cnf not found. Skipping.
Sat Aug  8 09:59:31 2020 - [info] Reading application default configuration from /etc/mha/mha.cnf..
Sat Aug  8 09:59:31 2020 - [info] Reading server configuration from /etc/mha/mha.cnf..
Sat Aug  8 09:59:31 2020 - [info] MHA::MasterMonitor version 0.58.
Sat Aug  8 09:59:33 2020 - [info] GTID failover mode = 1
Sat Aug  8 09:59:33 2020 - [info] Dead Servers:
Sat Aug  8 09:59:33 2020 - [info] Alive Servers:
Sat Aug  8 09:59:33 2020 - [info]   192.168.68.131(192.168.68.131:3306)
Sat Aug  8 09:59:33 2020 - [info]   192.168.68.132(192.168.68.132:3306)
Sat Aug  8 09:59:33 2020 - [info]   192.168.68.133(192.168.68.133:3306)
Sat Aug  8 09:59:33 2020 - [info] Alive Slaves:
Sat Aug  8 09:59:33 2020 - [info]   192.168.68.132(192.168.68.132:3306)  Version=5.7.30-log (oldest major version between slaves) log-bin:enabled
Sat Aug  8 09:59:33 2020 - [info]     GTID ON
Sat Aug  8 09:59:33 2020 - [info]     Replicating from 192.168.68.131(192.168.68.131:3306)
Sat Aug  8 09:59:33 2020 - [info]     Primary candidate for the new Master (candidate_master is set)
Sat Aug  8 09:59:33 2020 - [info]   192.168.68.133(192.168.68.133:3306)  Version=5.7.30-log (oldest major version between slaves) log-bin:enabled
Sat Aug  8 09:59:33 2020 - [info]     GTID ON
Sat Aug  8 09:59:33 2020 - [info]     Replicating from 192.168.68.131(192.168.68.131:3306)
Sat Aug  8 09:59:33 2020 - [info] Current Alive Master: 192.168.68.131(192.168.68.131:3306)
Sat Aug  8 09:59:33 2020 - [info] Checking slave configurations..
Sat Aug  8 09:59:33 2020 - [info]  read_only=1 is not set on slave 192.168.68.132(192.168.68.132:3306).
Sat Aug  8 09:59:33 2020 - [info]  read_only=1 is not set on slave 192.168.68.133(192.168.68.133:3306).
Sat Aug  8 09:59:33 2020 - [info] Checking replication filtering settings..
Sat Aug  8 09:59:33 2020 - [info]  binlog_do_db= , binlog_ignore_db= information_schema,mysql,performance_schema,sys
Sat Aug  8 09:59:33 2020 - [info]  Replication filtering check ok.
Sat Aug  8 09:59:33 2020 - [info] GTID (with auto-pos) is supported. Skipping all SSH and Node package checking.
Sat Aug  8 09:59:33 2020 - [info] Checking SSH publickey authentication settings on the current master..
Sat Aug  8 09:59:33 2020 - [info] HealthCheck: SSH to 192.168.68.131 is reachable.
Sat Aug  8 09:59:33 2020 - [info]
192.168.68.131(192.168.68.131:3306) (current master)
 +--192.168.68.132(192.168.68.132:3306)
 +--192.168.68.133(192.168.68.133:3306)

Sat Aug  8 09:59:33 2020 - [info] Checking replication health on 192.168.68.132..
Sat Aug  8 09:59:33 2020 - [info]  ok.
Sat Aug  8 09:59:33 2020 - [info] Checking replication health on 192.168.68.133..
Sat Aug  8 09:59:33 2020 - [info]  ok.
Sat Aug  8 09:59:33 2020 - [info] Checking master_ip_failover_script status:
Sat Aug  8 09:59:33 2020 - [info]   /usr/local/mha/scripts/master_ip_failover --command=status --ssh_user=root --orig_master_host=192.168.68.131 --orig_master_ip=192.168.68.131 --orig_master_port=3306


IN SCRIPT TEST====/sbin/ip addr del 192.168.68.135/24 dev eth0==/sbin/ifconfig eth0:1 192.168.68.135/24===

Checking the Status of the script.. OK
Sat Aug  8 09:59:33 2020 - [info]  OK.
Sat Aug  8 09:59:33 2020 - [warning] shutdown_script is not defined.
Sat Aug  8 09:59:33 2020 - [info] Got exit code 0 (Not master dead).

MySQL Replication Health is OK.
“MySQL Replication Health is OK.”表示1主2从的架构目前是正常的。
3.1.3 检查MHA状态:
[root@MHA-LHR-Monitor-ip134 /]# masterha_check_status --conf=/etc/mha/mha.cnf
mha is stopped(2:NOT_RUNNING).
注意:如果正常,会显示“PING_OK",否则会显示“NOT_RUNNING",这代表MHA监控没有开启。
3.1.4 启动MHA Manager
[root@MHA-LHR-Monitor-ip134 /]# nohup masterha_manager --conf=/etc/mha/mha.cnf  --ignore_last_failover < /dev/null > /usr/local/mha/manager_start.log 2>&1 &
[1] 216
[root@MHA-LHR-Monitor-ip134 /]# masterha_check_status --conf=/etc/mha/mha.cnf
mha (pid:216) is running(0:PING_OK), master:192.168.68.131
检查结果显示“PING_OK”,表示MHA监控软件已经启动了,主库为192.168.68.131。
启动参数介绍:
–remove_dead_master_conf 该参数代表当发生主从切换后,老的主库的IP将会从配置文件中移除。
–manger_log 日志存放位置
–ignore_last_failover 在缺省情况下,如果MHA检测到连续发生宕机,且两次宕机间隔不足8小时的话,则不会进行Failover,之所以这样限制是为了避免ping-pong效应。该参数代表忽略上次MHA触发切换产生的文件,默认情况下,MHA发生切换后会在日志目录下产生mha.failover.complete文件,下次再次切换的时候如果发现该目录下存在该文件将不允许触发切换,除非在第一次切换后收到删除该文件,为了方便,这里设置为–ignore_last_failover。
注意,一旦自动failover发生,mha manager就停止监控了,如果需要请手动再次开启。
3.1.5 关闭MHA-manager
masterha_stop --conf=/etc/mha/mha.cnf
我们当然不关闭,不能执行这句哟。
- 点赞
- 收藏
- 关注作者


评论(0)