我的第一个鸿蒙应用
作者:坚果
公众号:""
华为云享专家,InfoQ签约作者,阿里云专家博主,51CTO博客首席体验官,,专注于大前端技术的分享,包括Flutter,小程序,安卓,VUE,JavaScript。
在前几篇文章里也介绍了许多关于鸿蒙开发的技巧,今天我们就来做自己的第一个代办事项应用。鸿蒙开发和Flutter一样,都具有跨平台的特性,Flutter一套代码可以在Android,ios,web。linux,desk等部署,鸿蒙也有这样的特性,可同时在手机、大屏、手表生效,体验“一次开发、多设备部署”特性。
接下来我们开始正文
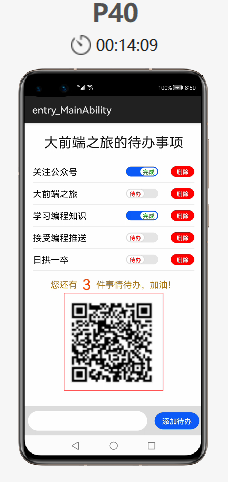
先来预览一下:

第一步必然是安装 。推荐安装3.0beta版,学习的话,用3.0还是蛮不错的。
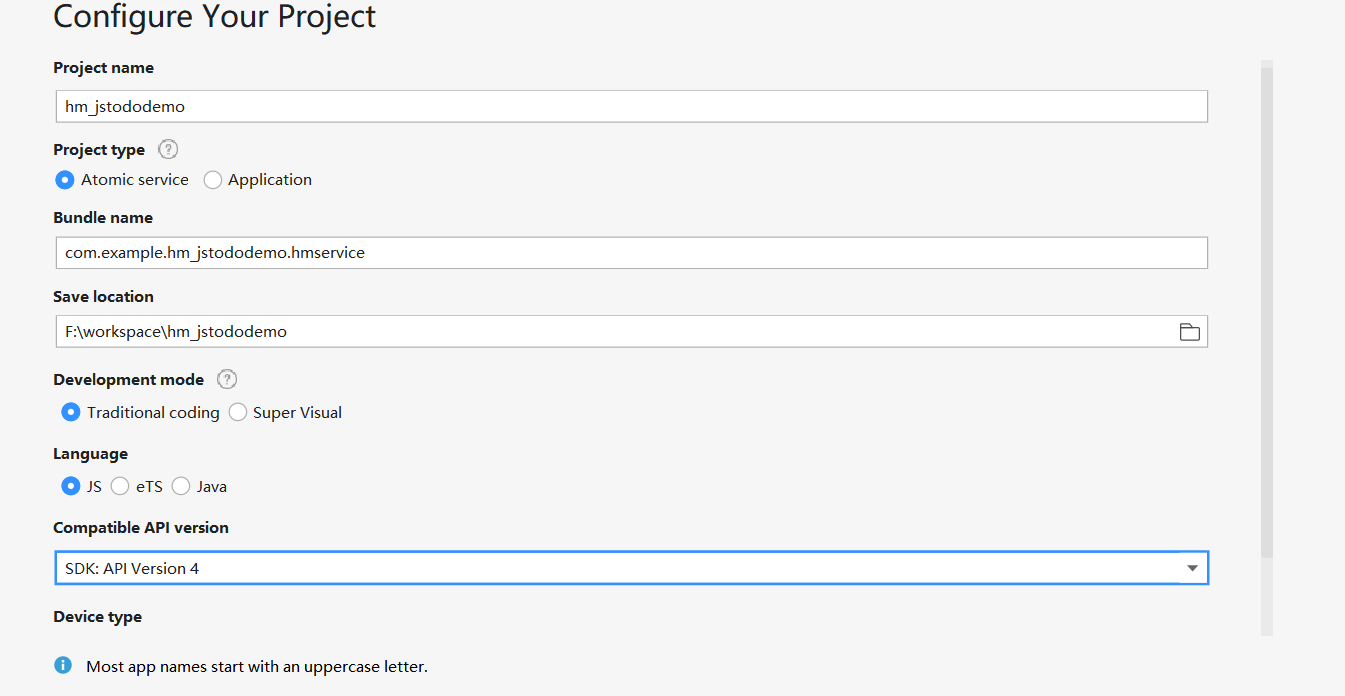
第二部新建工程
自从微信小程序出现以来,各种“小程序”如雨后春笋一般出现。事实证明小程序这种开发方式非常好,鸿蒙 JS UI 框架采用类似的方式也是在意料之中的。
一个小程序(在鸿蒙 OS 中,也就是 Ability)由多个页面组成,每个页面由三部分组成:
-
.hml 用来描述界面的元素
-
.css 用来描述界面的风格
-
.js 用来编写处理事件逻辑
我们来看个例子:
第一步,我们创建一个项目

js文件
import todoList from "../../common/todoList.js"
import router from '@system.router';
export default {
    data: {
        // 待办事件列表
        todoList,
        inputTodo: "IDE无法调用输入"
    },
    computed:{
        needTodoNum(){
            let num = 0;
            this.todoList.forEach(item => {
                if(!item.status){
                    num++;
                }
            });
            return num;
        }
    },
    remove(index){
        console.log(index)
        this.todoList.splice(index,1)
    },
    addTodo() {
        this.todoList.push({
            info:this.inputTodo,
            status: false
        })
    },
    checkStatus(index){
        console.log(index);
        this.todoList[index].status = !this.todoList[index].status;
    },
    getNewTodo(e){
        this.inputTodo = e.value;
    },
//    goback(){
//        router.back();
//    }
}
css文件
.container {
flex-direction: column;
justify-content: flex-start;
align-items: center;
padding-bottom: 100px;
}
.title {
font-size: 25px;
margin-top: 20px;
margin-bottom: 20px;
color: #000000;
opacity: 0.9;
font-size: 28px;
}
.item{
width: 325px;
padding: 10px 0;
flex-direction: row;
align-items: center;
justify-content: space-around;
border-bottom: 1px solid #eee;
}
.todo{
color: #000;
width: 180px;
font-size: 18px;
}
.switch{
font-size: 12px;
texton-color: green;
textoff-color:red;
text-padding: 5px;
width: 100px;
height: 24px;
allow-scale: false;
}
.remove {
font-size: 12px;
margin-left: 10px;
width: 50px;
height: 22px;
color: #fff;
background-color: red;
}
.info{
width: 100%;
margin-top: 10px;
justify-content: center;
}
.info-text {
font-size: 18px;
color: #AD7A1B;
}
.info-num{
color: orangered;
margin-left: 10px;
margin-right: 10px;
}
.add-todo {
position: fixed;
left: 0;
bottom: 0;
width: 100%;
height: 60px;
flex-direction: row;
justify-content: space-around;
align-items: center;
background-color: #ddd;
}
.plan-input {
width: 240px;
height: 40px;
background-color: #fff;
}
.plan-btn {
width: 90px;
height: 35px;
font-size: 15px;
}htm文件
<div class="container">
<text class="title">大前端之旅的待办事项</text>
<div class="item" for="{{todoList}}">
<text class="todo">{{$item.info}}</text>
<switch showtext="true" checked="{{$item.status}}"
texton="完成" textoff="待办"
class="switch"
@change="checkStatus($idx)"></switch>
<button class="remove" onclick="remove($idx)">删除</button>
</div>
<div class="info">
<text class="info-text">您还有</text>
<text class="info-num">{{needTodoNum}}</text>
<text class="info-text">件事情待办,加油!</text>
</div>
<div class="add-todo">
<input class="plan-input" type="text" onchange="getNewTodo"></input>
<button class="plan-btn" onclick="addTodo">添加待办</button>
</div>
</div>首先是数据源是通过导入的方式赋值给todolist。
剩余待办事项通过comouted计算属性来计算,遍历数据源todolist中状态为
false的数量。并且将其赋值给needToNum,并在页面上进行显示。
switch的change改变事件中,将其status反向。
checkStatus(index){
    console.log(index);
    this.todoList[index].status = !this.todoList[index].status;
},
删除待办事项时通过传递的索引从list中删除。
remove(index){
    console.log(index)
    this.todoList.splice(index,1)
},
添加待办事项,通过设置input的change事件
getNewTodo(e){
    this.inputTodo = e.value;
},
将输入的值赋值给变量inputTodo。
然后在新增按钮的点击事件中
addTodo() {
    this.todoList.push({
        info:this.inputTodo,
        status: false
    })
},
往数据源中新增一个对象。
数据源是从common下todoList中引入的
export default [
    {
        info: '关注公众号',
        status: true
    },
    {
        info: '大前端之旅',
        status: false
    },
    {
        info: '学习编程知识',
        status: true
    },
    {
        info: '接受编程推送',
        status: false
    },
    {
        info: '日拱一卒',
        status: false
    }
]
里面涉及到的一个关于图片的问题,就是(如果使用云端路径)要添加ohos.permission.INTERNET权限
2. 工作原理
要理解它的工作原理,先研究一下编译之后的代码是非常重要的。上面的三个文件,编译之后会生成一个文件,其位置在:./entry/build/intermediates/res/debug/lite/assets/js/default/pages/index/index.js
index.hml 变成了创建函数:
index.css 变成了 JSON 文件。
这种处理方式很妙,把 JS 不擅长处理的 XML/CSS 转换成了 JS 代码和 JSON 对象,这个转换由工具完成,避免了运行时的开销。
在没有研究编译之后的代码时,我尝试在 ace/graphic 两个包中寻找解析 HML 的代码,让我惊讶的是没有找到相关代码。看了这些生成的代码之后才恍然大悟。
计数器应用:
index.hml
<div class="container">
    <text>{{count}}</text>
    <input if="{{count < 10}}"type="button" value="Inc" onclick="inc"/>
    <input if="{{count > 0}}" type="button" value="Dec" onclick="dec"/>
</div>
index.css
.container {
    flex-direction: column;
    justify-content: center;
    align-items: center;
    left: 0px;
    top: 0px;
    width: 454px;
    height: 454px;
}
index.js
export default {
data: {
count: 5
},
inc() {
this.count++;
},
dec() {
this.count--;
}
}- 点赞
- 收藏
- 关注作者


评论(0)