iOS开发之实现毛玻璃效果及图片模糊效果

毛玻璃效果的实现
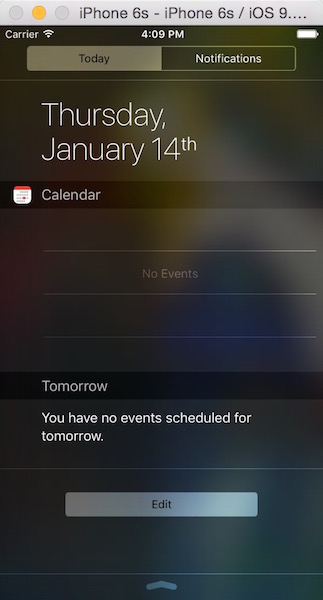
App设计时往往会用到一些模糊效果或者毛玻璃效果,iOS目前已提供了一些模糊API可以让我们方便使用。苹果在iOS7.0之后,很多系统界面都使用了毛玻璃效果,增加了界面的美观性,比如下图的通知中心界面:
一、UIToolbar
在iOS7.0之前还是有系统的类可以实现毛玻璃效果的, 就是 UIToolbar这个类,并且使用简单,实现起来也很简洁。
创建一个UIToolbar实例,设置它的frame或者也可以通过添加约束;
UIToolbar有一个属性:barStyle,设置对应的枚举值来呈现毛玻璃的样式,最后再添加到需要进行毛玻璃效果的view上即可。
    /* 毛玻璃的样式
     * UIBarStyleDefault
     * UIBarStyleBlack
     * UIBarStyleBlackOpaque
     * UIBarStyleBlackTranslucent
     */

    UIImageView *homeView = [[UIImageView alloc] initWithFrame:self.view.bounds];
    homeView.image = [UIImage imageNamed:@"103.png"];
    [self.view addSubview:homeView];

    UIToolbar *toolbar = [[UIToolbar alloc] initWithFrame:CGRectMake(CGRectGetWidth(self.view.bounds)/2, 0, homeView.frame.size.width, homeView.frame.size.height)];
    toolbar.barStyle = UIBarStyleBlackTranslucent;
    [homeView addSubview:toolbar];
- 1
- 2
- 3
- 4
- 5
- 6
- 7
- 8
- 9
- 10
- 11
- 12
- 13
- 14
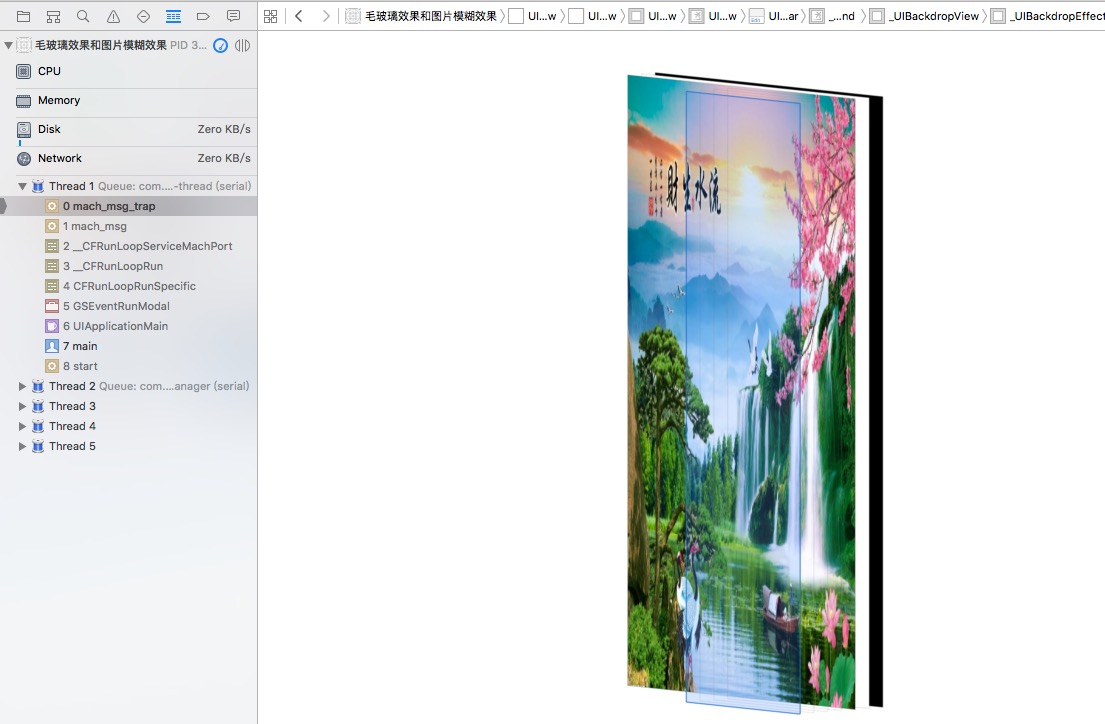
- 效果图:

- 视图结构:
通过视图,可以看出UIToolbar包含了三个子视图:一个背景图片和一个背景view,还有一个背景特效view,正是这几个视图结合在一起实现了毛玻璃的效果。
二、UIVisualEffectView
在iOS8.0之后,苹果新增了一个类UIVisualEffectView,通过这个类来实现毛玻璃效果与上面的UIToolbar一样,而且效率也非常高,使用也是非常简单。 UIVisualEffectView是一个抽象类,不能直接使用,需通过它下面的三个子类来实现(UIBlurEffect, UIVisualEffevt, UIVisualEffectView)。
子类UIBlurEffect只有一个类方法,用来快速创建一个毛玻璃效果,参数是一个枚举,用来设置毛玻璃的样式,而UIVisualEffectView则多了两个属性和两个构造方法,用来快速将创建的毛玻璃添加到这个UIVisualEffectView上。
实例化UIBlurEffect并设置毛玻璃的样式;
再通过UIVisualEffectView的构造方法将UIBlurEffect的实例添加上去;
设置frame或者是通过添加约束,将effectView添加到要实现了毛玻璃的效果的view控件上。
    /* 毛玻璃的样式
     * UIBlurEffectStyleExtraLight
     * UIBlurEffectStyleLight
     * UIBlurEffectStyleDark
     */

    UIImageView *homeView = [[UIImageView alloc] initWithFrame:self.view.bounds];
    homeView.image = [UIImage imageNamed:@"102.jpg"];
    homeView.contentMode = UIViewContentModeScaleToFill;
    homeView.userInteractionEnabled = YES;
    [self.view addSubview:homeView];

    UIBlurEffect *effect = [UIBlurEffect effectWithStyle:UIBlurEffectStyleDark];
    UIVisualEffectView *effectView = [[UIVisualEffectView alloc] initWithEffect:effect];
    effectView.frame = CGRectMake(0, 0, homeView.frame.size.width/2, homeView.frame.size.height);
    [homeView addSubview:effectView];
- 1
- 2
- 3
- 4
- 5
- 6
- 7
- 8
- 9
- 10
- 11
- 12
- 13
- 14
- 15
- 16
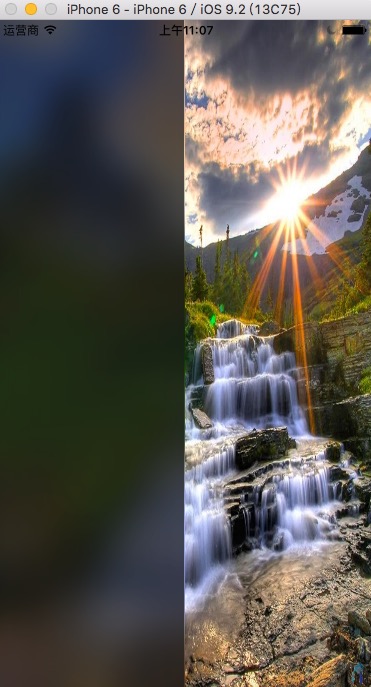
- 效果图:
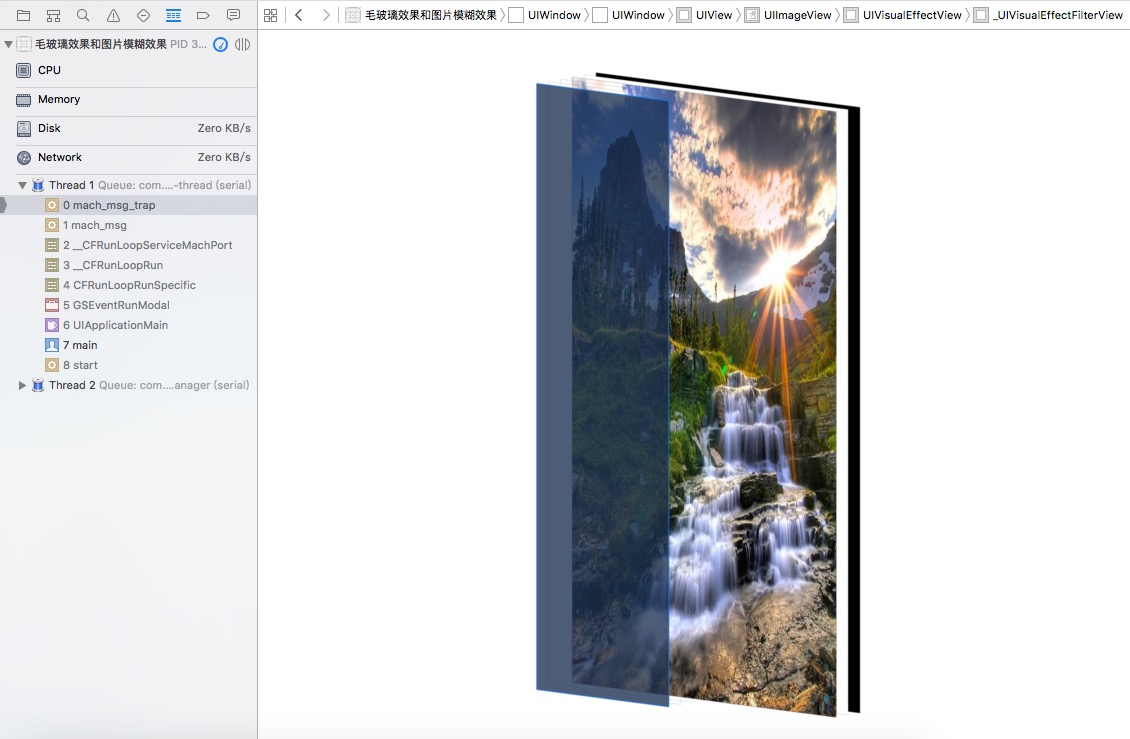
- 视图结构:
会发现和Toolbar不一样,其实是因为UIVisualEffectView这个类,构造方法帮我们创建了一个view,而在这个view做了毛玻璃处理,再将其覆盖到了背景图之上。
图片模糊效果的实现
一、使用Core Image进行模糊
- (UIImage *)blurryImage:(UIImage *)image
           withBlurLevel:(CGFloat)blur {
    CIImage  *inputImage = [CIImage imageWithCGImage:image.CGImage];
    CIFilter *filter = [CIFilter filterWithName:@"CIGaussianBlur" keysAndValues:kCIInputImageKey,inputImage,@"inputRadius", @(blur),nil];
    CIImage *outputImage = filter.outputImage;
    CGImageRef outImage = [self.context createCGImage:outputImage fromRect:[outputImage extent]];
    return [UIImage imageWithCGImage:outImage];
}
- 1
- 2
- 3
- 4
- 5
- 6
- 7
- 8
二、使用vImage API进行模糊
- (UIImage *)blurryImage:(UIImage *)image withBlurLevel:(CGFloat)blur {
    if (blur < 0.f || blur > 1.f) {
        blur = 0.5f;
    }
    int boxSize = (int)(blur * 100);
    boxSize = boxSize - (boxSize % 2) + 1;

    CGImageRef img = image.CGImage;

    vImage_Buffer inBuffer, outBuffer;
    vImage_Error error;

    void *pixelBuffer;

    CGDataProviderRef inProvider = CGImageGetDataProvider(img);
    CFDataRef inBitmapData = CGDataProviderCopyData(inProvider);

    inBuffer.width = CGImageGetWidth(img);
    inBuffer.height = CGImageGetHeight(img);
    inBuffer.rowBytes = CGImageGetBytesPerRow(img);

    inBuffer.data = (void*)CFDataGetBytePtr(inBitmapData);

    pixelBuffer = malloc(CGImageGetBytesPerRow(img) *
                         CGImageGetHeight(img));

    if(pixelBuffer == NULL)
        NSLog(@"No pixelbuffer");

    outBuffer.data = pixelBuffer;
    outBuffer.width = CGImageGetWidth(img);
    outBuffer.height = CGImageGetHeight(img);
    outBuffer.rowBytes = CGImageGetBytesPerRow(img);

    error = vImageBoxConvolve_ARGB8888(&inBuffer,
                                       &outBuffer,
                                       NULL,
                                       0,
                                       0,
                                       boxSize,
                                       boxSize,
                                       NULL,
                                       kvImageEdgeExtend);


    if (error) {
        NSLog(@"error from convolution %ld", error);
    }

    CGColorSpaceRef colorSpace = CGColorSpaceCreateDeviceRGB();
    CGContextRef ctx = CGBitmapContextCreate(
                                             outBuffer.data,
                                             outBuffer.width,
                                             outBuffer.height,
                                             8,
                                             outBuffer.rowBytes,
                                             colorSpace,
                                             kCGImageAlphaNoneSkipLast);
    CGImageRef imageRef = CGBitmapContextCreateImage (ctx);
    UIImage *returnImage = [UIImage imageWithCGImage:imageRef];

    //clean up
    CGContextRelease(ctx);
    CGColorSpaceRelease(colorSpace);

    free(pixelBuffer);
    CFRelease(inBitmapData);

    CGColorSpaceRelease(colorSpace);
    CGImageRelease(imageRef);

    return returnImage;
}
- 1
- 2
- 3
- 4
- 5
- 6
- 7
- 8
- 9
- 10
- 11
- 12
- 13
- 14
- 15
- 16
- 17
- 18
- 19
- 20
- 21
- 22
- 23
- 24
- 25
- 26
- 27
- 28
- 29
- 30
- 31
- 32
- 33
- 34
- 35
- 36
- 37
- 38
- 39
- 40
- 41
- 42
- 43
- 44
- 45
- 46
- 47
- 48
- 49
- 50
- 51
- 52
- 53
- 54
- 55
- 56
- 57
- 58
- 59
- 60
- 61
- 62
- 63
- 64
- 65
- 66
- 67
- 68
- 69
- 70
- 71
- 72
- 73
文章来源: blog.csdn.net,作者:Serendipity·y,版权归原作者所有,如需转载,请联系作者。
原文链接:blog.csdn.net/Forever_wj/article/details/51119855

- 点赞
- 收藏
- 关注作者
评论(0)