【愚公系列】2022年01月 华为鸿蒙OS-04-容器组件(badge、dialog、div)(JS开发版)
【摘要】 容器组件 一、badge 1.HML代码<div class="container"> <!-- placement:标记位置;label:设置文本提醒值 --> <badge class="badge" config="{{badgeConfig}}" visible="true" count="100" maxcount="99"> <text class="...
容器组件
一、badge
1.HML代码
<div class="container">
    <!-- placement:标记位置;label:设置文本提醒值 -->
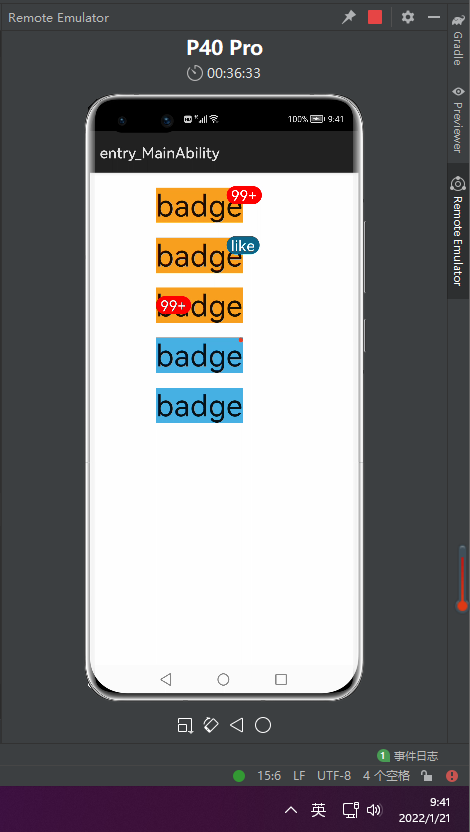
    <badge class="badge" config="{{badgeConfig}}" visible="true" count="100" maxcount="99">
        <text class="text1">badge</text>
    </badge>
    <!-- label:用法 -->
    <badge class="badge" config="{{badgeConfig1}}" visible="true" count="100" maxcount="99" label="like">
        <text class="text1">badge</text>
    </badge>
    <!-- placement:用法 -->
    <badge class="badge" config="{{badgeConfig}}" visible="true" count="100" maxcount="99" placement="left">
        <text class="text1">badge</text>
    </badge>
    <!-- visible:用法 -->
    <badge class="badge" visible="true" count="0">
        <text class="text2">badge</text>
    </badge>
    <badge class="badge" visible="false" count="0">
        <text class="text2">badge</text>
    </badge>
</div>
2.CSS代码
.container {
    flex-direction: column;
    width: 100%;
    align-items: center;
}
.badge {
    width: 50%;
    border-radius: 50px;
    margin-top: 20px;
}
.text1 {
    background-color: #f9a01e;
    font-size: 40px;
}
.text2 {
    background-color: #46b1e3;
    font-size: 40px;
}
3.JS代码
export default {
    data:{
        badgeConfig:{
            badgeColor:"red",//新事件标记背景色。
            textColor:"#ffffff",//数字标记的数字文本颜色。
            textSize:"20px",//数字标记的数字文本大小。
            badgeSize:"24px",//圆点标记的默认大小。
        },
        badgeConfig1:{
            badgeColor:"#0a6589",//新事件标记背景色。
            textColor:"#ffffff",//数字标记的数字文本颜色。
            textSize:"20px",//数字标记的数字文本大小。
            badgeSize:"24px",//圆点标记的默认大小。
        },
    }
}
4.效果
二、dialog
1.HML代码
<div class="doc-page">
    <!-- 弹框按钮 -->
    <div class="btn-div">
        <button value="点击弹框" class="btn" onclick="showDialog"></button>
    </div>
    <!-- dialog弹框 -->
    <!-- drag_able:设置对话框是否支持拖拽 -->
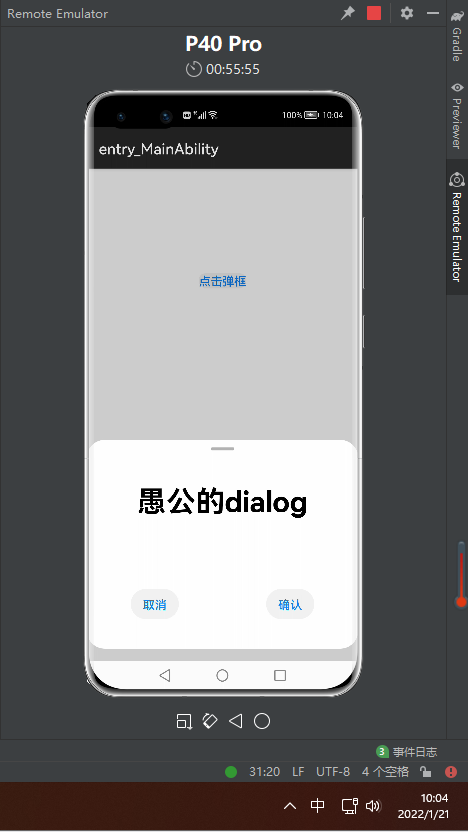
    <dialog id="simpleDialog" dragable="true" class="dialog-main" @cancel="cancelDialog">
        <div class="dialog-div">
            <div class="inner-txt">
                <text class="txt" @doubleclick="doubleClick">愚公的dialog</text>
            </div>
            <div class="inner-btn">
                <button type="capsule" value="取消" @click="cancelSchedule" class="btn-txt"></button>
                <button type="capsule" value="确认" @click="setSchedule" class="btn-txt"></button>
            </div>
        </div>
    </dialog>
</div>
2.CSS代码
/* xxx.css */
.doc-page {
    flex-direction: column;
    justify-content: center;
    align-items: center;
}
.btn-div {
    width: 100%;
    height: 300px;
    flex-direction: column;
    align-items: center;
    justify-content: center;
}
.btn {
    background-color: #F2F2F2;
    text-color: #0D81F2;
}
.txt {
    color: #000000;
    font-weight: bold;
    font-size: 39px;
}
.dialog-main {
    width: 500px;
}
.dialog-div {
    flex-direction: column;
    align-items: center;
}
.inner-txt {
    width: 400px;
    height: 160px;
    flex-direction: column;
    align-items: center;
    justify-content: space-around;
}
.inner-btn {
    width: 400px;
    height: 120px;
    justify-content: space-around;
    align-items: center;
}
.btn-txt {
    background-color: #F2F2F2;
    text-color: #0D81F2;
}
3.JS代码
import prompt from '@system.prompt';
export default {
    //显示弹框
    showDialog(e) {
        this.$element('simpleDialog').show()
    },
    //取消对话框
    cancelDialog(e) {
        prompt.showToast({
            message: '对话框消失了'
        })
    },
    //取消按钮事件
    cancelSchedule(e) {
        //取消弹框
        this.$element('simpleDialog').close()
        prompt.showToast({
            message: '取消成功'
        })
    },
    //确认按钮事件
    setSchedule(e) {
        //取消弹框
        this.$element('simpleDialog').close()
        prompt.showToast({
            message: '确认'
        })
    },
    //双击标题事件
    doubleClick(e){
        prompt.showToast({
            message: '标题被点击'
        })
    }
}
4.效果
三、div
1.布局
1.1HML代码
<div class="container">
    <text>
        愚公之Flex布局
    </text>
    <!--Flex 布局-->
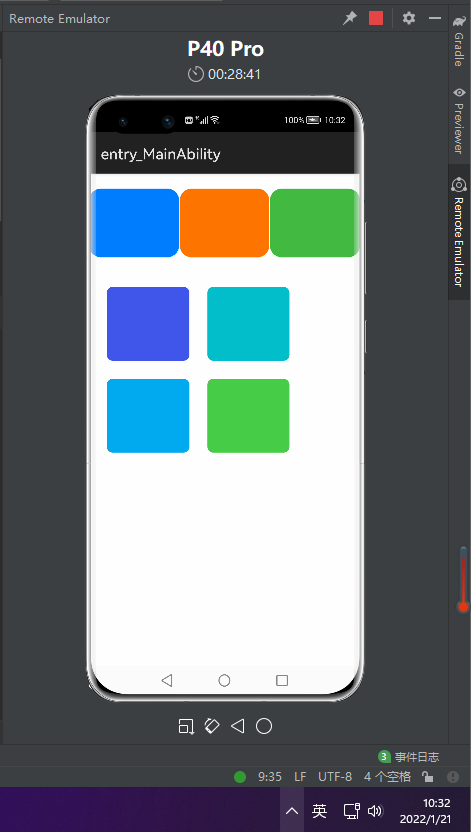
    <div class="flex-box">
        <div class="flex-item color-primary"></div>
        <div class="flex-item color-warning"></div>
        <div class="flex-item color-success"></div>
    </div>
    <text>
        愚公之grid布局
    </text>
    <!--grid 布局-->
    <div class="common grid-parent">
        <div class="grid-child grid-left-top"></div>
        <div class="grid-child grid-left-bottom"></div>
        <div class="grid-child grid-right-top"></div>
        <div class="grid-child grid-right-bottom"></div>
    </div>

</div>
1.2 CSS代码
.container {
    flex-direction: column;
    justify-content: center;
    align-items: center;
    width: 454px;
    height: 454px;
}
.flex-box {
    justify-content: space-around;
    align-items: center;
    width: 400px;
    height: 140px;
    background-color: #ffffff;
}

.flex-item {
    width: 120px;
    height: 120px;
    border-radius: 16px;
}
.color-primary {
    background-color: #007dff;
}
.color-warning {
    background-color: #ff7500;
}
.color-success {
    background-color: #41ba41;
}

.common {
    width: 400px;
    height: 400px;
    background-color: #ffffff;
    align-items: center;
    justify-content: center;
    margin: 24px;
}
.grid-parent {
    display: grid;
    grid-template-columns: 35% 35%;
    grid-columns-gap: 24px;
    grid-rows-gap: 24px;
    grid-template-rows: 35% 35%;
}
.grid-child {
    width: 100%;
    height: 100%;
    border-radius: 8px;
}
.grid-left-top {
    grid-row-start: 0;
    grid-column-start: 0;
    grid-row-end: 0;
    grid-column-end: 0;
    background-color: #3f56ea;
}
.grid-left-bottom {
    grid-row-start: 1;
    grid-column-start: 0;
    grid-row-end: 1;
    grid-column-end: 0;
    background-color: #00aaee;
}
.grid-right-top {
    grid-row-start: 0;
    grid-column-start: 1;
    grid-row-end: 0;
    grid-column-end: 1;
    background-color: #00bfc9;
}
.grid-right-bottom {
    grid-row-start: 1;
    grid-column-start: 1;
    grid-row-end: 1;
    grid-column-end: 1;
    background-color: #47cc47;
}
1.3 效果
2.事件
2.1 拖拽事件
<div class="container">
    <div>
        <text>
            愚公系列
        </text>
    </div>
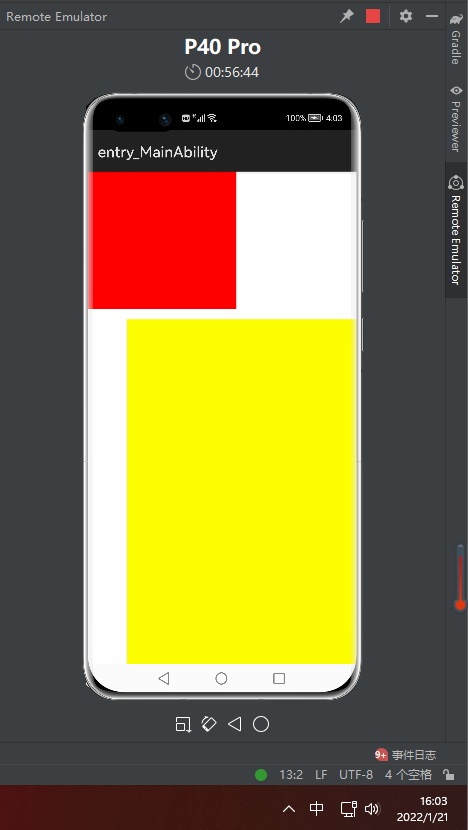
    <div class="content" ondragstart="dragStart" ondrag="drag" ondragend="dragEnd" style="position: absolute;left: {{left}};top:{{top}};">
    <div style="width: 500px; height: 500px; background-color: yellow; position: fixed; left: 15%; top: 30%; opacity:0.3"
    ondragenter="dragEnter" ondragover="dragOver" ondragleave="dragLeave" ondrop="drop">
    </div>
    </div>
</div>
.container {
    flex-direction: column;
    width: 100%;
    position: relative;
    max-width: 100%;
}
.content{
    width: 200px;
    height: 200px;
    background-color: red;
    position: absolute;
}
import prompt from '@system.prompt';
export default {
    data:{
        left:0,
        top:0,
    },
    //开始拖动
    dragStart(e){
        prompt.showToast({
            message: '开始拖动'
        })
    },
    //拖动中
    drag(e){
        this.left = e.globalX;
        this.top = e.globalY;
    },
    //拖动结束
    dragEnd(e){
        prompt.showToast({
            message: '拖动结束'
        })
    },
    //
    dragEnter(e){
        prompt.showToast({
            message: '进入'
        })
    },
    dragOver(e){
        prompt.showToast({
            message: '移动'
        })
    },
    dragLeave(e){
        prompt.showToast({
            message: '离开'
        })
    },
    drop(e){
        prompt.showToast({
            message: '销毁'
        })
    }
}
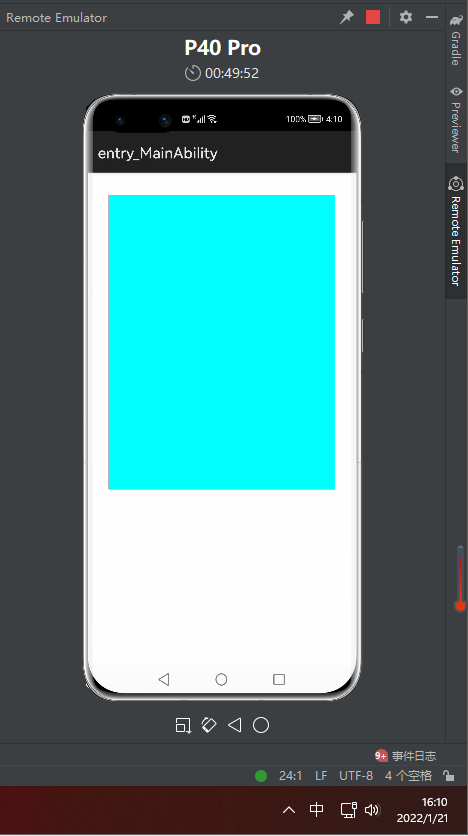
2.2 手指捏合事件
<div class="container">
    <div class="content "onpinchstart="pinchStart" onpinchend="pinchEnd" onpinchupdate="pinchUpdate"
         onpinchcancel=" pinchCancel">
    </div>
</div>
.container {
    flex-direction: column;
    justify-content: center;
    align-items: center;
    width: 454px;
    height: 454px;}
.content{
    width: 400px;
    height: 400px;
    background-color: aqua;
    margin:30px
}
import prompt from '@system.prompt';
export default {
    pinchStart(e){
        prompt.showToast({
            message: '捏合开始'
        })
    },
    pinchUpdate(e){
        prompt.showToast({
            message: '捏合更新'
        })
    },
    pinchEnd(e){
        prompt.showToast({
            message: '捏合结束'
        })
    },
    pinchCancel(e){
        prompt.showToast({
            message: '捏合取消'
        })
    }
}
【声明】本内容来自华为云开发者社区博主,不代表华为云及华为云开发者社区的观点和立场。转载时必须标注文章的来源(华为云社区)、文章链接、文章作者等基本信息,否则作者和本社区有权追究责任。如果您发现本社区中有涉嫌抄袭的内容,欢迎发送邮件进行举报,并提供相关证据,一经查实,本社区将立刻删除涉嫌侵权内容,举报邮箱:
cloudbbs@huaweicloud.com
- 点赞
- 收藏
- 关注作者


评论(0)