【愚公系列】2022年01月 Java教学课程 68-NIO

【摘要】 一.NIO 1.概述BIOBlocking IO,阻塞型IONIONo Blocking IO,非阻塞型IO阻塞IO的弊端在等待的过程中,什么事也做不了非阻塞IO的好处不需要一直等待,当一切就绪了再去做 2.NIO与BIO的区别区别一BIO是阻塞的,NIO是非阻塞的区别二BIO是面向流的,NIO是面向缓冲区的BIO中数据传输是单向的,NIO中的缓冲区是双向的 3.NIO三大模块缓冲区用来存...
一.NIO
1.概述
-
BIO
Blocking IO,阻塞型IO
-
NIO
No Blocking IO,非阻塞型IO
-
阻塞IO的弊端
在等待的过程中,什么事也做不了
-
非阻塞IO的好处
不需要一直等待,当一切就绪了再去做
2.NIO与BIO的区别
-
区别一
BIO是阻塞的,NIO是非阻塞的
-
区别二
BIO是面向流的,NIO是面向缓冲区的
BIO中数据传输是单向的,NIO中的缓冲区是双向的
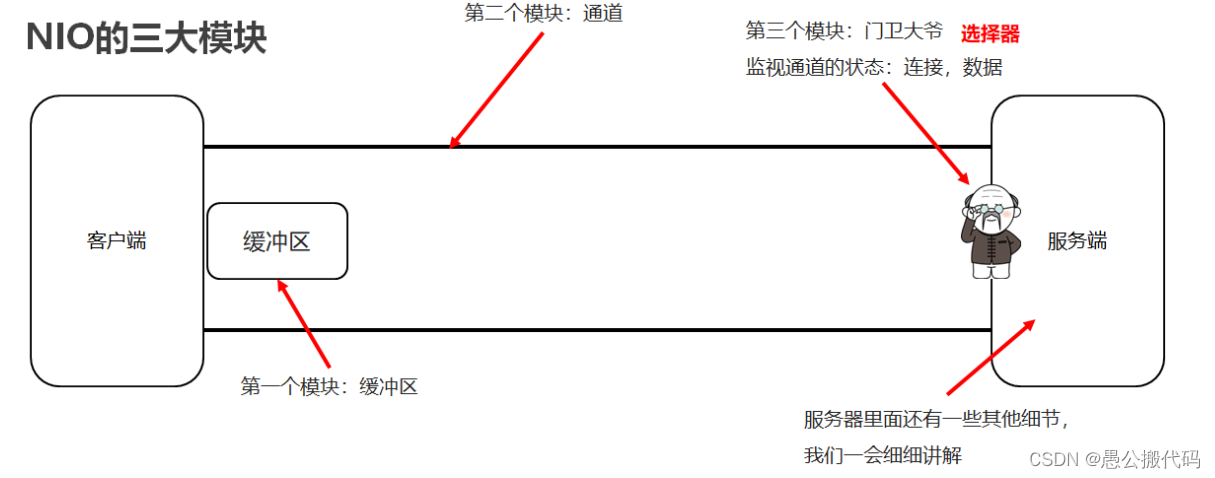
3.NIO三大模块
-
缓冲区
用来存储数据
-
通道
用来建立连接和传输数据
-
选择器
监视通道状态
4.NIO创建缓冲区对象
-
方法介绍
方法名 说明 static ByteBuffer allocate(长度) 创建byte类型的缓冲区 static ByteBuffer wrap(byte[] array) 创建一个有内容的byte类型缓冲区 -
代码示例
public class CreateByteBufferDemo1 {
    public static void main(String[] args) {
        //method1();

        //method2();

        ByteBuffer wrap = ByteBuffer.wrap("aaa".getBytes());
        for (int i = 0; i < 3; i++) {
            System.out.println(wrap.get());
        }
    }

    private static void method2() {
        byte [] bytes = {97,98,99};
        ByteBuffer byteBuffer2 = ByteBuffer.wrap(bytes);
        //缓冲区的长度3
        //缓冲区里面的内容就是字节数组的内容.
        for (int i = 0; i < 3; i++) {
            System.out.println(byteBuffer2.get());
        }
        System.out.println(byteBuffer2.get());
    }

    private static void method1() {
        ByteBuffer byteBuffer1 = ByteBuffer.allocate(5);
        //get
        for (int i = 0; i < 5; i++) {
            System.out.println(byteBuffer1.get());
        }
        System.out.println(byteBuffer1.get());
    }
}
5.NIO缓冲区添加数据
- 方法介绍
-
代码示例
public class ByteBufferDemo2 {
    public static void main(String[] args) {
//        int position()		  当前要操作的索引
//        int limit() 		  最多能操作到哪个索引
//        int capacity()		  缓冲区的总长度
        ByteBuffer byteBuffer = ByteBuffer.allocate(10);
        System.out.println(byteBuffer.position());//0
        System.out.println(byteBuffer.limit());//10
        System.out.println(byteBuffer.capacity());//10

//        put(byte b)		  一次添加一个字节
//        byteBuffer.put((byte) 97);
//        System.out.println(byteBuffer.position());
//        System.out.println(byteBuffer.limit());
//        System.out.println(byteBuffer.capacity());

//        put(byte[] src)		 一次添加一个字节数组
//        byteBuffer.put("aaa".getBytes());
//        System.out.println(byteBuffer.position());//3
//        System.out.println(byteBuffer.limit());//10
//        System.out.println(byteBuffer.capacity());//10

//        position(int newPosition) 修改position
//        byteBuffer.position(1);

//        limit(int newLimit)	  修改limit
//        byteBuffer.limit(5);
//        System.out.println(byteBuffer.position());
//        System.out.println(byteBuffer.limit());
//        System.out.println(byteBuffer.capacity());

//        int remaining()		  还有多少能操作
//        boolean hasRemaining()	  是否还有能操作的

        byteBuffer.put("0123456789".getBytes());
        System.out.println(byteBuffer.remaining());
        System.out.println(byteBuffer.hasRemaining());
    }
}
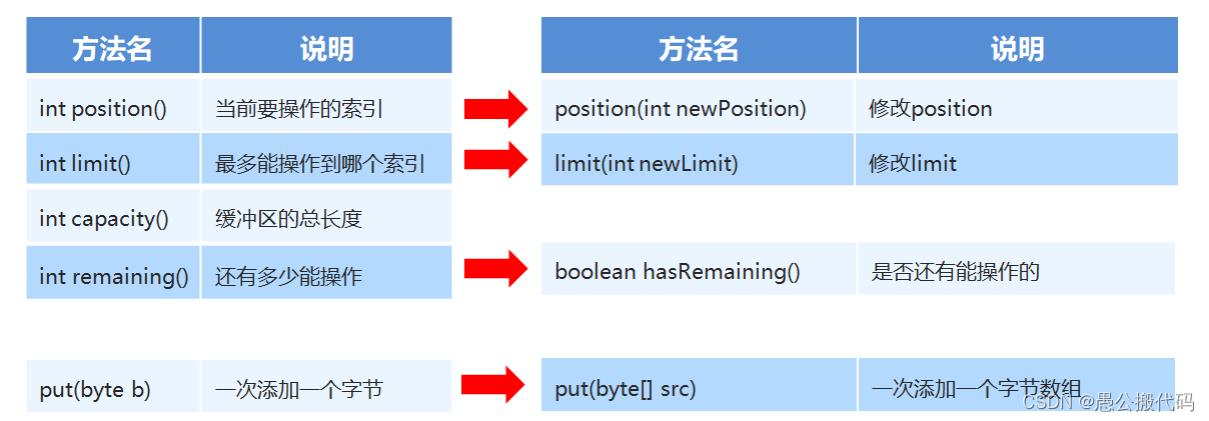
6.NIO缓冲区获取数据
-
方法介绍
方法名 介绍 flip() 切换读写模式(写à读) get() 读一个字节 get(byte[] dst) 读多个字节 get(int index) 读指定索引的字节 rewind() 将position设置为0,可以重复读 clear() 数据读写完毕(读->写) array() 将缓冲区转换成字节数组返回 -
代码示例
public class ByteBufferDemo3 { public static void main(String[] args) { ByteBuffer byteBuffer = ByteBuffer.allocate(10); byteBuffer.put("abc".getBytes()); // flip() 切换读写模式(写读) byteBuffer.flip(); // get() 读一个字节 // while(byteBuffer.limit() != byteBuffer.position()){ // System.out.println((char) byteBuffer.get()); // } for (int i = 0; i < byteBuffer.limit(); i++) { System.out.println((char) byteBuffer.get()); } // get(byte[] dst) 读多个字节 // byte [] bytes = new byte[byteBuffer.limit()]; // byteBuffer.get(bytes); // System.out.println(new String(bytes)); // get(int index) 读指定索引的字节 // System.out.println((char) byteBuffer.get(0)); // rewind() 将position设置为0,可以重复读 // byteBuffer.rewind(); // for (int i = 0; i < byteBuffer.limit(); i++) { // System.out.println((char) byteBuffer.get()); // } // clear() 数据读写完毕(读->写) byteBuffer.clear(); byteBuffer.put("qqq".getBytes()); // array() 将缓冲区转换成字节数组返回 byte[] bytes = byteBuffer.array(); System.out.println(new String(bytes)); } }
7.小结
-
需求:我要把数据写到缓冲区中。
数据是从外面进入到缓冲区的,所以缓冲区在做读数据的操作。
-
需求:我要把数据从缓冲区中读出来。
数据是从缓冲区里面到外面的。所以缓冲区在做写数据的操作。
-
capacity:容量(长度)
limit: 界限(最多能读/写到哪里)
posotion:位置(读/写哪个索引) -
获取缓冲区里面数据之前,需要调用flip方法
-
再次写数据之前,需要调用clear方法,
但是数据还未消失,等再次写入数据,被覆盖了才会消失。

【声明】本内容来自华为云开发者社区博主,不代表华为云及华为云开发者社区的观点和立场。转载时必须标注文章的来源(华为云社区)、文章链接、文章作者等基本信息,否则作者和本社区有权追究责任。如果您发现本社区中有涉嫌抄袭的内容,欢迎发送邮件进行举报,并提供相关证据,一经查实,本社区将立刻删除涉嫌侵权内容,举报邮箱:
cloudbbs@huaweicloud.com
- 点赞
- 收藏
- 关注作者
评论(0)