让我们使用JavaScript制作一个可以正常工作的Guitar

🌊 作者主页:海拥
🌊 简介:🏆CSDN全栈领域优质创作者、🥇HDZ核心组成员、🥈蝉联C站周榜前十
🌊 粉丝福利:粉丝群 每周送6~9本书,不定期送各种小礼品,往期获奖公布
@TOC
让我们来制作吉他!好吧,不是物理吉他,而是下面这个东西:数字吉他!感兴趣吗?好吧!就像一场精彩的摇滚表演一样,不妨来试试!
演示地址:https://wanghao221.github.io/game/js-guitar/(打不开的话刷新试试)
代码已打包上传,在文章末尾哦
锻造仪器
我从一些样板程序开始:一个带有内联SVG的简单HTML文件。内联,因为稍后我需要附加很多JS。我一直很喜欢Gibson Flying V的设计,因此我将以其头和脖子为灵感。我从一些线性渐变和一个用于阴影的滤镜开始:
<svg id="guitar" xmlns="http://www.w3.org/2000/svg" version="1.1" viewBox="0 0 2400 800" preserveAspectRatio="xMidYMid meet" width="2400" height="800">
  <defs>
    <linearGradient id="fretboard" x1="42%" y1="0%" x2="0%" y2="90%">
      <stop offset="0%" style="stop-color: rgb(56, 53, 53);" />
      <stop offset="100%" style="stop-color: rgb(56, 49, 43);" />
    </linearGradient>

    <linearGradient id="fredboardBorder" x1="0%" y1="0%" x2="0%" y2="100%">
      <stop offset="0%" style="stop-color: rgb(111, 111, 111);" />
      <stop offset="53%" style="stop-color: rgb(255, 255, 255);" />
      <stop offset="100%" style="stop-color: rgb(160, 160, 160);" />
    </linearGradient>

    <linearGradient id="fret" x1="0%" y1="0%" x2="100%" y2="0%">
      <stop offset="0%" style="stop-color: rgb(122, 117, 113);" />
      <stop offset="100%" style="stop-color: rgb(56, 49, 43);" />
    </linearGradient>

    <filter id="dropshadow" height="400%">
      <feGaussianBlur in="SourceAlpha" stdDeviation="3"/>
      <feOffset dx="4" dy="4" result="offsetblur"/>
      <feComponentTransfer>
        <feFuncA type="linear" slope="1.5"/>
      </feComponentTransfer>
      <feMerge>
        <feMergeNode/>
        <feMergeNode in="SourceGraphic"/>
      </feMerge>
    </filter>
  </defs>
  <!-- ... -->
</svg>
我将多边形用于基本结构,将rects和多边形用于字符串,将路径用于琴格:
<svg ...>
  <!-- ... -->
  <polygon
    points="
      -10,300 1860,300 1950,230 2380,400
      1950,570 1860,500 -10,500
    "
    fill="url(#fretboard)"
    stroke-width="10"
    stroke="url(#fredboardBorder)"
    style="filter:url(#dropshadow)"
    stroke-linejoin="round"
  />

  <path
    d="
      M110 305 110 495 M220 305 220 495 M330 305 330 495 M440 305 440 495
      M550 305 550 495 M660 305 660 495 M770 305 770 495 M880 305 880 495
      M990 305 990 495 M1100 305 1100 495 M1210 305 1210 495 M1320 305 1320 495
      M1430 305 1430 495 M1540 305 1540 495 M1650 305 1650 495 M1760 305 1760 495
      M1858 305 1858 495
    "
    stroke-width="10"
    stroke="rgb(122, 117, 113)"
  />

  <rect class="string" x="0" y="324.3" width="1864" height="5" fill="#ccc" />
  <rect class="string" x="0" y="353.6" width="1864" height="5" fill="#ccc" />
  <rect class="string" x="0" y="382.9" width="1864" height="5" fill="#ccc" />
  <rect class="string" x="0" y="412.2" width="1864" height="5" fill="#ccc" />
  <rect class="string" x="0" y="441.5" width="1864" height="5" fill="#ccc" />
  <rect class="string" x="0" y="470.8" width="1864" height="5" fill="#ccc" />

  <polygon points="1863,324.3 1980,290 1980,295 1863,329.3" fill="#ccc" />
  <polygon points="1863,353.6 2065,330 2065,335 1863,358.6" fill="#ccc" />
  <polygon points="1863,382.9 2150,365 2150,370 1863,387.9" fill="#ccc" />
  <polygon points="1863,412.2 2150,445 2150,450 1863,417.2" fill="#ccc" />
  <polygon points="1863,441.5 2065,475 2065,480 1863,446.5" fill="#ccc" />
  <polygon points="1863,470.8 1980,505 1980,510 1863,475.8" fill="#ccc" />

  <circle cx="1980" cy="510" r="20" fill="url(#fretboard)" stroke-width="15" stroke="url(#fredboardBorder)" />
  <circle cx="2065" cy="480" r="20" fill="url(#fretboard)" stroke-width="15" stroke="url(#fredboardBorder)" />
  <circle cx="2150" cy="445" r="20" fill="url(#fretboard)" stroke-width="15" stroke="url(#fredboardBorder)" />
  <circle cx="2150" cy="365" r="20" fill="url(#fretboard)" stroke-width="15" stroke="url(#fredboardBorder)" />
  <circle cx="2065" cy="330" r="20" fill="url(#fretboard)" stroke-width="15" stroke="url(#fredboardBorder)" />
  <circle cx="1980" cy="290" r="20" fill="url(#fretboard)" stroke-width="15" stroke="url(#fredboardBorder)" />
</svg>
这是它的样子:
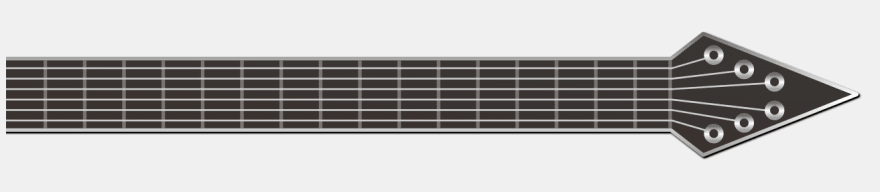
不是有史以来最漂亮的吉他,但无论如何一定要喜欢它!现在,让它可与某些JS和CSS一起玩!
将吉他弦夹在适当的位置
对于那些熟悉吉他/音乐理论的人,我将使用的标准音调E A d g h e。这些是没有按下音符时演奏的音符。每个品格将这些音调增加半个音符,因此对于第一个字符串,应为:
E2 > F2 > Gb2 > G2 > Ab2 > A2 > Bb2 > H2 > C3 > Db3 > D3 Eb3 > E3 > ...
一旦有回绕,八度会增加一个,圆会重新开始。在我的朋友的帮助下,我想到了以下注释图:
const noteMap = [
  ['Ab3', 'G3 ', 'Gb3', 'F3 ', 'E3 ', 'Eb3', 'D3 ', 'Db3', 'C3 ', 'B2 ', 'Bb2', 'A2 ', 'Ab2', 'G2 ', 'Gb2', 'F2 ', 'E2 '],
  ['Db4', 'C4 ', 'B3 ', 'Bb3', 'A3 ', 'Ab3', 'G3 ', 'Gb3', 'F3 ', 'E3 ', 'Eb3', 'D3 ', 'Db3', 'C3 ', 'B2 ', 'Bb2', 'A2 '],
  ['Gb4', 'F4 ', 'E4 ', 'Eb4', 'D4 ', 'Db4', 'C4 ', 'B3 ', 'Bb3', 'A3 ', 'Ab3', 'G3 ', 'Gb3', 'F3 ', 'E3 ', 'Eb3', 'D3 '],
  ['B4 ', 'Bb4', 'A4 ', 'Ab4', 'G4 ', 'Gb4', 'F4 ', 'E4 ', 'Eb4', 'D4 ', 'Db4', 'C4 ', 'B3 ', 'Bb3', 'A3 ', 'Ab3', 'G3 '],
  ['Eb5', 'D5 ', 'Db5', 'C5 ', 'B4 ', 'Bb4', 'A4 ', 'Ab4', 'G4 ', 'Gb3', 'F4 ', 'E4 ', 'Eb4', 'D4 ', 'Db4', 'C4 ', 'B3 '],
  ['Ab5', 'G5 ', 'Gb5', 'F5 ', 'E5 ', 'Eb5', 'D5 ', 'Db5', 'C5 ', 'B4 ', 'Bb4', 'A4 ', 'Ab4', 'G4 ', 'Gb4', 'F4 ', 'E4 ']
]
(请注意,我在这里从右到左,因为最低的音符在头部附近。)
现在,我需要使字符串可点击。理想情况下,我会为每个字符串的每个品格添加可点击的区域,以便找出在哪里选择了字符串来找出要弹奏的音符。我使用JS通过将它们动态添加到SVG来做到这一点。我还添加了一个称为的全局标志,isPlaying以确定是否按下了鼠标。该playNote()功能当前输出将要演奏的音符。
let isPlaying = false

function playNote (stringKey, note, force = false) {
  if (isPlaying || force) {
    console.log(note)
  }
}

window.addEventListener('mousedown', () => {
  isPlaying = true
})

window.addEventListener('mouseup', () => {
  isPlaying = false
})

const svg = document.querySelector('#guitar')

noteMap.forEach((string, stringKey) => {
  string.forEach((note, noteKey) => {
    const area = document.createElementNS('http://www.w3.org/2000/svg', 'rect')
    area.setAttribute('x', noteKey * 110)
    area.setAttribute('y', 315 + (29.3 * stringKey))
    area.setAttribute('width', 110)
    area.setAttribute('height', 20)
    area.setAttribute('fill', '#fff')
    area.setAttribute('opacity', '0')
    area.addEventListener('click', () => {
      playNote(stringKey, note, true)
    })
    area.addEventListener('mouseover', () => {
      playNote(stringKey, note, false)
    })

    svg.appendChild(area)
  })
})
让我们看看它的作用:

接下来,我将动画添加到播放的字符串中三秒钟,以向用户提供关于选择了哪个字符串的视觉反馈:
const stringVibrationTimes = [0, 0, 0, 0, 0, 0]
const strings = Array.from(document.querySelectorAll('.string'))

setInterval(() => {
  strings.forEach((stringEl, key) => {
    if (stringVibrationTimes[key] > 0) {
      stringEl.classList.add('vibrating')
    } else {
      stringEl.classList.remove('vibrating')
    }

    stringVibrationTimes[key] -= 50

    if (stringVibrationTimes[key] < 0) {
      stringVibrationTimes[key] = 0
    }
  })
}, 50)

function playNote (stringKey, note, force = false) {
  if (isPlaying || force) {
    console.log(note)

    stringVibrationTimes[stringKey] = 3000
  }
}
还有一些CSS:
@keyframes vibrate {
    0% {
        transform: translateY(-2px);
    }
    50% {
        transform: translateY(2px);
    }
    100% {
        transform: translateY(-2px);
    }
}
.string {
    transform: translateY(0);
}
.string.vibrating {
    animation: vibrate .05s infinite;
}
看起来很赞:

我们完成了一半,现在只剩下声音了!
启动放大器!
为了使其播放声音,我使用了Midi声音字体。我将使用midi-js-soundfonts,因为我喜欢它的声音。我使用该仪器electric_guitar_clean的FluidR3_GM。我需要下载声音字体并放入一个名为的文件夹sound/中,以使其可用于浏览器。要播放声音,我使用Audio:
const soundFontUrl = './sound/'
function playNote (stringKey, note, force = false) {
  if (isPlaying || force) {
    console.log(note)
    const audio = new Audio(soundFontUrl + note.trim() + '.mp3')
    audio.play()

    stringVibrationTimes[stringKey] = 3000
  }
}
这是完全正常的演示-通过单独单击字符串或按住鼠标并在字符串上滑动来播放:
https://wanghao221.github.io/game/js-guitar/
EDIT:抓住选择!
首先我为吉他拨片创建了SVG。我在网上寻找了一个好的形状,并用一条路径和一些贝塞尔曲线重新绘制了它:
<svg xmlns="http://www.w3.org/2000/svg" version="1.1" viewBox="0 0 1280 1280" preserveAspectRatio="xMidYMid meet" width="80" height="80">
  <defs>
    <linearGradient id="pickbg" x1="0%" y1="0%" x2="100%" y2="100%">
      <stop offset="0%" style="stop-color:rgb(77, 22, 22);" />
      <stop offset="100%" style="stop-color:rgb(150, 47, 47);" />
    </linearGradient>
  </defs>
  <g transform="rotate(135, 640, 640)">
    <path
      d="M120 310 C 330 -10 950 -10 1160 310 Q 980 1100 640 1210 Q 300 1100 120 310 Z"
      fill="url(#pickbg)"
    />
  </g>
</svg>
使用width和height属性将SVG缩小(缩小为128 x 128),这一点很重要,因为浏览器会忽略所有较大的SVG 。接下来,我只需要将新的光标图像应用于主体即可:
body {
  /* ... */
  cursor: url(./pick.svg), auto;
}
并做了:

Nice,一切准备就绪

- 点赞
- 收藏
- 关注作者
评论(0)