Stepper 小部件
这篇文章是关于 Flutter 中的 Stepper 小部件。
步进器通过一系列逻辑和编号的步骤显示进度。一些常见的步进器用例是:
-
用户进行购买并需要提供一些信息,例如姓名、电子邮件、电话号码、付款。
-
新账户注册流程包括提供电话号码、使用OTP确认电话号码、要求用户同意使用条款等步骤。
-
通过询问原因、确认用户确定等步骤取消注册服务的过程。
-
需要用户在白天完成多项任务才能获得奖励的应用程序或游戏。
步进器也可用于导航。
构造函数:
Stepper({
  Key? key,
  required List<Step> steps,
  ScrollPhysics? physics,
  StepperType type = StepperType.vertical,
  int currentStep = 0,
  ValueChanged<int>? onStepTapped,
  VoidCallback? onStepContinue,
  VoidCallback? onStepCancel,
  ControlsWidgetBuilder? controlsBuilder,
  double? elevation,
  EdgeInsetsGeometry? margin
})如您所见,除了典型的key属性外,这个小部件还可以接受一些参数。让我们探讨这些论点:
-
steps : Step小部件列表。每个步骤都可以有标题、副标题和图标。
-
physics : 确定步进器小部件的物理特性
-
类型:StepperType.vertical或StepperType.horizontal
-
currentStep : 内容暴露的步骤的索引
-
onStepContinue , onStepCancal:分别按下Continue和Cancel按钮时将调用的回调函数
-
controlBuild r:创建自定义控件
-
海拔:海拔
-
margin : 垂直步进器的边距
现在是时候编写一些代码了。
这个例子
应用预览
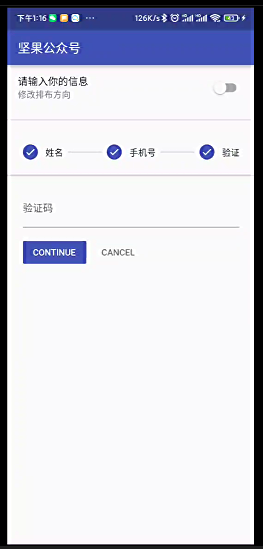
我们将要构建的应用程序包含一个开关和一个步进器。该开关用于控制步进器的方向(垂直、水平)。步进器显示 3 个步骤的进度:
-
要求用户输入名称
-
询问用户的电话号码
-
验证电话号码
当用户点击继续按钮时,下一步将被展开。当点击取消按钮时,将显示上一步。这是它的工作原理:
请注意,此示例仅关注 Stepper 小部件和 UI。它不实现表单验证(您可以将文本字段留空并按下按钮,步进器仍将正常工作)。
代码
main.dart 中的完整源代码并有详细说明:
import 'dart:math' as math;
import 'package:flutter/cupertino.dart';
import 'package:flutter/material.dart';
import 'package:async/async.dart';
import 'package:pin_code_fields/pin_code_fields.dart';
import 'package:url_strategy/url_strategy.dart';
void main() {
setPathUrlStrategy();
runApp(MyApp());
}
class MyApp extends StatelessWidget {
const MyApp({Key? key}) : super(key: key);
@override
Widget build(BuildContext context) {
return MaterialApp(
// Hide the debug banner
debugShowCheckedModeBanner: false,
title: '坚果',
theme: ThemeData(
primarySwatch: Colors.indigo,
),
home: const HomeScreen(),
);
}
}
class HomeScreen extends StatefulWidget {
const HomeScreen({Key? key}) : super(key: key);
@override
State<HomeScreen> createState() => _HomeScreenState();
}
class _HomeScreenState extends State<HomeScreen> {
String _imageUrl =
'https://luckly007.oss-cn-beijing.aliyuncs.com/image/image-20211124085239175.png';
double _fontSize = 20;
String _title = "坚果公众号";
// 4 text editing controllers that associate with the 4 input fields
TextEditingController textEditingController = TextEditingController();
String currentText = "";
// This one determines whether the other control elements are able to interact or not
bool _isAbsorbing = false;
// These variables are use for other control elements
bool _isChecked = false; // used for the checkbox
bool _isOn = false; // used for the switch at the bottom of the column
// the current step
int _currentStep = 0;
// Determines whether the stepper's orientation is vertical or horizontal
// This variable can be changed by using the switch below
bool _isVerticalStepper = true;
// This function will be triggered when a step is tapped
_stepTapped(int step) {
setState(() => _currentStep = step);
}
// This function will be called when the continue button is tapped
_stepContinue() {
_currentStep < 2 ? setState(() => _currentStep += 1) : null;
}
// This function will be called when the cancel button is tapped
_stepCancel() {
_currentStep > 0 ? setState(() => _currentStep -= 1) : null;
}
@override
Widget build(BuildContext context) {
return Scaffold(
appBar: AppBar(
title: Text(_title),
),
body: Column(
children: [
// Controls the stepper orientation
SwitchListTile(
title: const Text('请输入你的信息'),
subtitle: const Text('修改排布方向'),
value: _isVerticalStepper,
onChanged: (_) {
setState(() {
_isVerticalStepper = !_isVerticalStepper;
});
}),
const Divider(
thickness: 2,
height: 30,
),
Expanded(
// the Stepper widget
child: Stepper(
// vertical or horizontial
type: _isVerticalStepper
? StepperType.vertical
: StepperType.horizontal,
physics: const ScrollPhysics(),
currentStep: _currentStep,
onStepTapped: (step) => _stepTapped(step),
onStepContinue: _stepContinue,
onStepCancel: _stepCancel,
steps: [
// The first step: Name
Step(
title: const Text('姓名'),
content: Column(
children: [
TextFormField(
decoration: const InputDecoration(labelText: '请输入你的名字'),
),
],
),
isActive: _currentStep >= 0,
state: _currentStep >= 0
? StepState.complete
: StepState.disabled,
),
// The second step: Phone number
Step(
title: const Text('手机号'),
content: Column(
children: [
TextFormField(
decoration:
const InputDecoration(labelText: '请输入你的手机号'),
),
],
),
isActive: _currentStep >= 0,
state: _currentStep >= 1
? StepState.complete
: StepState.disabled,
),
// The third step: Verify phone number
Step(
title: const Text('验证'),
content: Column(
children: <Widget>[
TextFormField(
decoration: const InputDecoration(labelText: '验证码'),
),
],
),
isActive: _currentStep >= 0,
state: _currentStep >= 2
? StepState.complete
: StepState.disabled,
),
],
),
),
],
),
);
}
}
结论
您已经了解了 Flutter 中的 Stepper 小部件。这在用户需要完成一系列步骤或存档某些里程碑的许多场景中非常有用。通过使用此小部件,您可以创建直观且现代的 UI,而无需使用任何第三方插件。

- 点赞
- 收藏
- 关注作者


评论(0)