Netdata监控安装(汉化)
Netdata监控安装(汉化)
文章目录
本教程主要描述内网环境下netdata汉化版本的安装过程
Netdata安装部署<内网>
软体下载
1、Netdata主程序:
https://github.com/firehol/netdata (原版)
https://github.com/Fhaohaizi/netdata (汉化版本)
https://github.com/jasoncheng7115/netdata-cpatch (繁体汉化补丁[自行转简体]:html、js)
2、插件及配置下载:
外网安装时自动从git拉取,内网可提前下载文件置于http上,或者直接修改脚本,跳过下载步骤,手动上传并读取本地文件即可。
http://github.com/netdata/go.d.plugin/releases/download/v0.1.0/go.d.plugin-v0.1.0.linux-amd64
http://github.com/netdata/go.d.plugin/releases/download/v0.1.0/config.tar.gz
修改脚本
1、解压文件
-
# apt-get install unzip
-
# cd /home/netdata
-
# unzip netdata-master.zip
2、安装依赖
-
# apt-get install -y zlib1g-dev gcc make git autoconf autogen automake pkg-config uuid-dev 【ubuntu】
-
# yum install -y libuuid-devel zlib-devel gcc make git autoconf autogen automake 【centos】
3、Http服务
-
>>【ubuntu】<<
-
# apt-get install apache2
-
# mkdir -p /var/www/html/netdata/go.d.plugin/releases/download/v0.1.0
-
# 上传文件<go.d.plugin-v0.1.0.linux-amd64、config.tar.gz>至此目录
-
# 重启apache:service apache2 restart
-
# 测试:wget "http://127.0.0.1:80/netdata/go.d.plugin/releases/download/v0.1.0/go.d.plugin-v0.1.0.linux-amd64"
-
>>【centos】<<
-
# yum install -y httpd
-
# mkdir -p /var/www/html/netdata/go.d.plugin/releases/download/v0.1.0
-
# 上传文件<go.d.plugin-v0.1.0.linux-amd64、config.tar.gz>至此目录
-
# 重启Http:systemctl restart httpd
-
# 测试:wget "http://127.0.0.1:80/netdata/go.d.plugin/releases/download/v0.1.0/go.d.plugin-v0.1.0.linux-amd64"
4、修改脚本:(链接改到本地 http [非https])
-
# vim /home/netdata/netdata-master/netdata-installer.sh <约823行>
-
download "http://127.0.0.1:80/netdata/go.d.plugin/releases/download/$GO_PACKAGE_VERSION/$GO_PACKAGE_BASENAME" "${tmp}/$GO_PACKAGE_BASENAME"
-
download "http://127.0.0.1:80/netdata/go.d.plugin/releases/download/$GO_PACKAGE_VERSION/config.tar.gz" "${tmp}/config.tar.gz"
部署安装
1、安装
-
# cd /home/netdata/netdata-master
-
# ./netdata-installer.sh
2、汉化
当前选择繁体汉化补丁方式部署(暂时比另一个汉化全面)
下载:https://github.com/jasoncheng7115/netdata-cpatch (繁体汉化包[自行转简体])
-
下载四个文件后使用 python 转为简体:
-
下载Python库 : zh_wiki.py 、 langconv.py
-
zh_wiki:https://github.com/csdz/nstools/blob/master/zhtools/zh_wiki.py
-
langconv:https://github.com/csdz/nstools/blob/master/zhtools/langconv.py
-
下载nstools项目,再在项目文件里复制出这两个文件出来即可;
-
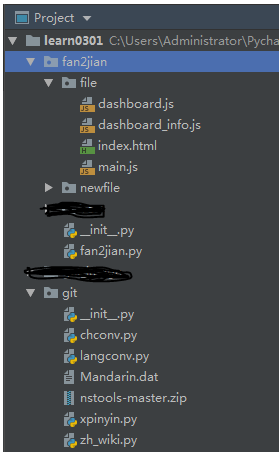
将下载的 langconv.py 和 zh_wiki.py,放在Python脚本所在目录即可使用。
-
目录结构:

Python脚本:
-
# -*- coding: utf8 -*-
-
import re
-
import os
-
from git.langconv import *
-
-
path = "file"
-
for filename in os.listdir(path):
-
print("开始处理: "+str(filename))
-
results = []
-
with open(str(path) + "/" + str(filename),'r',encoding = 'utf-8') as f_obj:
-
lines = f_obj.readlines()
-
for line in lines:
-
# print(line)
-
p = re.compile(r'[\u4e00-\u9fa5]')
-
res = re.findall(p, line)
-
results.extend(res)
-
print("繁体字符: " + str(results))
-
trans = []
-
newpath = 'newfile'
-
#清理目录
-
PathExists = os.path.exists(str(newpath))
-
if not PathExists:
-
os.makedirs(newpath)
-
print("创建目录: " + str(newpath))
-
FileExist = os.path.exists(str(newpath) + "/" + str(filename))
-
if FileExist:
-
os.remove(str(newpath) + "/" + str(filename))
-
print("删除文件: " + str(filename))
-
old_file = open(str(path) + "/" + str(filename), 'r', encoding='utf-8').readlines()
-
new_file = open(str(newpath) + "/" + str(filename), 'w', encoding='utf-8') # ,encoding = 'utf-8'
-
for line in old_file:
-
for f2j in results:
-
rf2j = Converter('zh-hans').convert(f2j)
-
trans.append(rf2j)
-
old_string = f2j
-
new_string = rf2j
-
#print(str(old_string) + " >> " + str(new_string))
-
replceline = line.replace(old_string, new_string)
-
line = replceline
-
new_file.write(replceline)
-
new_file.close()
-
print("替换结束: "+str(filename))
-
print("简体字符: " + str(trans))
-
print("===========================================================================================================")
-
print("处理结束")
-
提取简体文件覆盖 /usr/share/netdata/web/ ,注意备份。
-
【 dashboard_info.js、dashboard.js、main.js、index.html 】
-
# cd /usr/share/netdata/web;mkdir backup;cp dashboard_info.js dashboard.js main.js index.html backup
-
# 上传汉化文件覆盖之
-
# 繁体汉化,可自动简体汉化(短期一劳永逸,小版本无需频繁更新,在线繁转简网站:http://www.aies.cn/)
覆盖后注意文件属组 netdata:netdata,若不是使用该命令调整,并重启netdata服务。
-
# chown netdata:netdata {dashboard_info.js,dashboard.js,index.html,main.js}
-
# service netdata restart
集群配置
集群配置说明:https://github.com/firehol/netdata/wiki/Monitoring-ephemeral-nodes 【官方文档】
a.主节点配置
-
vi netdata.conf
-
[global]
-
hostname = Master
-
vi stream.conf
-
#[API_KEY] #注释此行,增加下方秘钥,秘钥自行生成
-
[75bb54ab-5494-4d8a-b200-5148cf03f4c7]
-
enabled = yes
b.从节点配置
-
vi netdata.conf
-
[global]
-
hostname = slave
-
memory mode = none
-
[health]
-
enabled = no
-
vi stream.conf
-
[stream]
-
enabled = yes
-
destination = ${MasterIp}:19999 #docker映射则需要修改为docker对外端口
-
api key = 75bb54ab-5494-4d8a-b200-5148cf03f4c7
-
default port = 19999 #docker映射则需要修改为docker对外端口
监控配置
a. 增加监控项目
-
# vi /etc/netdata/orig/apps_groups.conf # <结尾新增条目>
-
如:SecondaryNameNode: *org.apache.hadoop.hdfs.server.namenode.SecondaryNameNode*
b. 添加显卡监控
旧版
插件地址:https://github.com/coraxx/netdata_nv_plugin#installation
-
cp python_modules/pynvml.py /usr/libexec/netdata/python.d/python_modules/
-
cp nv.chart.py /usr/libexec/netdata/python.d/
-
cp nv.conf /etc/netdata/python.d/
-
配置:<开关>
-
vi python.d.conf
-
# nv: no
新版
新版netdata自带nvidia显卡监控:
-
# vim /usr/lib/netdata/conf.d/python.d.conf
-
nvidia_smi: yes
.精简项目
-
# vi /etc/netdata/orig/apps_groups.conf
-
#apps.plugin: apps.plugin
-
#node.d.plugin: *node.d.plugin*
-
#python.d.plugin: *python.d.plugin*
-
#tc-qos-helper: *tc-qos-helper.sh*
-
#sql: mysqld* mariad* postgres* postmaster* oracle_* ora_*
-
#nosql: mongod redis* memcached *couchdb*
-
#timedb: prometheus *carbon-cache.py* *carbon-aggregator.py* *graphite/manage.py* *net.opentsdb.tools.TSDMain*
-
#email: dovecot imapd pop3d amavis* master zmstat* zmmailboxdmgr qmgr oqmgr saslauthd opendkim clamd freshclam unbound tlsmgr postfwd2 postscreen postfix smtp* lmtp*
-
#torrents: *deluge* transmission* *SickBeard* *CouchPotato* *rtorrent*
-
#media: mplayer vlc xine mediatomb omxplayer* kodi* xbmc* mediacenter eventlircd
-
#media: mpd minidlnad mt-daapd avahi* Plex*
-
#X: X Xorg xinit lightdm xdm pulseaudio gkrellm xfwm4 xfdesktop xfce* Thunar
-
#X: xfsettingsd xfconfd gnome-* gdm gconf* dconf* xfconf* *gvfs gvfs* kdm slim
-
#X: evolution-* firefox chromium opera vivaldi-bin epiphany WebKit*
-
#rabbitmq: *rabbitmq*
-
#sidekiq: *sidekiq*
-
#java: java
-
#ipfs: ipfs
-
# vi netdata.conf
-
[users.*]
-
enabled = no
-
[ipv6.*]
-
enabled = no
-
[groups.*]
-
enabled = no
记录时长
-
# vi /etc/netdata/netdata.conf
-
[global]
-
history = 720000
历史查询
官方说明:https://docs.netdata.cloud/zh/backends/

启动环境
# service netdata restart
监控页面
http://IpAddress:19999
降低CPU占用
-
降低cpu占用:
-
编辑:vi netdata.conf
-
[global]
-
update every = 2
-
或者只修改apps部分:
-
[plugin:apps]
-
update every = 2
Docker数据缺失
-
a. 解决docker中(Apps plugin is missing information)(Applications->disk 部分数据缺失)
-
方法一:(基本无效)
-
chown root:netdata /usr/libexec/netdata/plugins.d/apps.plugin
-
chmod 4750 /usr/libexec/netdata/plugins.d/apps.plugin
-
方法二:(使用root用户执行)
-
修改:vi netdata.conf
-
[global]
-
run as user = root
-
修改权限:
-
chown -R root:root /usr/share/netdata/web
转载自:https://blog.csdn.net/waplys/article/details/88187438
文章来源: brucelong.blog.csdn.net,作者:Bruce小鬼,版权归原作者所有,如需转载,请联系作者。
原文链接:brucelong.blog.csdn.net/article/details/95615506
- 点赞
- 收藏
- 关注作者


评论(0)