Fragment

第五章 Fragement
1.知识点
1.概念
2.应用
2.为何用?
坚持AUF(Always Use Fragment)原则,即总是使用Fragment。Fragment本身占用内存比Activity少很多,在流畅性,性能上具有很大的优势,尤其是在中低端手机上。此外,如果你的应用需要移植到平板上的话,那使用Fragment更是你的不二之选。
3.是什么?
Frament也叫碎片,片段。是Google在Android 3.0引入的,主要为了给大屏幕的UI提供支持的。
Frament可以理解为一个迷你的Activity或者是Activity的模块化的组件,它有自己的生命周期与显示界面,我们可以利用多个Frament嵌套在Activity达到以下的功能,如适配平板,或适配横竖屏幕,或者在程序运行的过程中动态的更改我们的UI界面。如下图:
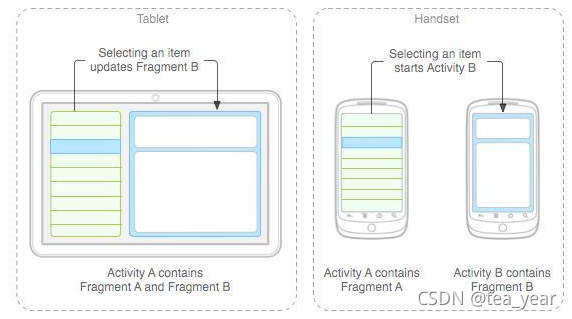


上图是显示应用运行在手机情况下,从一个列表页面跳转到详细页面的例子。如果我们不使用Fragment的情况,当应用运行在平板上面的情况,就只能显示放大版的手机显示的界面,为了利用平板的特性,Android在3.0版本中提供了Fragment技术,我们就可以将列表与内容以组件的方式插入,在手机上分屏显示两个内容,在平板上面就可以左右显示两个内容。
您可以将片段视为 Activity 的模块化组成部分,它具有自己的生命周期,能接收自己的输入事件,并且您可以在 Activity 运行时添加或删除片段(有点像您可以在不同 Activity 中重复使用的“子 Activity”)。
片段必须始终嵌入在 Activity 中,其生命周期直接受宿主 Activity 生命周期的影响。
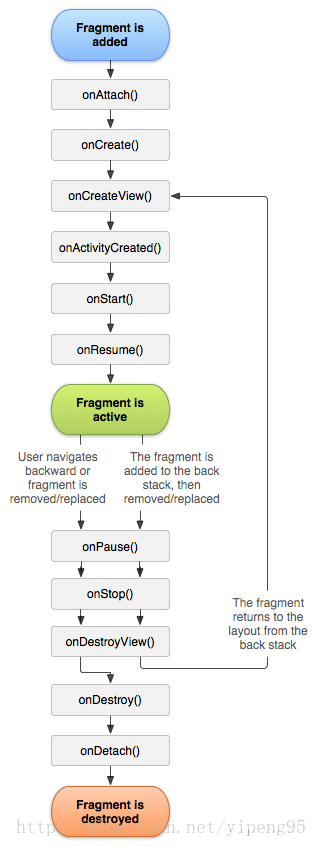
4.生命周期
每一个fragments 都有自己的一套生命周期回调方法和处理自己的用户输入事件。 对应生命周期可参考下图。其中大多数程序必须使用Fragments 必须实现的三个回调方法分别为:
onCreate
系统创建Fragments 时调用,可做执行初始化工作或者当程序被暂停或停止时用来恢复状态,跟Activity 中的onCreate相当。
onCreateView
用于首次绘制用户界面的回调方法,必须返回要创建的Fragments 视图UI。假如你不希望提供Fragments 用户界面则可以返回NULL。
onPause
当用户离开这个Fragments 的时候调用,这时你要提交任何应该持久的变化,因为用户可能不会回来。更多的事件可以参考生命周期关系图。
5.如何使用
5.1.主界面xml文件
<?xml version="1.0" encoding="utf-8"?>
<LinearLayout xmlns:android="http://schemas.android.com/apk/res/android"
    xmlns:app="http://schemas.android.com/apk/res-auto"
    xmlns:tools="http://schemas.android.com/tools"
    android:layout_width="match_parent"
    android:layout_height="match_parent"
    android:orientation="horizontal"
    tools:context=".MainActivity">

    <fragment
        android:layout_width="0dp"
        android:layout_height="match_parent"
        android:name="com.aaa.fragmentdemo.LeftFragment"
        android:layout_weight="1"
        android:id="@+id/left_fragment" />
    <fragment
        android:layout_width="0dp"
        android:layout_height="match_parent"
        android:name="com.aaa.fragmentdemo.RightFragment"
        android:layout_weight="1"
        android:id="@+id/right_fragment" />
</LinearLayout>
- 1
- 2
- 3
- 4
- 5
- 6
- 7
- 8
- 9
- 10
- 11
- 12
- 13
- 14
- 15
- 16
- 17
- 18
- 19
- 20
- 21
- 22
5.2 left_fragment.xml
<?xml version="1.0" encoding="utf-8"?>
<LinearLayout xmlns:android="http://schemas.android.com/apk/res/android"
    android:layout_width="match_parent"
    android:layout_height="match_parent">
    <Button

        android:text="加载内容"
        android:layout_width="wrap_content"
        android:layout_height="wrap_content"
        android:id="@+id/btn"
        android:layout_weight="1"
        android:onClick="myClick"
        />
</LinearLayout>
- 1
- 2
- 3
- 4
- 5
- 6
- 7
- 8
- 9
- 10
- 11
- 12
- 13
- 14
5.3 right_fragment.xml
<?xml version="1.0" encoding="utf-8"?>
<LinearLayout xmlns:android="http://schemas.android.com/apk/res/android"
    android:layout_width="match_parent"
    android:layout_height="match_parent">
    <TextView
        android:text="TextView"
        android:layout_width="wrap_content"
        android:layout_height="wrap_content"
        android:id="@+id/textView2"
        android:layout_weight="1" />
</LinearLayout>
- 1
- 2
- 3
- 4
- 5
- 6
- 7
- 8
- 9
- 10
- 11
5.4 主界面后台代码
package com.aaa.fragmentdemo;

import androidx.appcompat.app.AppCompatActivity;
import android.content.Intent;
import android.os.Bundle;
import android.view.View;
import android.widget.Button;
import android.widget.Toast;

public class MainActivity extends AppCompatActivity {
    Button btn_sta, btn_dyn;
    @Override
    protected void onCreate(Bundle savedInstanceState) {
        super.onCreate(savedInstanceState);
        setContentView(R.layout.activity_main);
        //----------------------------------------------
    }
    public void myClick(View view) {
        Toast.makeText(this, "Button clicked!", Toast.LENGTH_SHORT).show();
    }
}
- 1
- 2
- 3
- 4
- 5
- 6
- 7
- 8
- 9
- 10
- 11
- 12
- 13
- 14
- 15
- 16
- 17
- 18
- 19
- 20
- 21
5.5 左侧代码
package com.aaa.fragmentdemo;

import android.app.Fragment;
import android.os.Bundle;
import android.view.LayoutInflater;
import android.view.View;
import android.view.ViewGroup;

public class LeftFragment extends Fragment {
    @Override
    public View onCreateView(LayoutInflater inflater, ViewGroup container, Bundle savedInstanceState) {
        View view = inflater.inflate(R.layout.left_fragment, container, false);
        return view;
    }
}
- 1
- 2
- 3
- 4
- 5
- 6
- 7
- 8
- 9
- 10
- 11
- 12
- 13
- 14
- 15
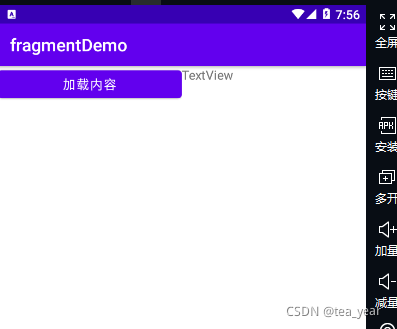
5.6 效果预览
文章来源: aaaedu.blog.csdn.net,作者:tea_year,版权归原作者所有,如需转载,请联系作者。
原文链接:aaaedu.blog.csdn.net/article/details/120815503

- 点赞
- 收藏
- 关注作者
评论(0)