Vue项目部署到Nginx服务-温馨版
【摘要】
Vue项目部署到Nginx服务-温馨版
文章目录
Vue项目部署到Nginx服务-温馨版1.概述2.搭建Nginx服务2.1.下载Nginx包2.2.配置Nginx编译环境1.安装gcc2.安装...
Vue项目部署到Nginx服务-温馨版
1.概述
这篇文章介绍两件事情,一个是搭建Nginx服务,一个是项目部署到Nginx服务。
2.搭建Nginx服务
Nginx服务搭建包含三个步骤
- 下载Nginx二进制安装包
- 配置Nginx编译环境
- 编译Nginx二进制包
- 设置Nginx配置文件
2.1.下载Nginx包
- 1.下载地址
http://nginx.org/en/download.html - 2.点击Nginx的linux版本下载

2.2.配置Nginx编译环境
Nginx包下载下来是一个二进制包,他不是解压就能用,需要进行编译生成Nginx服务才能使用,因此我们需要对他进行编译。
1.安装gcc
yum install gcc-c++
- 1
2.安装PCRE pcre-devel
Nginx的Rewrite模块和HTTP核心模块会使用到PCRE正则表达式语法。这里需要安装两个安装包pcre和pcre-devel。第一个安装包提供编译版本的库,而第二个提供开发阶段的头文件和编译项目的源代码。
yum install -y pcre pcre-devel
- 1
3.安装zlib
zlib库提供了开发人员的压缩算法,在Nginx的各种模块中需要使用gzip压缩。
yum install -y zlib zlib-devel
- 1
4.安装Open SSL
nginx不仅支持 http协议,还支持 https(即在 ssl 协议上传输 http),如果使用了 https,需要安装 OpenSSL 库。
yum install -y openssl openssl-devel
- 1
2.3.编译Nginx二进制包
1.解压Nginx包
将我们下载的Nginx二进制安装包放到Linux服务器上,路径可以随意。这里放到了home下。

tar -zxvf nginx-1.18.0.tar.gz
- 1
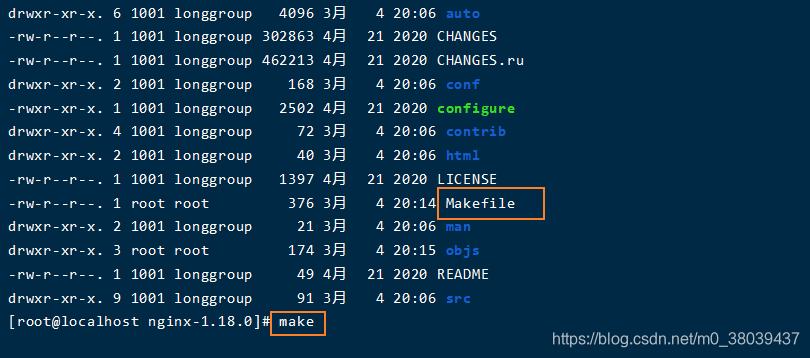
2.生成Makefile文件
- 进入Nginx解压文件

- 执行./configure命令生成 Makefile文件

补充: 如果需要开始https支持,这里请不要直接执行./configure,即不要直接执行该脚本,而是在该脚本后面加上SSL模块,请执行如下命令替代 ./confingure
–with-http_ssl_module 的意思,顾名思义可知是添加https支持。
添加https支持也很简单,添加SSL证书并修改 nginx.conf
附带一个SSL证书免费申请网站:https://www.sslforfree.com/
./configure --with-http_ssl_module
- 1
3.编译安装nginx
- 编译安装nginx时候下面没有指定安装的路径,默认安装后的路径是/usr/local/nginx
- 如果需要指定安装路径可以搜索下make 指定安装路径的命令
# 进入nginx解压包路径
cd /home/qiaozhi/nginx-1.18.0
# 执行make编译命令
make
# 执行安装nginx命令
make install
- 1
- 2
- 3
- 4
- 5
- 6

2.4.Nginx常用命令
1.启动Nginx
# 进入/usr/local/nginx/sbin目录,输入./nginx即可启动nginx
cd /usr/local/nginx/sbin

# 启动nginx
./nginx
- 1
- 2
- 3
- 4
- 5
2.关闭Nginx
# 进入/usr/local/nginx/sbin目录
cd /usr/local/nginx/sbin
# 关闭Nginx
./nginx -s quit  或者 ./nginx -s stop
- 1
- 2
- 3
- 4
3.重启Nginx
# 进入/usr/local/nginx/sbin目录
cd /usr/local/nginx/sbin
# 关闭Nginx
./nginx -s reload
- 1
- 2
- 3
- 4
4.查看Nginx进程
ps -ef |grep nginx
- 1
5.设置nginx开机启动,只需在rc.local增加启动代码即可
# 1.编辑配置文件
vim /etc/rc.local

# 2.然后在底部增加/usr/local/nginx/sbin/nginx

  1 #!/bin/bash
  2 # THIS FILE IS ADDED FOR COMPATIBILITY PURPOSES
  3 #
  4 # It is highly advisable to create own systemd services or udev rules
  5 # to run scripts during boot instead of using this file.
  6 #
  7 # In contrast to previous versions due to parallel execution during boot
  8 # this script will NOT be run after all other services.
  9 #
 10 # Please note that you must run 'chmod +x /etc/rc.d/rc.local' to ensure
 11 # that this script will be executed during boot.
 12
 13 touch /var/lock/subsys/local
 14 # 设置nginx开机启动
 15 /usr/local/nginx/sbin/nginx
- 1
- 2
- 3
- 4
- 5
- 6
- 7
- 8
- 9
- 10
- 11
- 12
- 13
- 14
- 15
- 16
- 17
- 18
- 19
- 20
3.部署Vue项目
Vue项目部署分为如下几个步骤
- 1.编译vue项目
- 2.上传到Nginx服务器
- 3.设置Nginx配置文件指向Vue项目
3.1.打包上传vue项目
1.打包vue项目
# 在vue开发工具中执行构建命令
npm run build
- 1
- 2
2.上传vue项目到Nginx服务器
- 1.在Nginx服务器上新建文件夹管理项目,我这里在home下新建文件夹存项目

- 2.将vue打包好的dist文件夹放到Nginx的管理项目文件夹下。

- 3.给管理项目文件夹赋操作权限
chmod -R 777 /helperResolve
- 1
3.2.设置Nginx配置文件
1.备份Nginx配置文件
# 1.进入nginx配置文件路径
cd /usr/local/nginx/conf
# 2.备份nginx配置文件
cp nginx.conf nginx.conf_back
- 1
- 2
- 3
- 4
2.nginx.conf配置vue项目
- 1.打开配置文件进行配置
vim nginx.conf
- 1
- 2.设置启动nginx用户

- 3.配置项目路径

3.启动Nginx服务访问项目
- 1.启动Nginx服务
# 进入/usr/local/nginx/sbin目录,输入./nginx即可启动nginx
cd /usr/local/nginx/sbin

# 启动nginx
./nginx
- 1
- 2
- 3
- 4
- 5
- 2.访问项目
在浏览器输入Nginx服务的地址访问项目

文章来源: brucelong.blog.csdn.net,作者:Bruce小鬼,版权归原作者所有,如需转载,请联系作者。
原文链接:brucelong.blog.csdn.net/article/details/114383466
【版权声明】本文为华为云社区用户转载文章,如果您发现本社区中有涉嫌抄袭的内容,欢迎发送邮件进行举报,并提供相关证据,一经查实,本社区将立刻删除涉嫌侵权内容,举报邮箱:
cloudbbs@huaweicloud.com
- 点赞
- 收藏
- 关注作者


评论(0)