AQS源码学习

AQS源码解读
视频参考:AQS源码解析
什么是AQS
AQS全称为 AbstractQueuedSynchronizer,抽象队列同步器。
是用来构建锁或者其他同步器组件的重量级基础框架以及整个JUC体系的基石。
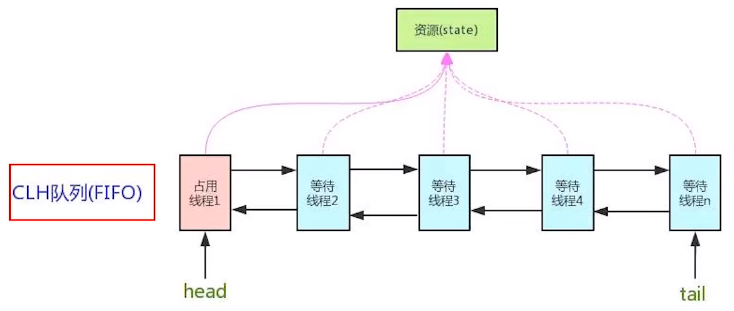
基本原理: 通过内置的FIFO队列 完成资源获取线程的排队工作,并且通过一个int类型变量表示持有锁的状态。
CLH: 等待队列是“CLH”(Craig、Landin 和 Hagersten)锁定队列的变体
AQS能干嘛

- AQS是一个队列
- 保存获取、抢占资源失败的线程数据
- 有一定的阻塞等待唤醒机制保证锁分配
- 它将请求共享资源的线程封装成队列的结点(Node),通过CAS、自旋以及LockSupportpark)的方式,维护state变量的状态,使并发达到同步的控制效果。
源码解读
重要类属性
private volatile int state; // 同步状态
AQS使用一个volatile的int类型成员变量来表示同步状态,通过内置的FIFO队列去完成资源获取的排队工作将每条要去抢占资源的线程封装成一个Node
节点来实现锁的分配,通过CAS完成对state值的修改。
state成员变量相当于银行办理业务的受理窗口状态。
- 零就是没人,自由状态可以办理
- 大于等于1,有人占用窗口,等着去
重要结构:AQS的CLH队列
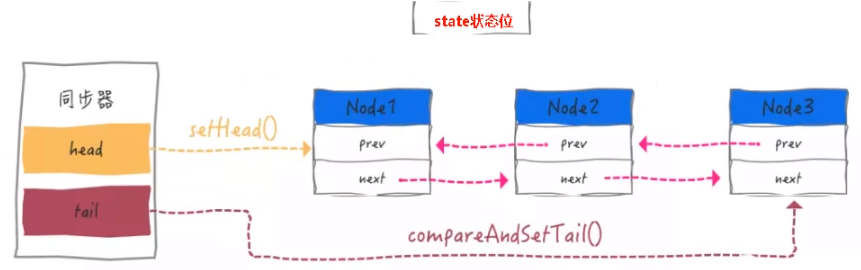
- CLH队列是一个双向队列
- 类比银行候客区的等待顾客
官方解释:
等待队列是“CLH”(Craig、Landin和Hagersten)锁队列的变体。CLH锁通常用于旋转锁。相反,我们使用它们来阻止同步器,但是使用相同的基本策略,即在其节点的前一个线程中保存一些关于该线程的控制信息。每个节点中的“status”字段跟踪线程是否应该阻塞。当一个节点的前一个节点释放时,它会发出信号。否则,队列的每个节点都充当一个特定的通知样式监视器,其中包含一个等待线程。状态字段并不控制线程是否被授予锁等。如果线程是队列中的第一个线程,它可能会尝试获取。但是,第一并不能保证成功,它只会给人争取的权利。因此,当前发布的内容线程可能需要重新等待。
要排队进入CLH锁,您可以将其作为新的尾部进行原子拼接。要出列,只需设置head字段。
有阻塞就需要排队,排队就需要队列。
AQS: state变量 + CLH变种的双端队列
Node类源码
AQS内部类Node源码
static final class Node {
        /** Marker to indicate a node is waiting in shared mode */
        // 表示线程以共享的模式等待锁
        static final Node SHARED = new Node();

        /** Marker to indicate a node is waiting in exclusive mode */
    	// 表示线程正在以独占的方式等待锁
        static final Node EXCLUSIVE = null;

        /** waitStatus value to indicate thread has cancelled */
    	// 线程被取消时的状态
        static final int CANCELLED =  1;

        /** waitStatus value to indicate successor's thread needs unparking */
    	// 后续线程需要唤醒
        static final int SIGNAL    = -1;

    	/** waitStatus value to indicate thread is waiting on condition */
    	// 等待condition 唤醒
        static final int CONDITION = -2;
        /**
         * waitStatus value to indicate the next acquireShared should
         * unconditionally propagate
         */
    	// 共享式同步状态获取将会无条件的传播下去(不懂)
        static final int PROPAGATE = -3;

    	// 当前节点在队列中的状态
    	// 初始为0 状态为上面的几种
    	// 对于条件节点,该字段被初始化为 CONDITION。 它使用 CAS 修改(或在可能的情况下,无条件 volatile 写入)。
        volatile int waitStatus;

      	// 前驱节点
        volatile Node prev;

       	// 后继节点
        volatile Node next;

        // 处于该节点的线程
        volatile Thread thread;

        // 指向下一个处于CONDITION状态的线程
        Node nextWaiter;

        /**
         * Returns true if node is waiting in shared mode.
         */
        final boolean isShared() {
            return nextWaiter == SHARED;
        }

   		/**
   		 * 返回前驱节点,没有抛出NPE
   		 */
        final Node predecessor() throws NullPointerException {
            Node p = prev;
            if (p == null)
                throw new NullPointerException();
            else
                return p;
        }

        Node() {    // Used to establish initial head or SHARED marker
        }

        Node(Thread thread, Node mode) {     // Used by addWaiter
            this.nextWaiter = mode;
            this.thread = thread;
        }

        Node(Thread thread, int waitStatus) { // Used by Condition
            this.waitStatus = waitStatus;
            this.thread = thread;
        }
    }
AQS队列的基本结构
从ReentrantLock解读AQS
ReentrantLock源码
下面是relock(简写)的基本结构
public class ReentrantLock implements Lock, java.io.Serializable {
    private static final long serialVersionUID = 7373984872572414699L;

    // 内部属性 sync
    private final Sync sync;

    // Sync 是一个抽象类,继承了 AQS
    abstract static class Sync extends AbstractQueuedSynchronizer {
        // ...
    }

    // 非公平锁的实现,继承了 Sync
    static final class NonfairSync extends Sync {
       // ...
    }

   // 公平锁的实现,继承了 Sync
    static final class FairSync extends Sync {
        // ...
    }

    public ReentrantLock() {
        sync = new NonfairSync();
    }

    public ReentrantLock(boolean fair) {
        sync = fair ? new FairSync() : new NonfairSync();
    }
}
ReentrantLock默认构造器返回一个 非公平锁,可以支持传入一个 布尔类型的值,指定返回一个 非公平锁 或者 公平锁。
relock的 lock()方法
public void lock() {
  sync.lock();
}
lock方法调用 sync的lock方法,这里面又分为 FairSync 和 NonFairSync
FairSync 和NonFairSync都重写了 AQS的lock方法
-
FairSync
// lock调用了 Sync 父类的 acquire方法, acquire方法调用了 重写后的 tryAcquire方法 final void lock() { acquire(1); } protected final boolean tryAcquire(int acquires) { final Thread current = Thread.currentThread(); int c = getState(); if (c == 0) { if (!hasQueuedPredecessors() && compareAndSetState(0, acquires)) { setExclusiveOwnerThread(current); return true; } } else if (current == getExclusiveOwnerThread()) { int nextc = c + acquires; if (nextc < 0) throw new Error("Maximum lock count exceeded"); setState(nextc); return true; } return false; } -
NonFairSync
 final void lock() {
     if (compareAndSetState(0, 1))
         setExclusiveOwnerThread(Thread.currentThread());
     else
         acquire(1);
 }
公平锁与非公平锁的区别在于
FairSync在获取同步状态时多了一个限制条件:!hasQueuedPredecessors()hasQueuedPredecessors 判断了是否需要排队
NonFairSync的占锁流程
- 尝试加锁。
- 加锁失败,线程入队列。
- 线程入队列后,进入阻塞状态。
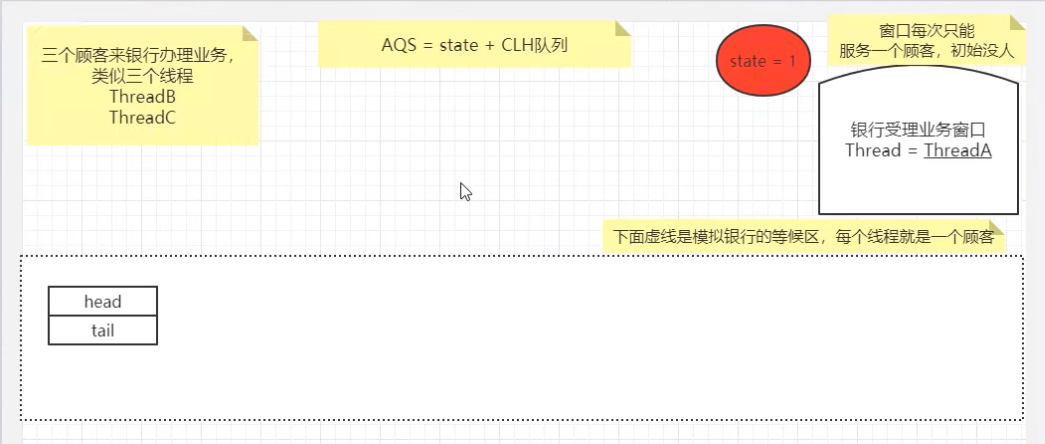
从银行流程理解AQS流程(非公平锁)
模拟三个线程 A、 B、 C来银行办理业务,现在只有一个窗口办理,所以需要排队。
初始状态: state = 0

启动线程A,默认按照非公平锁执行。调用relock的lock()方法
relock .lock ()

// NonfairSync 方法
final void lock() {
    if (compareAndSetState(0, 1))  // 尝试是否可以直接占锁成功,通过unsafe类的CAS功能
        setExclusiveOwnerThread(Thread.currentThread());  // 设置独占线程,开始是 A
    else
        acquire(1); // 占锁失败执行 acquire方法, 如线程B
}

// AQS 方法
public final void acquire(int arg) {
    //
    if (!tryAcquire(arg) &&
        acquireQueued(addWaiter(Node.EXCLUSIVE), arg))
        selfInterrupt();
}

// NonfairSync方法
protected final boolean tryAcquire(int acquires) {
    return nonfairTryAcquire(acquires);
}

// Sync的方法
final boolean nonfairTryAcquire(int acquires) {
    // 尝试再次占用
    final Thread current = Thread.currentThread();
    int c = getState();
    if (c == 0) {
        if (compareAndSetState(0, acquires)) {
            setExclusiveOwnerThread(current);
            return true;
        }
    }
    else if (current == getExclusiveOwnerThread()) {
        int nextc = c + acquires;
        if (nextc < 0) // overflow
            throw new Error("Maximum lock count exceeded");
        setState(nextc);
        return true;
    }
    return false;
}
A抢占到锁,线程A开始办业务。
-
假设线程B、C开始之前,线程A又执行了一次relock的
lock方法,会发生什么呢?(可重入锁)final boolean nonfairTryAcquire(int acquires) { // 尝试再次占用 final Thread current = Thread.currentThread(); // 当前线程是 线程A int c = getState(); // 获取 state = 1 if (c == 0) { if (compareAndSetState(0, acquires)) { setExclusiveOwnerThread(current); return true; } } else if (current == getExclusiveOwnerThread()) { // 走这里 int nextc = c + acquires; // nextc = 1 + 1 = 2 if (nextc < 0) // overflow throw new Error("Maximum lock count exceeded"); setState(nextc); // state 变为 2,则这个地方就需要 unlock两次,才能将state变为0 return true; } return false; }
线程B开始运行,调用lock方法
由于此时线程A还在占用,所以compareAndSetState方法失败,线程B执行acquire方法
final boolean nonfairTryAcquire(int acquires) {
    // 尝试再次占用
    final Thread current = Thread.currentThread();  // 这里是线程B
    int c = getState();  // state == 1
    if (c == 0) {
        if (compareAndSetState(0, acquires)) {
            setExclusiveOwnerThread(current);
            return true;
        }
    }
    else if (current == getExclusiveOwnerThread()) { // 独占线程 线程A 当前线程 线程B  A!=B
        int nextc = c + acquires;
        if (nextc < 0) // overflow
            throw new Error("Maximum lock count exceeded");
        setState(nextc);
        return true;
    }
    return false; // 直接返回false
}
线程B尝试获取锁失败,
if (!tryAcquire(arg) &&  // 线程B获取失败,执行acquireQueued方法
	acquireQueued(addWaiter(Node.EXCLUSIVE), arg))
	selfInterrupt();

acquireQueued(addWaiter(Node.EXCLUSIVE), arg)
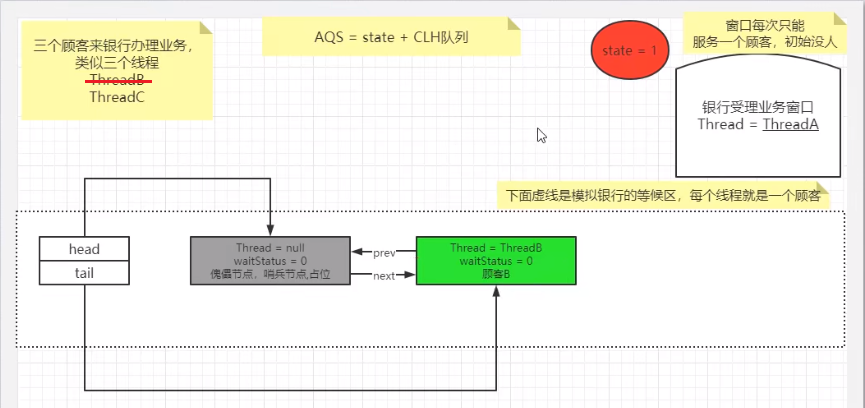
线程B加入等待队列
addWaiter(Node.EXCLUSIVE) > acquireQueued
// 创建一个节点,并且将其快速添加到队尾
private Node addWaiter(Node mode) {
Node node = new Node(Thread.currentThread(), mode);
Node pred = tail; // 队尾节点
if (pred != null) {
// 将新节点作为队尾节点
node.prev = pred;
if (compareAndSetTail(pred, node)) {
pred.next = node;
return node;
}
}
// 快速添加到队尾失败,则执行 enq方法,队列为空时。
enq(node);
return node;
}
private Node enq(final Node node) {
// 死循环
for (;;) {
Node t = tail;
if (t == null) { // Must initialize
if (compareAndSetHead(new Node())) // 如果队尾为空,插入一个空的节点,也就是傀儡节点
tail = head;
} else {
node.prev = t;
if (compareAndSetTail(t, node)) { // 真正插入我们需要的节点,也就是包含线程B引用的节点
t.next = node;
return t;
}
}
}
}
final boolean acquireQueued(final Node node, int arg) {
boolean failed = true;
try {
boolean interrupted = false;
for (;;) {
final Node p = node.predecessor();
// 返回前一个节点,对于线程B来说,p就是傀儡节点
// p == head 满足条件, 由于A还在占用,所以tryAcquire返回一个false
// 走下面的if
//第二次循环,假设线程A继续正在工作,下面的if语块还是不执行
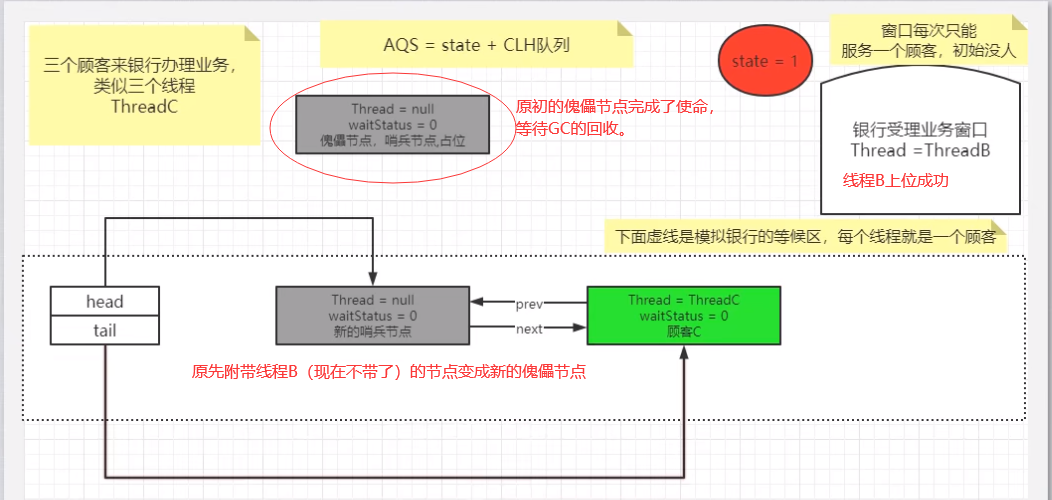
if (p == head && tryAcquire(arg)) {
setHead(node);// 将附带线程B的节点变成新的傀儡节点,去掉 前驱指针
p.next = null; // help GC //置空原傀儡指针与新的傀儡节点之间的后驱指针,方便GC回收
failed = false;
return interrupted;
}
// shouldParkAfterFailedAcquire
if (shouldParkAfterFailedAcquire(p, node) &&
parkAndCheckInterrupt()) // 通过parkAndCheckInterrupt()使用了 LockSupport阻塞了线程B
// 下次线程被唤醒从这个地方开始执行。
interrupted = true;
}
} finally {
if (failed)
cancelAcquire(node);
}
}
private static boolean shouldParkAfterFailedAcquire(Node pred, Node node) {
// p指向傀儡节点,p.waitStatus = 0
int ws = pred.waitStatus;
if (ws == Node.SIGNAL) // -1
return true;
if (ws > 0) {
do {
node.prev = pred = pred.prev;
} while (pred.waitStatus > 0);
pred.next = node;
} else {
// 第一次走这里,将p的waitStatus设为 -1
compareAndSetWaitStatus(pred, ws, Node.SIGNAL);
}
return false;
}
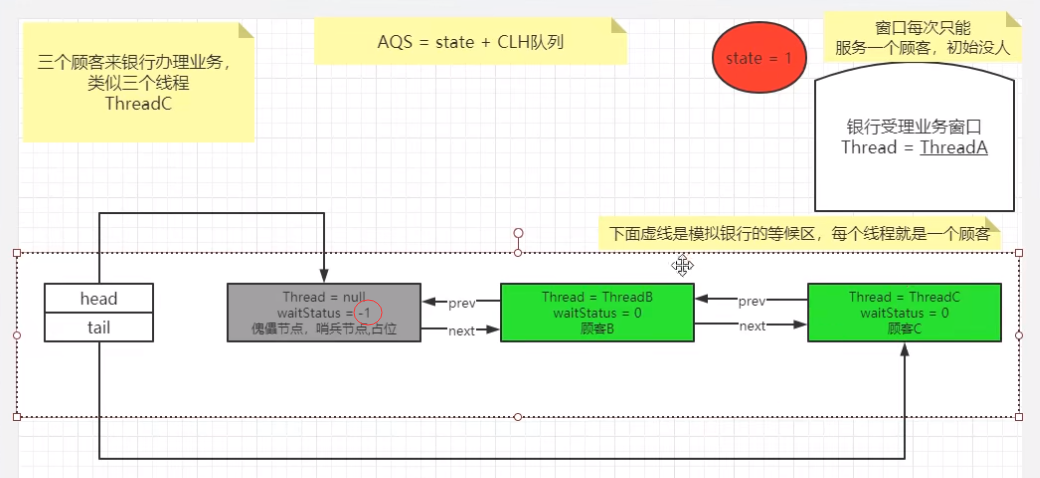
线程C开始获取锁
双向列表中,第一个节点为虚节点,也叫哨兵节点,其实不存储任何信息,只是占位
由于线程A还在使用,线程C与线程B一样,同样会被阻塞。
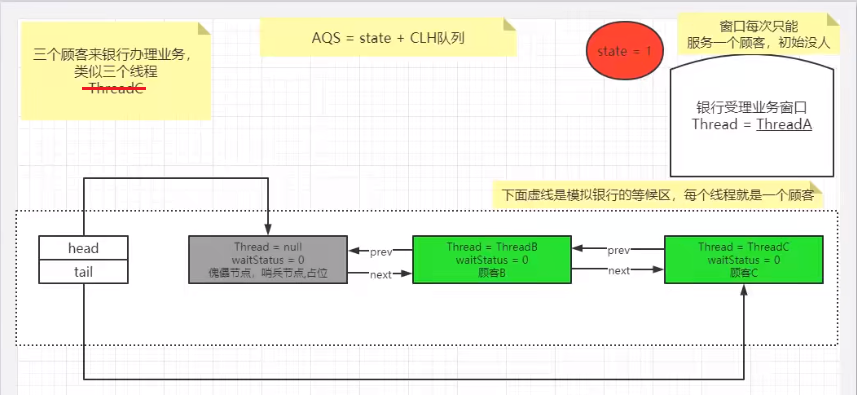
线程A释放锁
线程A调用完成后,需要调用lock.unlock()方法
// relock
public void unlock() {
sync.release(1);
}
// AQS的方法
public final boolean release(int arg) {
if (tryRelease(arg)) { //
Node h = head; // 返回傀儡节点
if (h != null && h.waitStatus != 0)
unparkSuccessor(h); // 设置傀儡节点状态为 0 ,并且 唤醒傀儡节点的下一个节点。
return true;
}
return false;
}
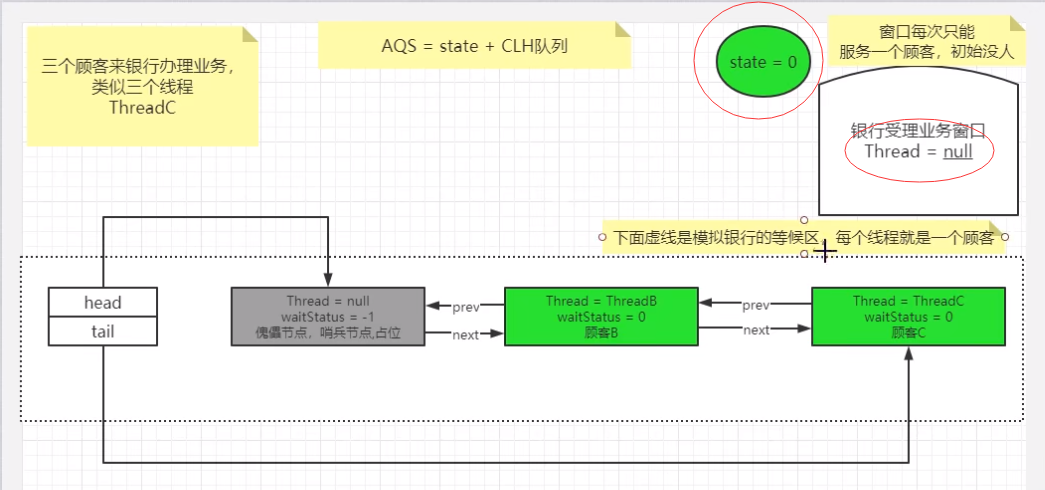
// Relock Sync的方法
protected final boolean tryRelease(int releases) { // releases = 1
int c = getState() - releases; // c = 1 - 1 = 0
if (Thread.currentThread() != getExclusiveOwnerThread())
throw new IllegalMonitorStateException();
boolean free = false;
if (c == 0) {
free = true;
setExclusiveOwnerThread(null); // c=0 设置独占线程为null
}
setState(c);
return free;
}
private void unparkSuccessor(Node node) {
// p表示傀儡节点
int ws = node.waitStatus;
if (ws < 0)
// waitStatus为-1 满足,改为0
compareAndSetWaitStatus(node, ws, 0);
Node s = node.next;
if (s == null || s.waitStatus > 0) {
s = null;
for (Node t = tail; t != null && t != node; t = t.prev)
if (t.waitStatus <= 0)
s = t;
}
if (s != null)
// 唤醒傀儡节点的下一个节点, 带有线程B的节点。
LockSupport.unpark(s.thread);
}
线程B获取锁成功
private void setHead(Node node) {
    head = node;
    node.thread = null;  // 傀儡节点的线程去掉
    node.prev = null;
}
公平锁回溯获取锁流程
更多细节参考:(11条消息) AQS深入理解 hasQueuedPredecessors源码分析 JDK8_anlian523的博客-CSDN博客
FairSync执行lock()方法
final void lock() {
    acquire(1);
}

public final void acquire(int arg) {
    if (!tryAcquire(arg) &&
        acquireQueued(addWaiter(Node.EXCLUSIVE), arg))
        selfInterrupt();
}

protected final boolean tryAcquire(int acquires) {
    final Thread current = Thread.currentThread();
    int c = getState();
    if (c == 0) {
        // 这个地方多了一个  hasQueuedPredecessors()  通过这个方法来判断有没有线程排在了当前线程前面
        // 只有这个方法返回false的时候,才会通过CAS占用锁
        if (!hasQueuedPredecessors() &&
            compareAndSetState(0, acquires)) {
            setExclusiveOwnerThread(current);
            return true;
        }
    }
    else if (current == getExclusiveOwnerThread()) {
        int nextc = c + acquires;
        if (nextc < 0)
            throw new Error("Maximum lock count exceeded");
        setState(nextc);
        return true;
    }
    return false;
}

// 公平锁独有
public final boolean hasQueuedPredecessors() {
    // The correctness of this depends on head being initialized
    // before tail and on head.next being accurate if the current
    // thread is first in queue.
    Node t = tail; // Read fields in reverse initialization order
    Node h = head;
    Node s;
    // 1. head 和 tail都为null,说明队列为空,可以占用锁,false
    // 2. head 和 tail都指向同一个Node,也返回false 说明只有 一个 dummy node(傀儡节点)
    return h != t &&
        // 3. (s = h.next == null) 为false 分多钟情况,参见前面的参考连接
        // 4. (s.thread != Thread.currentThread()) 为false 分多钟情况,参见前面的参考连接
        ((s = h.next) == null || s.thread != Thread.currentThread());
}
提问:为什么先读取 tail的值,再读取 head的值?
答案: 去看参考连接吧,主要是为了 避免 (s = h.next) == null 报空指针异常

- 点赞
- 收藏
- 关注作者
评论(0)