彩色图片转手绘线稿的原理简述与Python实现

【摘要】
大家好,我是小小明,在学习 好友叶庭云 介绍的一门中国大学MOOC的课程中,学到手绘图像,下面我测试并总结一下。
课程链接是:https://www.icourse163.org/course/BIT-...
大家好,我是小小明,在学习 好友叶庭云 介绍的一门中国大学MOOC的课程中,学到手绘图像,下面我测试并总结一下。
课程链接是:https://www.icourse163.org/course/BIT-1001870002?from=searchPage
下面使用Python Imaging Library ( PIL ) 进行图像处理,安装方式:
pip install pillow
- 1
彩色图片转手绘线稿的原理简述
对于一张手绘图,其特征主要是边界线条较重、相同或相近色彩趋于白色、略有光源效果。
将彩色图片转换为手绘线稿,首先需要将图片转换为灰度图片。
灰度值实际代表了图像明暗的变化,而梯度代表了灰度的变化率。
调整像素的梯度值可以间接改变图像的明暗程度。
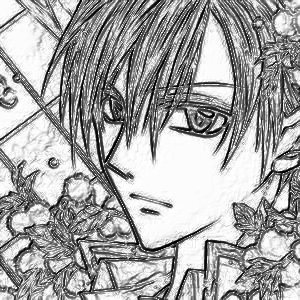
下面以如下图片为例进行测试:
from PIL import Image
import numpy as np

im = Image.open('001.jpg')
im
- 1
- 2
- 3
- 4
- 5

转换为灰度模式:
im = im.convert("L")
im
- 1
- 2

获取灰度图片像素点数据的numpy数组:
data = np.array(im)
data.shape, data.dtype
- 1
- 2
((300, 300), dtype('uint8'))
- 1
调整像素的梯度值
调整像素的梯度值间接改变图像的明暗程度
首先提取出x和y方向的梯度:
grad_x, grad_y = np.gradient(data)
print(grad_x.shape, grad_y.shape)
- 1
- 2
(300, 300) (300, 300)
- 1
深度值的取值范围为0-100,决定了梯度的缩放比例,现在预设深度值为10:
depth = 10
grad_x /= 100/depth
grad_y /= 100/depth
- 1
- 2
- 3
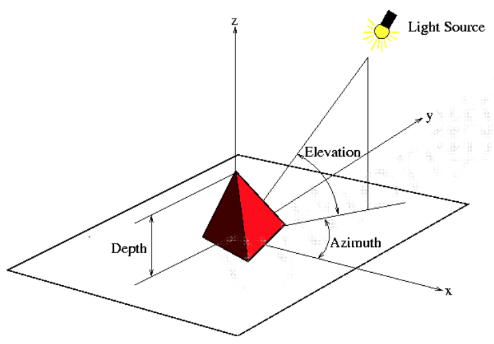
光源效果
根据灰度变化来模拟人类视觉的远近程度
- 设计一个位于图像斜上方的虚拟光源
- 光源相对于图像的俯视角为 eLevation,方位角为 Azimuth
- 建立光源对个点梯度值的影响函数
- 运算出各点的新像素值
 ]
]
假设俯视角eLevation= π 2.2 \frac \pi {2.2} 2.2π,方位角Azimuth= π 4 \frac \pi {4} 4π:
eLevation = np.pi / 2.2
azimuth = np.pi / 4
# 光源对x/y/z轴三个方向的影响程度
dx = np.cos(eLevation) * np.cos(azimuth)
dy = np.cos(eLevation) * np.sin(azimuth)
dz = np.sin(eLevation)
- 1
- 2
- 3
- 4
- 5
- 6
梯度归一化
构造x和y轴梯度的三维归一化单位坐标系:
A = np.sqrt(grad_x ** 2 + grad_y ** 2 + 1.)
uni_x = grad_x / A
uni_y = grad_y / A
uni_z = 1. / A
- 1
- 2
- 3
- 4
梯度与光源相互作用,将梯度转化为灰度:
b = 255 * (dx * uni_x + dy * uni_y + dz * uni_z)
- 1
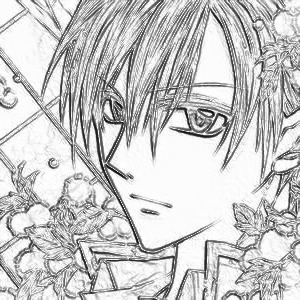
最终看看转换效果:
Image.fromarray(b.clip(0, 255).astype('uint8'))
- 1
代码封装
from PIL import Image
import numpy as np
from PIL.ImageFile import ImageFile
from typing import Union


def img2sketch(img: Union[str, ImageFile], depth=10, eLevation=np.pi / 2.2, azimuth=np.pi / 4):
    assert isinstance(img, str) or isinstance(img, ImageFile)
    assert 0 < depth <= 100
    if isinstance(img, str):
        im = Image.open(img)
    else:
        im = img
    data = np.array(im.convert("L"))
    grad_x, grad_y = np.gradient(data)

    # 根据深度缩放梯度
    grad_x /= 100/depth
    grad_y /= 100/depth

    # 光源对x/y/z轴三个方向的影响程度
    dx = np.cos(eLevation) * np.cos(azimuth)
    dy = np.cos(eLevation) * np.sin(azimuth)
    dz = np.sin(eLevation)

    # 构造x和y轴梯度的三维归一化单位坐标系
    A = np.sqrt(grad_x ** 2 + grad_y ** 2 + 1.)
    uni_x = grad_x / A
    uni_y = grad_y / A
    uni_z = 1. / A

    # 梯度与光源相互作用,将梯度转化为灰度
    b = 255 * (dx * uni_x + dy * uni_y + dz * uni_z)

    return Image.fromarray(b.clip(0, 255).astype('uint8'))
- 1
- 2
- 3
- 4
- 5
- 6
- 7
- 8
- 9
- 10
- 11
- 12
- 13
- 14
- 15
- 16
- 17
- 18
- 19
- 20
- 21
- 22
- 23
- 24
- 25
- 26
- 27
- 28
- 29
- 30
- 31
- 32
- 33
- 34
- 35
调整一下深度和光源方向测试一下:
img2sketch('001.jpg', 5, azimuth=-5/4*np.pi)
- 1
图像处理中的三个基本操作
反相:
对于三通道的RGB图片:
t = [255, 255, 255] - data    # 计算RGB三个通道的补值
Image.fromarray(t.astype('uint8'))
- 1
- 2
对于单通道的灰度图片:
t = 255 - data
Image.fromarray(t.astype('uint8'))
- 1
- 2
区间变换(灰度图像):
t = (100 / 255) * data + 150   # 区间变换
Image.fromarray(t.astype('uint8'))
- 1
- 2
像素取平方(灰度图像):
t = 255 * (data / 255) ** 2    # 像素平方
Image.fromarray(e.astype('uint8'))
- 1
- 2
文章来源: xxmdmst.blog.csdn.net,作者:小小明-代码实体,版权归原作者所有,如需转载,请联系作者。
原文链接:xxmdmst.blog.csdn.net/article/details/119064878

【版权声明】本文为华为云社区用户转载文章,如果您发现本社区中有涉嫌抄袭的内容,欢迎发送邮件进行举报,并提供相关证据,一经查实,本社区将立刻删除涉嫌侵权内容,举报邮箱:
cloudbbs@huaweicloud.com
- 点赞
- 收藏
- 关注作者
评论(0)