Java——简单Java类深入(数据表与简单Java类、一对多映射、双向一对多映射、多对多映射)

目录
1、数据表与简单Java类的映射
简单Java类是整个项目开发的灵魂,其有严格的开发标准,最为重要的是它要与数据表完全对应。由于目前没有接触过多的程序设计功能,所以对于此处的访问就有了一些限制,目前要求可以完成如下两个操作:
- 根据数据表的结构关系进行数据以及引用的设置;
- 根据数据表的结构可以取出所需要的数据。
选用熟悉的数据结构:dept、emp,实现这样的转换操作。现在开发要求如下:
1)使用以下的数据表与表中的字段:
- 雇员表emp:empno、ename、job、sal、comm、mgr、deptno;
- 部门表dept:deptno、dname、loc。
2)数据操作要求:
- 根据表结构完整的设置雇员、经理、部门的关系;
- 可以完成如下输出:
--可以输出一个雇员的完整信息,包括雇员 的领导、以及所在的部门信息;
--可以输出一个部门的完整信息,以及这个部门的所有雇员信息,以及这个雇员的领导信息。
【第一步】:写出基本字段的映射转换
- 雇员表emp:empno、ename、job、sal、comm、mgr、deptno;
- 部门表dept:deptno、dname、loc。
-
class Emp{
-
private int empno;
-
private String name;
-
private String job;
-
private double sal;
-
private double comm;
-
-
public Emp(){}
-
-
public Emp(int empno, String name, String job, double sal, double comm) {
-
this.empno = empno;
-
this.name = name;
-
this.job = job;
-
this.sal = sal;
-
this.comm = comm;
-
}
-
//setter getter暂时省略
-
public String getInfo(){
-
return "雇员编号:"+this.empno +",姓名:"+this.name +",职位:"+this.job+",佣金:"+this.sal+",佣金:"+this.comm;
-
}
-
}
-
-
class Dept{
-
private int deptno;
-
private String dname;
-
private String loc;
-
-
public Dept(){}
-
-
public Dept(int deptno, String dname, String loc) {
-
this.deptno = deptno;
-
this.dname = dname;
-
this.loc = loc;
-
}
-
//setter getter暂时省略
-
public String getInfo(){
-
return "部门编号:"+this.deptno +",名称:"+this.dname +",位置:"+this.loc;
-
}
-
}
【第二步】:设计关系字段
本程序存在两个关系:
- 自身关联:mgr字段,mgr也是一个雇员;
- 外键关联:deptno字段;
-
class Emp{
-
private int empno;
-
private String name;
-
private String job;
-
private double sal;
-
private double comm;
-
private Emp mgr;//领导,一个雇员一个领导
-
private Dept dept;//部门,一个雇员属于一个部门
-
-
public Emp(){}
-
-
public Emp(int empno, String name, String job, double sal, double comm) {
-
this.empno = empno;
-
this.name = name;
-
this.job = job;
-
this.sal = sal;
-
this.comm = comm;
-
}
-
-
public Emp getMgr() {
-
return mgr;
-
}
-
-
public void setMgr(Emp mgr) {
-
this.mgr = mgr;
-
}
-
-
public Dept getDept() {
-
return dept;
-
}
-
-
public void setDept(Dept dept) {
-
this.dept = dept;
-
}
-
-
//setter getter暂时省略
-
public String getInfo(){
-
return "雇员编号:"+this.empno +",姓名:"+this.name +",职位:"+this.job+",佣金:"+this.sal+",佣金:"+this.comm;
-
}
-
}
-
-
class Dept{
-
private int deptno;
-
private String dname;
-
private String loc;
-
private Emp[] emps;
-
-
public Dept(){}
-
-
public Dept(int deptno, String dname, String loc) {
-
this.deptno = deptno;
-
this.dname = dname;
-
this.loc = loc;
-
}
-
//setter getter暂时省略
-
public Emp[] getEmps() {
-
return emps;
-
}
-
-
public void setEmps(Emp[] emps) {
-
this.emps = emps;
-
}
-
-
public String getInfo(){
-
return "部门编号:"+this.deptno +",名称:"+this.dname +",位置:"+this.loc;
-
}
-
}
【第三步】:执行数据操作
- 设置数据关系;
-
public class MainActivity extends AppCompatActivity {
-
-
@Override
-
protected void onCreate(Bundle savedInstanceState) {
-
super.onCreate(savedInstanceState);
-
//第一步:根据已有的表结构设置数据
-
//1、准备好所有独立的类对象
-
Dept dept =new Dept(10,"技术部","China");
-
Emp empA = new Emp(100,"张三","硬件工程师",800.0,0.0);
-
Emp empB = new Emp(100,"李四","软件工程师",900.0,0.0);
-
//2、设置关系
-
empA.setMgr(empB);//设置雇员与领导关系
-
empA.setDept(dept);//设置雇员与部门关系
-
empB.setDept(dept);//设置雇员与部门关系
-
dept.setEmps(new Emp[]{empA,empB});//一个部门包含多个雇员
-
}
-
}
- 取出雇员完整数据;
-
public class MainActivity extends AppCompatActivity {
-
-
@Override
-
protected void onCreate(Bundle savedInstanceState) {
-
super.onCreate(savedInstanceState);
-
//第一步:根据已有的表结构设置数据
-
//1、准备好所有独立的类对象
-
Dept dept =new Dept(10,"技术部","China");
-
Emp empA = new Emp(100,"张三","硬件工程师",800.0,0.0);
-
Emp empB = new Emp(100,"李四","软件工程师",900.0,0.0);
-
//2、设置关系
-
empA.setMgr(empB);//设置雇员与领导关系
-
empA.setDept(dept);//设置雇员与部门关系
-
empB.setDept(dept);//设置雇员与部门关系
-
dept.setEmps(new Emp[]{empA,empB});//一个部门包含多个雇员
-
//第二步:根据表结构,利用引用关系取出数据
-
System.out.println("雇员信息:"+empA.getInfo()); //输出雇员基本信息
-
System.out.println("领导信息:"+empA.getMgr().getInfo()); //输出雇员领导信息
-
System.out.println("部门信息:"+empA.getDept().getInfo()); //输出雇员部门信息
-
-
}
-
}

- 取出部门的完整信息
-
public class MainActivity extends AppCompatActivity {
-
-
@Override
-
protected void onCreate(Bundle savedInstanceState) {
-
super.onCreate(savedInstanceState);
-
//第一步:根据已有的表结构设置数据
-
//1、准备好所有独立的类对象
-
Dept dept =new Dept(10,"技术部","China");
-
Emp empA = new Emp(100,"张三","硬件工程师",800.0,0.0);
-
Emp empB = new Emp(100,"李四","软件工程师",900.0,0.0);
-
//2、设置关系
-
empA.setMgr(empB);//设置雇员与领导关系
-
empA.setDept(dept);//设置雇员与部门关系
-
empB.setDept(dept);//设置雇员与部门关系
-
dept.setEmps(new Emp[]{empA,empB});//一个部门包含多个雇员
-
//第二步:根据表结构,利用引用关系取出数据
-
System.out.println("雇员信息:"+empA.getInfo()); //输出雇员基本信息
-
System.out.println("领导信息:"+empA.getMgr().getInfo()); //输出雇员领导信息
-
System.out.println("部门信息:"+empA.getDept().getInfo()); //输出雇员部门信息
-
System.out.println("==================================");
-
System.out.println(dept.getInfo());//部门信息
-
for(int x=0;x<dept.getEmps().length;x++){
-
System.out.println(dept.getEmps()[x].getInfo());
-
if(dept.getEmps()[x].getMgr()!=null)
-
System.out.println(dept.getEmps()[x].getMgr().getInfo());
-
-
}
-
}
-
}

2、一对多数据映射
【举例】:课程分类
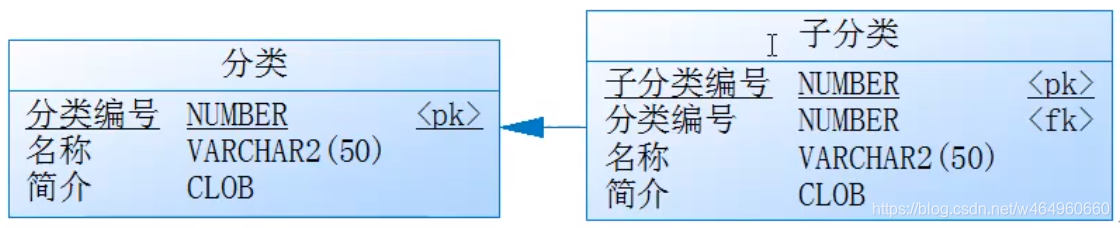
一个课程分类有多个子分类,要求:
- 利用简单Java类实现数据表的还原;
- 进行如下输出:
--可以输出一个子分类的信息,同时输出它所对应的分类信息;
--可以输出一个分类的信息,及所包含的所有子分类信息;
第一步:实现基本字段
-
class Item{
-
private int iid;
-
private String title;
-
private String note;
-
//setter getter 无参省略
-
public Item(int iid, String title, String note) {
-
this.iid = iid;
-
this.title = title;
-
this.note = note;
-
}
-
-
public String getInfo(){
-
return "id:"+this.iid+",名称:"+this.title+",简介:"+this.note;
-
}
-
-
}
-
-
class SubItem{
-
private int sid;
-
private String title;
-
private String note;
-
-
public SubItem(int sid, String title, String note) {
-
this.sid = sid;
-
this.title = title;
-
this.note = note;
-
}
-
-
public String getInfo(){
-
return "id:"+this.sid+",名称:"+this.title+",简介:"+this.note;
-
}
-
-
}
第二步:设置关联
-
class Item{
-
private int iid;
-
private String title;
-
private String note;
-
private SubItem[] subItems;
-
-
public Item(int iid, String title, String note) {
-
this.iid = iid;
-
this.title = title;
-
this.note = note;
-
}
-
//其他 setter getter 无参省略
-
public SubItem[] getSubItems() {
-
return subItems;
-
}
-
-
public void setSubItems(SubItem[] subItems) {
-
this.subItems = subItems;
-
}
-
-
public String getInfo(){
-
return "id:"+this.iid+",名称:"+this.title+",简介:"+this.note;
-
}
-
-
}
-
-
class SubItem{
-
private int sid;
-
private String title;
-
private String note;
-
private Item item;
-
-
public SubItem(int sid, String title, String note) {
-
this.sid = sid;
-
this.title = title;
-
this.note = note;
-
}
-
-
public Item getItem() {
-
return item;
-
}
-
-
public void setItem(Item item) {
-
this.item = item;
-
}
-
-
public String getInfo(){
-
return "id:"+this.sid+",名称:"+this.title+",简介:"+this.note;
-
}
-
-
}
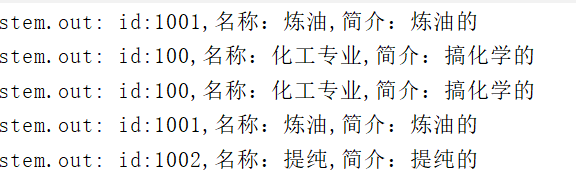
第三步:设置并取得数据
-
public class MainActivity extends AppCompatActivity {
-
-
@Override
-
protected void onCreate(Bundle savedInstanceState) {
-
super.onCreate(savedInstanceState);
-
//准备出所有独立对象
-
Item item = new Item(100,"化工专业","搞化学的");
-
SubItem subItemA = new SubItem(1001,"炼油","炼油的");
-
SubItem subItemB = new SubItem(1002,"提纯","提纯的");
-
//设置彼此引用关系
-
item.setSubItems(new SubItem[]{subItemA,subItemB});
-
subItemA.setItem(item);
-
subItemB.setItem(item);
-
//取出数据
-
System.out.println(subItemA.getInfo());
-
System.out.println(subItemA.getItem().getInfo());
-
System.out.println(item.getInfo());
-
for(int i=0;i<item.getSubItems().length;i++){
-
System.out.println(item.getSubItems()[i].getInfo());
-
}
-
}
-
}
以上是基本功,以后开发都要基于此步骤。
3、双向一对多映射
【举例】:用户-课程-考试成绩

要求:
- 根据数据表结构进行简单Java类转换;
- 实现如下的信息输出:
--根据课程取得全部参与该课程的用户信息及考试成绩;
--用户可取得自己参加的所有课程信息及考试成绩;
【关系分析】:一个用户可参加多个课程,每个课程可以有多个用户参加,每个用户对于每个课程都会有成绩,此时最麻烦的是用户课程关系表中除了关联字段外,还有其他字段,这样的表一个要单独定义成一个实体类,所以,以上需要三个类。
第一步:完成基本字段
-
class User{
-
private int uid;
-
private String name;
-
-
public User(int uid, String name) {
-
this.uid = uid;
-
this.name = name;
-
}
-
-
public String getInfo(){
-
return "用户编号:"+this.uid+",姓名:"+this.name;
-
}
-
}
-
-
class Course{
-
private int cid;
-
private String title;
-
private int num;
-
private String note;
-
-
public Course(int cid, String title, int num, String note) {
-
this.cid = cid;
-
this.title = title;
-
this.num = num;
-
this.note = note;
-
}
-
public String getInfo(){
-
return "课程编号:"+this.cid+",名称:"+this.title +",课时:"+this.num+",简介:"+this.note;
-
}
-
}
第二步:进行字段关联,一般以外键为主;
为了进行关联,需要引入一个新的类:要保存用户、课程等信息的联系;
-
class User{
-
private int uid;
-
private String name;
-
private UserCourse ucs[];
-
-
public User(int uid, String name) {
-
this.uid = uid;
-
this.name = name;
-
}
-
-
public String getInfo(){
-
return "用户编号:"+this.uid+",姓名:"+this.name;
-
}
-
-
public UserCourse[] getUcs() {
-
return ucs;
-
}
-
-
public void setUcs(UserCourse[] ucs) {
-
this.ucs = ucs;
-
}
-
}
-
-
class Course{
-
private int cid;
-
private String title;
-
private int num;
-
private String note;
-
private UserCourse ucs[];
-
public Course(int cid, String title, int num, String note) {
-
this.cid = cid;
-
this.title = title;
-
this.num = num;
-
this.note = note;
-
}
-
public String getInfo(){
-
return "课程编号:"+this.cid+",名称:"+this.title +",课时:"+this.num+",简介:"+this.note;
-
}
-
-
public UserCourse[] getUcs() {
-
return ucs;
-
}
-
-
public void setUcs(UserCourse[] ucs) {
-
this.ucs = ucs;
-
}
-
}
-
-
class UserCourse{
-
private User user;
-
private Course course;
-
private String note;
-
private double score;
-
-
public UserCourse(User user, Course course, String note, double score) {
-
this.user = user;
-
this.course = course;
-
this.note = note;
-
this.score = score;
-
}
-
-
public User getUser() {
-
return user;
-
}
-
-
public void setUser(User user) {
-
this.user = user;
-
}
-
-
public Course getCourse() {
-
return course;
-
}
-
-
public void setCourse(Course course) {
-
this.course = course;
-
}
-
-
public double getScore() {
-
return score;
-
}
-
-
public void setScore(double score) {
-
this.score = score;
-
}
-
}
第三步:测试程序
-
public class MainActivity extends AppCompatActivity {
-
-
@Override
-
protected void onCreate(Bundle savedInstanceState) {
-
super.onCreate(savedInstanceState);
-
//第一步:设置类与类之间的关系
-
//1、定义单独类对象
-
User userA = new User(100,"张三");
-
User userB = new User(101,"李四");
-
User userC = new User(102,"王五");
-
Course courseA = new Course(1,"Oracle",10,"-");
-
Course courseB = new Course(2,"Java",50,"-");
-
//2、设置关联
-
UserCourse uca = new UserCourse(userA,courseA,"无评价",100.0);
-
UserCourse ucb = new UserCourse(userA,courseB,"无评价",90.0);
-
UserCourse ucc = new UserCourse(userB,courseA,"无评价",99.0);
-
UserCourse ucd = new UserCourse(userC,courseA,"无评价",79.0);
-
UserCourse uce = new UserCourse(userC,courseB,"无评价",77.0);
-
//3、在用户中设置关系
-
userA.setUcs(new UserCourse[]{uca,ucb});
-
userB.setUcs(new UserCourse[]{ucc});
-
userC.setUcs(new UserCourse[]{ucd,uce});
-
courseA.setUcs(new UserCourse[]{uca,ucc,ucd});
-
courseB.setUcs(new UserCourse[]{ucb,uce});
-
//第二部:获取数据
-
//输出课程信息
-
System.out.println(courseA.getInfo());
-
System.out.println(courseB.getInfo());
-
//输出参与该课程的用户信息
-
for(int i=0;i<courseA.getUcs().length;i++){
-
System.out.println("参与课程的用户信息:"+courseA.getUcs()[i].getUser().getInfo()+",考试成绩:"+courseA.getUcs()[i].getScore());
-
}
-
//输出用户信息及参与的所有课程
-
System.out.println(userA.getInfo());
-
for(int i=0;i<userA.getUcs().length;i++){
-
System.out.println("参与课程:"+userA.getUcs()[i].getCourse().getInfo()+",考试成绩:"+userA.getUcs()[i].getScore());
-
}
-
}
-
}

与上一个程序相比,唯一麻烦的是中间关系表上有其他字段,代码链是本次程序的重点所在。
4、多对多数据映射
【举例】:权限-权限组-用户-角色-角色权限组

要求:
- 1、将数据还原为简单Java类;
- 2、数据输出:
--根据一个用户,输出其对应的角色以及每个角色对应的权限,以及包含的具体的权限详情;
--一个权限可以输出具备此权限的角色,以及具备此角色的所有管理员,同时输出该权限的所有权限详情;
--一个角色可以输出它所包含的管理员,每个管理员对应的具体权限,以及权限详情;
【第一步】:数据表转换为简答Java类
-
//用户
-
class User{
-
private String userid;
-
private String name;
-
private String password;
-
-
public User(String userid, String name, String password) {
-
this.userid = userid;
-
this.name = name;
-
this.password = password;
-
}
-
-
public String getInfo(){
-
return "用户ID:"+this.userid+",姓名:"+this.name+",密码"+this.password;
-
}
-
}
-
//角色
-
class Role{
-
private int rid;
-
private String title;
-
-
public Role(int rid, String title) {
-
this.rid = rid;
-
this.title = title;
-
}
-
-
public String getInfo(){
-
return "角色编号:"+this.rid+",名称:"+this.title;
-
}
-
}
-
//权限组
-
class Group{
-
private int gid;
-
private String title;
-
-
public Group(int gid, String title) {
-
this.gid = gid;
-
this.title = title;
-
}
-
-
public String getInfo(){
-
return "权限组编号:"+this.gid+",组名称:"+this.title;
-
}
-
-
}
-
//权限
-
class Action{
-
private int aid;
-
private String title;
-
private String url;
-
-
public Action(int aid, String title, String url) {
-
this.aid = aid;
-
this.title = title;
-
this.url = url;
-
}
-
-
public String getInfo(){
-
return "权限编号:"+this.aid+",权限名称:"+this.title+",权限路径:"+this.url;
-
}
-
}
第二步:设置关系
- 一个角色包含多个用户,一对多关系;
- 一个权限组包含多个权限,一对多关系;
- 一个角色对应有多个权限组,每个权限组可能有多个角色,多对多关系;
-
//用户
-
class User{
-
private String userid;
-
private String name;
-
private String password;
-
private Role role;
-
public User(String userid, String name, String password) {
-
this.userid = userid;
-
this.name = name;
-
this.password = password;
-
}
-
-
public String getInfo(){
-
return "用户ID:"+this.userid+",姓名:"+this.name+",密码"+this.password;
-
}
-
-
public Role getRole() {
-
return role;
-
}
-
-
public void setRole(Role role) {
-
this.role = role;
-
}
-
}
-
//角色
-
class Role{
-
private int rid;
-
private String title;
-
private User users[];
-
private Group groups[];
-
-
public Role(int rid, String title) {
-
this.rid = rid;
-
this.title = title;
-
}
-
-
public String getInfo(){
-
return "角色编号:"+this.rid+",名称:"+this.title;
-
}
-
-
public User[] getUsers() {
-
return users;
-
}
-
-
public void setUsers(User[] users) {
-
this.users = users;
-
}
-
-
public Group[] getGroups() {
-
return groups;
-
}
-
-
public void setGroups(Group[] groups) {
-
this.groups = groups;
-
}
-
}
-
//权限组
-
class Group{
-
private int gid;
-
private String title;
-
private Action actions[];
-
private Role roles[];
-
public Group(int gid, String title) {
-
this.gid = gid;
-
this.title = title;
-
}
-
-
public String getInfo(){
-
return "权限组编号:"+this.gid+",组名称:"+this.title;
-
}
-
-
public Action[] getActions() {
-
return actions;
-
}
-
-
public void setActions(Action[] actions) {
-
this.actions = actions;
-
}
-
-
public Role[] getRoles() {
-
return roles;
-
}
-
-
public void setRoles(Role[] roles) {
-
this.roles = roles;
-
}
-
}
-
//权限
-
class Action{
-
private int aid;
-
private String title;
-
private String url;
-
private Group group;
-
-
public Action(int aid, String title, String url) {
-
this.aid = aid;
-
this.title = title;
-
this.url = url;
-
}
-
-
public String getInfo(){
-
return "权限编号:"+this.aid+",权限名称:"+this.title+",权限路径:"+this.url;
-
}
-
-
public Group getGroup() {
-
return group;
-
}
-
-
public void setGroup(Group group) {
-
this.group = group;
-
}
-
}
【第三步】:定义实例对象,测试程序
-
public class MainActivity extends AppCompatActivity {
-
-
@Override
-
protected void onCreate(Bundle savedInstanceState) {
-
super.onCreate(savedInstanceState);
-
//第一步:根据表结构设置关系
-
//1、定义单独类对象
-
User ua = new User("user-a","用户A","1111");
-
User ub = new User("user-b","用户B","1111");
-
User uc = new User("user-c","用户C","1111");
-
//2、定义权限
-
Action act1 = new Action(1,"新闻管理","www....");
-
Action act2 = new Action(2,"用户管理","www....");
-
Action act3 = new Action(3,"备份管理","www....");
-
Action act4 = new Action(4,"缓存管理","www....");
-
Action act5 = new Action(5,"数据管理","www....");
-
//3、定义权限组
-
Group g1 = new Group(1,"数据管理");
-
Group g2 = new Group(2,"人事管理");
-
Group g3 = new Group(3,"信息管理");
-
//4、定义角色信息
-
Role r1 = new Role(10,"超级管理员角色");
-
Role r2 = new Role(10,"普通管理员角色");
-
//5、设置权限组与权限的关系,一对多
-
act1.setGroup(g1);
-
act2.setGroup(g1);
-
act3.setGroup(g2);
-
act4.setGroup(g2);
-
act5.setGroup(g3);
-
g1.setActions(new Action[]{act1,act2});
-
g2.setActions(new Action[]{act3,act4});
-
g3.setActions(new Action[]{act5});
-
//6、权限组与角色的关系
-
r1.setGroups(new Group[]{g1,g2,g3});
-
r2.setGroups(new Group[]{g2,g3});
-
g1.setRoles(new Role[]{r1});
-
g2.setRoles(new Role[]{r1,r2});
-
g3.setRoles(new Role[]{r1,r2});
-
//7、定义用户与角色关系
-
ua.setRole(r1);
-
ub.setRole(r2);
-
uc.setRole(r2);
-
r1.setUsers(new User[]{ua});
-
r2.setUsers(new User[]{ub,uc});
-
}
-
}
【第四步】:输出信息
-
public class MainActivity extends AppCompatActivity {
-
-
@Override
-
protected void onCreate(Bundle savedInstanceState) {
-
super.onCreate(savedInstanceState);
-
//第一步:根据表结构设置关系
-
//1、定义单独类对象
-
User ua = new User("user-a","用户A","1111");
-
User ub = new User("user-b","用户B","1111");
-
User uc = new User("user-c","用户C","1111");
-
//2、定义权限
-
Action act1 = new Action(1,"新闻管理","www....");
-
Action act2 = new Action(2,"用户管理","www....");
-
Action act3 = new Action(3,"备份管理","www....");
-
Action act4 = new Action(4,"缓存管理","www....");
-
Action act5 = new Action(5,"数据管理","www....");
-
//3、定义权限组
-
Group g1 = new Group(1,"数据管理");
-
Group g2 = new Group(2,"人事管理");
-
Group g3 = new Group(3,"信息管理");
-
//4、定义角色信息
-
Role r1 = new Role(10,"超级管理员角色");
-
Role r2 = new Role(10,"普通管理员角色");
-
//5、设置权限组与权限的关系,一对多
-
act1.setGroup(g1);
-
act2.setGroup(g1);
-
act3.setGroup(g2);
-
act4.setGroup(g2);
-
act5.setGroup(g3);
-
g1.setActions(new Action[]{act1,act2});
-
g2.setActions(new Action[]{act3,act4});
-
g3.setActions(new Action[]{act5});
-
//6、权限组与角色的关系
-
r1.setGroups(new Group[]{g1,g2,g3});
-
r2.setGroups(new Group[]{g2,g3});
-
g1.setRoles(new Role[]{r1});
-
g2.setRoles(new Role[]{r1,r2});
-
g3.setRoles(new Role[]{r1,r2});
-
//7、定义用户与角色关系
-
ua.setRole(r1);
-
ub.setRole(r2);
-
uc.setRole(r2);
-
r1.setUsers(new User[]{ua});
-
r2.setUsers(new User[]{ub,uc});
-
-
//第二步:取出数据
-
//根据一个用户,输出其对应的角色以及每个角色对应的权限,以及包含的具体的权限详情;
-
System.out.println(ua.getInfo());
-
System.out.println("角色:"+ua.getRole().getInfo());
-
for(int x=0;x<ua.getRole().getGroups().length;x++){
-
System.out.println("权限组:"+ua.getRole().getGroups()[x].getInfo());
-
for(int y=0;y<ua.getRole().getGroups()[x].getActions().length;y++){
-
System.out.println("权限:"+ua.getRole().getGroups()[x].getActions()[y].getInfo());
-
}
-
}
-
System.out.println("========================================");
-
//一个权限可以输出具备此权限的角色,以及具备此角色的所有管理员,同时输出该权限的所有权限详情;
-
System.out.println(act1.getInfo());
-
for(int x=0;x<act1.getGroup().getRoles().length;x++){
-
System.out.println("角色:"+act1.getGroup().getRoles()[x].getInfo());
-
for(int y=0;y<act1.getGroup().getRoles()[x].getUsers().length;y++){
-
System.out.println("用户"+act1.getGroup().getRoles()[x].getUsers()[y].getInfo());
-
}
-
}
-
System.out.println("========================================");
-
//一个角色可以输出它所包含的管理员,每个管理员对应的具体权限,以及权限详情;
-
System.out.println(r1.getInfo());
-
for(int x=0;x<r1.getUsers().length;x++){
-
System.out.println("用户:"+r1.getUsers()[x].getInfo());
-
for(int y=0;y<r1.getGroups().length;y++){
-
System.out.println("权限组:"+r1.getGroups()[y].getInfo());
-
for(int z=0;z<r1.getGroups()[y].getActions().length;z++){
-
System.out.println("权限:"+r1.getGroups()[y].getActions()[z].getInfo());
-
}
-
}
-
}
-
-
}
-
}
作于202004142310,已归档
———————————————————————————————————
本文为博主原创文章,转载请注明出处!
若本文对您有帮助,轻抬您发财的小手,关注/评论/点赞/收藏,就是对我最大的支持!
祝君升职加薪,鹏程万里!
文章来源: winter.blog.csdn.net,作者:Winter_world,版权归原作者所有,如需转载,请联系作者。
原文链接:winter.blog.csdn.net/article/details/105418417

- 点赞
- 收藏
- 关注作者
评论(0)