基于Tensorflow2.x Object Detection API构建自定义物体检测器(三)

【摘要】 本文描述了基于Tensorflow2.x Object Detection API构建自定义物体检测器的保姆级教程,详细地描述了代码框架结构、数据集的标准方法,标注文件的数据处理、模型流水线的配置、模型的训练、评估、推理全流程。
这是机器未来的第1篇文章,由机器未来原创
写在前面:
- 博客简介:专注AIoT领域,追逐未来时代的脉搏,记录路途中的技术成长!
- 专栏简介:记录博主从0到1掌握物体检测工作流的过程,具备自定义物体检测器的能力
- 面向人群:具备深度学习理论基础的学生或初级开发者
- 专栏计划:接下来会逐步发布跨入人工智能的系列博文,敬请期待
- Python零基础快速入门系列
- 快速入门Python数据科学系列
- 人工智能开发环境搭建系列
- 机器学习系列
- 物体检测快速入门系列
- 自动驾驶物体检测系列
- …
接上文《基于Tensorflow2.x Object Detection API构建自定义物体检测器(二)》
9. 模型推理
python inference_main_v2.py -m "exported_models/my_model/saved_model" -l "annotations/label_map.pbtxt" -i "images/test" -o "inference_result/"
脚本内容如下:
#!/usr/bin/env python
# coding: utf-8
"""
Object Detection From TF2 Saved Model
=====================================
"""

# %%
# This demo will take you through the steps of running an "out-of-the-box" TensorFlow 2 compatible
# detection model on a collection of images. More specifically, in this example we will be using
# the `Saved Model Format <https://www.tensorflow.org/guide/saved_model>`__ to load the model.

# %%
# Download the test images
# ~~~~~~~~~~~~~~~~~~~~~~~~
# First we will download the images that we will use throughout this tutorial. The code snippet
# shown bellow will download the test images from the `TensorFlow Model Garden <https://github.com/tensorflow/models/tree/master/research/object_detection/test_images>`_
# and save them inside the ``data/images`` folder.
import os
os.environ['TF_CPP_MIN_LOG_LEVEL'] = '2'    # Suppress TensorFlow logging (1)
import pathlib
import tensorflow as tf
import argparse

tf.get_logger().setLevel('ERROR')           # Suppress TensorFlow logging (2)

# Enable GPU dynamic memory allocation
gpus = tf.config.experimental.list_physical_devices('GPU')
for gpu in gpus:
    tf.config.experimental.set_memory_growth(gpu, True)


# Initiate argument parser
parser = argparse.ArgumentParser(
    description="model inference sample")
parser.add_argument("-m",
                    "--saved_model_dir",
                    help="Path to saved model directory.",
                    type=str, default="exported_models/my_model/saved_model")
parser.add_argument("-l",
                    "--labels_path",
                    help="Path to the labels (.pbtxt) file.", type=str, default="annotations/label_map.pbtxt")
parser.add_argument("-i",
                    "--images_dir",
                    help="Path of input images file.", type=str, default="images/test")
parser.add_argument("-o",
                    "--output_inference_result",
                    help="Path of output inference result file.", type=str, default='inference_result/')
args = parser.parse_args()

# %%
# Load the model
# ~~~~~~~~~~~~~~
# Next we load the downloaded model
import time
from object_detection.utils import label_map_util
from object_detection.utils import visualization_utils as viz_utils

# PATH_TO_SAVED_MODEL      = "exported_models/my_model/saved_model"
# PATH_TO_LABELS           = "annotations/label_map.pbtxt"
# PATH_TO_IMAGES           = "images/test"
# PATH_TO_INFERENCE_RESULT = 'inference_result/'

PATH_TO_SAVED_MODEL      = args.saved_model_dir
PATH_TO_LABELS           = args.labels_path
PATH_TO_IMAGES           = args.images_dir
PATH_TO_INFERENCE_RESULT = args.output_inference_result

print('Loading model...', end='')
start_time = time.time()

# Load saved model and build the detection function
detect_fn = tf.saved_model.load(PATH_TO_SAVED_MODEL)

end_time = time.time()
elapsed_time = end_time - start_time
print('Done! Took {} seconds'.format(elapsed_time))

# %%
# Load label map data (for plotting)
# ~~~~~~~~~~~~~~~~~~~~~~~~~~~~~~~~~~~
# Label maps correspond index numbers to category names, so that when our convolution network
# predicts `5`, we know that this corresponds to `airplane`.  Here we use internal utility
# functions, but anything that returns a dictionary mapping integers to appropriate string labels
# would be fine.

category_index = label_map_util.create_category_index_from_labelmap(PATH_TO_LABELS,
                                                                    use_display_name=True)

# %%
# Putting everything together
# ~~~~~~~~~~~~~~~~~~~~~~~~~~~
# The code shown below loads an image, runs it through the detection model and visualizes the
# detection results, including the keypoints.
#
# Note that this will take a long time (several minutes) the first time you run this code due to
# tf.function's trace-compilation --- on subsequent runs (e.g. on new images), things will be
# faster.
#
# Here are some simple things to try out if you are curious:
#
# * Modify some of the input images and see if detection still works. Some simple things to try out here (just uncomment the relevant portions of code) include flipping the image horizontally, or converting to grayscale (note that we still expect the input image to have 3 channels).
# * Print out `detections['detection_boxes']` and try to match the box locations to the boxes in the image.  Notice that coordinates are given in normalized form (i.e., in the interval [0, 1]).
# * Set ``min_score_thresh`` to other values (between 0 and 1) to allow more detections in or to filter out more detections.
import numpy as np
from PIL import Image
import matplotlib.pyplot as plt
import warnings
import os

warnings.filterwarnings('ignore')   # Suppress Matplotlib warnings

def load_image_into_numpy_array(path):
    """Load an image from file into a numpy array.

    Puts image into numpy array to feed into tensorflow graph.
    Note that by convention we put it into a numpy array with shape
    (height, width, channels), where channels=3 for RGB.

    Args:
      path: the file path to the image

    Returns:
      uint8 numpy array with shape (img_height, img_width, 3)
    """
    return np.array(Image.open(path))

def load_images_path(images_dir):
    images_path_list = []

    images_filename_list =  os.listdir(images_dir)
    for img_path in images_filename_list:
        if img_path.endswith(".jpg") == True:
            img_path = os.path.join('%s/%s' % (images_dir, img_path))
            images_path_list.append(img_path)

    return images_path_list

IMAGE_PATHS = load_images_path(PATH_TO_IMAGES)

for image_path in IMAGE_PATHS:

    print('Running inference for {}... '.format(image_path), end='')

    image_np = load_image_into_numpy_array(image_path)

    # Things to try:
    # Flip horizontally
    # image_np = np.fliplr(image_np).copy()

    # Convert image to grayscale
    # image_np = np.tile(
    #     np.mean(image_np, 2, keepdims=True), (1, 1, 3)).astype(np.uint8)

    # The input needs to be a tensor, convert it using `tf.convert_to_tensor`.
    input_tensor = tf.convert_to_tensor(image_np)
    # The model expects a batch of images, so add an axis with `tf.newaxis`.
    input_tensor = input_tensor[tf.newaxis, ...]

    # input_tensor = np.expand_dims(image_np, 0)
    detections = detect_fn(input_tensor)

    # All outputs are batches tensors.
    # Convert to numpy arrays, and take index [0] to remove the batch dimension.
    # We're only interested in the first num_detections.
    num_detections = int(detections.pop('num_detections'))
    detections = {key: value[0, :num_detections].numpy()
                   for key, value in detections.items()}
    detections['num_detections'] = num_detections

    # detection_classes should be ints.
    detections['detection_classes'] = detections['detection_classes'].astype(np.int64)

    image_np_with_detections = image_np.copy()

    viz_utils.visualize_boxes_and_labels_on_image_array(
          image_np_with_detections,
          detections['detection_boxes'],
          detections['detection_classes'],
          detections['detection_scores'],
          category_index,
          use_normalized_coordinates=True,
          max_boxes_to_draw=200,
          min_score_thresh=.30,
          agnostic_mode=False)

    plt.figure()
    # plt.imshow(image_np_with_detections)
    image_filename = os.path.join(PATH_TO_INFERENCE_RESULT, os.path.basename(image_path))
    plt.imsave(image_filename, image_np_with_detections)
    print('Done')
# plt.show()

# sphinx_gallery_thumbnail_number = 2
- • 结果展示

raccoon-15
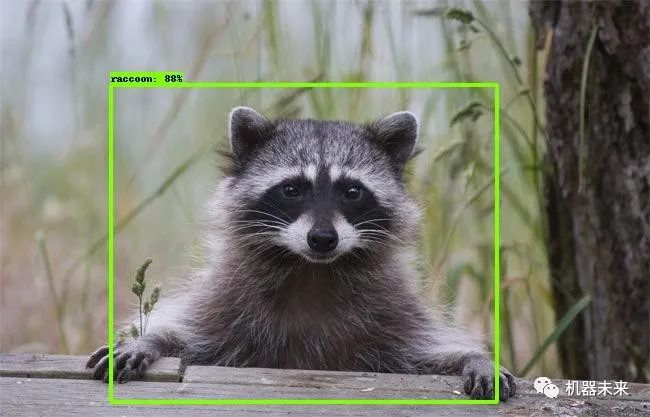
raccoon-1
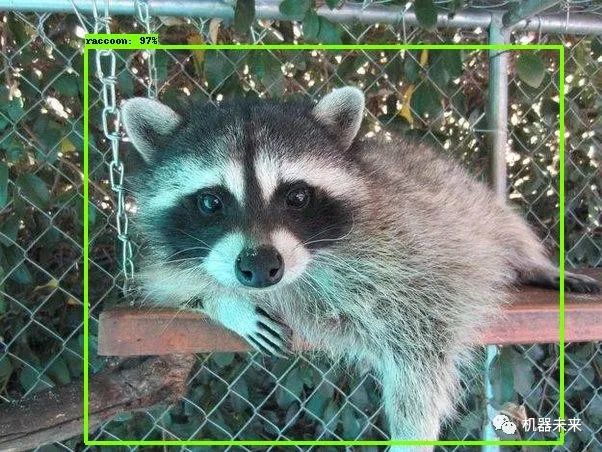
raccoon-28
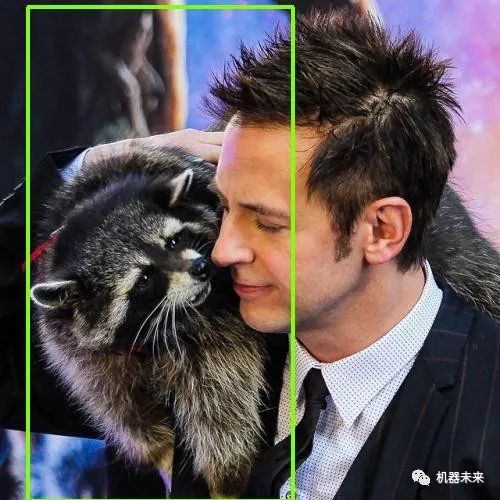
raccoon-182
以上就是一个完整的基于TF2 OD API自定义物体检测器的完整操作流程。
10. 总结
推理结果中仍然有同一个物体被框选2次的情况,需要调节NVS进一步优化。除此之外,还可以尝试使用不同的模型,例如SSD等,选择出效果最优的训练模型。
推荐阅读:
- 物体检测快速入门系列(1)-Windows部署GPU深度学习开发环境
- 物体检测快速入门系列(2)-Windows部署Docker GPU深度学习开发环境
- 物体检测快速入门系列(3)-TensorFlow 2.x Object Detection API快速安装手册
- 物体检测快速入门系列(4)-基于Tensorflow2.x Object Detection API构建自定义物体检测器


【声明】本内容来自华为云开发者社区博主,不代表华为云及华为云开发者社区的观点和立场。转载时必须标注文章的来源(华为云社区)、文章链接、文章作者等基本信息,否则作者和本社区有权追究责任。如果您发现本社区中有涉嫌抄袭的内容,欢迎发送邮件进行举报,并提供相关证据,一经查实,本社区将立刻删除涉嫌侵权内容,举报邮箱:
cloudbbs@huaweicloud.com
- 点赞
- 收藏
- 关注作者
评论(0)