Spring Cloud【Finchley】-06服务消费者整合Feign

概述
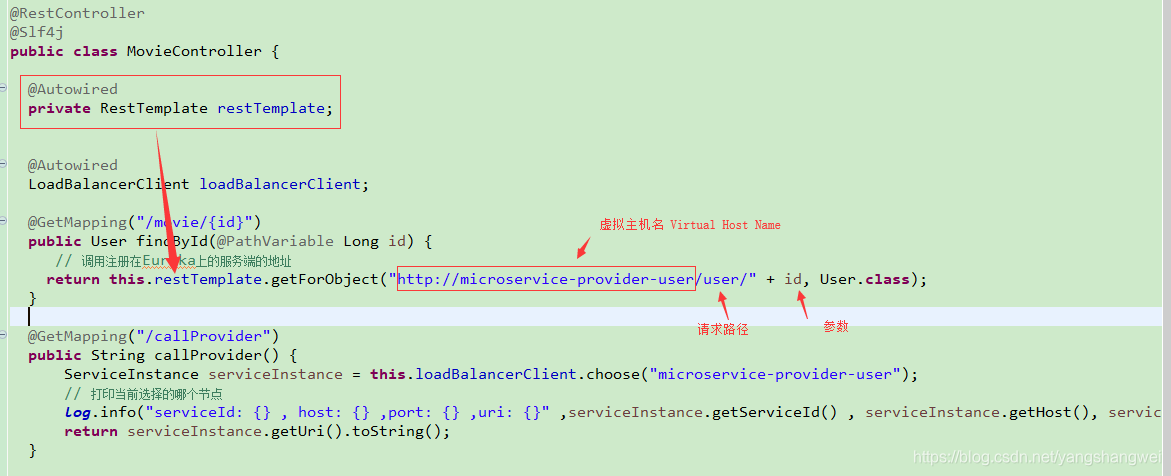
回想下我们在使用Eureka 和 Ribbon的时候是怎么调用注册在Eureka Server上的微服务的地址呢?

可以看到其实是通过拼接的方式,当然了我们上面的这个例子只有一个参数 id,看起来没有这麻烦。
设想下如果有多个参数呢?
假设URL如下
http://localhost:8080/search?name=小工匠&age=20&username=artisan
那我们用RestTemplate如何调用对方的微服务呢? 可以采用如下方式
  @GetMapping("/searchUser")
  public User searchUser(String name ,String age ,String username) {
	  Map<String, Object> paraMap = new HashMap<String ,Object>() {
		  {
			  put("name",name);
			  put("age",age);
			  put("username",username);
		  }
	  };

	 return  this.restTemplate.getForObject("http://microservice-provider-user/search?name={name}&age={age}&username={username}", User.class, paraMap);

  }
- 1
- 2
- 3
- 4
- 5
- 6
- 7
- 8
- 9
- 10
- 11
- 12
- 13
是不是已经很麻烦了?
Spring Cloud为我们整合了Fegin解决上述苦恼。
Feign官方文档: https://cloud.spring.io/spring-cloud-static/Finchley.SR2/single/spring-cloud.html#_spring_cloud_openfeign
Feign是Netflix开发的声明模板化的HTTP客户端。 在Spring Cloud中使用Feign,只需要创建一个接口,并在接口上添加一些注解即可。 Spring Cloud对Feign进行了增强,使Feign支持了SpringMVC的总结,并整合了Ribbon和Eureka。
实例
新建工程
在父工程上右键,新建Maven Module ,如下

下面根据官方文档操作即可

增加maven依赖
<dependency>
			<groupId>org.springframework.cloud</groupId>
			<artifactId>spring-cloud-starter-openfeign</artifactId>
</dependency>
- 1
- 2
- 3
- 4
创建一个Feign接口,并添加@FeignClient注解
package com.artisan.micorservice.feignclient;

import org.springframework.cloud.openfeign.FeignClient;
import org.springframework.web.bind.annotation.PathVariable;
import org.springframework.web.bind.annotation.RequestMapping;
import org.springframework.web.bind.annotation.RequestMethod;

import com.artisan.micorservice.model.User;


@FeignClient("microservice-provider-user")
public interface UserFeignClient {

	@RequestMapping(method = RequestMethod.GET, value = "/user/{id}")
	public User findById(@PathVariable Long id);

}
- 1
- 2
- 3
- 4
- 5
- 6
- 7
- 8
- 9
- 10
- 11
- 12
- 13
- 14
- 15
- 16
- 17
FeignClient中的microservice-provider-user是要调用的微服务的名称,用于创建Ribbon负载均衡器。
因为我们这里使用了Eureka,所以Ribbon会把microservice-provider-user解析成Eureka Server中注册的服务。
另外,也可以通过url属性指定请求的URL ,比如 @FeignClient("microservice-provider-user", url="http://localhost:8900/")
修改Controller层,将RestTemplate改为调用Feign接口
package com.artisan.micorservice.controller;

import org.springframework.beans.factory.annotation.Autowired;
import org.springframework.web.bind.annotation.GetMapping;
import org.springframework.web.bind.annotation.PathVariable;
import org.springframework.web.bind.annotation.RestController;

import com.artisan.micorservice.feignclient.UserFeignClient;
import com.artisan.micorservice.model.User;

@RestController
public class MovieController {

 @Autowired
 private UserFeignClient userClient;

  @GetMapping("/movie/{id}")
  public User findById(@PathVariable Long id) {
    return userClient.findById(id);
  }
}
- 1
- 2
- 3
- 4
- 5
- 6
- 7
- 8
- 9
- 10
- 11
- 12
- 13
- 14
- 15
- 16
- 17
- 18
- 19
- 20
- 21
- 22
启动类增加@EnableFeiginClients注解
package com.artisan.micorservice;

import org.springframework.boot.SpringApplication;
import org.springframework.boot.autoconfigure.SpringBootApplication;
import org.springframework.cloud.client.discovery.EnableDiscoveryClient;
import org.springframework.cloud.openfeign.EnableFeignClients;

@EnableDiscoveryClient
@SpringBootApplication
@EnableFeignClients
public class MicorserviceConsumerFeginApplication {

	public static void main(String[] args) {
		SpringApplication.run(MicorserviceConsumerFeginApplication.class, args);
	}
}
- 1
- 2
- 3
- 4
- 5
- 6
- 7
- 8
- 9
- 10
- 11
- 12
- 13
- 14
- 15
- 16
测试
- 启动eureka server微服务
- 启动2个 provider-user微服务
- 启动该微服务

2次请求http://localhost:7901/movie/1 ,观察 provider-user微服务的日志打印情况。
8900端口

8901端口

通过日志可以看到不仅实现了声明式的REST API调用,同时也实现了客户端的负载均衡。
源码
https://github.com/yangshangwei/SpringCloudMaster
文章来源: artisan.blog.csdn.net,作者:小小工匠,版权归原作者所有,如需转载,请联系作者。
原文链接:artisan.blog.csdn.net/article/details/84932494
- 点赞
- 收藏
- 关注作者


评论(0)