Oracle存储过程和自定义函数
概述
PL/SQL中的过程和函数(通常称为子程序)是PL/SQL块的一种特殊的类型,这种类型的子程序可以以编译的形式存放在数据库中,并为后续的程序块调用。
相同点: 完成特定功能的程序
不同点:是否用return语句返回值。
举个例子:
create or replace procedure PrintStudents(p_staffName in xgj_test.username%type) as

  cursor c_testData is
    select t.sal, t.comm from xgj_test t where t.username = p_staffName;

begin

  for v_info in c_testData loop
    DBMS_OUTPUT.PUT_LINE(v_info.sal || '  ' || v_info.comm);
  end loop;

end PrintStudents;
- 1
- 2
- 3
- 4
- 5
- 6
- 7
- 8
- 9
- 10
- 11
- 12
- 13
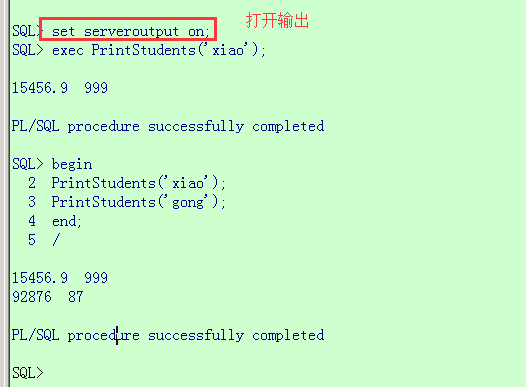
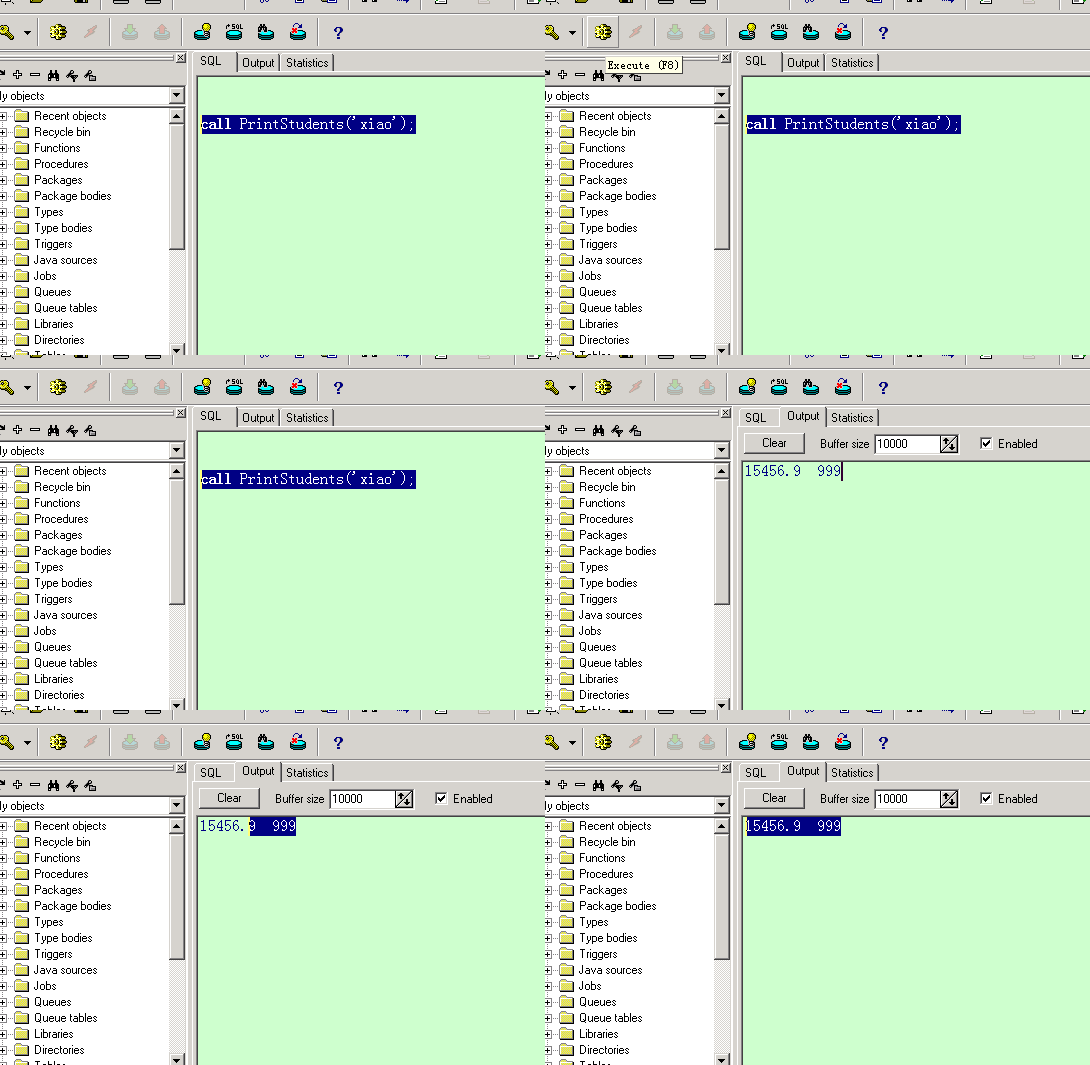
一旦创建了改程序并将其存储在数据库中,就可以使用如下的方式调用该过程
begin
    PrintStudents('Computer Science');
    PrintStudents('Match');
end;
/
- 1
- 2
- 3
- 4
- 5
或者
exec PrintStudents('Computer Science');
exec PrintStudents('Match');
- 1
- 2
在命令窗口中:
在pl/sql工具的sql窗口中:
存储过程的创建和调用
基本语法
create [ or replace] procedure procedure_name
[( argument [ {IN | OUT | IN OUT }] type,
......
argument [ {IN | OUT | IN OUT }] type ) ] { IS | AS}
procedure_body
- 1
- 2
- 3
- 4
- 5
无参的存储过程
/**
 无参数的存过
 打印hello world

 调用存储过程:
 1. exec sayhelloworld();
 2 begin
   sayhelloworld();
   end;
   /

*/
create or replace procedure sayhelloworld
as
--说明部分
begin
  dbms_output.put_line('hello world');
end sayhelloworld;
- 1
- 2
- 3
- 4
- 5
- 6
- 7
- 8
- 9
- 10
- 11
- 12
- 13
- 14
- 15
- 16
- 17
- 18
调用过程:
SQL> set serveroutput on ;
SQL> exec sayhelloworld();

hello world

PL/SQL procedure successfully completed

SQL> begin
  2  sayhelloworld();
  3  sayhelloworld();
  4  end;
  5  /

hello world
hello world

PL/SQL procedure successfully completed
- 1
- 2
- 3
- 4
- 5
- 6
- 7
- 8
- 9
- 10
- 11
- 12
- 13
- 14
- 15
- 16
- 17
- 18
带参数的存储过程
/**
创建一个带参数的存储过程

给指定的员工增加工资,并打印增长前后的工资

*/
create or replace procedure addSalary(staffName  in  xgj_test.username%type )
as
--定义一个变量保存调整之前的薪水
oldSalary  xgj_test.sal%type;

begin
  --查询员工涨之前的薪水
  select t.sal into oldSalary  from xgj_test t where t.username=staffName;

  --调整薪水
  update  xgj_test  t set t.sal = sal+1000 where t.username=staffName ;

  --输出
  dbms_output.put_line('调整之前的薪水:'|| oldSalary || ' ,调整之后的薪水:' || (oldSalary + 1000));

end addSalary;
- 1
- 2
- 3
- 4
- 5
- 6
- 7
- 8
- 9
- 10
- 11
- 12
- 13
- 14
- 15
- 16
- 17
- 18
- 19
- 20
- 21
- 22
可以看到,update语句之后并没有commit的操作。
一般来讲为了保证事务的一致性,由调用者来提交比较合适,当然了是需要区分具体的业务需求的~
begin
addSalary('xiao');
addSalary('gong');
commit ;
end ;
/
- 1
- 2
- 3
- 4
- 5
- 6
存储函数
基本语法
create [ or replace] function function_name
[( argument [ {IN | OUT | IN OUT }] type,
......
argument [ {IN | OUT | IN OUT }] type ) ]
RETURN { IS | AS}
function_body
- 1
- 2
- 3
- 4
- 5
- 6
其中 return子句是必须存在的,一个函数如果没有执行return就结束将发生错误,这一点和存过有说不同。
存储函数
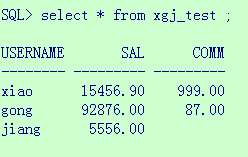
准备的数据如下:
/**
查询员工的年薪 (月工资*12 + 奖金)
*/

create or replace function querySalaryInCome(staffName in varchar2)

 return number as
  --定义变量保存员工的工资和奖金
  pSalary xgj_test.sal%type;
  pComm   xgj_test.comm%type;

begin
  --查询员工的工资和奖金
  select t.sal, t.comm
    into pSalary, pComm
    from xgj_test t
   where t.username = staffName;
  --直接返回年薪
  return pSalary * 12 + pComm;
end querySalaryInCome;
- 1
- 2
- 3
- 4
- 5
- 6
- 7
- 8
- 9
- 10
- 11
- 12
- 13
- 14
- 15
- 16
- 17
- 18
- 19
- 20

存在一个问题,当奖金为空的时候,算出来的年收入竟然是空的。
因为 如果一个表达式中有空值,那么这个表达式的结果即为空值。
所以我们需要对空值进行处理, 使用nvl函数即可。
最后修改后的function为
create or replace function querySalaryInCome(staffName in varchar2)

 return number as
  --定义变量保存员工的工资和奖金
  pSalary xgj_test.sal%type;
  pComm   xgj_test.comm%type;

begin
  --查询员工的工资和奖金
  select t.sal, t.comm
    into pSalary, pComm
    from xgj_test t
   where t.username = staffName;
  --直接返回年薪
  return pSalary * 12 + nvl(pComm,0);
end querySalaryInCome;
- 1
- 2
- 3
- 4
- 5
- 6
- 7
- 8
- 9
- 10
- 11
- 12
- 13
- 14
- 15
- 16
out参数
out参数
一般来讲,存储过程和存储函数的区别在于存储函数可以有一个返回值,而存储过程没有返回值。
- 存储过程和存储函数都可以有out参数
- 存储过程和存储函数都可以有多个out参数
- 存储过程可以通过out参数实现返回值
那我们如何选择存储过程和存储函数呢?
原则:
如果只有一个返回值,用存储函数,否则(即没有返回值或者有多个返回值)使用存储过程。
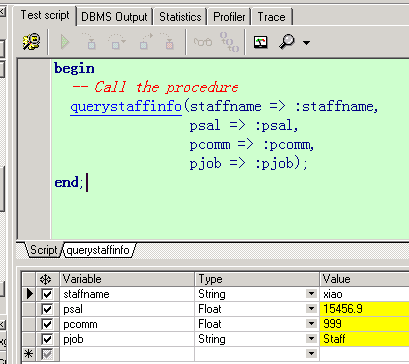
/**
根据员工姓名,查询员工的全部信息
*/
create or replace procedure QueryStaffInfo(staffName in xgj_test.username%type,
                                           pSal out number,
                                           pComm out xgj_test.comm%type,
                                           pJob out xgj_test.job%type)

is

begin
  --查询该员工的薪资,奖金和职位
  select t.sal,t.comm,t.job into pSal,pComm,pJob from xgj_test t where t.username=staffName;
end QueryStaffInfo;
- 1
- 2
- 3
- 4
- 5
- 6
- 7
- 8
- 9
- 10
- 11
- 12
- 13
- 14
先抛出两个思考问题:
- 查询员工的所有信息–> out参数太多怎么办?
- 查询某个部门中所有员工的信息–> out中返回集合?
后面会讲到如何解决? 总不能一个个的写out吧~
在应用中访问存储过程和存储函数
概述
我们使用JAVA程序连接ORACLE数据库。
使用jar: ojdbc14.jar
关于oracle官方提供的几个jar的区别
classes12.jar (1,600,090 bytes) - for use with JDK 1.2 and JDK 1.3
classes12_g.jar (2,044,594 bytes) - same as classes12.jar, except that classes were compiled with “javac -g” and contain some tracing information.
classes12dms.jar (1,607,745 bytes) - same as classes12.jar, except that it contains additional code`to support Oracle Dynamic Monitoring Service.
classes12dms_g.jar (2,052,968 bytes) - same as classes12dms.jar except that classes were compiled with “javac -g” and contain some tracing information.
ojdbc14.jar (1,545,954 bytes) - classes for use with JDK 1.4 and 1.5
ojdbc14_g.jar (1,938,906 bytes) - same as ojdbc14.jar, except that classes were compiled with “javac -g” and contain some tracing information.
ojdbc14dms.jar (1,553,561 bytes) - same as ojdbc14.jar, except that it contains additional code`to support Oracle Dynamic Monitoring Service.
ojdbc14dms_g.jar (1,947,136 bytes) - same as ojdbc14dms.jar, except that classes were compiled with “javac -g” and contain some tracing information.
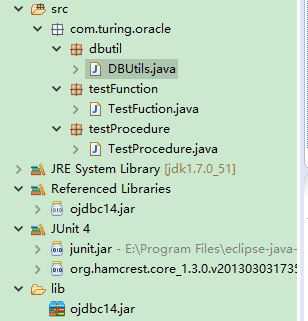
工程目录如下:
简单的写下获取数据库连接的工具类
import java.sql.Connection;
import java.sql.DriverManager;
import java.sql.ResultSet;
import java.sql.SQLException;
import java.sql.Statement;

public class DBUtils {

    // 设定数据库驱动,数据库连接地址端口名称,用户名,密码
    private static final String driver = "oracle.jdbc.driver.OracleDriver";
    private static final String url = "jdbc:oracle:thin:@ip:xxxx";
    private static final String username = "xxxx";
    private static final String password = "xxxx";

    /**
     * 注册数据库驱动
     */
    static {
        try {
            Class.forName(driver);
        } catch (ClassNotFoundException e) {
            throw new ExceptionInInitializerError(e.getMessage());
        }
    }

    /**
     * 获取数据库连接
     */
    public static Connection getConnection() {
        try {
            Connection connection = DriverManager.getConnection(url, username, password);
            // 成功,返回connection
            return connection;
        } catch (SQLException e) {
            e.printStackTrace();
        }
        // 获取失败,返回null
        return null;
    }

    /**
     * 释放连接
     */
    public static void cleanup(Connection conn, Statement st, ResultSet rs) {

        if (rs != null) {
            try {
                rs.close();
            } catch (SQLException e) {
                e.printStackTrace();
            } finally {
                rs = null;
            }
        }

        if (st != null) {
            try {
                st.close();
            } catch (SQLException e) {
                e.printStackTrace();
            } finally {
                st = null;
            }
        }

        if (conn != null) {
            try {
                conn.close();
            } catch (SQLException e) {
                e.printStackTrace();
            } finally {
                conn = null;
            }
        }

    }
}
- 1
- 2
- 3
- 4
- 5
- 6
- 7
- 8
- 9
- 10
- 11
- 12
- 13
- 14
- 15
- 16
- 17
- 18
- 19
- 20
- 21
- 22
- 23
- 24
- 25
- 26
- 27
- 28
- 29
- 30
- 31
- 32
- 33
- 34
- 35
- 36
- 37
- 38
- 39
- 40
- 41
- 42
- 43
- 44
- 45
- 46
- 47
- 48
- 49
- 50
- 51
- 52
- 53
- 54
- 55
- 56
- 57
- 58
- 59
- 60
- 61
- 62
- 63
- 64
- 65
- 66
- 67
- 68
- 69
- 70
- 71
- 72
- 73
- 74
- 75
- 76
- 77
- 78
- 79
在应用程序中访问存储过程
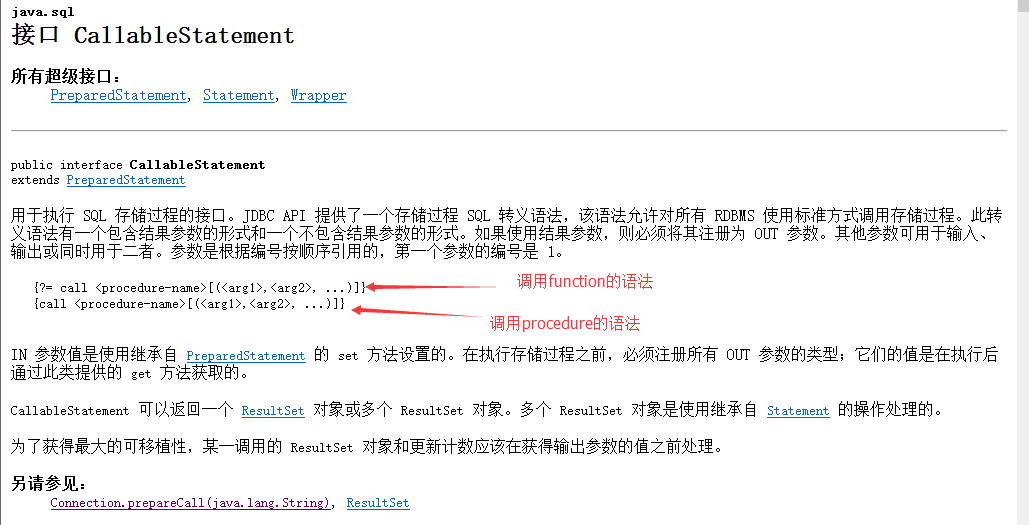
根据官方提供的API,我们可以看到:
import java.sql.CallableStatement;
import java.sql.Connection;
import java.sql.SQLException;

import org.junit.Test;

import com.turing.oracle.dbutil.DBUtils;

import oracle.jdbc.OracleTypes;


public class TestProcedure {

    @Test
    public void callProcedure(){
        //  {call <procedure-name>[(<arg1>,<arg2>, ...)]}

        Connection conn = null ;
        CallableStatement callableStatement = null ;

        /**
         *
            根据员工姓名,查询员工的全部信息
            create or replace procedure QueryStaffInfo(staffName in xgj_test.username%type,
                                                       pSal out number,
                                                       pComm out xgj_test.comm%type,
                                                       pJob out xgj_test.job%type)
            is
            begin
              --查询该员工的薪资,奖金和职位
              select t.sal,t.comm,t.job into pSal,pComm,pJob from xgj_test t where t.username=staffName;
            end QueryStaffInfo;
         */
        // 我们可以看到该存过 4个参数 1个入参 3个出参
        String sql = "{call QueryStaffInfo(?,?,?,?)}";

        try {
            // 获取连接
            conn = DBUtils.getConnection();
            // 通过连接获取到CallableStatement
            callableStatement = conn.prepareCall(sql);

            // 对于in 参数,需要赋值
            callableStatement.setString(1, "xiao");
            // 对于out 参数,需要声明
            callableStatement.registerOutParameter(2, OracleTypes.NUMBER); // 第二个 ?
            callableStatement.registerOutParameter(3, OracleTypes.NUMBER);// 第三个 ?
            callableStatement.registerOutParameter(4, OracleTypes.VARCHAR);// 第四个 ?

            // 执行调用
            callableStatement.execute();

            // 取出结果
            int salary = callableStatement.getInt(2);
            int comm = callableStatement.getInt(3);
            String job = callableStatement.getString(3);

            System.out.println(salary + "\t" + comm + "\t" + job);

        } catch (SQLException e) {
            e.printStackTrace();
        }finally {
            DBUtils.cleanup(conn, callableStatement, null);
        }


    }
}
- 1
- 2
- 3
- 4
- 5
- 6
- 7
- 8
- 9
- 10
- 11
- 12
- 13
- 14
- 15
- 16
- 17
- 18
- 19
- 20
- 21
- 22
- 23
- 24
- 25
- 26
- 27
- 28
- 29
- 30
- 31
- 32
- 33
- 34
- 35
- 36
- 37
- 38
- 39
- 40
- 41
- 42
- 43
- 44
- 45
- 46
- 47
- 48
- 49
- 50
- 51
- 52
- 53
- 54
- 55
- 56
- 57
- 58
- 59
- 60
- 61
- 62
- 63
- 64
- 65
- 66
- 67
- 68
- 69
- 70
在应用程序中访问存储函数
import java.sql.CallableStatement;
import java.sql.Connection;

import org.junit.Test;

import com.turing.oracle.dbutil.DBUtils;

import oracle.jdbc.OracleTypes;

public class TestFuction {

    @Test
    public void  callFuction(){
        //{?= call <procedure-name>[(<arg1>,<arg2>, ...)]}
        Connection conn = null;
        CallableStatement call = null;
        /**
         * create or replace function querySalaryInCome(staffName in varchar2)
                 return number as
                  --定义变量保存员工的工资和奖金
                  pSalary xgj_test.sal%type;
                  pComm   xgj_test.comm%type;

                begin
                  --查询员工的工资和奖金
                  select t.sal, t.comm
                    into pSalary, pComm
                    from xgj_test t
                   where t.username = staffName;
                  --直接返回年薪
                  return pSalary * 12 + nvl(pComm,0);
                end querySalaryInCome;
         */

        String sql = "{?=call querySalaryInCome(?)}";

        try {
            // 获取连接
            conn = DBUtils.getConnection();
            // 通过conn获取CallableStatement
            call = conn.prepareCall(sql);

            // out 参数,需要声明
            call.registerOutParameter(1, OracleTypes.NUMBER);
            // in 参数,需要赋值
            call.setString(2, "gong");

            // 执行
            call.execute();
            // 取出返回值  第一个?的值
            double income = call.getDouble(1);
            System.out.println("该员工的年收入:" + income);
        } catch (Exception e) {
            e.printStackTrace();
        }finally {
            DBUtils.cleanup(conn, call, null);
        }
    }

}
- 1
- 2
- 3
- 4
- 5
- 6
- 7
- 8
- 9
- 10
- 11
- 12
- 13
- 14
- 15
- 16
- 17
- 18
- 19
- 20
- 21
- 22
- 23
- 24
- 25
- 26
- 27
- 28
- 29
- 30
- 31
- 32
- 33
- 34
- 35
- 36
- 37
- 38
- 39
- 40
- 41
- 42
- 43
- 44
- 45
- 46
- 47
- 48
- 49
- 50
- 51
- 52
- 53
- 54
- 55
- 56
- 57
- 58
- 59
- 60
- 61
- 62
在out参数中访问光标
在out参数中使用光标
我们之前抛出的两个思考问题:
- 查询员工的所有信息–> out参数太多怎么办?
- 查询某个部门中所有员工的信息–> out中返回集合?
我们可以通过返回Cursor的方式来实现。
在out参数中使用光标 的步骤:
- 申明包结构
- 包头
- 包体
包头:
create or replace package MyPackage is

  -- Author  : ADMINISTRATOR
  -- Created : 2016-6-4 18:10:42
  -- Purpose :

  -- 使用type关键字  is ref cursor说明是cursor类型
  type staffCursor is ref cursor;

  procedure queryStaffJob(pJob         in xgj_test.job%type,
                          jobStaffList out staffCursor);

end MyPackage;
- 1
- 2
- 3
- 4
- 5
- 6
- 7
- 8
- 9
- 10
- 11
- 12
- 13
创建完包头之后,创建包体,包体需要实现包头中声明的所有方法。
包体
create or replace package body MyPackage is

  procedure queryStaffJob(pJob         in xgj_test.job%type,
                          jobStaffList out staffCursor)

   as
  begin
       open jobStaffList for select * from xgj_test t where t.job=pJob;
  end queryStaffJob;

end MyPackage;
- 1
- 2
- 3
- 4
- 5
- 6
- 7
- 8
- 9
- 10
- 11
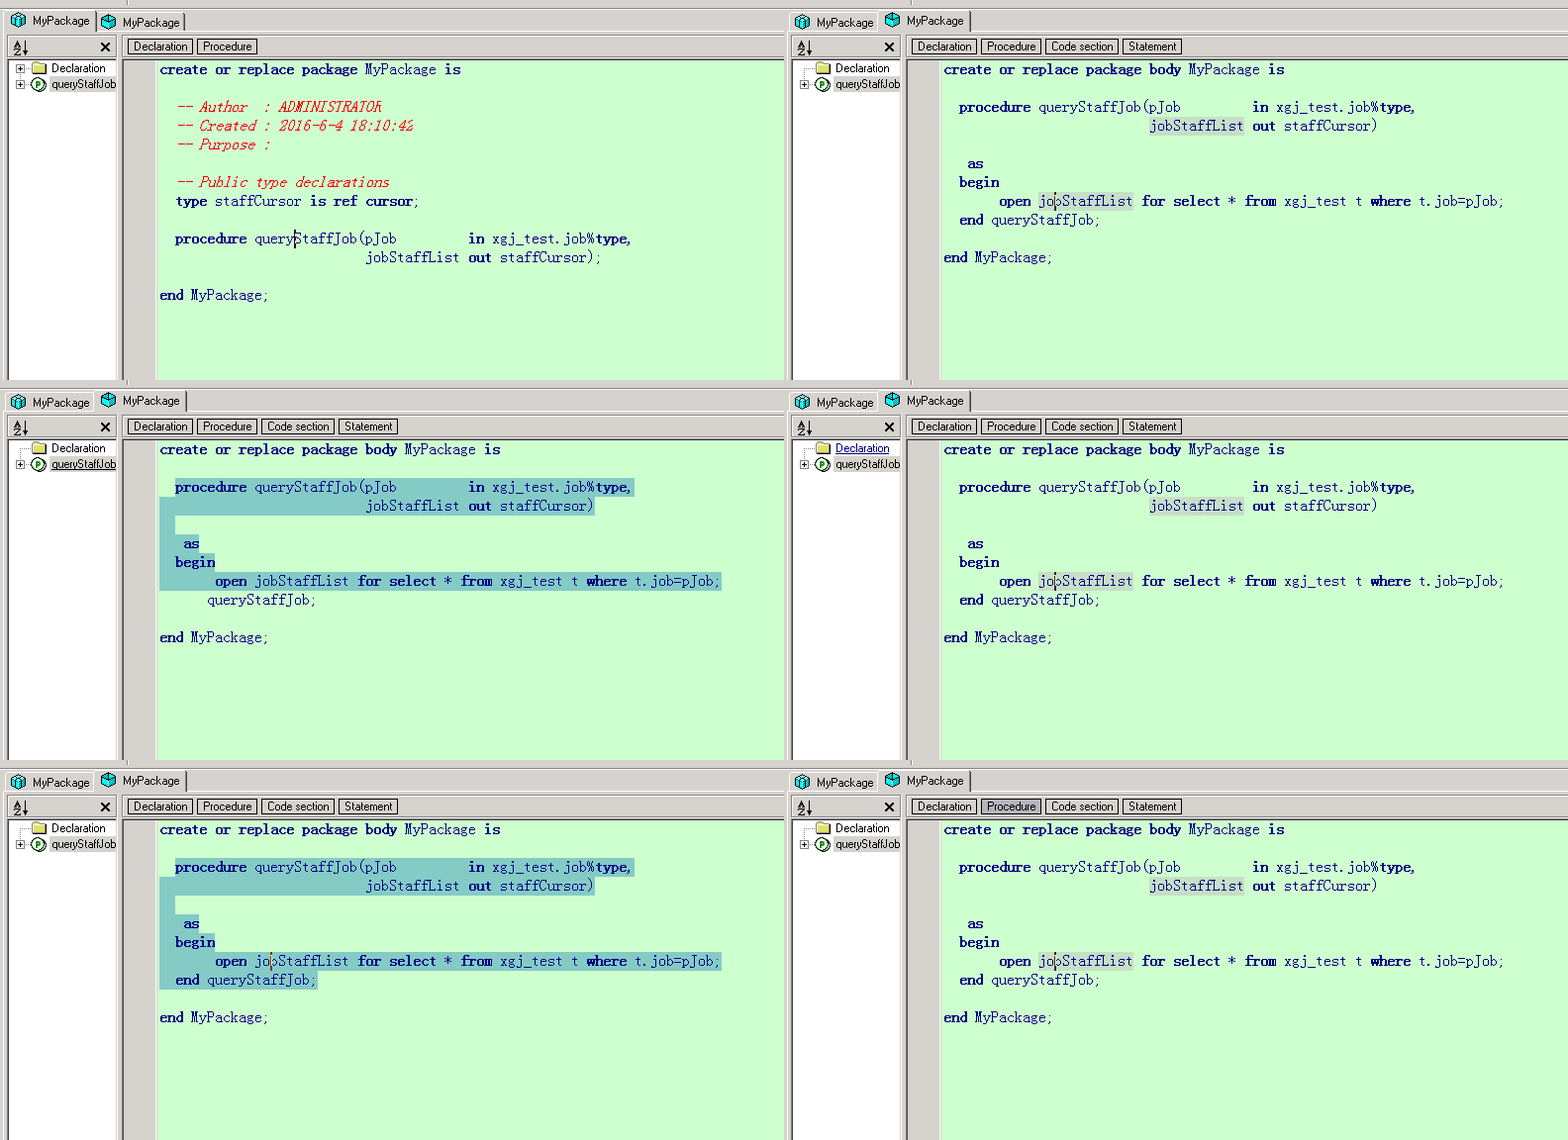
事实上,通过plsql工具创建包头,编译后,包体的框架就会自动的生成了。
在应用程序中访问包下的存储过程
在应用程序中访问包下的存储过程
在应用程序中访问包下的存储过程 ,需要带包名
import java.sql.CallableStatement;
import java.sql.Connection;
import java.sql.ResultSet;

import org.junit.Test;

import com.turing.oracle.dbutil.DBUtils;

import oracle.jdbc.OracleTypes;
import oracle.jdbc.driver.OracleCallableStatement;

public class TestCursor {

    @Test
    public void testCursor(){
        /**
         *
         * create or replace package MyPackage is
                  type staffCursor is ref cursor;

                  procedure queryStaffJob(pJob         in xgj_test.job%type,
                                          jobStaffList out staffCursor);

                end MyPackage;
         */
        String sql = "{call MyPackage.queryStaffJob(?,?)}" ;

        Connection conn = null;
        CallableStatement call = null ;
        ResultSet rs = null;

        try {
            // 获取数据库连接
            conn = DBUtils.getConnection();
            // 通过conn创建CallableStatemet
            call = conn.prepareCall(sql);

            // in 参数 需要赋值
            call.setString(1, "Staff");
            // out 参数需要声明
            call.registerOutParameter(2, OracleTypes.CURSOR);

            // 执行调用
            call.execute();

            // 获取返回值
            rs = ((OracleCallableStatement)call).getCursor(2);
            while(rs.next()){
                // 取出值
                String username = rs.getString("username");
                double sal = rs.getDouble("sal");
                double comm = rs.getDouble("comm");

                System.out.println("username:" + username + "\t sal:" + sal + "\t comm:" + comm);
            }
        } catch (Exception e) {
            e.printStackTrace();
        }finally {
            DBUtils.cleanup(conn, call, rs);
        }
    }

}
- 1
- 2
- 3
- 4
- 5
- 6
- 7
- 8
- 9
- 10
- 11
- 12
- 13
- 14
- 15
- 16
- 17
- 18
- 19
- 20
- 21
- 22
- 23
- 24
- 25
- 26
- 27
- 28
- 29
- 30
- 31
- 32
- 33
- 34
- 35
- 36
- 37
- 38
- 39
- 40
- 41
- 42
- 43
- 44
- 45
- 46
- 47
- 48
- 49
- 50
- 51
- 52
- 53
- 54
- 55
- 56
- 57
- 58
- 59
- 60
- 61
- 62
- 63
- 64
- 65
文章来源: artisan.blog.csdn.net,作者:小小工匠,版权归原作者所有,如需转载,请联系作者。
原文链接:artisan.blog.csdn.net/article/details/51581952
- 点赞
- 收藏
- 关注作者


评论(0)