Spring Boot2.x-04Spring Boot基础-使用注解装配bean

概述
Spring Boot主要是通过注解来装配 Bean 到 Spring IoC 容器中,使用注解装配Bean就不得不提AnnotationConfigApplicationContext,很显然它是一个基于注解的 IoC 容器。
之前的博文 Spring-基于Java类的配置
通过Java配置文件@Bean的方式定义Bean
POJO类
package com.artisan.springbootmaster.pojo;

public class Artisan {

    public String name;
    public int age;

   	// setter/getter
}
- 1
- 2
- 3
- 4
- 5
- 6
- 7
- 8
- 9
- 10
- 11
然后编写一个配置文件
package com.artisan.springbootmaster;

import com.artisan.springbootmaster.pojo.Artisan;
import org.springframework.context.annotation.Bean;
import org.springframework.context.annotation.Configuration;

@Configuration
public class AppConfig {

    @Bean(name = "artisan")
    public Artisan initArtisan(){
        Artisan artisan = new Artisan();
        artisan.setName("小工匠");
        artisan.setAge(20);
        return artisan;
    }
}
- 1
- 2
- 3
- 4
- 5
- 6
- 7
- 8
- 9
- 10
- 11
- 12
- 13
- 14
- 15
- 16
- 17
- 18
-
@Configuration代表是一个 Java 配置文件 , Spring会根据它来生成 IoC 容器去装配 Bean @Bean代表将 initArtisan方法返回的 POJO 装配到 IoC 容器中,属性 name 定义 Bean 的名称,如果没有配置它,则会将方法名称“initArtisan作为 Bean 的名称保存到 Spring IoC 容器中 。
使用 AnnotationConfigApplicationContext 来构建
package com.artisan.springbootmaster;

import com.artisan.springbootmaster.pojo.Artisan;
import org.springframework.context.ApplicationContext;
import org.springframework.context.annotation.AnnotationConfigApplicationContext;

public class LoadTest {

    public static void main(String[] args) {
        ApplicationContext applicationContext = new AnnotationConfigApplicationContext(AppConfig.class);
        //Artisan artisan =  applicationContext.getBean(Artisan.class);
        Artisan artisan = (Artisan) applicationContext.getBean("artisan");
        System.out.println(artisan.getName() + " || "  + artisan.getAge());
    }
}
- 1
- 2
- 3
- 4
- 5
- 6
- 7
- 8
- 9
- 10
- 11
- 12
- 13
- 14
- 15
- 16
-
new AnnotationConfigApplicationContext(AppConfig.class)将 Java 配置文件 AppConfig 传递给 AnnotationConfigApplicationContext 的构造方法,这样它就能够实例化该配置类中定义的信息,然后将配置里面的 Bean 装配到 IoC 容器中 - 装载到IoC容器以后,就可以使用getBean来获取对应实例化的bean信息了
输出 :
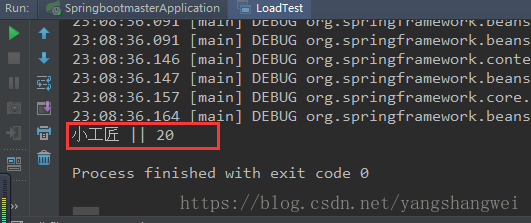
23:08:36.164 [main] DEBUG org.springframework.beans.factory.support.DefaultListableBeanFactory - Returning cached instance of singleton bean 'artisan'
小工匠 || 20
- 1
- 2
关键日志:Returning cached instance of singleton bean 'artisan' ,可以知道配置在配置文件中 的名称为 artisan的 Bean 已经被装配到 IoC 容器中 ,并且可以通过 getBean方法获取对应的 Bean.
通过注解扫描的方式(@Component/@ComponentScan)装配Bean
Spring 中可以使用 XML 或者 Java 配置文件的方式装配 Bean , 但是由于 Spring Boot 是基于注解的方式,因此我们来说下基于注解的方式.
上面的例子使用Java配置文件的方式,使注解@Bean 注入 Spring loC 容器中,假设有多个bean的话,就需要多个@Bean来标注多次。
Spring也提供通过扫描的方式去装配bean到IoC容器中。 对于扫描装配而言使用的注解是@Component和@ComponentScan.
@Component:标明哪个类被扫描进入 Spring IoC 容器@ComponentScan:标明采用何种策略去扫描装配 Bean
同样的,我们还是用上个例子来演示下用法
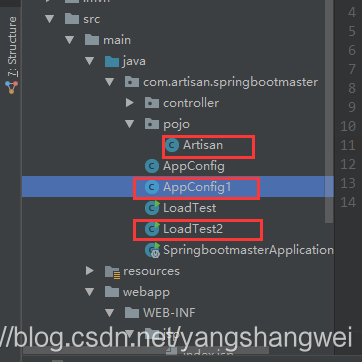
我们先假设AppConfig1.java 和 Artisan.java在同一个包下面 ,

然后对Artisan这个类加上@Component注解,如下
package com.artisan.springbootmaster.pojo;


import org.springframework.beans.factory.annotation.Value;
import org.springframework.stereotype.Component;

@Component("artisan")
public class Artisan {

    @Value("little_artisan")
    public String name;

    @Value("99")
    public int age;


	// setter/getter


}
- 1
- 2
- 3
- 4
- 5
- 6
- 7
- 8
- 9
- 10
- 11
- 12
- 13
- 14
- 15
- 16
- 17
- 18
- 19
- 20
- 21
-
注解@Component 表明这个类将被Spring IoC容器扫描装配,bean的名称为artisan。 如果不配置这个值 ,那IoC 容器就会把类名第一个字母作为小写,其他的不变作为 Bean 名称放入到 IoC 容器中。
-
注解@Value 则是指定具体的值,使得 Spring IoC 给予对应的属性注入对应的值
为了让 Spring IoC 容器装配这个类 , 我们来改造下AppConfig,重新命名为AppConfig1,加入注解@ComponentScan,并取消掉其中的@Bean的配置。
package com.artisan.springbootmaster.pojo;

import org.springframework.context.annotation.ComponentScan;
import org.springframework.context.annotation.Configuration;

@Configuration
@ComponentScan
public class AppConfig1 {

}
- 1
- 2
- 3
- 4
- 5
- 6
- 7
- 8
- 9
- 10
- 11
加入了@ComponentScan,意味着它会进行扫描,但是只是个干巴巴的注解,什么属性都没设置,这就意味着它只会扫描类 AppConfig1 所在的当前包和其子包。 因为Artisan和它在同一个目录下,所以可以删掉之前使用@Bean 标注的创建对象方法。
测试同第一个例子
package com.artisan.springbootmaster;

import com.artisan.springbootmaster.pojo.AppConfig1;
import com.artisan.springbootmaster.pojo.Artisan;
import org.springframework.context.ApplicationContext;
import org.springframework.context.annotation.AnnotationConfigApplicationContext;

public class LoadTest2 {

    public static void main(String[] args) {
        ApplicationContext applicationContext = new AnnotationConfigApplicationContext(AppConfig1.class);
        Artisan artisan =  applicationContext.getBean(Artisan.class);
        System.out.println(artisan.getName() + " || "  + artisan.getAge());
    }
- 1
- 2
- 3
- 4
- 5
- 6
- 7
- 8
- 9
- 10
- 11
- 12
- 13
- 14
- 15

23:17:05.981 [main] DEBUG org.springframework.beans.factory.support.DefaultListableBeanFactory - Returning cached instance of singleton bean 'artisan'
little_artisan || 99
- 1
- 2
来,继续优化,上面为了让Spring扫描到Artisan, 把Artisan.java类和AppConfig1.java放在一块,实在是不合理。所以:使用 @ComponentScan自定义扫包
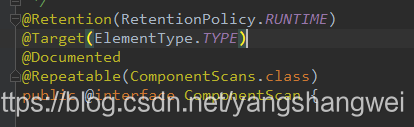
那就去看下@ComponentScan源码吧
定义:
方法:
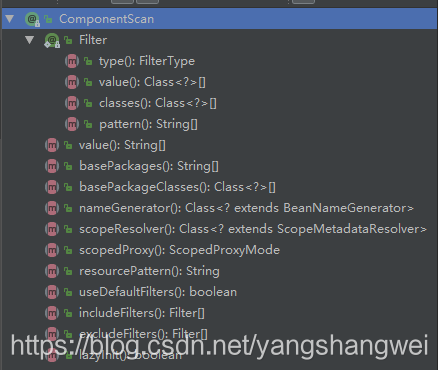
说几个比较常用的
- basePackages: 定义扫描的包名,在没有定义的情况下,只会扫描当前包和其子包下的路径。
- includeFilters :定义满足过滤器( Filter )条件的 Bean 才去 扫描,
- excludeFilters :排除过滤器条件的 Bean , 和includeFilters 一样都需要通过注解@Filter 去定义,@Filter中的type 类型,可以定义为注解或者正则式等类型
- @Filter中classes属性定义注解类, pattern属性 定义正则式类。
来吧,把Artisan还是放在pojo下,AppConfig1.java换个地方吧 ,并通过以下任意方式指定使得 IoC 容器去扫描到 User 类即可
package com.artisan.springbootmaster;

import com.artisan.springbootmaster.pojo.Artisan;
import org.springframework.context.annotation.ComponentScan;
import org.springframework.context.annotation.Configuration;

@Configuration
//@ComponentScan(basePackages = "com.artisan.springbootmaster.*")
@ComponentScan(basePackages = "com.artisan.springbootmaster.pojo")
//@ComponentScan(basePackageClasses = Artisan.class)
public class AppConfig1 {

}
- 1
- 2
- 3
- 4
- 5
- 6
- 7
- 8
- 9
- 10
- 11
- 12
- 13
- 14
- 15
运行测试,结果同样可以获取到

使用excludeFilters属性不让IoC加载某些Bean
假设AppConfig1上配置的basePackages 属性为basePackages = "com.artisan.springbootmaster.*", 在springbootmaster目录下还有个service包,里面的类都标注了@Service注解,假设我们只想让IoC容器扫描到Artisan类,而不扫描ArtisanService类呢?

只需要加上excludeFilters属性,通过excludeFilters 指定排除掉标注了Service注解的类即可
package com.artisan.springbootmaster;

import org.springframework.context.annotation.ComponentScan;
import org.springframework.context.annotation.Configuration;
import org.springframework.stereotype.Service;

@Configuration
@ComponentScan(basePackages = "com.artisan.springbootmaster.*",
                excludeFilters = {@ComponentScan.Filter(classes = {Service.class})})
public class AppConfig1 {

}
- 1
- 2
- 3
- 4
- 5
- 6
- 7
- 8
- 9
- 10
- 11
- 12
验证下吧
package com.artisan.springbootmaster;

import com.artisan.springbootmaster.pojo.Artisan;
import com.artisan.springbootmaster.service.ArtisanService;
import org.springframework.context.ApplicationContext;
import org.springframework.context.annotation.AnnotationConfigApplicationContext;

public class LoadTest2 {

    public static void main(String[] args) {
        ApplicationContext applicationContext = new AnnotationConfigApplicationContext(AppConfig1.class);
        Artisan artisan =  applicationContext.getBean(Artisan.class);
        System.out.println(artisan.getName() + " || "  + artisan.getAge());


        ArtisanService artisanService =  applicationContext.getBean(ArtisanService.class);
        artisanService.doSomething();
    }
}
- 1
- 2
- 3
- 4
- 5
- 6
- 7
- 8
- 9
- 10
- 11
- 12
- 13
- 14
- 15
- 16
- 17
- 18
- 19
- 20
23:54:04.274 [main] DEBUG org.springframework.beans.factory.support.DefaultListableBeanFactory - Returning cached instance of singleton bean 'artisan'
little_artisan || 99
Exception in thread "main" org.springframework.beans.factory.NoSuchBeanDefinitionException: No qualifying bean of type 'com.artisan.springbootmaster.service.ArtisanService' available
	at org.springframework.beans.factory.support.DefaultListableBeanFactory.getBean(DefaultListableBeanFactory.java:346)
	at org.springframework.beans.factory.support.DefaultListableBeanFactory.getBean(DefaultListableBeanFactory.java:333)
	at org.springframework.context.support.AbstractApplicationContext.getBean(AbstractApplicationContext.java:1105)
	at com.artisan.springbootmaster.LoadTest2.main(LoadTest2.java:16)

Process finished with exit code 1
- 1
- 2
- 3
- 4
- 5
- 6
- 7
- 8
- 9
- 10
- 11
可以看到,No qualifying bean of type 'com.artisan.springbootmaster.service.ArtisanService' available,Spring IoC容器并没有在启动的时候去扫表标注了@Service的ArtisanService类,说明excludeFilters 起了作用 。由于加入了 excludeFilters 的配置,使标注了@Service 的类将不被 IoC 容器扫描注入
装配第三方 Bean
一个项目中,不可避免的要使用到第三方的jar,如果希望把第三方包的类对象也放入到 Spring IoC 容器中,@Bean 注解就发挥用处了。
如下
package com.artisan.redpacket.config;

import java.util.Properties;

import javax.sql.DataSource;

import org.apache.commons.dbcp2.BasicDataSourceFactory;
import org.mybatis.spring.SqlSessionFactoryBean;
import org.mybatis.spring.mapper.MapperScannerConfigurer;
import org.springframework.context.annotation.Bean;
import org.springframework.context.annotation.ComponentScan;
import org.springframework.context.annotation.ComponentScan.Filter;
import org.springframework.context.annotation.Configuration;
import org.springframework.context.annotation.FilterType;
import org.springframework.core.io.ClassPathResource;
import org.springframework.core.io.Resource;
import org.springframework.jdbc.datasource.DataSourceTransactionManager;
import org.springframework.stereotype.Repository;
import org.springframework.stereotype.Service;
import org.springframework.transaction.PlatformTransactionManager;
import org.springframework.transaction.annotation.EnableTransactionManagement;
import org.springframework.transaction.annotation.TransactionManagementConfigurer;

@Configuration
//定义Spring 扫描的包
@ComponentScan(value= "com.*", includeFilters= {@Filter(type = FilterType.ANNOTATION, value ={Service.class})})
//使用事务驱动管理器
@EnableTransactionManagement
//实现接口TransactionManagementConfigurer,这样可以配置注解驱动事务
public class RootConfig implements TransactionManagementConfigurer {

	private DataSource dataSource = null;

	/**
	 * 配置数据库.
	 * @return 数据连接池
	 */
	@Bean(name = "dataSource")
	public DataSource initDataSource() {
		if (dataSource != null) {
			return dataSource;
		}
		try {
			Properties props = new Properties();
			props.load(RootConfig.class.getClassLoader().getResourceAsStream("jdbc.properties"));
			props.setProperty("driverClassName", props.getProperty("jdbc.driver"));
			props.setProperty("url", props.getProperty("jdbc.url"));
			props.setProperty("username", props.getProperty("jdbc.username"));
			props.setProperty("password", props.getProperty("jdbc.password"));
			dataSource = BasicDataSourceFactory.createDataSource(props);
		} catch (Exception e) {
			e.printStackTrace();
		}
		return dataSource;
	}

	/***
	 * 配置SqlSessionFactoryBean
	 * @return SqlSessionFactoryBean
	 */
	@Bean(name="sqlSessionFactory")
	public SqlSessionFactoryBean initSqlSessionFactory() {
		SqlSessionFactoryBean sqlSessionFactory = new SqlSessionFactoryBean();
		sqlSessionFactory.setDataSource(initDataSource());
		//配置MyBatis配置文件
		Resource resource = new ClassPathResource("mybatis/mybatis-config.xml");
		sqlSessionFactory.setConfigLocation(resource);
		return sqlSessionFactory;
	}

	/***
	 * 通过自动扫描,发现MyBatis Mapper接口
	 * @return Mapper扫描器
	 */
	@Bean
	public MapperScannerConfigurer initMapperScannerConfigurer() {
		MapperScannerConfigurer msc = new MapperScannerConfigurer();
		msc.setBasePackage("com.*");
		msc.setSqlSessionFactoryBeanName("sqlSessionFactory");
		msc.setAnnotationClass(Repository.class);
		return msc;
	}


	/**
	 * 实现接口方法,注册注解事务,当@Transactional 使用的时候产生数据库事务
	 */
	@Override
	@Bean(name="annotationDrivenTransactionManager")
	public PlatformTransactionManager annotationDrivenTransactionManager() {
		DataSourceTransactionManager transactionManager =
           new DataSourceTransactionManager();
		transactionManager.setDataSource(initDataSource());
		return transactionManager;
	}


}
- 1
- 2
- 3
- 4
- 5
- 6
- 7
- 8
- 9
- 10
- 11
- 12
- 13
- 14
- 15
- 16
- 17
- 18
- 19
- 20
- 21
- 22
- 23
- 24
- 25
- 26
- 27
- 28
- 29
- 30
- 31
- 32
- 33
- 34
- 35
- 36
- 37
- 38
- 39
- 40
- 41
- 42
- 43
- 44
- 45
- 46
- 47
- 48
- 49
- 50
- 51
- 52
- 53
- 54
- 55
- 56
- 57
- 58
- 59
- 60
- 61
- 62
- 63
- 64
- 65
- 66
- 67
- 68
- 69
- 70
- 71
- 72
- 73
- 74
- 75
- 76
- 77
- 78
- 79
- 80
- 81
- 82
- 83
- 84
- 85
- 86
- 87
- 88
- 89
- 90
- 91
- 92
- 93
- 94
- 95
- 96
- 97
- 98
- 99
- 100
- 101
- 102
上面通过@Bean 如果指定了name属性的名字,Spring 就会把该name的值作为bean的名称 保存在 loC 容器中如果不填name的值,Spring就会用方法名作为 Bean 名称保存到IoC 容器中。
文章来源: artisan.blog.csdn.net,作者:小小工匠,版权归原作者所有,如需转载,请联系作者。
原文链接:artisan.blog.csdn.net/article/details/83352400

- 点赞
- 收藏
- 关注作者
评论(0)