Spring Boot2.x-03Spring Boot基础

搭建Spring Boot开发环境
搭建方式有很多种,这里不一一列出了,仅列出如下两种常用的方式。
使用Spring Tool Suit 构建
Spring Boot-Spring Tool Suit + Gradle 构建第一个Spring Boot 项目01
Spring Boot-Spring Tool Suit + Gradle 构建第一个Spring Boot 项目02
使用 IntelliJ IDEA来构建
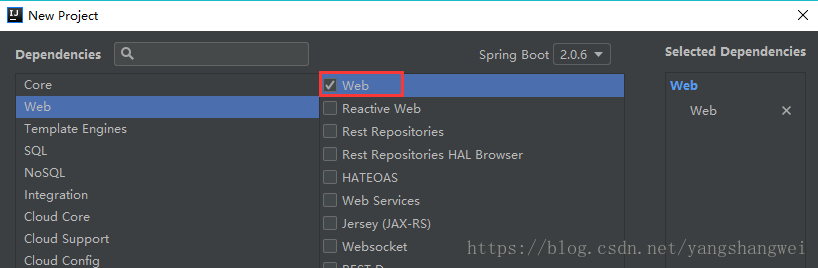
版本: IntelliJ IDEA 2018.2.5 Ultimate 版本 商用版本
Spring Boot 2.0.6
![[图片]](https://img-blog.csdn.net/2018102318115147?watermark/2/text/aHR0cHM6Ly9ibG9nLmNzZG4ubmV0L3lhbmdzaGFuZ3dlaQ==/font/5a6L5L2T/fontsize/400/fill/I0JBQkFCMA==/dissolve/70)
跟随提示,一步步的操作即可 ,依赖的话,初次构建只要选择Web即可满足。
如果没有Spring Initializr ,需要安装插件
操作:setting—>plugins—>搜索Spring boot—>勾选安装Spring boot插件,重启IDEA。

Spring Boot配置
入口类的main方法和@SpringBootApplication注解
在自动生成的工程里面,我们来看下应用启动的入口类,类的名称取决于你的工程的名称,比如这里我的是SpringbootmasterApplication
package com.artisan.springbootmaster;

import org.springframework.boot.SpringApplication;
import org.springframework.boot.autoconfigure.SpringBootApplication;

@SpringBootApplication
public class SpringbootmasterApplication {

    public static void main(String[] args) {
          SpringApplication.run(SpringbootmasterApplication.class, args);
    }
}
- 1
- 2
- 3
- 4
- 5
- 6
- 7
- 8
- 9
- 10
- 11
- 12
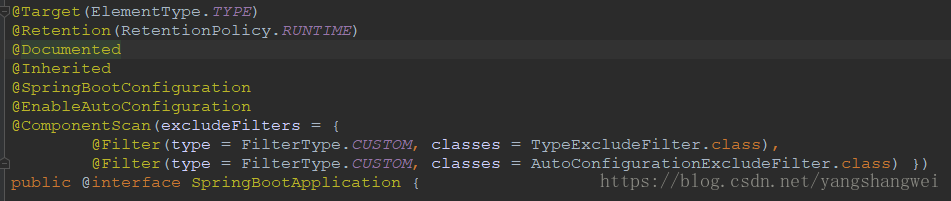
看下@SpringBootApplication注解
-
@SpringBootConfiguration继承自@Configuration,标注当前类是配置类,并会将当前类内声明的一个或多个以@Bean注解标记的方法的实例纳入到spring容器中,Bean的实例名就是方法名。
-
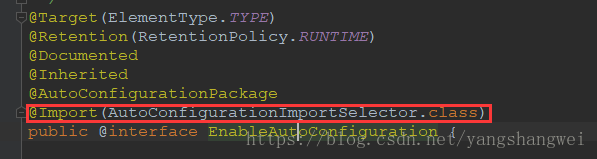
@EnableAutoConfiguration 自动配置,依赖AutoConfigurationImportSelector。具体的细节以后再说。

全局配置文件application.properties或者application.yml
Spring Boot 不仅支持常规的Properties配置文件,还支持yaml语言的配置文件。 这里我们用Properties作为配置文件。
我们以修改端口为例子,讲Tomcat默认的8080 改为8088端口启动。
application.properties 增加
server.port=8088
- 1
可配置的属性server开头的属性见 org.springframework.boot.autoconfigure.web.ServerProperties
启动验证

如果使用application.yml配置,如下
server:
  port: 8080
- 1
- 2
结果是相同的。
使用@ImportResource加载xml
虽然Spring boot提倡使用Java注解的方式来实现零配置的应用开发,但是并不代表不支持加载xml配置。
Spring提供了@ImportResource来加载xml文件。
用法也是很简单,这里就不贴例子了。
属性配置
常规属性配置
在Spring Boot 中,只需要在application.properties中定义属性,直接使用@Value注入即可
示例:
在application.properties增加两个属性
artisan.name=spring boot
artisan.age=99
- 1
- 2
获取
package com.artisan.springbootmaster.controller;

import org.springframework.beans.factory.annotation.Value;
import org.springframework.web.bind.annotation.GetMapping;
import org.springframework.web.bind.annotation.RestController;

import java.util.HashMap;
import java.util.Map;

@RestController
public class ArtisanController {

    @Value("${artisan.name}")
    private String name;
    @Value("${artisan.age}")
    private int age;


    @GetMapping("/loadPropertiesValue")
    public String loadPropertiesValue(){
        return "artisan name:【" + name + "】 , age:【" + age  + "】";
    }
  }
- 1
- 2
- 3
- 4
- 5
- 6
- 7
- 8
- 9
- 10
- 11
- 12
- 13
- 14
- 15
- 16
- 17
- 18
- 19
- 20
- 21
- 22
- 23
- 24
访问:http://localhost:8080/loadPropertiesValue

基于properties的类型安全的配置
上述这种方式,如果属性很多,需要一个个的使用@Value注入,显得十分的麻烦。 Spring Boot提供了基于类型安全的配置方式,可以使用@ConfigurationProperties将Properties的属性和一个Bean及其属性关联,从而实现类型安全的配置
示例:
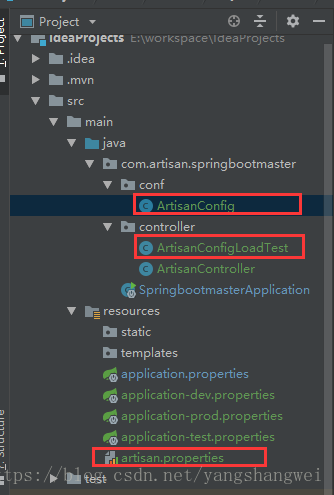
假设有个配置文件 artisan.properties
xxx.name=artisan_self
xxx.age=23
- 1
- 2
配置类
package com.artisan.springbootmaster.conf;

import org.springframework.boot.context.properties.ConfigurationProperties;
import org.springframework.context.annotation.PropertySource;
import org.springframework.stereotype.Component;

@Component
@ConfigurationProperties(prefix = "xxx")
@PropertySource(value = "classpath:artisan.properties")
public class ArtisanConfig {

    private String name;

    private int age ;

    public String getName() {
        return name;
    }

    public void setName(String name) {
        this.name = name;
    }

    public int getAge() {
        return age;
    }

    public void setAge(int age) {
        this.age = age;
    }
}
- 1
- 2
- 3
- 4
- 5
- 6
- 7
- 8
- 9
- 10
- 11
- 12
- 13
- 14
- 15
- 16
- 17
- 18
- 19
- 20
- 21
- 22
- 23
- 24
- 25
- 26
- 27
- 28
- 29
- 30
- 31
- 32
prefix 要和 配置文件的前缀保持一致。 属性名称也要和配置文件中的一致, 否则获取不到该值。
如果需要指定特定位置的配置文件,可以使用@PropertySource注解。旧版本@ConfigurationProperties中的locations已经被废弃了。
同时,不要忘记给该类加上@Component,使其成为Spring管理的bean
使用: 直接 @Autowired注入该类即可获取
package com.artisan.springbootmaster.controller;

import com.artisan.springbootmaster.conf.ArtisanConfig;
import org.springframework.beans.factory.annotation.Autowired;
import org.springframework.web.bind.annotation.GetMapping;
import org.springframework.web.bind.annotation.RestController;

import java.util.HashMap;
import java.util.Map;

@RestController
public class ArtisanConfigLoadTest {

    @Autowired
    private ArtisanConfig artisanConfig;

    @GetMapping("/loadSelfConfigProperties")
    public Map<String,Object> loadConf(){
        Map<String,Object> map = new HashMap<>();

        map.put("name",artisanConfig.getName());
        map.put("value", artisanConfig.getAge());

        return map;
    }
}
- 1
- 2
- 3
- 4
- 5
- 6
- 7
- 8
- 9
- 10
- 11
- 12
- 13
- 14
- 15
- 16
- 17
- 18
- 19
- 20
- 21
- 22
- 23
- 24
- 25
- 26
启动测试:

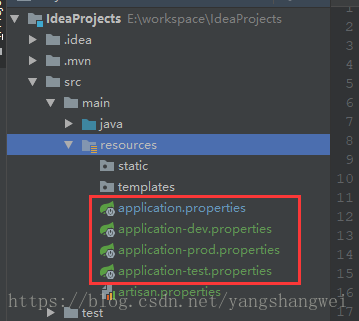
开发、测试、生产环境配置通过Profile来区分
Profile是Spring对不同环境提供不同配置功能的支持,可以通过指定参数等方式快速切换环境。默认使用application.properties配置文件
格式
application-{profile}.properties
- 1
配置
简单起见,我们仅仅指定端口
application-dev.properties
server.port=8888
- 1
application-test.properties
server.port=9999
- 1
application-prod.properties
server.port=80
- 1
在application.properties中指定使用的文件
这里我们指定prod ,即启动80端口
#spring.profiles.active=dev
#spring.profiles.active=test
spring.profiles.active=prod
- 1
- 2
- 3
观察日志:

代码
https://github.com/yangshangwei/springbootmaster
文章来源: artisan.blog.csdn.net,作者:小小工匠,版权归原作者所有,如需转载,请联系作者。
原文链接:artisan.blog.csdn.net/article/details/83311263

- 点赞
- 收藏
- 关注作者
评论(0)