Spring Boot2.x-15 整合RabbitMQ 及RabbitMQ的基本使用
概述
以 Spring Cloud实战-06使用/actuator/bus-refresh端点手动刷新配置 + 使用Spring Cloud Bus自动更新配置中使用的几个微服务工程为基础,我们梳理下整合RabbitMQ及RabbitMQ的基本用法.
官方教程: https://spring.io/guides/gs/messaging-rabbitmq/
我们这里不是官方的Demo
后续开篇系统的介绍RabbitMQ,这里直接上Demo了先。
先说下RabbitMQ中的几个名词:
- Broker:简单来说就是消息队列服务器实体,可以理解为一个节点
- Exchange:消息交换机,它指定消息按什么规则,路由到哪个队列
- Queue:消息队列载体,每个消息都会被投入到一个或多个队列
- Binding:绑定,它的作用就是把exchange和queue按照路由规则绑定起来
- Routing Key:路由关键字,exchange根据这个关键字进行消息投递
- vhost:虚拟主机,一个broker里可以开设多个vhost,用作不同用户的权限分离
- Producer:消息生产者,投递消息的程序
- Consumer:消息消费者,接受消息的程序
- Channel:消息通道,在客户端的每个连接里,可建立多个channel,每个channel代表一个会话任务
在Docker CE中安装RabbitMQ
依赖
依赖必不可少嘛
 	 <dependency>
            <groupId>org.springframework.boot</groupId>
            <artifactId>spring-boot-starter-amqp</artifactId>
        </dependency>
- 1
- 2
- 3
- 4
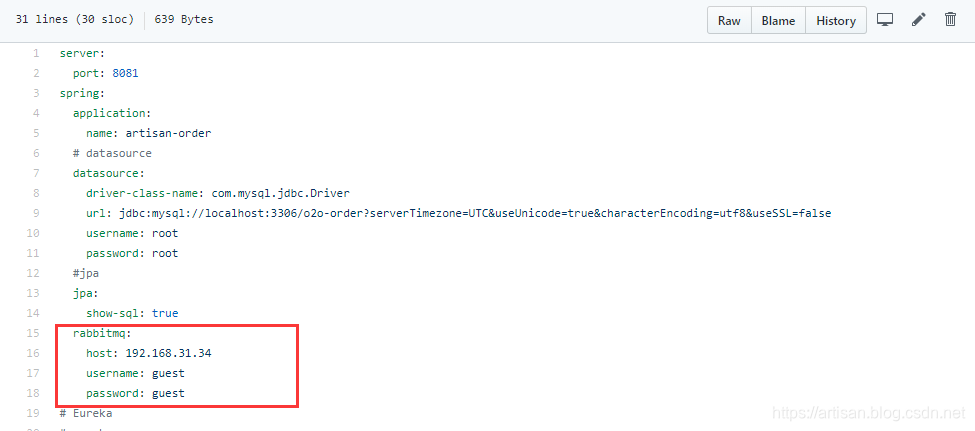
配置

如果是默认的localhost和 5672端口 ,也可以不配。当然了,最好还是配上。
基本使用
工程结构 如下

为了方便,发送方直接使用了Controller作为发送发。 当然了,最好再新建个工程。
主要的注解 @RabbitListener
手工创建队列,发送消息到指定的队列
接收方代码
package com.artisan.order.message;

import lombok.extern.slf4j.Slf4j;
import org.springframework.amqp.rabbit.annotation.Exchange;
import org.springframework.amqp.rabbit.annotation.Queue;
import org.springframework.amqp.rabbit.annotation.QueueBinding;
import org.springframework.amqp.rabbit.annotation.RabbitListener;
import org.springframework.stereotype.Component;

/**
 * 接收RabbitMQ消息的接收方
 */
@Slf4j
@Component
public class MessageReceive {


    /**
     *  queues指定对列名,需要先手工在RabbitMQ上建立队列artisanQueue
     * @param message
     */
    @RabbitListener(queues = "artisanQueue")
    public void processReceivedMsg(String message){
        log.info("artisanQueue Received MSG : {}", message);
    }
}
- 1
- 2
- 3
- 4
- 5
- 6
- 7
- 8
- 9
- 10
- 11
- 12
- 13
- 14
- 15
- 16
- 17
- 18
- 19
- 20
- 21
- 22
- 23
- 24
- 25
- 26
- 27
需要提前在RabbitMQ上新建好artisanQueue这个队列,否则报错。如下

发送发测试
package com.artisan.order.controller;

import lombok.extern.slf4j.Slf4j;
import org.springframework.amqp.core.AmqpTemplate;
import org.springframework.beans.factory.annotation.Autowired;
import org.springframework.web.bind.annotation.GetMapping;
import org.springframework.web.bind.annotation.RestController;

@RestController
@Slf4j
public class MsgController {

    @Autowired
    private AmqpTemplate amqpTemplate;

    @GetMapping("/sendMsg2ArtisanQueue")
    public void sendMsg(){
        log.info("begin to send msg to artisanQueue ....");
        this.amqpTemplate.convertAndSend("artisanQueue","[artisanQueue] I send one msg to u with RabbitMQ");
    }
}
- 1
- 2
- 3
- 4
- 5
- 6
- 7
- 8
- 9
- 10
- 11
- 12
- 13
- 14
- 15
- 16
- 17
- 18
- 19
- 20
- 21
主要使用AmqpTemplate ,注入后,调用convertAndSend即可
启动微服务,访问 http://localhost:8081/sendMsg2ArtisanQueue
观察消息队列的变化 :

观察日志:
2019-04-11 23:06:43.004  INFO 33612 --- [nio-8081-exec-1] c.a.order.controller.MsgController       : begin to send msg to artisanQueue ....
2019-04-11 23:06:43.011  INFO 33612 --- [cTaskExecutor-1] c.artisan.order.message.MessageReceive   : artisanQueue Received MSG : [artisanQueue] I send one msg to u with RabbitMQ
- 1
- 2
- 3
自动创建队列,发送消息到指定的队列
上面的例子手工创建队列,是不是很崩溃,自动创建还是使用@RabbitListener,换个属性 queuesToDeclare 即可
@RabbitListener(queuesToDeclare = @Queue("artisanQueue2"))
- 1
我们先删掉 artisanQueue2 ,目前的消息队列如下

接收方
MessageReceive 中新加个方法如下
 /**
     *  queuesToDeclare自动创建队列
     * @param message
     */
    @RabbitListener(queuesToDeclare = @Queue("artisanQueue2"))
    public void processReceivedMsg2(String message){
        log.info("artisanQueue2 Received MSG : {}", message);
    }
- 1
- 2
- 3
- 4
- 5
- 6
- 7
- 8
发送方 MsgController新建个方法如下
   @GetMapping("/sendMsg2ArtisanQueue2")
    public void sendMsg2(){
        log.info("begin to send msg to artisanQueue2 ....");
        this.amqpTemplate.convertAndSend("artisanQueue2","[artisanQueue2] I send one msg to u with RabbitMQ");
    }
- 1
- 2
- 3
- 4
- 5
- 6
RabbitMQ管理页面查看

日志:
2019-04-11 23:12:20.120  INFO 33612 --- [nio-8081-exec-4] c.a.order.controller.MsgController       : begin to send msg to artisanQueue2 ....
2019-04-11 23:12:20.148  INFO 33612 --- [cTaskExecutor-2] c.artisan.order.message.MessageReceive   : artisanQueue2 Received MSG : [artisanQueue2] I send one msg to u with RabbitMQ
- 1
- 2
自动创建队列,Exchange和队列绑定
确保不影响,先删掉 artisanQueue3
接收方:
    /**
     *  自动创建队列,Exchange和队列绑定
     * @param message
     */
    @RabbitListener(bindings = @QueueBinding(
            value = @Queue("artisanQueue3"),
            exchange = @Exchange("artisanExchange3")
    ))
    public void processReceivedMsg3(String message){
        log.info("artisanQueue3 Received MSG : {}", message);
    }
- 1
- 2
- 3
- 4
- 5
- 6
- 7
- 8
- 9
- 10
- 11
发送测试
 @GetMapping("/sendMsg3ArtisanQueue3")
    public void sendMsg3(){
        log.info("begin to send msg to artisanQueue3 ....");
        this.amqpTemplate.convertAndSend(
                "artisanQueue3",
                "[artisanQueue3] I send one msg to u with RabbitMQ");
    }
- 1
- 2
- 3
- 4
- 5
- 6
- 7
点击自动创建的消息队列后,查看Bindings

日志:
2019-04-11 23:17:04.772  INFO 33612 --- [nio-8081-exec-7] c.a.order.controller.MsgController       : begin to send msg to artisanQueue3 ....
2019-04-11 23:17:04.790  INFO 33612 --- [cTaskExecutor-2] c.artisan.order.message.MessageReceive   : artisanQueue3 Received MSG : [artisanQueue3] I send one msg to u with RabbitMQ
- 1
- 2
自动创建队列,Exchange和队列绑定,接收指定key的消息

短信的消息,通过key ,仅发送到短信消息队列中。 Email仅发送到Email的消息队列中
接收方
 /**
     *  自动创建队列,Exchange和队列绑定,接收指定key的消息
     * @param message
     */
    @RabbitListener(bindings = @QueueBinding(
            value = @Queue("SMSQueue"),
            exchange = @Exchange("smsExchange"),
            key = "sms"

    ))
    public void processSMSMsg(String message){
        log.info("SMSQueue Received MSG : {}", message);
    }

    /**
     *  自动创建队列,Exchange和队列绑定,接收指定key的消息
     * @param message
     */
    @RabbitListener(bindings = @QueueBinding(
            value = @Queue("EmailQueue"),
            exchange = @Exchange("emailExchange"),
            key = "email"

    ))
    public void processEmailMsg(String message){
        log.info("EmailQueue Received MSG : {}", message);
    }
- 1
- 2
- 3
- 4
- 5
- 6
- 7
- 8
- 9
- 10
- 11
- 12
- 13
- 14
- 15
- 16
- 17
- 18
- 19
- 20
- 21
- 22
- 23
- 24
- 25
- 26
- 27
发送方测试
@GetMapping("/sendSMSMsg")
    public void sendSMSMsg(){
        log.info("begin to send msg to sendSMSMsg ....");
        this.amqpTemplate.convertAndSend(
                "smsExchange",
                "sms",
                "[SMSQueue] I send one msg to u with RabbitMQ");
    }


    @GetMapping("/sendEmailMsg")
    public void sendEmailMsg(){
        log.info("begin to send msg to sendEmailMsg ....");
        this.amqpTemplate.convertAndSend(
                "emailExchange",
                "email",
                "[EmailQueue] I send one msg to u with RabbitMQ");
    }
- 1
- 2
- 3
- 4
- 5
- 6
- 7
- 8
- 9
- 10
- 11
- 12
- 13
- 14
- 15
- 16
- 17
- 18
启动访问 http://localhost:8081/sendEmailMsg

日志
2019-04-11 23:35:44.631  INFO 33612 --- [nio-8081-exec-7] c.a.order.controller.MsgController       : begin to send msg to sendEmailMsg ....
2019-04-11 23:35:44.643  INFO 33612 --- [cTaskExecutor-3] c.artisan.order.message.MessageReceive   : EmailQueue Received MSG : [EmailQueue] I send one msg to u with RabbitMQ
- 1
- 2
- 3
访问 http://localhost:8081/sendSMSMsg

日志
2019-04-11 23:37:16.293  INFO 33612 --- [io-8081-exec-10] c.a.order.controller.MsgController       : begin to send msg to sendSMSMsg ....
2019-04-11 23:37:16.308  INFO 33612 --- [cTaskExecutor-3] c.artisan.order.message.MessageReceive   : SMSQueue Received MSG : [SMSQueue] I send one msg to u with RabbitMQ
- 1
- 2
- 3
代码
https://github.com/yangshangwei/springcloud-o2o/tree/master/artisan_order
文章来源: artisan.blog.csdn.net,作者:小小工匠,版权归原作者所有,如需转载,请联系作者。
原文链接:artisan.blog.csdn.net/article/details/89222306
- 点赞
- 收藏
- 关注作者


评论(0)