Spring5学习笔记(六)AOP简介、动态代理、AspectJ开发详解

1、AOP概念
什么是AOP?
面向切面编程(方面),利用AOP可以对业务逻辑的各个部分进行隔离,从而使得业务逻辑各部分之间的耦合度降低,提高程序的可重用性,同时提高了开发的效率。
简单来说就是说不通过修改源代码方式,在主干功能里面添加新功能。
1.1、AOP常用术语
| 名称 | 说明 |
|---|---|
| Joinpoint(连接点) | 指那些被拦截到的点,在 Spring 中,可以被动态代理拦截目标类的方法。 |
| Pointcut(切入点) | 指要对哪些 Joinpoint 进行拦截,即被拦截的连接点。 |
| Advice(通知) | 指拦截到 Joinpoint 之后要做的事情,即对切入点增强的内容。 |
| Target(目标) | 指代理的目标对象。 |
| Weaving(植入) | 指把增强代码应用到目标上,生成代理对象的过程。 |
| Proxy(代理) | 指生成的代理对象。 |
| Aspect(切面) | 切入点和通知的结合。 |
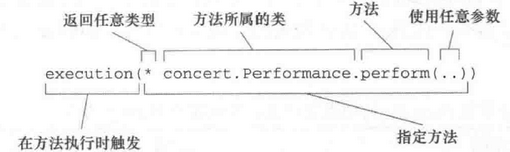
1.2、Pointcut语法
切入点表达式中可以使用的通配符
| 通配符 | 说明 |
|---|---|
| … | 匹配方法定义中任何数量的参数,还可匹配类定义中任何数量的包 |
| + | 匹配类的任何子类 |
| * | 匹配任何数量的字符 |
2、AOP场景
计算器运行计算方法的时候进行日志记录
//计算方法接口
public interface Calculator {
//加减乘除
public int add(int i,int j);
public int sub(int i,int j);
public int mul(int i,int j);
public int div(int i,int j);
}
//实现类
public class MyMathCalculator implements Calculator{
@Override
public int add(int i, int j) {
//日志记录
System.out.println("开始add方法,参数为"+i+","+j);
int result = i + j;
System.out.println("add打印结果:"+result);
return result;
}
@Override
public int sub(int i, int j) {
System.out.println("开始sub方法"+i+","+j);
int result = i - j;
System.out.println("sub打印结果:"+result);
return result;
}
@Override
public int mul(int i, int j) {
System.out.println("开始mul方法"+i+","+j);
int result = i * j;
System.out.println("mul打印结果:"+result);
return result;
}
@Override
public int div(int i, int j) {
System.out.println("开始div方法"+i+","+j);
int result = i / j;
System.out.println("div打印结果:"+result);
return result;
}
}
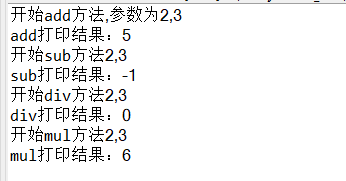
@Test
public void test01() {
MyMathCalculator myMathCalculator = new MyMathCalculator();
myMathCalculator.add(2, 3);
myMathCalculator.sub(2, 3);
myMathCalculator.div(2, 3);
myMathCalculator.mul(2, 3);
}
结论
实现确实没什么问题,但是过程实现过于麻烦、耦合度太高、不够灵活,因此我们不推荐使用这样的方法。我们希望有一种方法能够在运行期间,可以动态的实现这样的功能,那就是AOP的动态代理。
2.1、JDK动态代理
使用JDK动态代理,使用Proxy类里面的方法创建代理对象,调用newProxyInstance方法

public static Object newProxyInstance(ClassLoader loader,Class<?>[] interfaces,InvocationHandler h)
- ClassLoader loader :类加载器
- Class<?>[] interfaces:增强方法所在的类,这个类实现的接口,支持多个接口
- InvocationHandler h:实现这个接口InvocationHandler ,创建代理对象,写增强的部分。
public class AOPTest {

	@Test
	public void test01() {
		MyMathCalculator myMathCalculator = new MyMathCalculator();

		Class<?>[] interfaces = {Calculator.class};

		//相当于接口 = new 实现类();
		Calculator myMath = (Calculator)Proxy.newProxyInstance(AOPTest.class.getClassLoader(), interfaces,new CalculatorProxy(myMathCalculator));
		int num = myMath.add(1, 2);
		System.out.println("result:"+num);
	}
}


//创建代理对象代码
class CalculatorProxy implements InvocationHandler{

	private Object obj;
	//把创建的代理对象传过来
	public CalculatorProxy(Object obj) {
		this.obj = obj;
	}


	//增强的逻辑
	@Override
	public Object invoke(Object proxy, Method method, Object[] args) throws Throwable {

		//方法之前
		System.out.println("方法执行之前.."+method.getName()+":参数....."+Arrays.toString(args));

		//执行方法
		Object invoke = method.invoke(obj, args);


		//方法之后
		System.out.println("方法执行之后.."+obj);

		return invoke;
	}


}

3、AOP操作-AspectJ注解
Spring框架一般都是基于AspectJ实现AOP操作。
什么是AspectJ?
AspectJ不是Spring的组成部分,独立AOP框架,一般把AspectJ和Spring框架一起使用,进行AOP操作。
基于AspectJ实现AOP操作
(1)、基于xml配置文件实现。
(2)、基于注解方式实现(推荐)。
3.1、AspectJ注解操作
- 在spring配置文件中,开启注解扫描
- 使用注解创建User和UserProxy对象
- 在增强类上添加注解@Aspect
- 在spring配置文件中开启生成代理对象
//bean配置文件
<?xml version="1.0" encoding="UTF-8"?>
<beans xmlns="http://www.springframework.org/schema/beans"
xmlns:xsi="http://www.w3.org/2001/XMLSchema-instance"
xmlns:context="http://www.springframework.org/schema/context"
xmlns:aop="http://www.springframework.org/schema/aop"
xsi:schemaLocation="http://www.springframework.org/schema/beans http://www.springframework.org/schema/beans/spring-beans.xsd
http://www.springframework.org/schema/context http://www.springframework.org/schema/context/spring-context-4.3.xsd
http://www.springframework.org/schema/aop http://www.springframework.org/schema/aop/spring-aop-4.3.xsd">
<!-- 开启注解扫描 -->
<context:component-scan base-package="com.dong.aopanno"></context:component-scan>
<!-- 开启Aspect生成代理对象 -->
<aop:aspectj-autoproxy></aop:aspectj-autoproxy>
</beans>
//User类
@Component
public class User {
public void add() {
System.out.println("add............");
}
}
//增强的类
@Component
@Aspect //生产代理对象
public class UserProxy {
//前置通知
//@Before 表示前置通知
@Before(value = "execution(* com.dong.aopanno.User.add(..))")
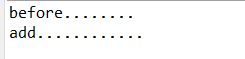
public void before() {
System.out.println("before........");
}
}
//测试
@Test
public void test() {
ApplicationContext ioc = new ClassPathXmlApplicationContext("bean.xml");
User bean = ioc.getBean("user",User.class);
bean.add();
}
@Component
@Aspect //生产代理对象
public class UserProxy {
//前置通知
//@Before 表示前置通知
@Before((value = "execution(* com.dong.aopanno.User.add(..))")
public void before() {
System.out.println("before........");
}
//后置通知
@AfterReturning(value = "execution(* com.dong.aopanno.User.add(..))")
public void afterReturning() {
System.out.println("afterReturning........");
}
//最终final通知
@After(value = "execution(* com.dong.aopanno.User.add(..))")
public void after() {
System.out.println("after........");
}
//异常通知
@AfterThrowing(value = "execution(* com.dong.aopanno.User.add(..))")
public void afterThrowing() {
System.out.println("afterThrowing........");
}
//环绕通知
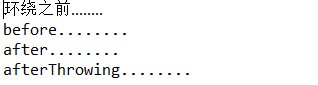
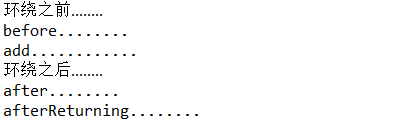
@Around(value = "execution(* com.dong.aopanno.User.add(..))")
public void around(ProceedingJoinPoint proceedingJoinPoint) throws Throwable {
System.out.println("环绕之前........");
proceedingJoinPoint.proceed();
System.out.println("环绕之后........");
}
}
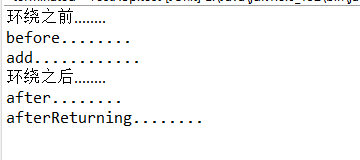
区别:
@After表示方法执行之后执行
@AfterReturning表示方法返回结果之后执行
发现异常通知没有执行,那是因为代码运行没有出现异常,所以不会执行,我们手动添加异常

出现异常通知
3.1.1细节处理
1.公共切入点抽取
@Component
@Aspect //生产代理对象
public class UserProxy {

	//相同切入点抽取
	@Pointcut(value = "execution(* com.dong.aopanno.User.add(..))")
	public void pointdemo() {

	}


	//前置通知
	//@Before 表示前置通知
	@Before(value = "pointdemo()")
	public void before() {
		System.out.println("before........");
	}
}
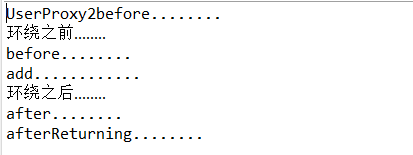
2.有多个增强类对同一个方法进行增强,设置增强类的优先级
在增强类上面添加注解@Order(数字类型值),数字类型越小优先级越高
@Component
@Aspect //生产代理对象
@Order(1) //设置优先级
public class UserProxy2 {


	//前置通知
	//@Before 表示前置通知
	@Before(value = "execution(* com.dong.aopanno.User.add(..))")
	public void before() {
		System.out.println("UserProxy2before........");
	}

}
3.2、AspectJ配置文件操作(了解)
创建增强类和被增强类
@Component
public class Book {
public void buy() {
System.out.println("buy............");
}
}
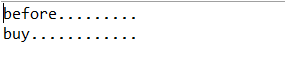
@Component
public class BookProxy {
public void before() {
System.out.println("before.........");
}
}
在配置文件中配置切入点
<!-- 配置aop增强 -->
<aop:config>
	<!-- 配置切入点 -->
	<aop:pointcut expression="execution(* com.dong.aopxml.Book.buy(..))" id="p"/>

	<!-- 配置切面 -->
	<aop:aspect ref="bookProxy">
		<!-- 增强作用在具体的方法上
			前置通知
		-->
		<aop:before method="before" pointcut-ref="p"/>
	</aop:aspect>
</aop:config>
测试
@Test
publicvoid test() {
	ApplicationContext ioc = new ClassPathXmlApplicationContext("bean.xml");

	Book bean = ioc.getBean("book",Book.class);
	bean.buy();
}
觉得写的不错的小伙伴,可以点赞关注和收藏哦,博主会持续发布与大家共同学习!

- 点赞
- 收藏
- 关注作者
评论(0)