android自定义View之钟表诞生记

先来看看我们今天要实现的一个效果图:
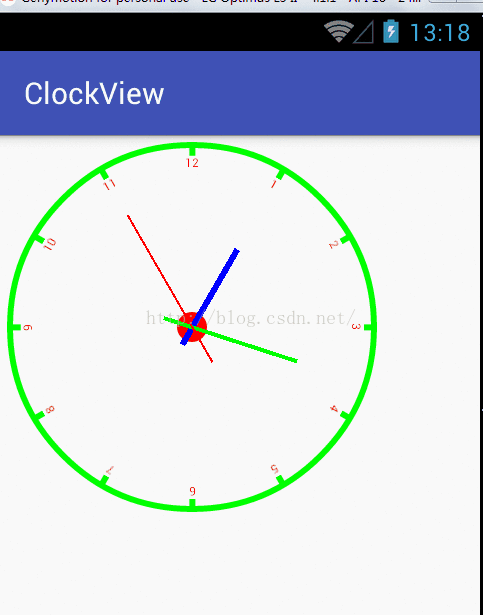
整个效果很简单,就是在屏幕上显示一个钟表,该钟表可以自动走动。
OK,那就开始动工吧。
1.准备工作
首先,要实现这个时钟,我得继承自View来自己绘制时钟,因为这种效果没有办法继承已有控件去完善功能。然后我们来看看我们这里需要哪些变量?在这篇博客中我暂时不打算介绍自定义属性以及View的测量,这里我只想介绍绘图API,所以View的大小以及钟表表针的颜色等我都暂时先给一个固定的值。OK,那么我们需要的变量主要就是下面几个:
-
/**
-
* 绘制表盘的画笔
-
*/
-
private Paint circlePaint;
-
-
/**
-
* 绘制表盘数字
-
*/
-
private Paint numPaint;
-
/**
-
* 绘制表心
-
*/
-
private Paint dotPaint;
-
/**
-
* 时针
-
*/
-
private Paint hourPaint;
-
/**
-
* 分针
-
*/
-
private Paint minutePaint;
-
/**
-
* 秒针
-
*/
-
private Paint secondPaint;
-
/**
-
* View宽度,默认256dp
-
*/
-
private int width;
-
/**
-
* View高度,默认256dp
-
*/
-
private int height;
-
/**
-
* 日历类,用来获取当前时间
-
*/
-
private Calendar calendar;
-
/**
-
* 当前时针颜色
-
*/
-
private int hourColor;
-
/**
-
* 当前分针颜色
-
*/
-
private int minuteColor;
-
/**
-
* 当前秒针颜色
-
*/
-
private int secondColor;
-
/**
-
* 时针宽度
-
*/
-
private int hourWidth;
-
/**
-
* 分针宽度
-
*/
-
private int minuteWidth;
-
/**
-
* 秒针宽度
-
*/
-
private int secondWidth;
2.关于构造方法
大家看到,当我继承View之后,系统要求我实现它的构造方法,构造方法主要有四个,如下:
1.
public ClockView(Context context)
2.
public ClockView(Context context, AttributeSet attrs)
3.
public ClockView(Context context, AttributeSet attrs, int defStyleAttr)
很多筒子看到第三个参数defStyleAttr之后,误以为如果我在布局文件中写了style就会调用该构造方法,其实不然,这个构造方法系统并不会自己去调用(大家有兴趣可以自己写一个style,然后在这个方法中打印日志,看看该方法究竟会不会调用),要由我们自己显式调用(可以在第二个构造方法中调用)。那么这里的defStyleAttr究竟是什么意思呢?正如这个参数的字面意思,它是我们为自定义的View指定的一个默认样式。(后面博客我们再来详细说一下这个方法)。
另外,还有一个高版本使用的构造方法,我们这里暂不做介绍。
一般情况下,我们需要在构造方法中完成一些初始化的操作,比如读取在XML文件中定义的属性,或者初始化画笔等等,因为我们的控件既有可能是通过Java代码实例化的,也有可能是在布局文件中通过xml添加的。如前所述,如果我们在Java代码中初始化控件,那么将调用第一个构造方法,如果我们在xml布局文件中添加控件,那么将调用第二个构造方法。这时问题来了,那我们的初始化控件的方法应该写在那个构造方法中呢?你可以按下面这种方式来写:
-
public ClockView(Context context) {
-
super(context);
-
initView();
-
}
-
public ClockView(Context context, AttributeSet attrs) {
-
super(context,attrs);
-
initView();
-
}
-
//在代码中创建控件时调用
-
public ClockView(Context context) {
-
this(context, null);
-
}
-
-
//在布局文件中创建View时调用
-
public ClockView(Context context, AttributeSet attrs) {
-
this(context, attrs, 0);
-
}
-
-
public ClockView(Context context, AttributeSet attrs, int defStyleAttr) {
-
super(context, attrs, defStyleAttr);
-
initView();
-
}
3.初始化控件
我们在准备工作中定义了许多变量,包括钟表的颜色,指针的颜色等等许多变量,那么接下来我们需要在initView这个方法中来初始化这些变量,以供下一步使用,OK,我们来看一看初始化代码:
-
private void initView() {
-
//获取当前时间的实例
-
calendar = Calendar.getInstance();
-
//时钟默认宽高
-
width = (int) TypedValue.applyDimension(TypedValue.COMPLEX_UNIT_DIP, 256, getResources().getDisplayMetrics());
-
height = (int) TypedValue.applyDimension(TypedValue.COMPLEX_UNIT_DIP, 256, getResources().getDisplayMetrics());
-
//初始化表针的颜色
-
hourColor = Color.RED;
-
minuteColor = Color.GREEN;
-
secondColor = Color.BLUE;
-
//初始化表针的宽度
-
hourWidth = 8;
-
minuteWidth = 5;
-
secondWidth = 2;
-
//初始化各种画笔
-
circlePaint = new Paint();
-
//去锯齿
-
circlePaint.setAntiAlias(true);
-
//设置画笔颜色
-
circlePaint.setColor(Color.GREEN);
-
//设置画笔style为描边
-
circlePaint.setStyle(Paint.Style.STROKE);
-
//设置描边的宽度
-
circlePaint.setStrokeWidth(6);
-
dotPaint = new Paint();
-
dotPaint.setAntiAlias(true);
-
dotPaint.setColor(Color.RED);
-
dotPaint.setStyle(Paint.Style.FILL);
-
numPaint = new Paint();
-
numPaint.setColor(Color.RED);
-
numPaint.setAntiAlias(true);
-
//文本对齐方式
-
numPaint.setTextAlign(Paint.Align.CENTER);
-
hourPaint = new Paint();
-
-
hourPaint.setColor(hourColor);
-
hourPaint.setStyle(Paint.Style.FILL);
-
hourPaint.setStrokeWidth(hourWidth);
-
minutePaint = new Paint();
-
minutePaint.setColor(minuteColor);
-
minutePaint.setStyle(Paint.Style.FILL);
-
minutePaint.setStrokeWidth(minuteWidth);
-
secondPaint = new Paint();
-
secondPaint.setColor(secondColor);
-
secondPaint.setStyle(Paint.Style.FILL);
-
secondPaint.setStrokeWidth(secondWidth);
-
}
4.绘制钟表
上面所有的工作做完之后,接下来就是绘制钟表了,绘制工作我们放在了onDraw方法中执行,在自定义控件时,如果该控件是我们继承自View来实现的,那么基本上这个控件就是需要我们自己来绘制了。
OK,那我们来看看钟表的绘制吧。
钟表不算复杂,但是我们也需要一步一步来:
首先是绘制表盘,这个最简单:
-
//1.圆心X轴坐标,2.圆心Y轴坐标,3.半径,4.画笔
-
int radius = width / 2 - 10;
-
//画表盘
-
canvas.drawCircle(width / 2, height / 2, radius, circlePaint);
圆环画好之后,那么接下来就是绘制表心了,也就是表盘正中心那个红色的圆心。
canvas.drawCircle(width / 2, height / 2, 15, dotPaint);
OK,两个最简单的东东画完之后,那么接下来就是绘制表盘的时间刻度了,时间刻度的绘制除了数字之外,还有一个绿色的短线,我们一共要画十二个这种东西,那么这个要怎么绘制呢?思路有很多,你可以按照高中的数学知识,计算出每一个数字的坐标以及每一个短线起始位置和结束位置的坐标,然后绘制出来,毫无疑问,这种方式的计算量太大,那我们这里采取一个简单的方式:我每次只在十二点的那个位置上进行绘制,如果需要绘制一点,那么我把画布逆时针旋转30度到十二点的位置,然后画上1和一个短线之后再将画布顺时针旋转30度,如果是绘制2点,那么我把画布逆时针旋转60度到十二点的位置,然后绘制上2和一个短线,绘制完成之后再将画布顺时针旋转60度,思路就是这样,下面我们来看看代码:
-
for (int i = 1; i < 13; i++) {
-
//在旋转之前保存画布状态
-
canvas.save();
-
canvas.rotate(i * 30, width / 2, height / 2);
-
//1.2表示起点坐标,3.4表示终点坐标,5.画笔
-
canvas.drawLine(width / 2, height / 2 - radius, width / 2, height / 2 - radius + 10, circlePaint);
-
//画表盘数字1.要绘制的文本,2.文本x轴坐标,3.文本基线,4.文本画笔
-
canvas.drawText(i + "", width / 2, height / 2 - radius + 22, numPaint);
-
//恢复画布状态
-
canvas.restore();
-
}
OK,这些东西都绘制完成之后,接下来就该绘制表针了,表针的绘制思路和上面一样,也是先旋转表盘,然后绘制表针,绘制完成之后,再把表盘旋转回之前的状态。这里我就不再详细说明了,大家看代码:
-
//获得当前小时
-
int hour = calendar.get(Calendar.HOUR);
-
canvas.save();
-
//旋转屏幕
-
canvas.rotate(hour * 30, width / 2, height / 2);
-
//画时针
-
canvas.drawLine(width / 2, height / 2 + 20, width / 2, height / 2 - 90, hourPaint);
-
canvas.restore();
-
-
int minute = calendar.get(Calendar.MINUTE);
-
canvas.save();
-
canvas.rotate(minute * 6, width / 2, height / 2);
-
canvas.drawLine(width / 2, height / 2 + 30, width / 2, height / 2 - 110, minutePaint);
-
canvas.restore();
-
int second = calendar.get(Calendar.SECOND);
-
canvas.save();
-
canvas.rotate(second * 6, width / 2, height / 2);
-
canvas.drawLine(width / 2, height / 2 + 40, width / 2, height / 2 - 130, secondPaint);
-
canvas.restore();
-
<org.mobiletrain.clockview.ClockView
-
android:layout_width="match_parent"
-
android:layout_height="match_parent"/>
1.开始处添加:
calendar = Calendar.getInstance();
2.结束处添加:
postInvalidateDelayed(1000);
OK,至此,我们的自定义钟表就完成了,完整的代码应该是这个样子:
-
/**
-
* Created by wangsong on 2016/3/29.
-
*/
-
public class ClockView extends View {
-
-
/**
-
* 绘制表盘的画笔
-
*/
-
private Paint circlePaint;
-
-
/**
-
* 绘制表盘数字
-
*/
-
private Paint numPaint;
-
/**
-
* 绘制表心
-
*/
-
private Paint dotPaint;
-
/**
-
* 时针
-
*/
-
private Paint hourPaint;
-
/**
-
* 分针
-
*/
-
private Paint minutePaint;
-
/**
-
* 秒针
-
*/
-
private Paint secondPaint;
-
/**
-
* View宽度,默认256dp
-
*/
-
private int width;
-
/**
-
* View高度,默认256dp
-
*/
-
private int height;
-
/**
-
* 日历类,用来获取当前时间
-
*/
-
private Calendar calendar;
-
/**
-
* 当前时针颜色
-
*/
-
private int hourColor;
-
/**
-
* 当前分针颜色
-
*/
-
private int minuteColor;
-
/**
-
* 当前秒针颜色
-
*/
-
private int secondColor;
-
/**
-
* 时针宽度
-
*/
-
private int hourWidth;
-
/**
-
* 分针宽度
-
*/
-
private int minuteWidth;
-
/**
-
* 秒针宽度
-
*/
-
private int secondWidth;
-
-
//在代码中创建控件时调用
-
public ClockView(Context context) {
-
this(context, null);
-
}
-
-
//在布局文件中创建View时调用
-
public ClockView(Context context, AttributeSet attrs) {
-
this(context, attrs, 0);
-
}
-
-
public ClockView(Context context, AttributeSet attrs, int defStyleAttr) {
-
super(context, attrs, defStyleAttr);
-
initView();
-
}
-
-
private void initView() {
-
//获取当前时间的实例
-
calendar = Calendar.getInstance();
-
//时钟默认宽高
-
width = (int) TypedValue.applyDimension(TypedValue.COMPLEX_UNIT_DIP, 256, getResources().getDisplayMetrics());
-
height = (int) TypedValue.applyDimension(TypedValue.COMPLEX_UNIT_DIP, 256, getResources().getDisplayMetrics());
-
//初始化表针的颜色
-
hourColor = Color.RED;
-
minuteColor = Color.GREEN;
-
secondColor = Color.BLUE;
-
//初始化表针的宽度
-
hourWidth = 8;
-
minuteWidth = 5;
-
secondWidth = 2;
-
//初始化各种画笔
-
circlePaint = new Paint();
-
//去锯齿
-
circlePaint.setAntiAlias(true);
-
//设置画笔颜色
-
circlePaint.setColor(Color.GREEN);
-
//设置画笔style为描边
-
circlePaint.setStyle(Paint.Style.STROKE);
-
//设置描边的宽度
-
circlePaint.setStrokeWidth(6);
-
dotPaint = new Paint();
-
dotPaint.setAntiAlias(true);
-
dotPaint.setColor(Color.RED);
-
dotPaint.setStyle(Paint.Style.FILL);
-
numPaint = new Paint();
-
numPaint.setColor(Color.RED);
-
numPaint.setAntiAlias(true);
-
//文本对齐方式
-
numPaint.setTextAlign(Paint.Align.CENTER);
-
hourPaint = new Paint();
-
-
hourPaint.setColor(hourColor);
-
hourPaint.setStyle(Paint.Style.FILL);
-
hourPaint.setStrokeWidth(hourWidth);
-
minutePaint = new Paint();
-
minutePaint.setColor(minuteColor);
-
minutePaint.setStyle(Paint.Style.FILL);
-
minutePaint.setStrokeWidth(minuteWidth);
-
secondPaint = new Paint();
-
secondPaint.setColor(secondColor);
-
secondPaint.setStyle(Paint.Style.FILL);
-
secondPaint.setStrokeWidth(secondWidth);
-
}
-
-
//绘制View
-
@Override
-
protected void onDraw(Canvas canvas) {
-
calendar = Calendar.getInstance();
-
//1.圆心X轴坐标,2.圆心Y轴坐标,3.半径,4.画笔
-
int radius = width / 2 - 10;
-
//画表盘
-
canvas.drawCircle(width / 2, height / 2, radius, circlePaint);
-
-
canvas.drawCircle(width / 2, height / 2, 15, dotPaint);
-
for (int i = 1; i < 13; i++) {
-
//在旋转之前保存画布状态
-
canvas.save();
-
canvas.rotate(i * 30, width / 2, height / 2);
-
//1.2表示起点坐标,3.4表示终点坐标,5.画笔
-
canvas.drawLine(width / 2, height / 2 - radius, width / 2, height / 2 - radius + 10, circlePaint);
-
//画表盘数字1.要绘制的文本,2.文本x轴坐标,3.文本基线,4.文本画笔
-
canvas.drawText(i + "", width / 2, height / 2 - radius + 22, numPaint);
-
//恢复画布状态
-
canvas.restore();
-
}
-
//获得当前小时
-
int hour = calendar.get(Calendar.HOUR);
-
canvas.save();
-
//旋转屏幕
-
canvas.rotate(hour * 30, width / 2, height / 2);
-
//画时针
-
canvas.drawLine(width / 2, height / 2 + 20, width / 2, height / 2 - 90, hourPaint);
-
canvas.restore();
-
-
int minute = calendar.get(Calendar.MINUTE);
-
canvas.save();
-
canvas.rotate(minute * 6, width / 2, height / 2);
-
canvas.drawLine(width / 2, height / 2 + 30, width / 2, height / 2 - 110, minutePaint);
-
canvas.restore();
-
int second = calendar.get(Calendar.SECOND);
-
canvas.save();
-
canvas.rotate(second * 6, width / 2, height / 2);
-
canvas.drawLine(width / 2, height / 2 + 40, width / 2, height / 2 - 130, secondPaint);
-
canvas.restore();
-
//每隔1秒重绘View,重绘会调用onDraw()方法
-
postInvalidateDelayed(1000);
-
}
-
}
文章来源: wangsong.blog.csdn.net,作者:_江南一点雨,版权归原作者所有,如需转载,请联系作者。
原文链接:wangsong.blog.csdn.net/article/details/51030141

- 点赞
- 收藏
- 关注作者
评论(0)