android开发之自定义AutoCompleteTextView
AutoCompleteTextView,很多人都用过,有些情况下使用Google提供的ArrayAdapter作为适配器就可以完成需求,但是在实际开发中,我们经常需要开发自定义适配器来完成开发工作。
今天就来看看怎么自定义这样一个AutoCompleteTextView。
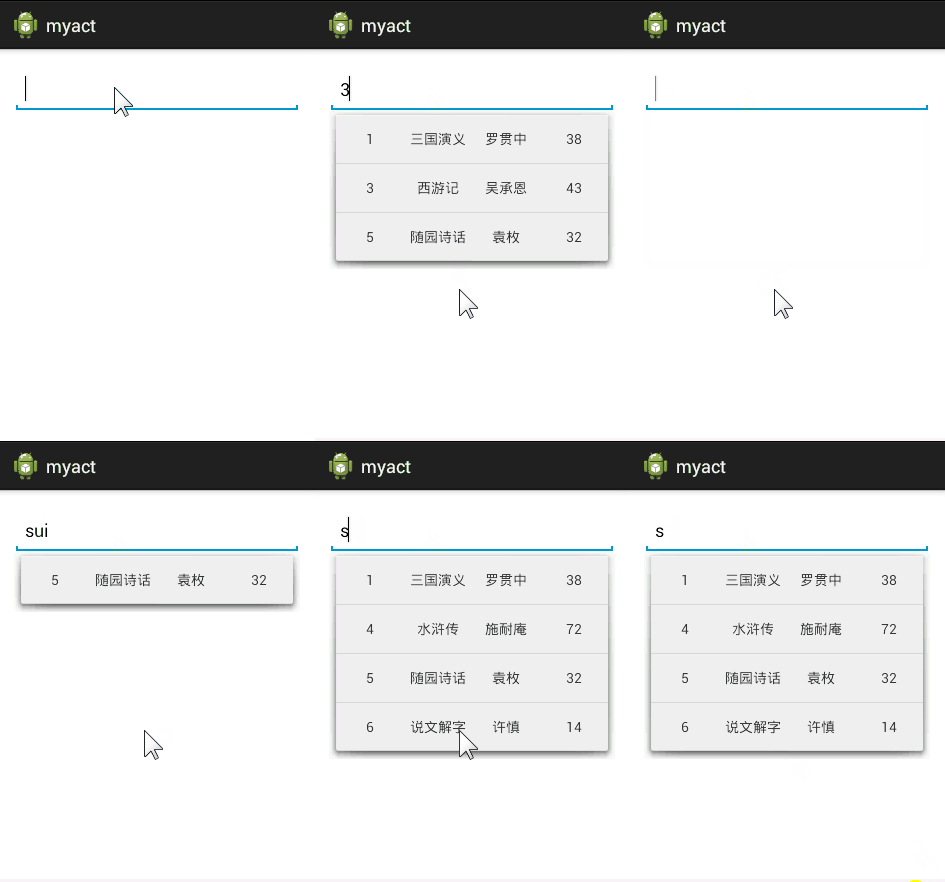
假设我们有一个Book类,Book有四个属性,id,name,author,price,pinyin,我希望在AutoCompleteTextView中无论输入什么字符,都和这五个属性进行匹配,只要有一个匹配上就将该项数据显示出来。要实现的效果如下图:

要实现这样一个功能的重点在于重写Adapter,我们自定义一个Adapter继承自BaseAdapter,同时实现过滤器Filterable。
继承BaseAdapter很好写,我们经常在ListView中使用,这里还是一样的。
继承BaseAdapter主要实现下面四个方法,books是从构造方法中传进来的数据源。
@Override public int getCount() { return books.size(); } @Override public Object getItem(int position) { return books.get(position); } @Override public long getItemId(int position) { return position; } @Override public View getView(int position, View convertView, ViewGroup parent) { ViewHolder viewHolder; if (convertView == null) { viewHolder = new ViewHolder();
// convertView = LayoutInflater.from(context).inflate(
// R.layout.act_item, null); convertView = View.inflate(context, R.layout.act_item, null); viewHolder.id = (TextView) convertView.findViewById(R.id.id_book); viewHolder.name = (TextView) convertView .findViewById(R.id.name_book); viewHolder.author = (TextView) convertView .findViewById(R.id.author_book); viewHolder.price = (TextView) convertView .findViewById(R.id.price_book); convertView.setTag(viewHolder); } else { viewHolder = (ViewHolder) convertView.getTag(); } Book book = books.get(position); viewHolder.id.setText(book.getId() + ""); viewHolder.name.setText(book.getName()); viewHolder.author.setText(book.getAuthor()); viewHolder.price.setText(book.getPrice()+""); return convertView; } class ViewHolder { TextView id, name, author, price; }
- 1
- 2
- 3
- 4
- 5
- 6
- 7
- 8
- 9
- 10
- 11
- 12
- 13
- 14
- 15
- 16
- 17
- 18
- 19
- 20
- 21
- 22
- 23
- 24
- 25
- 26
- 27
- 28
- 29
- 30
- 31
- 32
- 33
- 34
- 35
- 36
- 37
- 38
- 39
- 40
- 41
- 42
- 43
- 44
- 45
act_item布局文件是这样的:
<?xml version="1.0" encoding="utf-8"?>
<LinearLayout xmlns:android="http://schemas.android.com/apk/res/android" android:layout_width="match_parent" android:layout_height="match_parent" android:orientation="horizontal" > <TextView
 android:id="@+id/id_book" android:layout_width="0dp" android:layout_height="48dp" android:layout_weight="1" android:gravity="center" android:text="id" /> <TextView
 android:id="@+id/name_book" android:layout_width="0dp" android:layout_height="48dp" android:layout_weight="1" android:gravity="center" android:text="name" /> <TextView
 android:id="@+id/author_book" android:layout_width="0dp" android:layout_height="48dp" android:layout_weight="1" android:gravity="center" android:text="author" /> <TextView
 android:id="@+id/price_book" android:layout_width="0dp" android:layout_height="48dp" android:layout_weight="1" android:gravity="center" android:text="price" />

</LinearLayout>
- 1
- 2
- 3
- 4
- 5
- 6
- 7
- 8
- 9
- 10
- 11
- 12
- 13
- 14
- 15
- 16
- 17
- 18
- 19
- 20
- 21
- 22
- 23
- 24
- 25
- 26
- 27
- 28
- 29
- 30
- 31
- 32
- 33
- 34
- 35
- 36
- 37
- 38
- 39
同时,由于我们实现了Filterable接口,所以还要实现该接口里边的一个方法:
@Override public Filter getFilter() { if(mArrayFilter==null){ mArrayFilter = new ArrayFilter(); } return mArrayFilter; }
- 1
- 2
- 3
- 4
- 5
- 6
- 7
ArrayFilter是我们实现数据过滤的一个关键类,该类继承自Filter,实现其中的两个方法,第一方法时数据的过滤逻辑,第二个方法是把过滤结果赋值给数据源。
- 1
- 2
 private class ArrayFilter extends Filter { @Override protected FilterResults performFiltering(CharSequence constraint) { FilterResults results = new FilterResults(); if (mFilterBooks == null) { mFilterBooks = new ArrayList<Book>(books); } //如果没有过滤条件则不过滤 if (constraint == null || constraint.length() == 0) { results.values = mFilterBooks; results.count = mFilterBooks.size(); } else { List<Book> retList = new ArrayList<Book>(); //过滤条件 String str = constraint.toString().toLowerCase(); //循环变量数据源,如果有属性满足过滤条件,则添加到result中 for (Book book : mFilterBooks) { if (book.getAuthor().contains(str) || book.getName().contains(str) || (book.getId() + "").contains(str) || (book.getPrice() + "").contains(str)||book.getPinyin().contains(str)) { retList.add(book); } } results.values = retList; results.count = retList.size(); } return results; } //在这里返回过滤结果 @Override protected void publishResults(CharSequence constraint, FilterResults results) {
// notifyDataSetInvalidated(),会重绘控件(还原到初始状态)
// notifyDataSetChanged(),重绘当前可见区域 books = (List<Book>) results.values; if(results.count>0){ notifyDataSetChanged(); }else{ notifyDataSetInvalidated(); } } }
- 1
- 2
- 3
- 4
- 5
- 6
- 7
- 8
- 9
- 10
- 11
- 12
- 13
- 14
- 15
- 16
- 17
- 18
- 19
- 20
- 21
- 22
- 23
- 24
- 25
- 26
- 27
- 28
- 29
- 30
- 31
- 32
- 33
- 34
- 35
- 36
- 37
- 38
- 39
- 40
- 41
- 42
- 43
- 44
- 45
- 46
最重要的Adapter已经做好了,下来看看在MainActivity中怎么调用吧:
public class MainActivity extends Activity { private List<Book> books = new ArrayList<Book>(); private AutoCompleteTextView act; @Override protected void onCreate(Bundle savedInstanceState) { super.onCreate(savedInstanceState); setContentView(R.layout.activity_main); initData(); initView(); } private void initView() { act = (AutoCompleteTextView) this.findViewById(R.id.myact); MyActAdapter adapter = new MyActAdapter(books, this); act.setAdapter(adapter); act.setThreshold(0); } private void initData() { Book b1 = new Book(1, "三国演义", "罗贯中", 38, "sanguoyanyi"); Book b2 = new Book(2, "红楼梦", "曹雪芹", 25, "hongloumeng"); Book b3 = new Book(3, "西游记", "吴承恩", 43, "xiyouji"); Book b4 = new Book(4, "水浒传", "施耐庵", 72, "shuihuzhuan"); Book b5 = new Book(5, "随园诗话", "袁枚", 32, "suiyuanshihua"); Book b6 = new Book(6, "说文解字", "许慎", 14, "shuowenjiezi"); Book b7 = new Book(7, "文心雕龙", "刘勰", 18, "wenxindiaolong"); books.add(b1); books.add(b2); books.add(b3); books.add(b4); books.add(b5); books.add(b6); books.add(b7); }
}
- 1
- 2
- 3
- 4
- 5
- 6
- 7
- 8
- 9
- 10
- 11
- 12
- 13
- 14
- 15
- 16
- 17
- 18
- 19
- 20
- 21
- 22
- 23
- 24
- 25
- 26
- 27
- 28
- 29
- 30
- 31
- 32
- 33
- 34
- 35
- 36
- 37
布局文件:
public class MainActivity extends Activity { private List<Book> books = new ArrayList<Book>(); private AutoCompleteTextView act; @Override protected void onCreate(Bundle savedInstanceState) { super.onCreate(savedInstanceState); setContentView(R.layout.activity_main); initData(); initView(); } private void initView() { act = (AutoCompleteTextView) this.findViewById(R.id.myact); MyActAdapter adapter = new MyActAdapter(books, this); act.setAdapter(adapter); act.setThreshold(0); } private void initData() { Book b1 = new Book(1, "三国演义", "罗贯中", 38, "sanguoyanyi"); Book b2 = new Book(2, "红楼梦", "曹雪芹", 25, "hongloumeng"); Book b3 = new Book(3, "西游记", "吴承恩", 43, "xiyouji"); Book b4 = new Book(4, "水浒传", "施耐庵", 72, "shuihuzhuan"); Book b5 = new Book(5, "随园诗话", "袁枚", 32, "suiyuanshihua"); Book b6 = new Book(6, "说文解字", "许慎", 14, "shuowenjiezi"); Book b7 = new Book(7, "文心雕龙", "刘勰", 18, "wenxindiaolong"); books.add(b1); books.add(b2); books.add(b3); books.add(b4); books.add(b5); books.add(b6); books.add(b7); }
}
- 1
- 2
- 3
- 4
- 5
- 6
- 7
- 8
- 9
- 10
- 11
- 12
- 13
- 14
- 15
- 16
- 17
- 18
- 19
- 20
- 21
- 22
- 23
- 24
- 25
- 26
- 27
- 28
- 29
- 30
- 31
- 32
- 33
- 34
- 35
- 36
- 37
好了,就是这么简单,不过这里有一个最大的缺憾就是我们的数据源中本身带有一个pinyin属性,在实际的开发中肯定不能这样,那么我们怎么实现通过汉字首字母来搜索呢?比如输入sg,就会提示“三国演义”。我会在下篇文章中介绍怎么通过Java类来实现这么一个功能。
文章来源: wangsong.blog.csdn.net,作者:_江南一点雨,版权归原作者所有,如需转载,请联系作者。
原文链接:wangsong.blog.csdn.net/article/details/48708755
- 点赞
- 收藏
- 关注作者


评论(0)