Unity 之 UGUI代码生成UI设置为相对位置问题

什么是RectTransform?
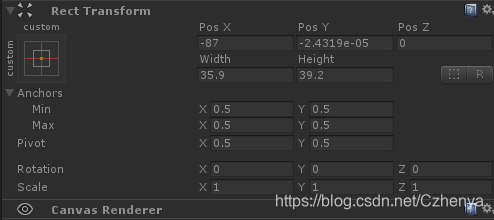
创建一个UGUI组件时,查看其Inspector面板,原来Transform已经被替换成RectTransform,面板属性也不一样了,如下图:
Unity官方对RectTransform的描述:
Position, size, anchor and pivot information for a rectangle.
RectTransforms are used for GUI but can also be used for other things. It’s used to store and manipulate the position, size, and anchoring of a rectangle and supports various forms of scaling based on a parent RectTransform.
矩形的位置、大小、锚点和枢轴信息。
RectTransforms用于GUI,也可以用于其他用途。它用于存储和操作矩形的位置、大小和锚定,并支持基于父矩形变换的各种形式的缩放
相较于RectTransform,RectTransform提供了更强大的功能来对矩形进行操作,这主要归功于新增加的两个概念:Anchor(锚点)和Pivot(中心)。
做适配时,主要设置好锚点和要让其显示的位置就可以了,
对其基础设置:
//posx,y,z  --> 相对位置
 go.transform.localPosition = new Vector3(35, 0, 0);
//也可以这样
go.GetComponent<RectTransform>().anchoredPosition3D =new Vector3(35, 0, 0);
go.GetComponent<RectTransform>().anchoredPosition = new Vector2(0,1);
//width , height -->
go.GetComponent<RectTransform>().sizeDelta = new Vector2(134, 187);
//top  --> 点击Unity预定义的锚点位置,其Anchors 下的Min,Max 对应的值就会发生变化
//代码设置为对应的值,就会有相应的效果
 go.transform.GetComponent<RectTransform>().anchorMin = new Vector2(0.5f, 1);
 go.transform.GetComponent<RectTransform>().anchorMax = new Vector2(0.5f, 1);
- 1
- 2
- 3
- 4
- 5
- 6
- 7
- 8
- 9
- 10
- 11
- 12
官方文档:https://docs.unity3d.com/ScriptReference/RectTransform.html
 基础操作就不在这里说了,官方有很详细的说明,其他博主也有很详尽的解析,,,
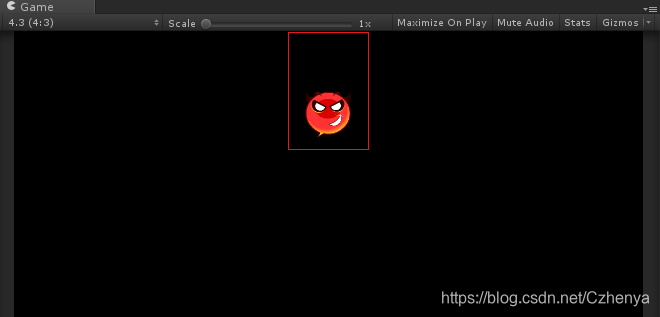
实现目标:在不同分辨率下生成的UI在相对位置
如下图:(不管是什么比例,都和顶部保持一定的距离)

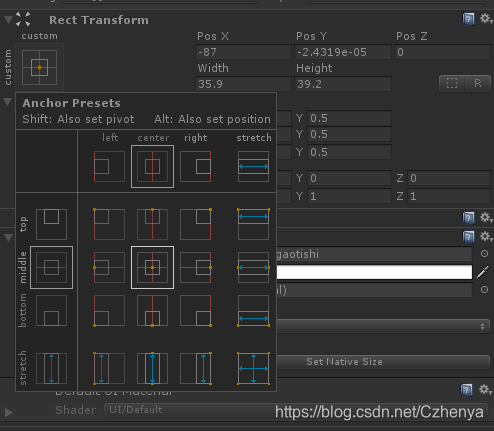
PS:如果只在此处使用,那么完全可以将锚点设置为这样:
但是我多处使用,又不想为了适配来两个预制体使用,,,只好用代码来帮助我实现了
UGUI内置的两个方法,
SetInsetAndSizeFromParentEdge
SetSizeWithCurrentAnchors
- 1
- 2
获取动态生成的UI(RectTransform),以及调试好的相对位置偏移,调用如下方法:
/// <summary> /// 设置生成 UI 的相对位置 (right) /// 更改运算符即可设置Left (如注释) /// </summary> /// <param name="rect">RectTransform</param> /// <param name="right">Bot值</param> public void SetRight(RectTransform rect, float right) { if (right < -rect.offsetMax.x) //Left (left < rect.offsetMin.x) { float value = -rect.offsetMax.x - right;//rect.offsetMin.x - left; rect.offsetMin = new Vector2(rect.offsetMin.x + value, rect.offsetMin.y);// - value rect.offsetMax = new Vector2(-right, rect.offsetMax.y); //(left, rect.offsetMax.y) } else if (right > -rect.offsetMax.x) // (left > rect.offsetMin.x) { float value = right + rect.offsetMax.x; //- rect.offsetMin = new Vector2(rect.offsetMin.x - value, rect.offsetMin.y);// + value rect.offsetMax = new Vector2(-right, rect.offsetMax.y); //(left, rect.offsetMax.y) } } /// <summary> /// 设置生成 UI 的相对位置 (Bottom) /// 更改运算符即可设置Top (如注释) /// </summary> /// <param name="rect">RectTransform</param> /// <param name="bot">Bot值</param> public void SetBottom(RectTransform rect, float bot) { if (bot < rect.offsetMin.y) //(top < -rect.offsetMax.y) { float value = rect.offsetMin.y - bot; //-rect.offsetMax.y - top; rect.offsetMin = new Vector2(rect.offsetMin.x, bot); rect.offsetMax = new Vector2(rect.offsetMax.x, rect.offsetMax.y - value);//top: + value } else if (bot > rect.offsetMin.y) //(top > -rt.offsetMax.y) { float value = bot - rect.offsetMin.y; //top + rect.offsetMin = new Vector2(rect.offsetMin.x, bot); // - top rect.offsetMax = new Vector2(rect.offsetMax.x, rect.offsetMax.y + value); // - value } }
- 1
- 2
- 3
- 4
- 5
- 6
- 7
- 8
- 9
- 10
- 11
- 12
- 13
- 14
- 15
- 16
- 17
- 18
- 19
- 20
- 21
- 22
- 23
- 24
- 25
- 26
- 27
- 28
- 29
- 30
- 31
- 32
- 33
- 34
- 35
- 36
- 37
- 38
- 39
- 40
- 41
- 42
- 43
- 44
- 45
- 46
- 47
- 48
很实用的方法,,,这样可以实现在不同分辨率下生成的UI在相对位置,(当然如果可以事先对预制体设置好了适配,生成时直接设置位置就可以了)
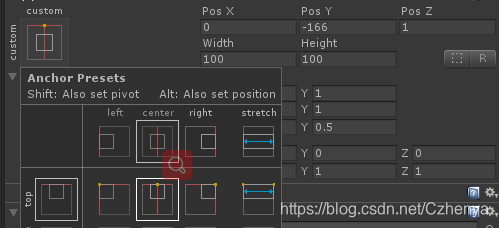
还有一种很便捷的方式(推荐使用):
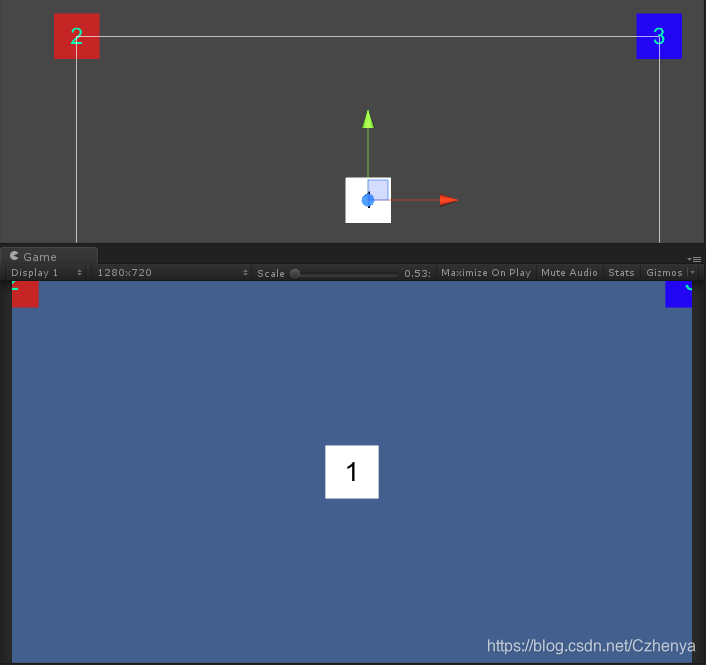
大致思路:设置要目标UI的锚点,然后通过anchoredPosition3D属性,设置去相对于锚点的位置,(不是相对于中心点,如下面的img_3)
using UnityEngine;
using UnityEngine.UI;

public class TestTransDemo : MonoBehaviour { public Image img_1; public Image img_2; public Image img_3; // Use this for initialization void Start () { //锚点为中心 img_1.transform.localPosition = Vector3.zero; //此时锚点在左上 img_2.rectTransform.anchoredPosition3D = Vector3.zero; //设置锚点为右上 img_3.GetComponent<RectTransform>().anchorMax = Vector2.one; img_3.GetComponent<RectTransform>().anchorMin = Vector2.one; img_3.rectTransform.anchoredPosition3D = Vector3.zero; } }
- 1
- 2
- 3
- 4
- 5
- 6
- 7
- 8
- 9
- 10
- 11
- 12
- 13
- 14
- 15
- 16
- 17
- 18
- 19
- 20
- 21
- 22
- 23
下面1,2,3和上面代码img_1,2,3一一对应,,,
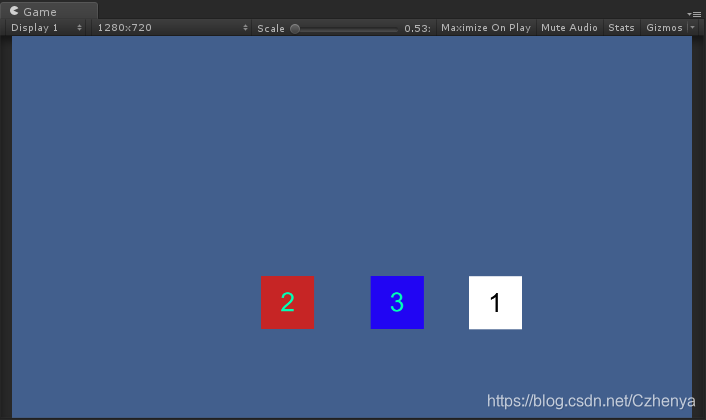
运行效果图:
文章来源: czhenya.blog.csdn.net,作者:陈言必行,版权归原作者所有,如需转载,请联系作者。
原文链接:czhenya.blog.csdn.net/article/details/84962864

- 点赞
- 收藏
- 关注作者
评论(0)