Centos7.X安装PHP7.0版本
百度云服务器还有一个星期就要到期了,还是三个月前买的,这个时候续费价格可是几百一个月,没有了优惠就不再续费了,而且这个备案经历了一波三折还是没有备好。百度云服务什么的还是不如阿里云,从创建快照的时间的快慢可以看得出来。想着怎么把镜像拷到本地去,不然下次再玩的话又要重新配置环境了,又是一件麻烦事。
- 首先要更新yum源,不然是默认的老版本,一般都在5.6及以下,但是php7都出来好久了,虽然不排除也有好多网站是老版本的PHP。
下载所对应的rpm包,按照系统更新yum源。
如果是centos6,那么执行以下代码:
CentOS/RHEL 6.x:
rpm -Uvh https://dl.fedoraproject.org/pub/epel/epel-release-latest-6.noarch.rpm
rpm -Uvh https://mirror.webtatic.com/yum/el6/latest.rpm
CentOS/RHEL 7.x:
rpm -Uvh https://dl.fedoraproject.org/pub/epel/epel-release-latest-7.noarch.rpm
rpm -Uvh https://mirror.webtatic.com/yum/el7/webtatic-release.rpm
第一种方法
- yum安装PHP7.0,用yum装的唯一好处就是不用管什么依赖,yum都会帮你装上。
yum install php70w.x86_64 php70w-cli.x86_64 php70w-common.x86_64 php70w-gd.x86_64 php70w-ldap.x86_64 php70w-mbstring.x86_64 php70w-mcrypt.x86_64 php70w-mysql.x86_64 php70w-pdo.x86_64
安装php-fpm
yum install php70w-fpm php70w-opcache
启动php-fpm
systemctl start php-fpm
开机启动设置
systemctl enable php-fpm
systemctl daemon-reload
第二种方法
也可以这样直接yum安装PHP7.0,可以安装的拓展如下:
yum install php70w-common php70w-fpm php70w-opcache php70w-gd php70w-mysqlnd php70w-mbstring php70w-pecl-redis php70w-pecl-memcached php70w-devel
就这一条命令,就可以安装了下面的拓展
php-api, php-bz2, php-calendar, php-ctype, php-curl, php-date, php-exif, php-fileinfo, php-filter, php-ftp, php-gettext, php-gmp, php-hash, php-iconv, php-json, php-libxml, php-openssl, php-pcre, php-pecl-Fileinfo, php-pecl-phar, php-pecl-zip, php-reflection, php-session, php-shmop, php-simplexml, php-sockets, php-spl, php-tokenizer, php-zend-abi, php-zip, php-zlib
- 安装对应的拓展如下
安装包         提供的拓展
php70w          mod_php , php70w-zts
php70w-bcmath
php70w-cli      php-cgi, php-pcntl, php-readline
php70w-common   php-api, php-bz2, php-calendar, php-ctype, php-curl, php-date, php-exif, php-fileinfo, php-filter, php-ftp, php-gettext, php-gmp, php-hash, php-iconv, php-json, php-libxml, php-openssl, php-pcre, php-pecl-Fileinfo, php-pecl-phar, php-pecl-zip, php-reflection, php-session, php-shmop, php-simplexml   , php-sockets, php-spl, php-tokenizer, php-zend-abi, php-zip, php-zlib
php70w-dba
php70w-devel
php70w-embedded     php-embedded-devel
php70w-enchant
php70w-fpm
php70w-gd
php70w-imap
php70w-interbase        php_database, php-firebird
php70w-intl
php70w-ldap
php70w-mbstring
php70w-mcrypt
php70w-mysql        php-mysqli, php_database
php70w-mysqlnd      php-mysqli, php_database
php70w-odbc     php-pdo_odbc, php_database
php70w-opcache      php70w-pecl-zendopcache
php70w-pdo      php70w-pdo_sqlite, php70w-sqlite3
php70w-pdo_dblib        php70w-mssql
php70w-pear
php70w-pecl-apcu
php70w-pecl-imagick
php70w-pecl-memcached
php70w-pecl-mongodb
php70w-pecl-redis
php70w-pecl-xdebug
php70w-pgsql        php-pdo_pgsql, php_database
php70w-phpdbg
php70w-process      php-posix, php-sysvmsg, php-sysvsem, php-sysvshm
php70w-pspell
php70w-recode
php70w-snmp
php70w-soap
php70w-tidy
php70w-xml      php-dom, php-domxml, php-wddx, php-xsl
php70w-xmlrpc
如需要加装xml,那么可以直接这样安装
yum install php70w-xml
- 检查是否安装成功
php -v

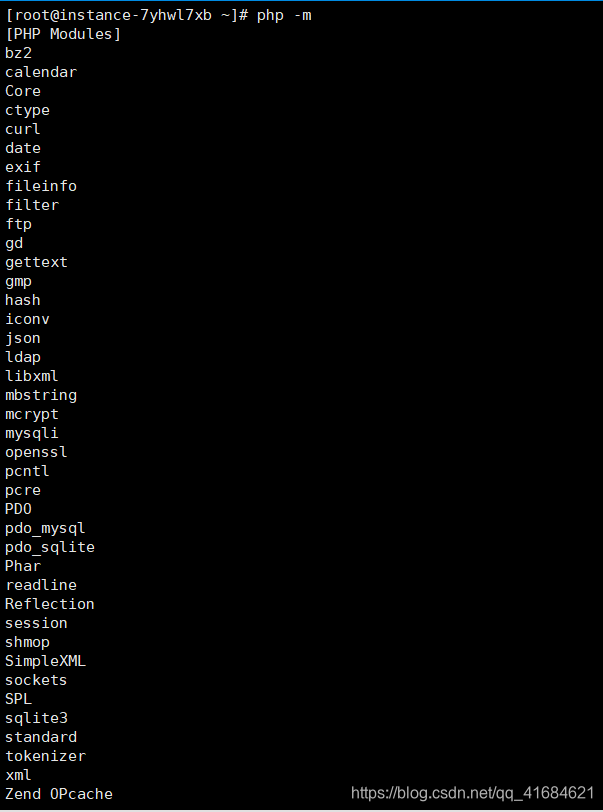
查看一下php拓展:
php -m

需要拓展,直接yum安装就可以了。
- 最后是PHP和Nginx配置一起使用了
打开已经装好的Nginx目录下的配置文件nginx.conf,关于Nginx、mysql、Tomcat、JDK的安装可以访问我写的这篇博文:
https://blog.csdn.net/qq_41684621/article/details/102934590
如:我的nginx所处的目录是/usr/local/nginx/conf/nginx.conf
vim /usr/local/nginx/conf/nginx.conf
- 把下面的 location ~ .php$ 删掉注释
fastcgi_param SCRIPT_FILENAME /scripts$fastcgi_script_name; 替换为
fastcgi_param SCRIPT_FILENAME $document_root$fastcgi_script_name;
- 在下面的location中添加个默认文件名:index.php
server {
        listen       80;
        server_name  localhost;

        #charset koi8-r;

        #access_log  logs/host.access.log  main;

        location / {
            root   html;
            index  index.html index.htm index.php;
        }

        #error_page  404              /404.html;

        # redirect server error pages to the static page /50x.html
        #
        error_page   500 502 503 504  /50x.html;
        location = /50x.html {
            root   html;
        }

        # proxy the PHP scripts to Apache listening on 127.0.0.1:80
        #
        #location ~ \.php$ {
        #    proxy_pass   http://127.0.0.1;
        #}

        # pass the PHP scripts to FastCGI server listening on 127.0.0.1:9000
        #
        location ~ \.php$ {
        #    root           html;
            fastcgi_pass   127.0.0.1:9000;
            fastcgi_index  index.php;
        #   fastcgi_param  SCRIPT_FILENAME  /scripts$fastcgi_script_name;
			fastcgi_param SCRIPT_FILENAME $document_root$fastcgi_script_name;
            include        fastcgi_params;
        }

        # deny access to .htaccess files, if Apache's document root
        # concurs with nginx's one
        #
        #location ~ /\.ht {
        #    deny  all;
        #}
    }
然后重新加载nginx配置文件 ,必须以root用户执行:
先进入到nginx目录下的sbin目录再执行
cd /usr/local/nginx/sbin
./nginx -s reload
- 最后测试下是否可以成功执行PHP文件
上述的nginx配置中,我的根目录在/usr/local/nginx/html下,打开目录后把html下存在的index.html删除或改为其他名字,在html目录下创建个index.php文件,添加如下内容:
<?php
echo "helloworld"
?>
浏览器中访问IP或域名:

- 点赞
- 收藏
- 关注作者


评论(0)