用 Flask 来写个轻博客 (14) — M(V)C_实现项目首页的模板

Blog 项目源码:https://github.com/JmilkFan/JmilkFan-s-Blog
目录
前文列表
用 Flask 来写个轻博客 (1) — 创建项目
用 Flask 来写个轻博客 (2) — Hello World!
用 Flask 来写个轻博客 (3) — (M)VC_连接 MySQL 和 SQLAlchemy
用 Flask 来写个轻博客 (4) — (M)VC_创建数据模型和表
用 Flask 来写个轻博客 (5) — (M)VC_SQLAlchemy 的 CRUD 详解
用 Flask 来写个轻博客 (6) — (M)VC_models 的关系(one to many)
用 Flask 来写个轻博客 (7) — (M)VC_models 的关系(many to many)
用 Flask 来写个轻博客 (8) — (M)VC_Alembic 管理数据库结构的升级和降级
用 Flask 来写个轻博客 (9) — M(V)C_Jinja 语法基础快速概览
用 Flask 来写个轻博客 (10) — M(V)C_Jinja 常用过滤器与 Flask 特殊变量及方法
用 Flask 来写个轻博客 (11) — M(V)C_创建视图函数
用 Flask 来写个轻博客 (12) — M(V)C_编写和继承 Jinja 模板
用 Flask 来写个轻博客 (13) — M(V)C_WTForms 服务端表单检验
实现所需要的视图函数
- 在开始实现首页模板之前, 我们为了调试和显示的方便, 首先伪造一些假数据:
- fake_data.py
import random
import datetime
from uuid import uuid4

from models import db, User, Tag, Post

user = User(id=str(uuid4()), username='jmilkfan', password='fanguiju')
db.session.add(user)
db.session.commit()

user = db.session.query(User).first()
tag_one = Tag(id=str(uuid4()), name='Python')
tag_two = Tag(id=str(uuid4()), name='Flask')
tag_three = Tag(id=str(uuid4()), name='SQLALchemy')
tag_four = Tag(id=str(uuid4()), name='JMilkFan')
tag_list = [tag_one, tag_two, tag_three, tag_four]

s = "EXAMPLE TEXT"

for i in xrange(100): new_post = Post(id=str(uuid4()), title="Post" + str(i)) new_post.user = user new_post.publish_date = datetime.datetime.now() new_post.text = s new_post.tags = random.sample(tag_list, random.randint(1, 3)) db.session.add(new_post)

db.session.commit()
- 1
- 2
- 3
- 4
- 5
- 6
- 7
- 8
- 9
- 10
- 11
- 12
- 13
- 14
- 15
- 16
- 17
- 18
- 19
- 20
- 21
- 22
- 23
- 24
- 25
- 26
- 27
- 28
直接在 manager shell 中导入就能够执行该脚本文件:
>>> import fake_data
- 1
home.html 的视图函数之前博文中就已经记录过了,现在再将必须的视图函数代码贴出。
- views.py
from flask import render_template
from sqlalchemy import func

from main import app
from models import db, User, Post, Tag, Comment, posts_tags


def sidebar_data(): """Set the sidebar function.""" # Get post of recent recent = db.session.query(Post).order_by( Post.publish_date.desc() ).limit(5).all() # Get the tags and sort by count of posts. top_tags = db.session.query( Tag, func.count(posts_tags.c.post_id).label('total') ).join( posts_tags ).group_by(Tag).order_by('total DESC').limit(5).all() return recent, top_tags


@app.route('/')
@app.route('/<int:page>')
def home(page=1): """View function for home page""" posts = Post.query.order_by( Post.publish_date.desc() ).paginate(page, 10) recent, top_tags = sidebar_data() return render_template('home.html', posts=posts, recent=recent, top_tags=top_tags)

@app.route('/post/<string:post_id>')
def post(post_id): """View function for post page""" post = Post.query.get_or_404(post_id) tags = post.tags comments = post.comments.order_by(Comment.date.desc()).all() recent, top_tags = sidebar_data() return render_template('post.html', post=post, tags=tags, comments=comments, recent=recent, top_tags=top_tags)


@app.route('/tag/<string:tag_name>')
def tag(tag_name): """View function for tag page""" # Tag.qurey() 对象才有 first_or_404(),而 db.session.query(Model) 是没有的 tag = Tag.query.filter_by(name=tag_name).first_or_404() posts = tag.posts.order_by(Post.publish_date.desc()).all() recent, top_tags = sidebar_data() return render_template('tag.html', tag=tag, posts=posts, recent=recent, top_tags=top_tags)
- 1
- 2
- 3
- 4
- 5
- 6
- 7
- 8
- 9
- 10
- 11
- 12
- 13
- 14
- 15
- 16
- 17
- 18
- 19
- 20
- 21
- 22
- 23
- 24
- 25
- 26
- 27
- 28
- 29
- 30
- 31
- 32
- 33
- 34
- 35
- 36
- 37
- 38
- 39
- 40
- 41
- 42
- 43
- 44
- 45
- 46
- 47
- 48
- 49
- 50
- 51
- 52
- 53
- 54
- 55
- 56
- 57
- 58
- 59
- 60
- 61
- 62
- 63
- 64
- 65
- 66
- 67
- 68
- 69
- 70
- 71
实现 home.html 模板
- templates/home.html
<!-- Replace the TITLE of template base.html -->
{% extends "base.html"%}
{% block title %}JmilkFan's Blog{% endblock %}

<!-- Replace the BODY of template base.html -->
{% block body %}
<!-- The data object from view function: `home()` -->
<div class="row">
  <div class="col-lg-9"> <!-- Get Pagination object--> {% for post in posts.items %} <div class="row"> <div class="col-lg-12"> <h1>{{ post.title }}</h1> </div> </div> <div class="row"> <div class="col-lg-12"> {{ post.text | truncate(255) | safe }} <!-- Set the link for read more --> <a href="{{ url_for('post', post_id=post.id) }}">Read More</a> </div> </div> {% endfor %}
  </div>
  <div class="col-lg-3"> <div class="row"> <h5>Recent Posts</h5> <ul> {% for post in recent %} <!-- Set the link for recent posts. --> <li><a href="{{ url_for('post', post_id=post.id) }}">{{ post.title }}</a></li> {% endfor %} </ul> </div> <div class="row"> <h5>Popular Tags</h5> <ul> {% for tag in top_tags %} <li><a href="{{ url_for('tag', tag_name=tag[0].name) }}">{{ tag[0].name }}</a></li> {% endfor %} </ul> </div>
  </div>
  <!-- Call the Macro: `render_pagination` from base.html -->
  {{ render_pagination(posts, 'home') }}
</div>
{% endblock %}
- 1
- 2
- 3
- 4
- 5
- 6
- 7
- 8
- 9
- 10
- 11
- 12
- 13
- 14
- 15
- 16
- 17
- 18
- 19
- 20
- 21
- 22
- 23
- 24
- 25
- 26
- 27
- 28
- 29
- 30
- 31
- 32
- 33
- 34
- 35
- 36
- 37
- 38
- 39
- 40
- 41
- 42
- 43
- 44
- 45
- 46
- 47
- 48
- 49
- 50
- 51
- 52
- 53
- 54
代码分析
需求:我们希望当访问到域名 http://<ipaddress>:5000/,即访问博客的 / 时,能够正文处显示文章列表,右上侧边栏显示最新的 5 篇博文,右下侧边拦显示 关联博文数最多的 5 个标签,并且希望每一个页面的右侧边栏都是一致的。
按照这个需求,首先我们需要定义一个路由函数(在这里同时也是视图函数)
home()来跳转到首页,并且首页中具有分页的功能,所以会定义两个app.oute()装饰器。同时因为我们需要在右侧边栏显示最新的 5 篇博文和博文关联数最多的 5 个标签,所以需要提供
recent/recent数据对象,并且这些对象是高重用的,所以将其抽象成一个函数。我们还希望能够通过右侧边拦提供的链接跳转到具体的 post 或 tag 中,这就需要得到 posts/tags 表中的数据对象,所以会使用到视图函数
post()/tag()。
实现效果
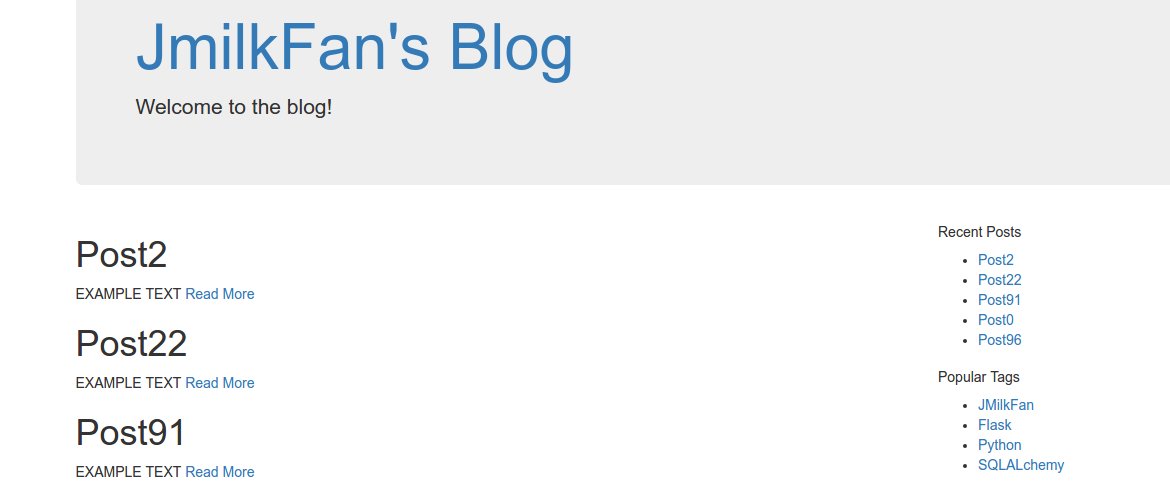
- 再结合在前面博文中实现的分页链接宏


文章来源: is-cloud.blog.csdn.net,作者:范桂飓,版权归原作者所有,如需转载,请联系作者。
原文链接:is-cloud.blog.csdn.net/article/details/53327164

- 点赞
- 收藏
- 关注作者
评论(0)