Qt&Vtk-004-AmbientSpheres


欢迎来到我的博客,希望这篇文章对你有所帮助,如果觉得不错,请点赞搜藏哈。
Qt&Vtk-AmbientSpheres
从本章开始,将开始搬运官方实例代码,顺便开始学习,能理解多少算多少。
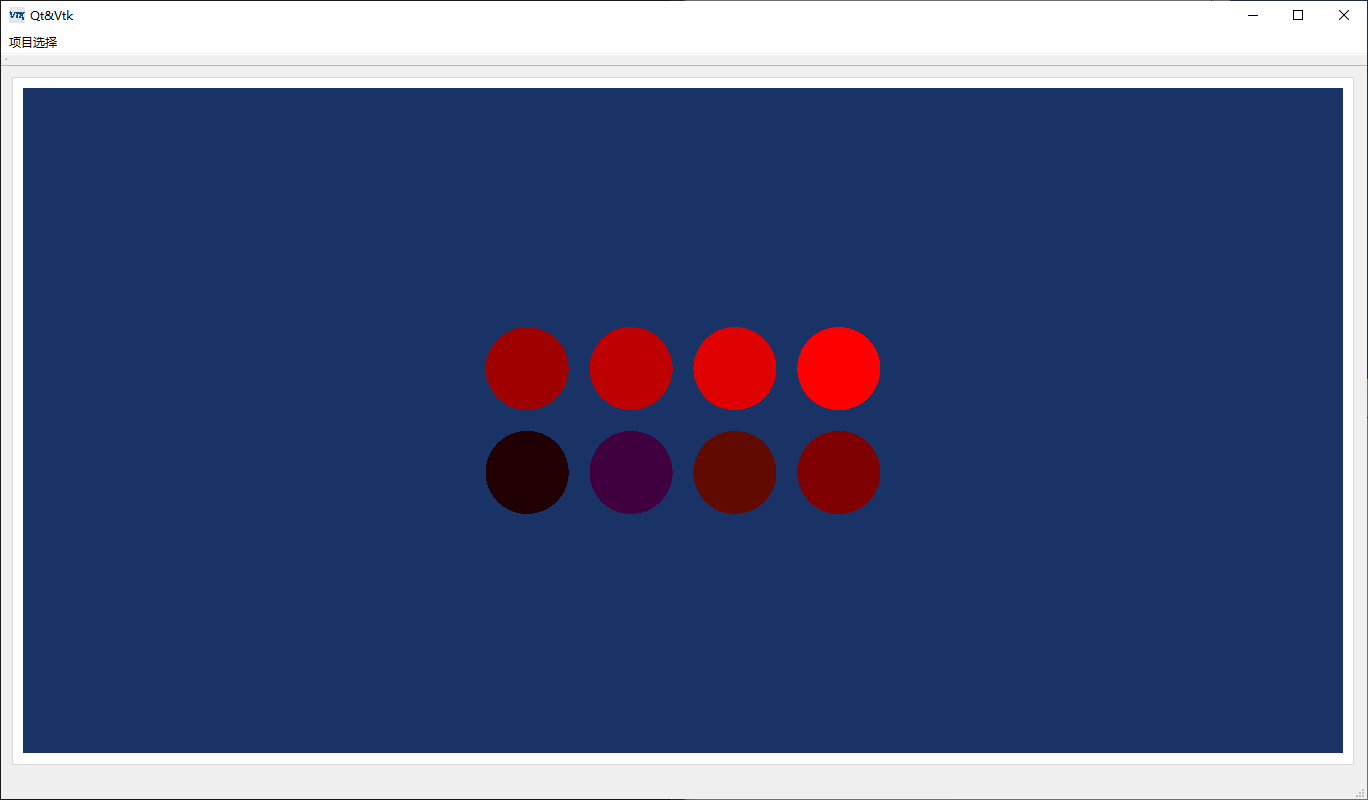
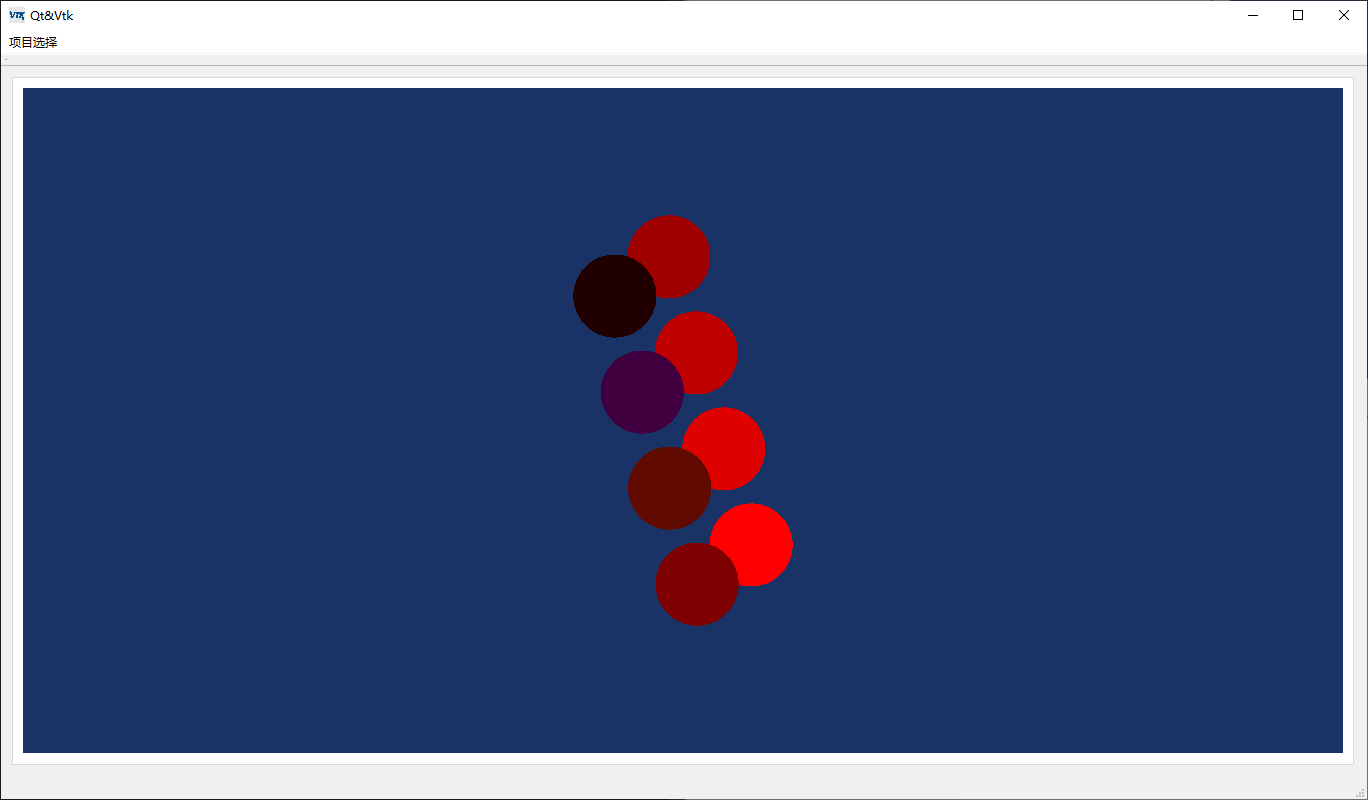
1 效果展示
今天搬运第一个Vtk官方示例***AmbientSpheres***,如下图
2源码
下面看下源代码,这次分别写在了头文件中和源文件中。
2.1 ambientspheres.h
#ifndef AMBIENTSPHERES_H
#define AMBIENTSPHERES_H

#include <QWidget>
#include "QVTKOpenGLWidget.h"               //新版本,旧版QVTKWidget
#include "vtkAutoInit.h"
#include "vtkSmartPointer.h"
#include "vtkSphereSource.h"
#include "vtkPolyDataMapper.h"
#include "vtkActor.h"
#include "vtkRenderer.h"
#include "vtkRenderWindow.h"
#include "vtkProperty.h"
#include "vtkCamera.h"
#include "vtkLight.h"

namespace Ui {
class AmbientSpheres;
}

class AmbientSpheres : public QWidget
{
    Q_OBJECT

public:
    explicit AmbientSpheres(QWidget *parent = 0);
    ~AmbientSpheres();

private:
    Ui::AmbientSpheres *ui;
    vtkSmartPointer<vtkSphereSource> sphere = nullptr;
    vtkSmartPointer<vtkPolyDataMapper> sphereMapper = nullptr;
    vtkSmartPointer<vtkActor>   sphere1 = nullptr,
                                sphere2 = nullptr,
                                sphere3 = nullptr,
                                sphere4 = nullptr,
                                sphere5 = nullptr,
                                sphere6 = nullptr,
                                sphere7 = nullptr,
                                sphere8 = nullptr;
    vtkSmartPointer<vtkRenderer> renderer = nullptr;
    vtkSmartPointer<vtkLight> light = nullptr;
};

#endif // AMBIENTSPHERES_H
2.2 ambientspheres.cpp
#include "ambientspheres.h"
#include "ui_ambientspheres.h"
#include <QDebug>
/**
 * @brief AmbientSpheres::AmbientSpheres
 * @param parent
 * 照搬官方实例,有道翻译官方文件中内容如下
 * This examples demonstrates the effect of specular lighting.
 * 这个例子演示了镜面照明的效果。
 * 专业名词后面慢慢学习,代码先撸起来
 */
AmbientSpheres::AmbientSpheres(QWidget *parent) :QWidget(parent),ui(new Ui::AmbientSpheres)
{
    ui->setupUi(this);
    //创建一个球体
    sphere = vtkSmartPointer<vtkSphereSource>::New();
    sphere->SetThetaResolution(100);
    sphere->SetPhiResolution(50);
    //创建一个映射器
    sphereMapper = vtkSmartPointer<vtkPolyDataMapper>::New();
    sphereMapper->SetInputConnection(sphere->GetOutputPort());
    //创建8个小球
    sphere1 = vtkSmartPointer<vtkActor>::New();
    sphere2 = vtkSmartPointer<vtkActor>::New();
    sphere3 = vtkSmartPointer<vtkActor>::New();
    sphere4 = vtkSmartPointer<vtkActor>::New();
    sphere5 = vtkSmartPointer<vtkActor>::New();
    sphere6 = vtkSmartPointer<vtkActor>::New();
    sphere7 = vtkSmartPointer<vtkActor>::New();
    sphere8 = vtkSmartPointer<vtkActor>::New();

    sphere1->SetMapper(sphereMapper);
    sphere1->GetProperty()->SetColor(1,0,0);            //颜色
    sphere1->GetProperty()->SetAmbient(0.125);          //环境光系数
    sphere1->GetProperty()->SetDiffuse(0.0);            //漫反射光系数
    sphere1->GetProperty()->SetSpecular(0.0);           //镜面反射系数
                                                        //镜面系数SetSpecularPower()


    sphere2->SetMapper(sphereMapper);
    sphere2->GetProperty()->SetColor(1,0,1);
    sphere2->GetProperty()->SetAmbient(0.25);
    sphere2->GetProperty()->SetDiffuse(0.0);
    sphere2->GetProperty()->SetSpecular(0.0);
    sphere2->AddPosition(1.25,0,0);


    sphere3->SetMapper(sphereMapper);
    sphere3->GetProperty()->SetColor(1,0.1,0);
    sphere3->GetProperty()->SetAmbient(0.375);
    sphere3->GetProperty()->SetDiffuse(0.0);
    sphere3->GetProperty()->SetSpecular(0.0);
    sphere3->AddPosition(2.5,0,0);

    sphere4->SetMapper(sphereMapper);
    sphere4->GetProperty()->SetColor(1,0,0);
    sphere4->GetProperty()->SetAmbient(0.5);
    sphere4->GetProperty()->SetDiffuse(0.0);
    sphere4->GetProperty()->SetSpecular(0.0);
    sphere4->AddPosition(3.75,0,0);


    sphere5->SetMapper(sphereMapper);
    sphere5->GetProperty()->SetColor(1,0,0);
    sphere5->GetProperty()->SetAmbient(0.625);
    sphere5->GetProperty()->SetDiffuse(0.0);
    sphere5->GetProperty()->SetSpecular(0.0);
    sphere5->AddPosition(0.0,1.25,0);


    sphere6->SetMapper(sphereMapper);
    sphere6->GetProperty()->SetColor(1,0,0);
    sphere6->GetProperty()->SetAmbient(0.75);
    sphere6->GetProperty()->SetDiffuse(0.0);
    sphere6->GetProperty()->SetSpecular(0.0);
    sphere6->AddPosition(1.25,1.25,0);

    sphere7->SetMapper(sphereMapper);
    sphere7->GetProperty()->SetColor(1,0,0);
    sphere7->GetProperty()->SetAmbient(0.875);
    sphere7->GetProperty()->SetDiffuse(0.0);
    sphere7->GetProperty()->SetSpecular(0.0);
    sphere7->AddPosition(2.5,1.25,0);

    sphere8->SetMapper(sphereMapper);
    sphere8->GetProperty()->SetColor(1,0,0);
    sphere8->GetProperty()->SetAmbient(1.0);
    sphere8->GetProperty()->SetDiffuse(0.0);
    sphere8->GetProperty()->SetSpecular(0.0);
    sphere8->AddPosition(3.75,1.25,0);


    renderer = vtkSmartPointer<vtkRenderer>::New();         //窗口渲染器
    renderer->AddActor(sphere1);
    renderer->AddActor(sphere2);
    renderer->AddActor(sphere3);
    renderer->AddActor(sphere4);
    renderer->AddActor(sphere5);
    renderer->AddActor(sphere6);
    renderer->AddActor(sphere7);
    renderer->AddActor(sphere8);
    renderer->SetBackground(0.1,0.2,0.4);               //设置背景颜色
    ui->widget->GetRenderWindow()->AddRenderer(renderer);   //

    light = vtkSmartPointer<vtkLight>::New();               //创建光照
    light->SetFocalPoint(1.875,0.6125,0);                   //设置灯光焦点
    light->SetPosition(0.875,1.6125,1);                     //设置灯光位置
                                                            //设置灯光强度SetIntensity()
                                                            //设置灯光锥角SetConeAngle()
                                                            //选择设置平行光或者聚光PositionalOff/On()
    renderer->AddLight(light);

    renderer->GetActiveCamera()->SetFocalPoint(0,0,0);      //设置相机焦点
    renderer->GetActiveCamera()->SetPosition(0,0,1);        //设置相机位置
    renderer->GetActiveCamera()->SetViewUp(0,1,0);          //设置图像正方向
    renderer->GetActiveCamera()->ParallelProjectionOn();    //平行投影/透视投影
    renderer->ResetCamera();
    renderer->GetActiveCamera()->SetParallelScale(4.0);

}

AmbientSpheres::~AmbientSpheres()
{
    delete ui;
}
3 涉及主要知识点
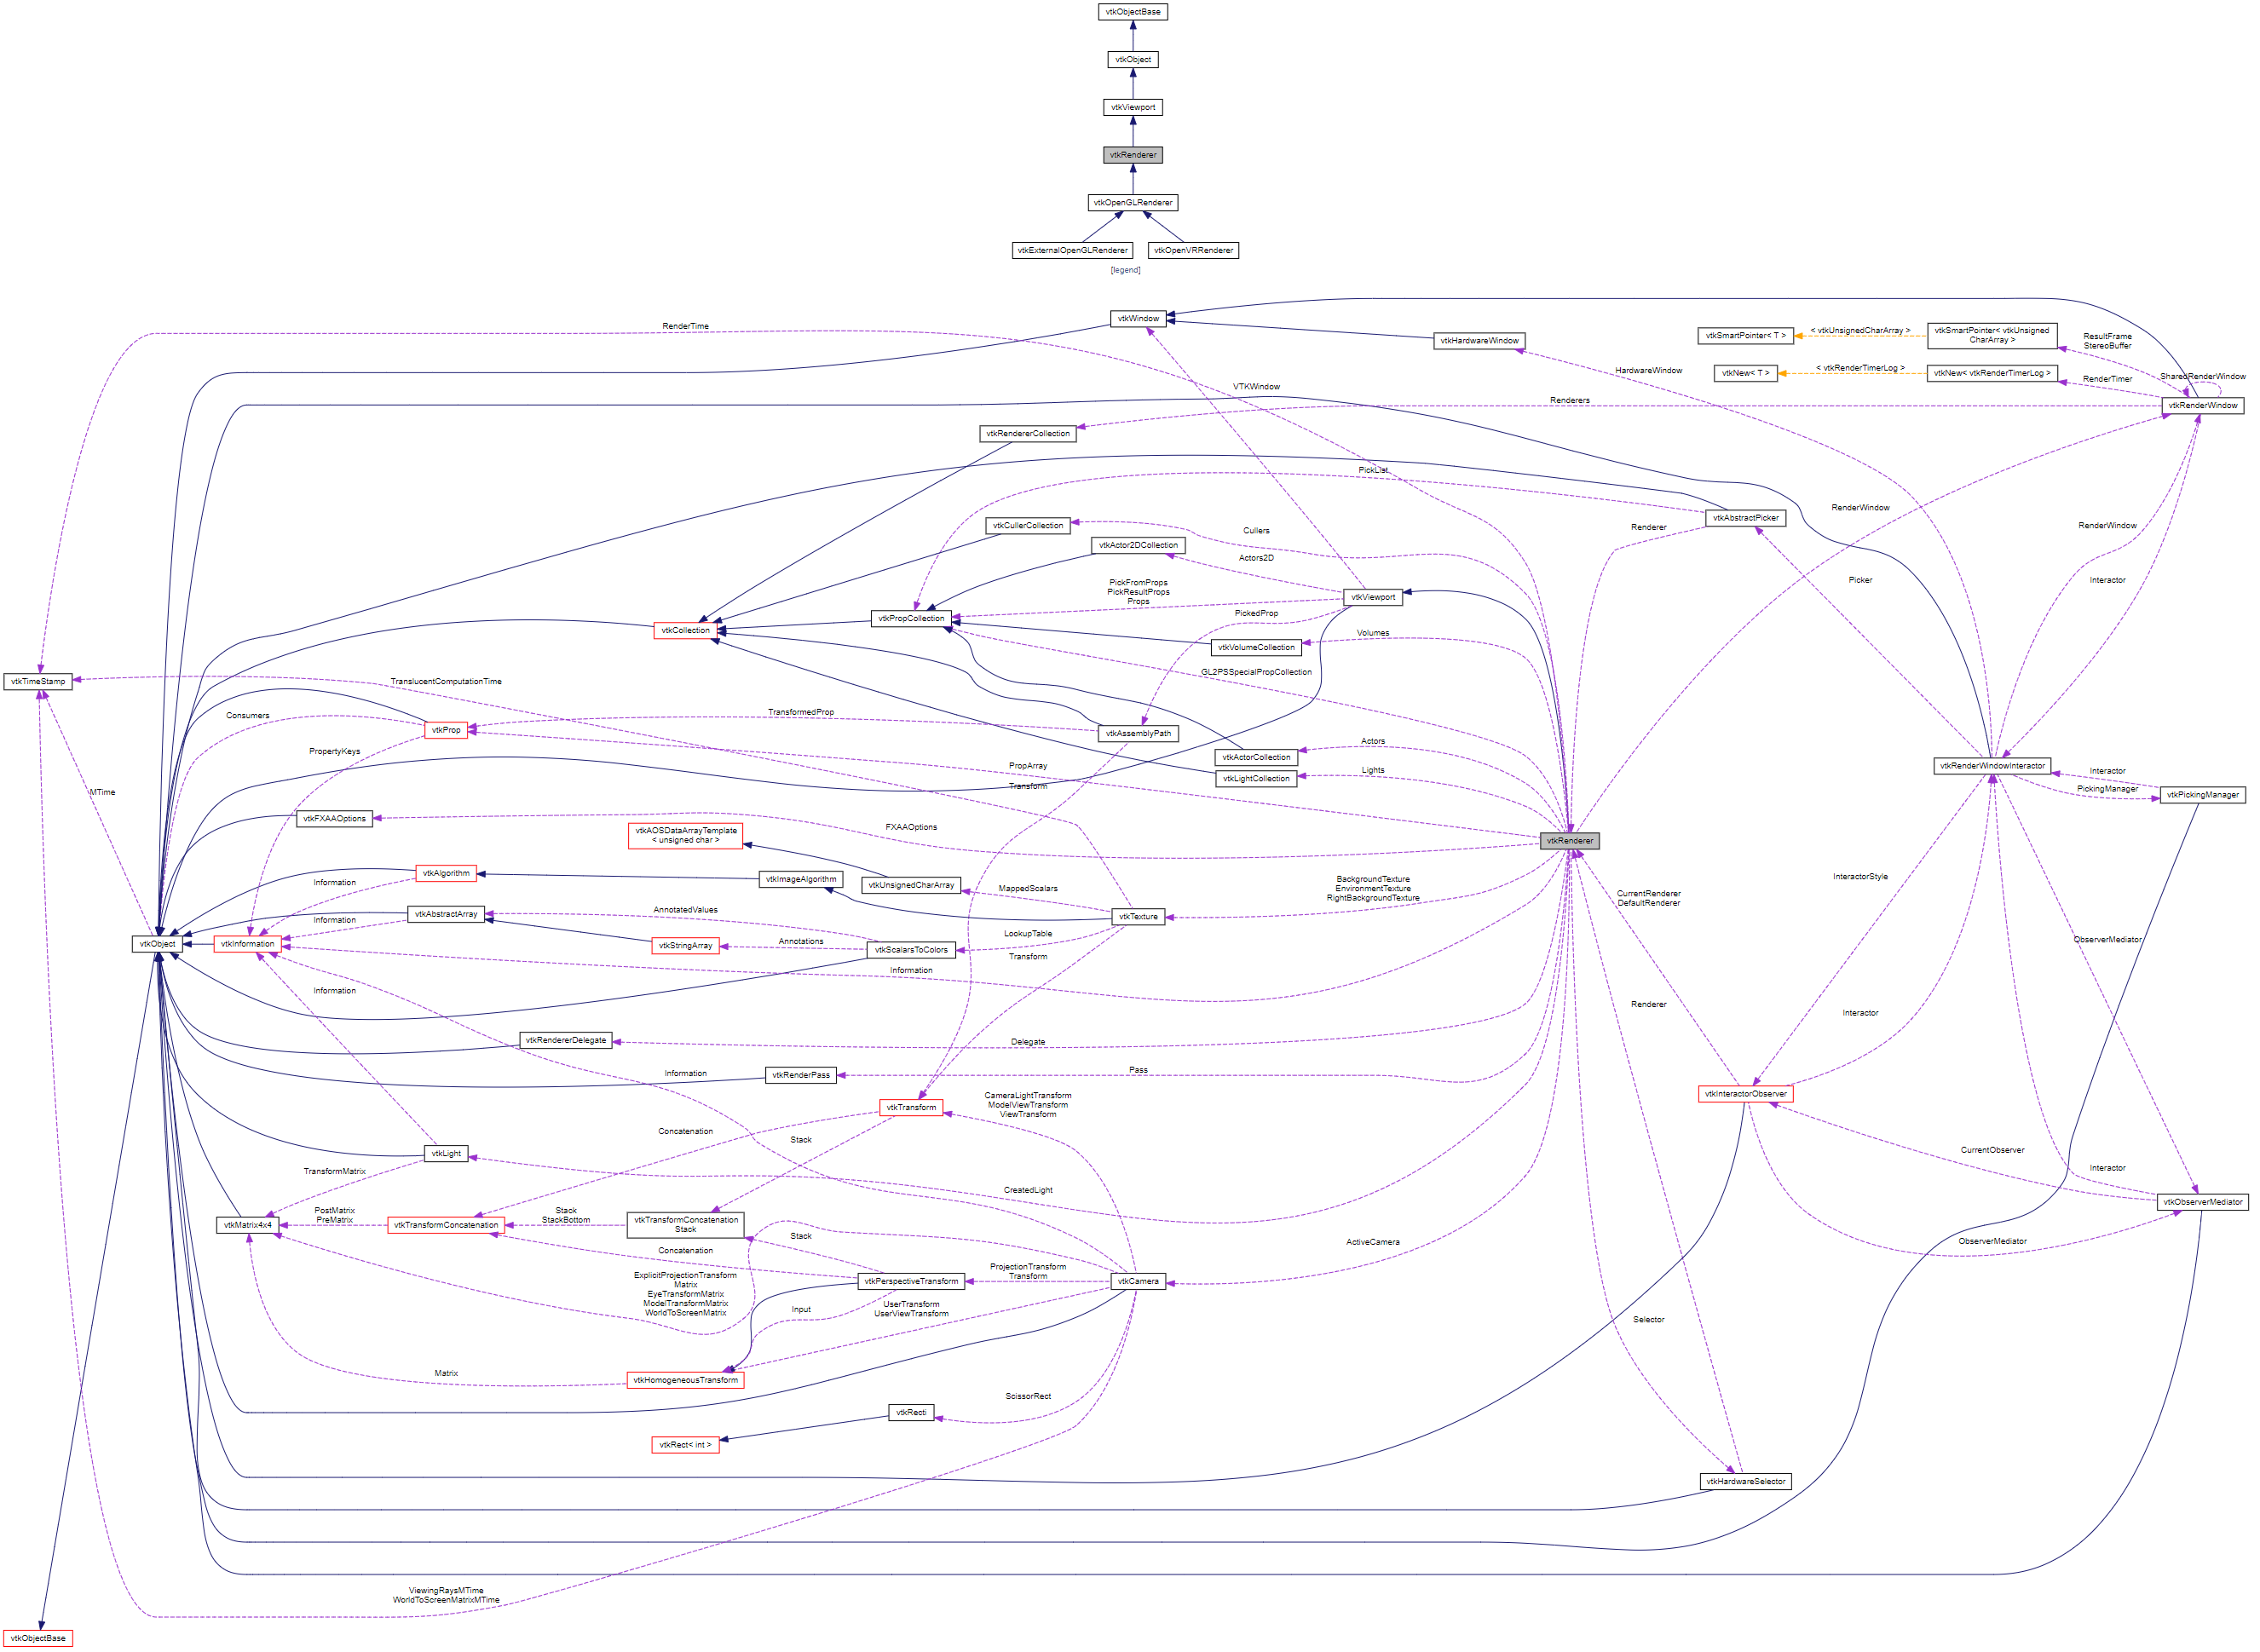
3.1 vtkCamera
参考链接: https://vtk.org/doc/release/5.2/html/a00154.html
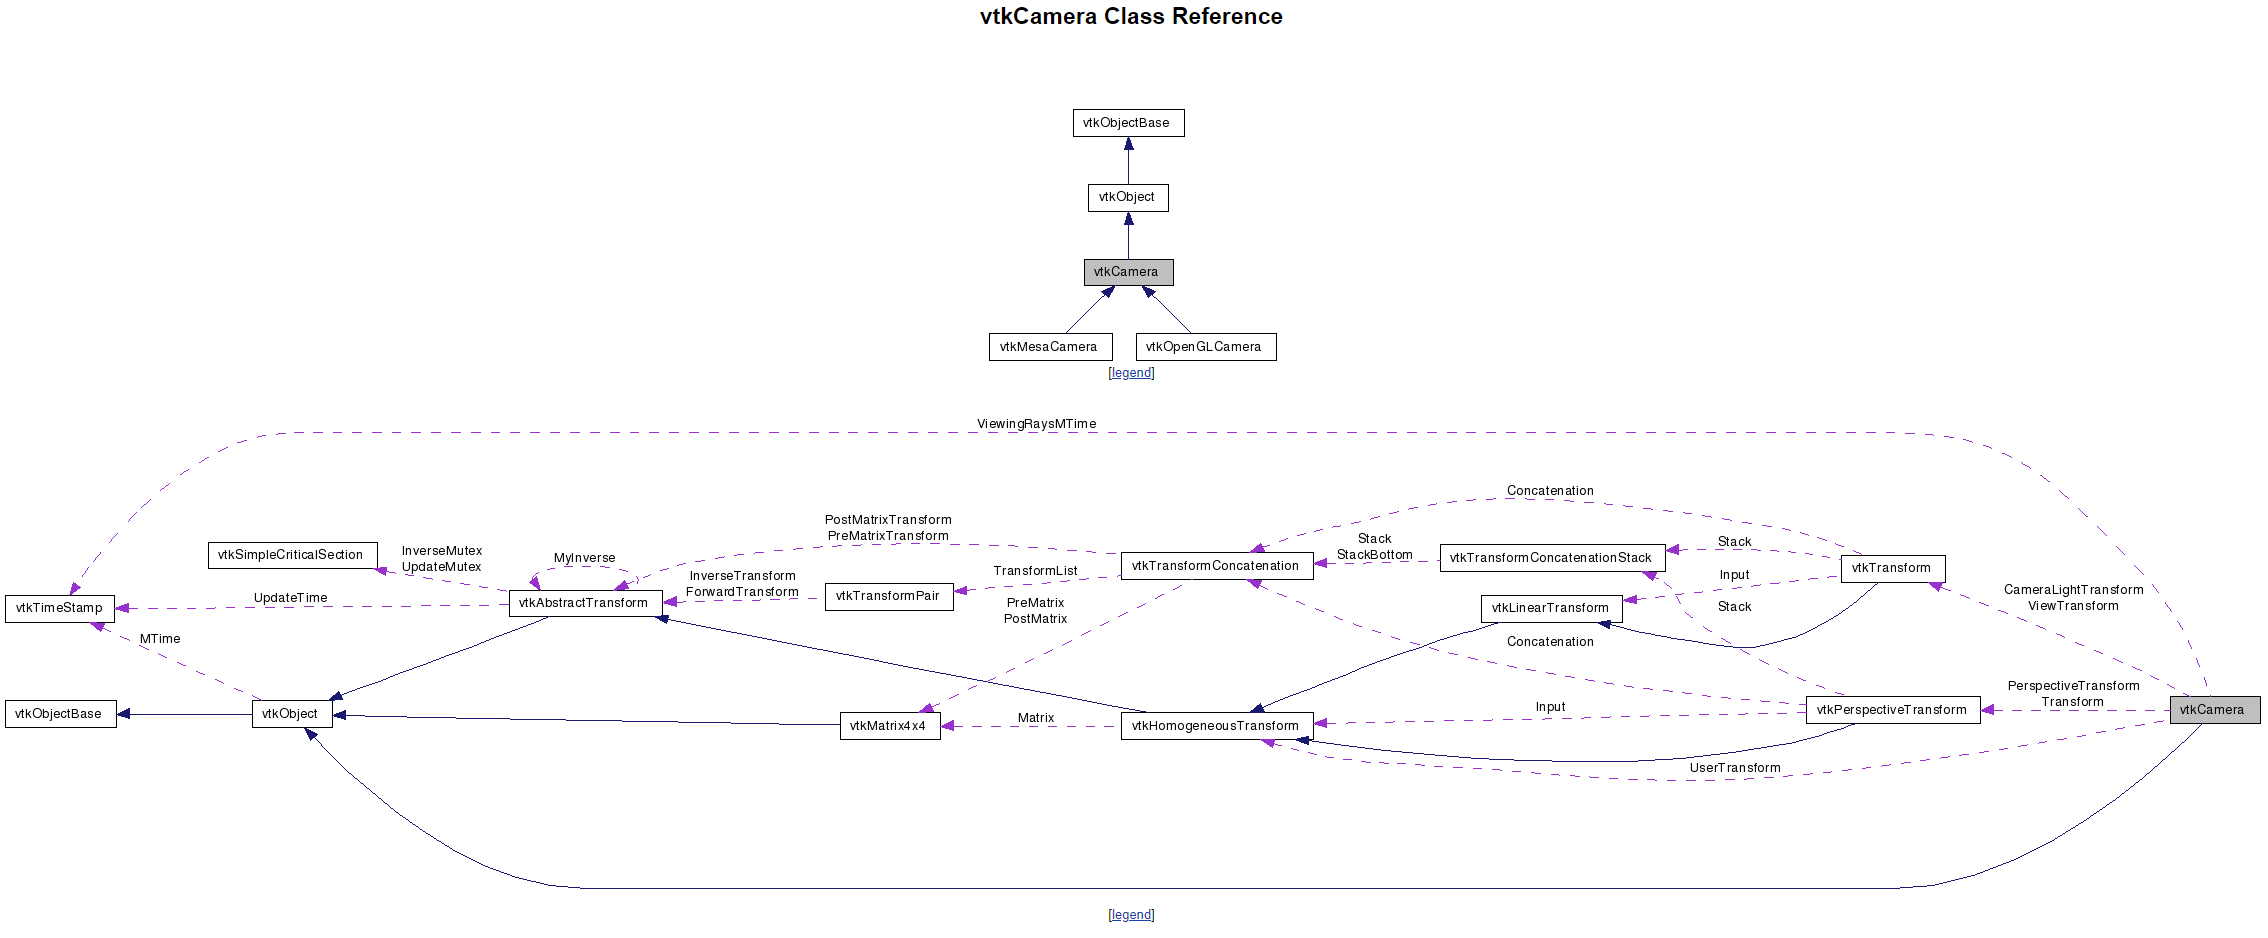
vtkCamera在这里其实没有涉及太多,仅仅有SetFocalPoint、SetPosition、SetViewUp、ParallelProjectionOn和SetParallelScale。
摘自 :VTK图形图像开发进阶
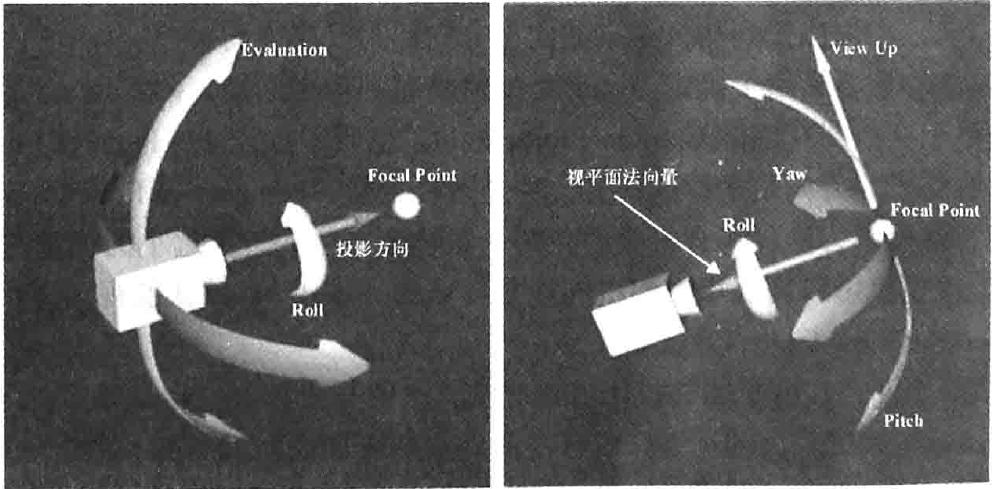
相机负责把三维场景投影到二维平面,如屏幕,相机投影是一体如下图所示。
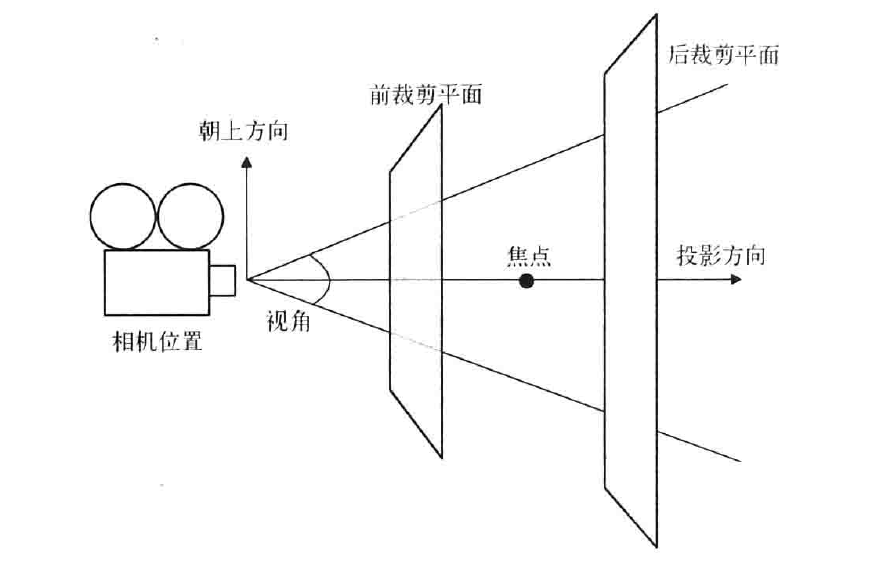
- 相机位置,相机所处的位置,使用vtkCamera::SetPosition()方法设置
- 相机焦点,用vtkCamera::SetFocusPoint()方法设置,默认的焦点位置在世界坐标系的原点
- 朝上方向,朝上方向即那个方向为相机的朝上方向;就好比直立看东西,方向为头朝上,看到东西也是直立的,如果是倒立看某个东西,这是方向为头朝下,看到的东西就是倒立的,相机位置、相机焦点和朝上方向三个因素确定了相机的实际方向,即确定相机的视图。
- 投影方向,相机位置到相机焦点的向量方向即为投影方向。
- 投影方法,该要素用于确定Actor是如何映射到平面的,vtkCanmera定义了两种投影方法:一种是正交投影(Orthographic Projection),也叫平行投影(Parallel Projection),即进入相机的光线与投影方向是平行的;另一种是透视投影(Perspective Projection),即所有光线相交于一点。该投影方法最符合人类眼镜对于景物所产生的近大远小的视觉习惯。
- 视角,透视投影时需要指定相机的视角(View Angle),默认视角大小为30°,可以使用vtkCamera::SetViewAngle()方法设置
- 前后裁剪平面,裁剪平面与投影方向相交,一般与投影方向也是垂直的。裁剪平面主要用于评估Actor与相机距离的远近,只有在前后裁剪平面之间的Actor才是可见的,裁剪平面的位置可以用vtkCamera::SetClippongRange()方法设置
vtkCamera除了提供设置与相机投影因素相关的方法之外,还提供了大量的控制相机运动的方法,如Dolly()、Azimuth()、Yaw()、Elevation()、Pitch()和Zoom()。相机运动方向示意图如下
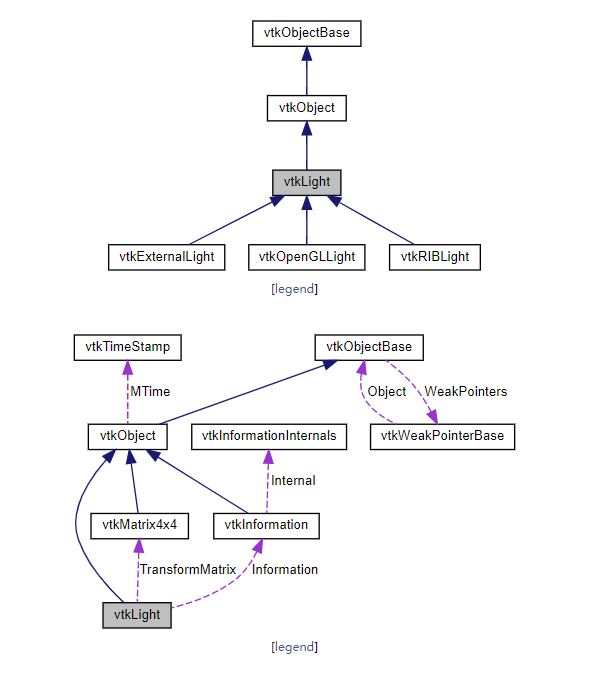
3.2 vtkLight
参考链接:https://blog.csdn.net/zy2317878/article/details/78663264
https://blog.csdn.net/zz187260382/article/details/81478351
摘自:VTK图形图像开发进阶
vtkLight可以分为位置灯光(Positional Light也叫聚光灯)和方向灯光(Direction Light)。位置灯光是光源位置在渲染场景中的某个位置,可以指定灯光的衰减值、锥角等;方向灯光及光源位置在无穷远,可以认为光线是平行的,比如自然界中的太阳。光源的位置和焦点的连线定义光线的方向,默认的vtkLight为方向灯光。
vtkLight的常用方法如下:
SetColor():设置灯光的颜色,以RGB的形式指定颜色。
SetPosition():设置灯光位置。
SetFocalPoint():设置灯光焦点。
SetIntensity():设置灯光的强度。
SetSwitch()/SwitchOn()/SwitchOff():打开或关闭对应的灯光。
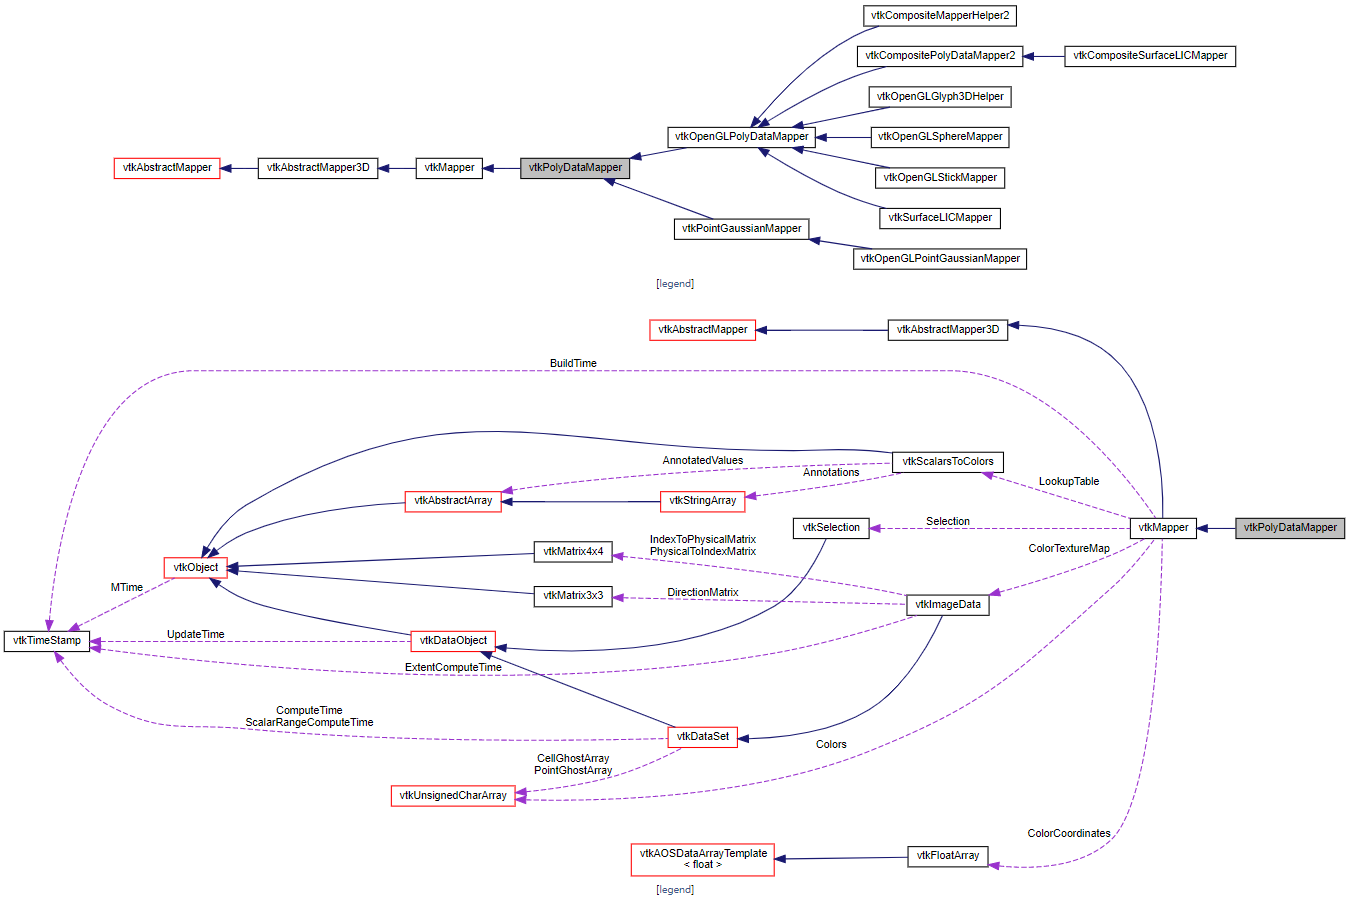
3.3 vtkPolyDataMapper
参考链接:https://vtk.org/doc/nightly/html/classvtkPolyDataMapper.html
https://blog.csdn.net/shenziheng1/article/details/54809989
摘自:VTK图形图像开发进阶
该类用于渲染多边形集合数据(vtkPolyData),派生自类vtkMapper,将输入的数据转换为几何图元(点、线、多边形)进行渲染。
vtkPolyDataMapper::SetInputConnection(): VTK可视化管线的输入数据接口,对应的可视化管线的输出数据接口为GetOutputPort();在VTK5.0之前的版本使用SetInput()和GetOutput()作为输入输出接口。
结合官方实例中的代码,
sphereMapper = vtkSmartPointer<vtkPolyDataMapper>::New();
sphereMapper->SetInputConnection(sphere->GetOutputPort());          //把球体的输出接口链接到映射器的输入接口
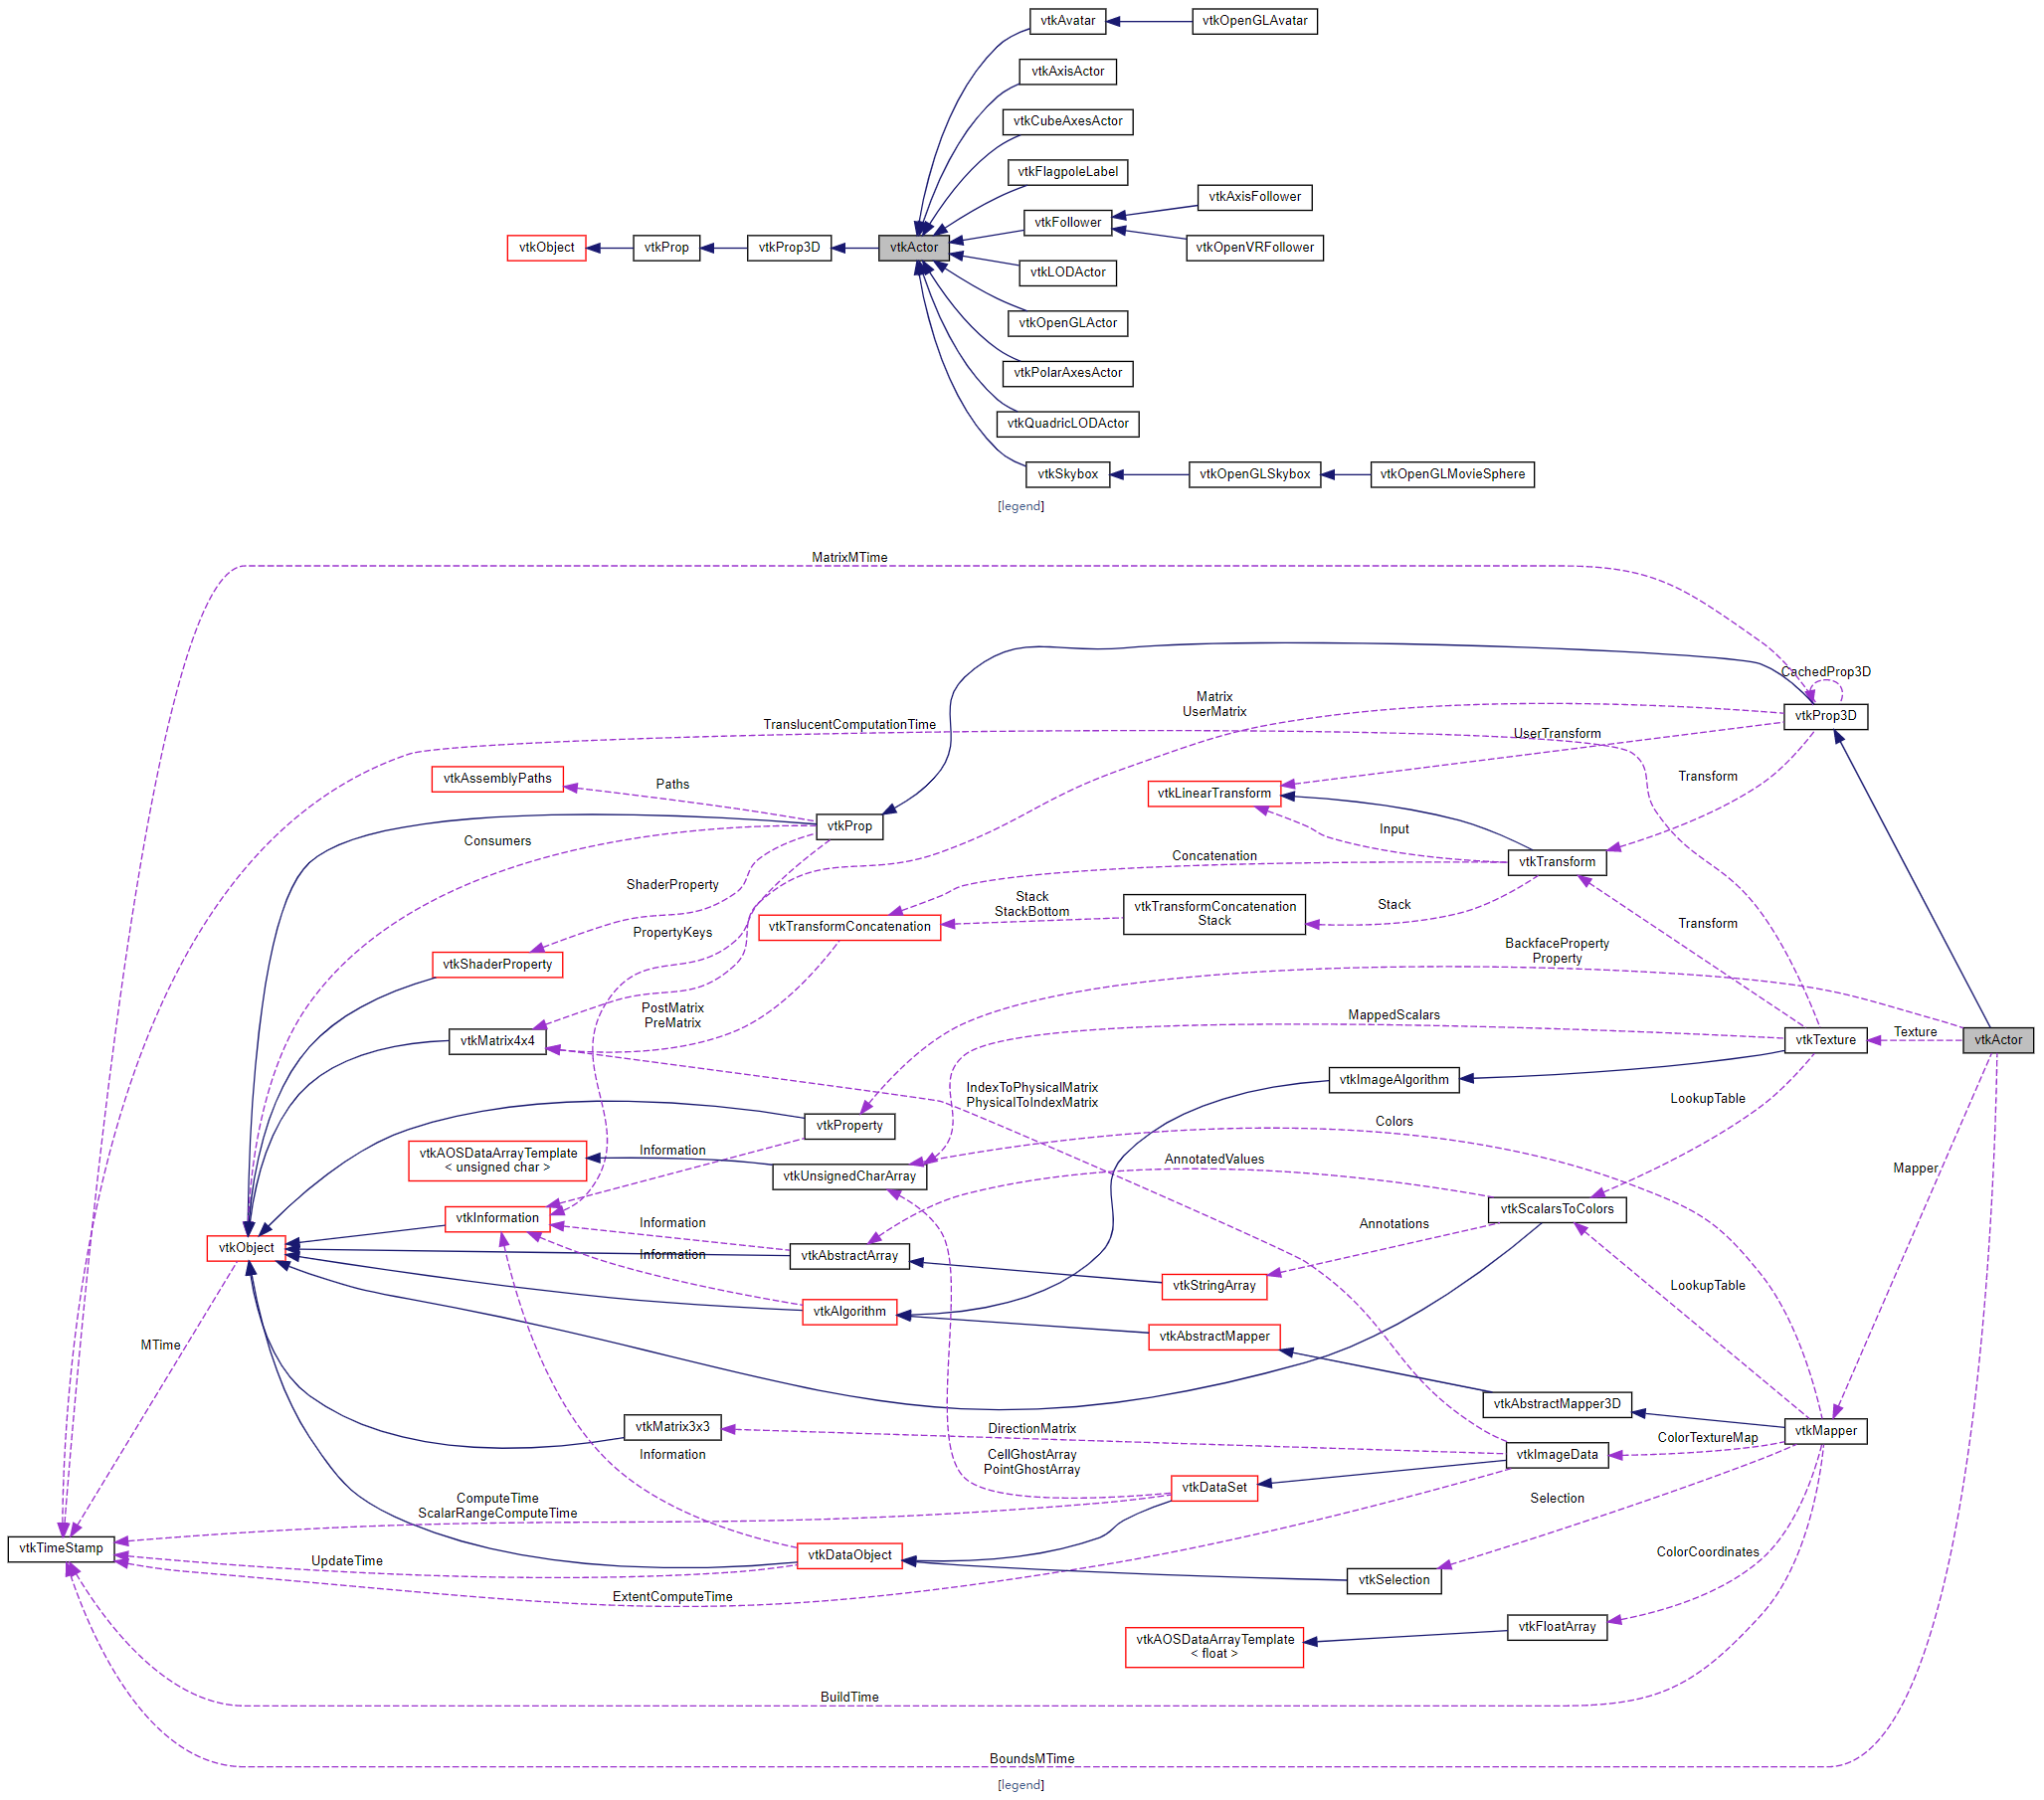
3.4 vtkActor
摘自VTK图形图像开发进阶
该类派生自(vtkProp3D)vtkProp类,渲染场景中数据的可视化表达通过vtkProp的子类负责,比如实例中的Cbue,Cube的数据类型是vtkPolyData,数据要在场景中渲染时,不是直接把数据加入到渲染场景,而是以vtkProp的形式存在于渲染场景中。三维空间中渲染对象最常用的vtkProp子类有vtkActor(表达场景中的几何数据)和vtkVolume(表达场景中的体数据);二维空间中的数据则是用vtkActor2D表达,vtkProp子类扶着确定渲染场景中对象的位置、大小和方向信息;Prop依赖两个对象,一个是Mapper(vtkMapper)对象,负责存放数据和渲染信息;另一个是属性(vtkProperty)对象,负责控制颜色、不透明度等参数。另外vtkActor中还可以设置纹理(vtkTexrure)对象,用于纹理贴图。
VTK定义了大量的Prop,如vtkImageActor(负责图像显示)和vtkPieChartActor(用来创建数组数据的饼图可视化表示形式)。其中有些Prop内部直接包含了控制显示的参数和待渲染数据的索引,因此并不需要额外的Property和Mapper对象,例如vtkAxisActor。vtkActor的子类vtkFollower可以自动更新方向信息,使其始终面向一个特定的相机,这样无论怎样旋转该对象都是可见的,例如三维场景中广告版或者文本。vtkActor的子类vtkLODActor可以自动改变自身的几何表达式来实现所需的交互帧率。vtkAssemble建立了各个Actor的层次结构以便在整个结构平移、旋转或缩放等变换是能够更合理的进行控制。
vtkActor::SetMapper():该方法用于设置生成几何图元的Mapper,即链接一个Actor到可视化管线的末端(Mapper是可视化管线的末端)
3.5 vtkRenderWindow
参考链接:https://vtk.org/doc/nightly/html/classvtkRenderWindow.html
https://blog.csdn.net/qq_38446366/article/details/82787847

摘自VTK图形图像开发进阶
vtkRenderWindow将操作系统与VTK渲染引擎链接到一起。不同平台下的vtkRenderWindow子类负责管理本地计算机系统中窗口创建和渲染过程。当使用VTK开发应用程序是,只需要使用与平台无关的vtkRenderWindow类,程序运行时,系统会自动替换为平台相关的vtkRenderWindow子类。比如Windows下运行程序时,实际创建的是vtkWin32OpenGLRenderWindow对象。
vtkRenderWindow中包含了vtkRenderer集合、渲染参数,如立体显示(Strero)、反走样、运动模糊(Motion Blur)和焦点深度(Focal Depth)等。
vtkRenderWindow::AddRenderer():该方法用于加入vtkRenderer对象。
vtkRenderWindow::SetSize():该方法从vtkRenderWindow的父类vtkWindow继承而来,用于设置窗口的大小,以像素为单位。
3.6 vtkRenderer
摘自VTK图形图像开发进阶
vtkRenderer负责管理场景的渲染过程。组织场景的对象包括Prop、相机(vtkCammera)和光照(vtkLight)都被整合到一个vtkRenderer对象中。一个vtkRenderWindow中可以有多个vtkRenderer对象,而这些vtkRenderer可以选在在窗口不同的矩形区域(即视口)或者覆盖整个窗口区域。
vtkRenderer::AddActor():该方法用于将vtkProp类型的对象添加到渲染场景中。
vtkRenderer::SetBackground():该方法是从vtkRenderer的父类vtkViewport继承的,用于设置渲染场景的背景颜色,用RGB格式设置,取值范围0.0~1.0.
vtkViewport::SetBackgroung2()用于设置简便的另外一种颜色,但是要是背景颜色渐变生效或者关闭,必须调用以下方法
vtkViewport::SetGradientBackground(bool):参数为0是关闭,反之为开
vtkViewport::GradientBackgroundOn():该方法用于打开背景渐变效果,
vtkViewport::GradientBackgroundOff():该方法用户关闭背景渐变效果。
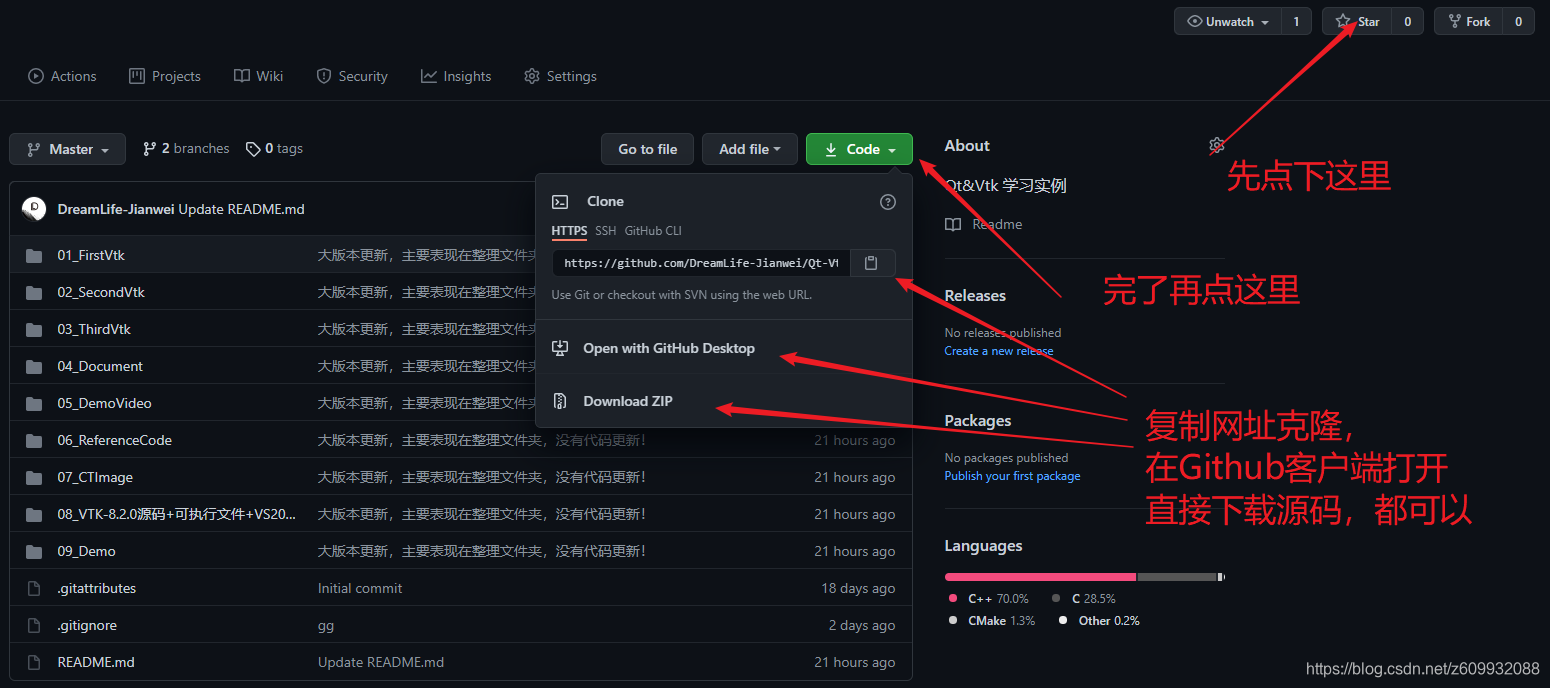
★ 源码 ★

这里就要有人问了呀,这么优秀的代码,能不能分享下呀,当然可以呀,我不生产代码,我只是代码的搬运工,链接如下:


- 点赞
- 收藏
- 关注作者
评论(0)