Android自定义控件(六)——文字波浪加载效果
前面介绍了贝济埃曲线,实现了波浪动画,也介绍了颜色叠加相关模式,比如其中的SRC_OUT模式实现了刮刮乐,今天将反过来以目标图像模式来是实现文字波浪加载动画效果。

1.目标图像模式DST_IN
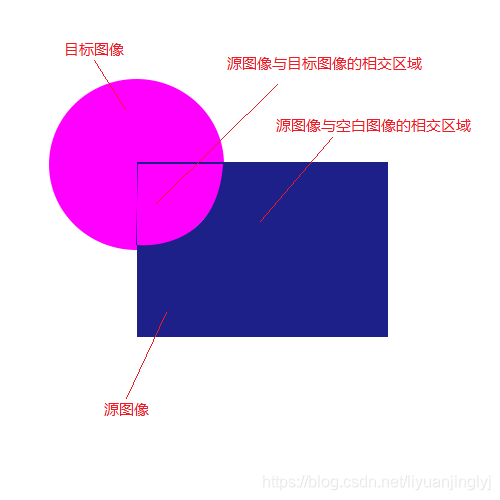
在前面的刮刮乐中,SRC为前缀的所有模式都是以源图像显示为主;今天介绍的模式DST_IN在DST(目标相关模式)中,优先以目标图像为主,也就是说,SRC_IN与DST_IN,只要交换源图像与目标图像,其实实现的效果是相同的。
public PorterDuffXfermode(PorterDuff.Mode mode)
那么什么是DST_IN模式?
Mode.DST_IN是在相交时利用源图像的透明度来改变目标图像的透明度和饱和度的,也就是当源图像透明度为0时,目标图像完全不显示,同理SRC_IN就是把源图像与目标图像反过来。
那么具体可以实现什么效果呢?

比如今天小编要讲解的文字波浪加载效果,假设文字图像为源图像,蓝色波浪为目标图像,那么除文字图像中文字不透明外,其他地方都是透明度为0,也就是波浪目标图像相交的透明区域不会显示,那么波浪就会附着在文字上面显示,形成波浪文字加载效果。
2.实现文字播放加载效果
原理我们已经分析清楚了,接着按照自定义控件步骤,先自定义一个View,然后初始化成员变量,方便后面使用,代码如下:
-
public class TextWaveView extends View {
-
private Paint paint;//画笔工具
-
private Path path;//路径
-
private int waveLength=200;//波长
-
private int dx,dy;//记录动画位置
-
private Bitmap srcBitmap,dstBitmap;//源图像,目标图像
-
public TextWaveView(Context context) {
-
super(context);
-
}
-
-
public TextWaveView(Context context, @Nullable AttributeSet attrs) {
-
super(context, attrs);
-
this.paint=new Paint();
-
this.path=new Path();
-
this.paint.setColor(Color.GREEN);
-
this.paint.setStyle(Paint.Style.FILL_AND_STROKE);
-
this.srcBitmap= BitmapFactory.decodeResource(getResources(),R.drawable.text_name);//获取源图像
-
this.dstBitmap=Bitmap.createBitmap(this.srcBitmap.getWidth(),this.srcBitmap.getHeight(),Bitmap.Config.ARGB_8888);/以源图像大小创建目标图像位图
-
this.startAnim();//这里动画实现
-
}
-
}
上面都是一些自定义View后,所需要做的成员变量初始化,以防止空指针异常。细心的伙伴应该已经看到了,这里有个动画实现,那我们先来实现动画。
这里我们来分析一下,需要实现那些动画?肯定有波浪移动动画,也肯定有波浪慢慢覆盖文字动画,所以我们需要实现两个动画效果,这里为了代码的可读性,小编写成了两个动画,后面会讲解组合动画,代码如下:
-
/***
-
* 动画初始化
-
*/
-
private void startAnim(){
-
ValueAnimator waveAnim=ValueAnimator.ofInt(0,this.waveLength);//波浪动画,一个波长
-
waveAnim.setDuration(2000);//动画事件2秒
-
waveAnim.setRepeatCount(ValueAnimator.INFINITE);//无限循环
-
waveAnim.setInterpolator(new LinearInterpolator());//匀速变化,插值器,可以加速,减速以及自定义
-
waveAnim.addUpdateListener(new ValueAnimator.AnimatorUpdateListener() {
-
@Override
-
public void onAnimationUpdate(ValueAnimator animation) {
-
dx=(Integer)animation.getAnimatedValue();//获取动画进度
-
postInvalidate();//重绘
-
}
-
});
-
//覆盖文字动画
-
ValueAnimator CoverAnim=ValueAnimator.ofInt(0,this.waveLength/4,this.waveLength/4,this.waveLength/3,this.waveLength/3,this.waveLength/2,this.waveLength/2,this.waveLength);
-
CoverAnim.setDuration(5000);//动画事件为5秒
-
CoverAnim.setRepeatCount(ValueAnimator.INFINITE);//无线循环
-
CoverAnim.addUpdateListener(new ValueAnimator.AnimatorUpdateListener() {
-
@Override
-
public void onAnimationUpdate(ValueAnimator animation) {
-
dy=(Integer)animation.getAnimatedValue();//获取动画进度
-
postInvalidate();//重绘
-
}
-
});
-
//开始动画
-
waveAnim.start();
-
CoverAnim.start();
-
}
备注应该非常详细了,这里就不做过多的赘述,接着,我们需要绘制波浪,对于波浪效果的实现,在前面第三节贝济埃曲线中已经详细讲解过了,这里的代码几乎跟那里的代码一模一样,也要用到贝济埃曲线rQuadTo()函数,代码如下:
-
***
-
* 绘制波浪
-
*/
-
private void drawWavePath(){
-
this.path.reset();//清除之前绘制的path
-
int originY=this.srcBitmap.getHeight()/2;
-
int halfLength=this.waveLength/2;
-
//设置波浪起始点,加上动画的偏移量,形成动画效果
-
this.path.moveTo(-this.waveLength+dx,originY-dy);
-
//循环设置整个屏幕+waveLength长的波浪
-
for(int i=-this.waveLength;i<=getWidth()+this.waveLength;i+=this.waveLength){
-
//两句代码组成一个波长,中间到波峰在到中间是第一个rQuadTo,中间到波谷到中间是第二rQuadTo
-
this.path.rQuadTo(halfLength/2,-50,halfLength,0);
-
this.path.rQuadTo(halfLength/2,50,halfLength,0);
-
}
-
//闭合区域
-
this.path.lineTo(this.srcBitmap.getWidth(),this.srcBitmap.getHeight());
-
this.path.lineTo(0,this.srcBitmap.getHeight());
-
this.path.close();
-
}
这里面的注释也很多,但是如果你还不理解贝济埃曲线,可以前往该专栏第三篇《Android自定义控件(三)——贝济埃曲线与水波纹动画》那里,详细原理那里都有。接着该把实现的水波纹以及文字都绘制到屏幕上,下面我们实现OnDraw()函数,代码如下:
-
protected void onDraw(Canvas canvas) {
-
super.onDraw(canvas);
-
drawWavePath();//绘制波纹
-
Canvas c=new Canvas(this.dstBitmap);
-
c.drawColor(Color.BLACK, PorterDuff.Mode.CLEAR);
-
c.drawPath(this.path,this.paint);//将波纹绘制到目标图像上
-
canvas.drawBitmap(this.srcBitmap,0,0,this.paint);//绘制源图像
-
//离屏绘制的代码在canvas.save与canvas.restoreToCount中间
-
int layerId=canvas.saveLayer(0,0,getWidth(),getHeight(),null,Canvas.ALL_SAVE_FLAG);
-
canvas.drawBitmap(this.dstBitmap,0,0,this.paint);//首先绘制目标图像
-
this.paint.setXfermode(new PorterDuffXfermode(PorterDuff.Mode.DST_IN));//设置画笔的图像模式
-
canvas.drawBitmap(this.srcBitmap,0,0,this.paint);//绘制源图像
-
this.paint.setXfermode(null);//设置画笔的图像模式为空
-
canvas.restoreToCount(layerId);
-
}
备注:Xfermode的混合模式,先后画出目标图层与源图层,记住,这个顺序不能变,不管是SRC源图像模式,还是DST目标图像模式,这个都是永恒不变的。
最后就是XML代码,无非也就是想引用其他控件一样直接使用自定义控件,代码如下:
-
<LinearLayout xmlns:android="http://schemas.android.com/apk/res/android"
-
android:orientation="vertical"
-
xmlns:tools="http://schemas.android.com/tools"
-
android:layout_width="match_parent"
-
android:layout_height="match_parent"
-
tools:context=".MainActivity">
-
-
<com.liyuanjinglyj.textwaveapplication.TextWaveView
-
android:layout_width="match_parent"
-
android:layout_height="wrap_content"/>
-
-
</LinearLayout>
Github下载地址:点击下载
文章来源: liyuanjinglyj.blog.csdn.net,作者:李元静,版权归原作者所有,如需转载,请联系作者。
原文链接:liyuanjinglyj.blog.csdn.net/article/details/103111603
- 点赞
- 收藏
- 关注作者


评论(0)