四十二、开始Vuex的学习:如何在Vue中使用Vuex

@Author:Runsen
@Date:2020/7/12
人生最重要的不是所站的位置,而是内心所朝的方向。只要我在每篇博文中写得自己体会,修炼身心;在每天的不断重复学习中,耐住寂寞,练就真功,不畏艰难,奋勇前行,不忘初心,砥砺前行,人生定会有所收获,不留遗憾 (作者:Runsen )
作者介绍:Runsen目前大三下学期,专业化学工程与工艺,大学沉迷日语,Python, Java和一系列数据分析软件。导致翘课严重,专业排名中下。.在大学60%的时间,都在CSDN。决定今天比昨天要更加努力。我的征途是星辰大海!
今天,我们开始了Vuex的学习。Vuex用白话来说,就是帮我们存储一下多个组件共享的数据,方便我们对其读取和更改。
Vuex的简介
Vuex 是专门为 Vue.js 设计的状态管理库,它集中存储,管理所有组件的状态;通过前面的学习,我们知道父组件要把值传递给子组件的时候,可以通过 props 来传递,子组件要把值传递给父组件的时候,可以通过事件的形式来实现,而对于兄弟组件来说,就需要用到 Vuex 来实现了。也就是一个组件把值放入到 Vuex 中,另一个组件从中取值从而实现参数传递的效果。
Vuex的五大特性:状态state、计算属性getter、同步行为mutation、异步行为action、模块module
- state:用于存储数据,类似vue实例的data属性。
- mutations:用于递交更改,对state对象中的属性数据进行更改。
- actions:用于进行递交异步更改,通过调用mutations实现对数据的更改。
- getters:可以认为是store的计算属性;与计算属性一样,getter的返回值会根据它的依赖缓存起来,且只有当它的依赖值发生变化才会被重新计算
- mapGetters:辅助函数,将 store 中的 getter 映射到局部计算属性:
- module:将 store 分割成模块(module)。每个模块拥有自己的 state、mutation、action、getter、甚至是嵌套子模块——从上至下进行同样方式的分割
Vuex的安装
下面我们创建Vue项目

创建的目录如下所示。
下面要执行npm install vuex --save 命令安装 Vuex,要注意的是这里一定要加上 –save,因为你这个包我们在生产环境中是要使用的。
引入 Vuex挂载到vue对象
先通过官方提供的一个计数器的示例来引入 Vuex 的使用,具体实现步骤如下,在 src 文件夹下新建 store 文件夹,意思为数据仓库,里面存放了整个项目需要的共享数据,在 store 下新建 index.js
index.js代码如下。
import Vue from 'vue'
import Vuex from 'vuex'
//使用vuex
Vue.use(Vuex)
//导出store
export default new Vuex.Store({
  state: { count: 0
  },
  //组件通过dispatch方法触发actions里面的countAdd方法,然后actions提交mutations里面的countAdd方法。
  actions: {
  //接收组件传过来的参数num,Action 函数接受一个与 store 实例具有相同方法和属性的 context 对象 countAdd(context,num){ context.commit('countAdd',num) }
  },
  mutations: {
  //传入一个state对象,接收传过来的参数num countAdd(state,num){ state.count+=num }
  }
})
- 1
- 2
- 3
- 4
- 5
- 6
- 7
- 8
- 9
- 10
- 11
- 12
- 13
- 14
- 15
- 16
- 17
- 18
- 19
- 20
- 21
- 22
- 23
这里顺便主要介绍下store文件夹中的四个js文件。
index.js //存储状态 并建立依赖关系
actions.js //触发mutations中的方法 请求数据写在这里
getters.js //状态获取逻辑
mutations.js //操作逻辑
- 1
- 2
- 3
- 4
创建Vuex的实例 new Vuex.store(),然后再main.js将vuex实例挂载到vue对象。接下来,在main.js中引入store,这里我导入了router,router在下篇文章中介绍。
下面就是main.js代码
// The Vue build version to load with the `import` command
// (runtime-only or standalone) has been set in webpack.base.conf with an alias.
import Vue from 'vue'
import store from './store/index' // 引入store
import router from './router'

import App from './App'

Vue.config.productionTip = false
/* eslint-disable no-new */
new Vue({
  el: '#app',
  store,
  router,
  components: { App },
  template: '<App/>'
})
- 1
- 2
- 3
- 4
- 5
- 6
- 7
- 8
- 9
- 10
- 11
- 12
- 13
- 14
- 15
- 16
- 17
- 18
执行npm run dev跑起来
兄弟组件
Vuex的作用就是在兄弟组件共享数据。
下面新建组件Child1.vue,代码如下。
<template>
  <div class="child-1"> <p>Child1:{{count}}</p> <button @click="handleClick(1)">Child1-Add</button> </div>
</template>

<script>
export default {
  name: 'Child1',
  data () { return { //我们不再将数据放到组件里 //count: 0 }
  },
  //通过计算属性来获得count
  computed: { count: function(){ //通过vue的this.$store来获得state return this.$store.state.count }
  },
  methods: { handleClick:function(num){ //通过dispatch触发actions中的方法countAdd,actions提交mutations,num是携带的参数 this.$store.dispatch('countAdd',num) }
  }
}
</script>
<style scoped>
</style>
- 1
- 2
- 3
- 4
- 5
- 6
- 7
- 8
- 9
- 10
- 11
- 12
- 13
- 14
- 15
- 16
- 17
- 18
- 19
- 20
- 21
- 22
- 23
- 24
- 25
- 26
- 27
- 28
- 29
- 30
- 31
- 32
- 33
- 34
下面新建组件Child2.vue,代码如下。
<template>
  <div class="child-2"> <p>Child2:{{count}}</p> <button @click="handleClick(10)">Child2-Add</button>
  </div>
</template>

<script>
export default {
  name: 'Child2',
  data () { return { //count: 0 }
  },
  //通过计算属性来获得count
  computed: { count: function(){ //通过vue的this.$store来获得state return this.$store.state.count }
  },
  methods: { handleClick:function(num){ //通过dispatch触发actions中的方法countAdd,actions提交mutations,num是携带的参数 this.$store.dispatch('countAdd',num) }
  }
}
</script>
<style scoped>

</style>
- 1
- 2
- 3
- 4
- 5
- 6
- 7
- 8
- 9
- 10
- 11
- 12
- 13
- 14
- 15
- 16
- 17
- 18
- 19
- 20
- 21
- 22
- 23
- 24
- 25
- 26
- 27
- 28
- 29
- 30
- 31
- 32
- 33
最后,新建组件Parent.vue,然后在路由中引过去,指定上面的两个components。
<template>
  <div class="parent"> <child-1></child-1> <child-2></child-2>
  </div>
</template>

<script>
import Child1 from './Child1'
import Child2 from './Child2'
export default {
  name: 'Parent',
  data () { return { }
  },
  components: { Child1, Child2
  }
}
</script>

<!-- Add "scoped" attribute to limit CSS to this component only -->
<style scoped>
</style>
- 1
- 2
- 3
- 4
- 5
- 6
- 7
- 8
- 9
- 10
- 11
- 12
- 13
- 14
- 15
- 16
- 17
- 18
- 19
- 20
- 21
- 22
- 23
- 24
- 25
- 26
- 27
路由编写
关于router直接是没有介绍的,其实我在创建项目的时候选择了router路由。路由就是指定路径和组件的,index代码如下。
import Vue from 'vue'
import Router from 'vue-router'
import Parent from '@/components/Parent'

Vue.use(Router)

export default new Router({
  routes: [ { path: '/', name: 'Parent', component: Parent }
  ]
})
- 1
- 2
- 3
- 4
- 5
- 6
- 7
- 8
- 9
- 10
- 11
- 12
- 13
- 14
- 15
下面就是最终的目录模块。
最终效果就是点击第一个按钮加一,第二个加10的效果。
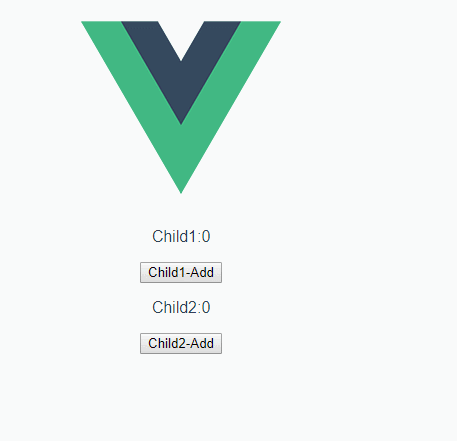
相信写到这里,我i应该对vuex有了更加清楚的理解了。
文章来源: maoli.blog.csdn.net,作者:刘润森!,版权归原作者所有,如需转载,请联系作者。
原文链接:maoli.blog.csdn.net/article/details/107256911

- 点赞
- 收藏
- 关注作者
评论(0)