SpringBoot+Vue后台管理系统整合Kaptcha验证码
【摘要】 SpringBoot+Vue后台管理系统整合Kaptcha验证码
1、导入Kaptcha依赖
<dependency>
  <groupId>com.github.penggle</groupId>
  <artifactId>kaptcha</artifactId>
  <version>2.3.2</version>
</dependency>
2、配置Config类
@Configuration
public class KaptchaConfig {
    @Bean
    public DefaultKaptcha defaultKaptcha() {
        DefaultKaptcha defaultKaptcha = new DefaultKaptcha();
        Properties properties = new Properties();
        // 字体
        properties.setProperty(Constants.KAPTCHA_TEXTPRODUCER_FONT_NAMES, "宋体,楷体,微软雅黑");
        properties.setProperty(Constants.KAPTCHA_BORDER, "no");

        Config config = new Config(properties);
        defaultKaptcha.setConfig(config);
        return defaultKaptcha;
    }

}
3、配置Controller
@RestController
@CrossOrigin  //跨域
public class KaptchaController {
    @Autowired
    private DefaultKaptcha defaultKaptcha;

    @Autowired
    RedisTemplate redisTemplate;

    @GetMapping("/createImageCode")
    public void createImageCode(HttpServletRequest request,HttpServletResponse response) throws IOException {
        response.setHeader("Cache-Control", "no-store, no-cache");
        response.setContentType("image/jpeg");

        // 生成文字验证码
        String text = defaultKaptcha.createText();
        // 生成图片验证码
        BufferedImage image = defaultKaptcha.createImage(text);
        // 这里我们使用redis缓存验证码的值,并设置过期时间为60秒
        redisTemplate.opsForValue().set("imageCode",text,60, TimeUnit.SECONDS);

        ServletOutputStream out = response.getOutputStream();
        ImageIO.write(image, "jpg", out);
        out.flush();
        out.close();
    }
}
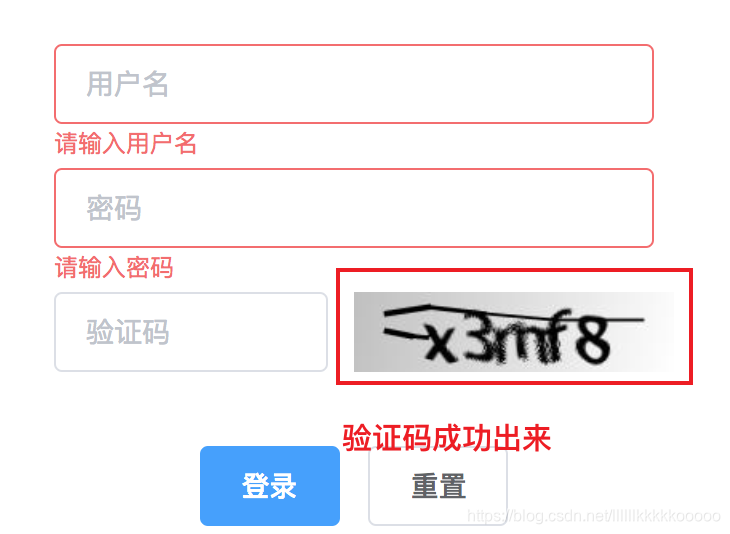
4、Vue前端表单代码
<el-form :model="ruleForm" :rules="rules" ref="ruleForm">
<el-form-item prop="username">
<el-input placeholder="用户名" v-model="ruleForm.username"></el-input>
</el-form-item>
<el-form-item prop="password">
<el-input placeholder="密码" type="password" v-model="ruleForm.password"></el-input>
</el-form-item>
<el-form-item prop="code">
<el-col :span="11">
<el-input placeholder="验证码" v-model="ruleForm.code"></el-input>
</el-col>
<el-col class="line" :span="1"> </el-col>
<el-col :span="8">
<!--加载验证码-->
<img width="160px" onclick="this.src='http://localhost:8888/createImageCode?d='+new Date()*1" src="http://localhost:8888/createImageCode"/>
</el-col>
</el-form-item>
<el-form-item class="ms-btn">
<el-button type="primary" @click="submitForm('ruleForm')">登录</el-button>
<el-button @click="resetForm('ruleForm')">重置</el-button>
</el-form-item>
</el-form>
表单提交
methods: {
      submitForm(formName) {
        let params = new URLSearchParams();
        params.append("username",this.ruleForm.username)
        params.append("password",this.ruleForm.password)
        params.append("code",this.ruleForm.code)

        getLoginStatus(params)
        .then(res => {
          console.log(res)
          if (res.code == 200) {
            localStorage.setItem("userName",this.ruleForm.username)
            this.notify("登陆成功","success")
            this.$router.push("/Info")
          }else {
            get("/createImageCode")
            //局部刷新
            this.reload()
            this.$message.error(res.message);
          }
        })
      }

刷新页面,验证码也会刷新,而且Redis也成功缓存了验证码的值

Redis成功缓存验证码的值

本篇博文到此结束,觉得不错的小伙伴可以==一键三连哦!==,感谢支持!!!
【版权声明】本文为华为云社区用户原创内容,未经允许不得转载,如需转载请自行联系原作者进行授权。如果您发现本社区中有涉嫌抄袭的内容,欢迎发送邮件进行举报,并提供相关证据,一经查实,本社区将立刻删除涉嫌侵权内容,举报邮箱:
cloudbbs@huaweicloud.com
- 点赞
- 收藏
- 关注作者


评论(0)