[转]Pytest测试框架介绍

Pytest测试框架介绍(https://medium.com/testcult/intro-to-test-framework-pytest-5b1ce4d011ae)
在本文中,我们将学习 pytest(https://docs.pytest.org/en/latest/),一个基于 python 的测试框架。
在继续前进之前,建议阅读本系列的第1部分,该部分解释了自动化的基础知识-
API 自动化入门: 第1部分-概述
所以你想开始自动化 api,但是,每次你在 google 上搜索最好的 api 自动化工具,你会看到这么多..
Step 1: Installation-
第一步: 安装 -
我们需要安装 python,版本2或3支持两个版本。随着 Python 的安装而来的是 pip ——一个用于安装和管理 Python 编写的软件包的包管理系统。
要安装 pytest,我们将使用 pip 命令-
pip install pytest就这样,pytest 已经安装,我们可以继续使用 pytest 编写测试。
Step 2: Pytest syntax for writing tests-
步骤2: 编写测试的 Pytest 语法-
- “ 文件名应以“test 测试”, as in ”,比如
test_example.pyor 或example_test.py. - the 如果测试定义为类上的方法,则class name 类名 “ 应该从“Test 测试”, as in ”,比如
TestExample.。类不应该有一个__init__method. 方法 - 测试方法名或函数名 应该从“test_ 测试”, 比如
test_example. 名称与此模式不匹配的方法不会作为测试执行
现在,我们已经清楚了命名约定,让我们创建项目目录-
- demo_tests/
    - test_example.py
Step 3: Write basic tests in pytest
步骤3: 在 pytest 中编写基本测试
在 test _ example.py 文件中,让我们编写一个非常简单的函数 sum,它接受两个参数 num1和 num2并返回它们的和。
def sum(num1, num2):
    """It returns sum of two numbers"""
    return num1 + num2
现在我们将编写测试来测试 sum 函数-
import pytest#make sure to start function name with test
def test_sum():
    assert sum(1, 2) == 3
要运行这个测试,遍历 demo _ tests 目录并运行命令:
#It will find all tests inside file test_example.py and run them
pytest test_example.py

在这里,每个点代表一个测试用例。由于我们现在只有一个测试用例,我们可以看到1点,它通过在0.01秒。
要获得关于测试运行的更多信息,请使用上面的命令 -v (verbose)选项。
pytest test_example.py -v在 test _ example.py 文件中添加一个测试,它将测试函数 sum 给出的输出类型即整数。
def test_sum_output_type():
assert type(sum(1, 2)) is int现在,如果我们再次运行测试,我们将得到两个测试的输出,以及test_sum 和 test_sum_output_type

到目前为止,我们已经看到了所有通过的测试,让我们将test_sum assertion 更改为 fail-
def test_sum():
    assert sum(1, 2) == 4
这将给出结果和失败的原因,我们预期和(1,2)是3等于4。

这包括 pytest 的基本知识。现在我们将深入研究一些高级的概念,这些概念使得 pytest 中的测试编写更加强大。
Step 4: Parametrizing test methods
第四步: 参数化测试方法
如果您查看我们的 test_sum 函数,它只使用一组输入(1,2)测试我们的 sum 函数,并且测试是使用这个值进行硬编码的。
覆盖更多场景的更好方法是将测试数据作为参数传递给我们的测试函数,然后断言预期的结果。
让我们修改 test_sum 函数来使用参数。
import pytest@pytest.mark.parametrize('num1, num2, expected', [(3,5,8)])
def test_sum(num1, num2, expected):
        assert sum(num1, num2) == expected
内建的 pytest.mark.parametrize(https://docs.pytest.org/en/latest/reference.html#pytest-mark-parametrize-ref) decorator 允许对测试函数的参数进行参数化
- argnames 阿尔戈名 —ー一个逗号分隔的字符串,表示一个或多个参数名称,或参数字符串的列表/元组
num1,num2and 及expectedas 1st input , 2nd input and expected sum respectively. 分别作为第一输入、第二输入和期望和 - argvalues 阿尔格值 — argvalues 列表决定了使用不同参数值调用测试的频率。如果只指定了一个 argname 值,那么就是一个值列表。如果指定了 n 个 argnames,则 argvalues 必须是 n-tuple 的列表,其中每个 tuple 元素为其各自的 argname 指定一个值。在这里,我们传递了一个元组
(3,5,8)inside a list where 在一个名单里3is 是num1,5is 是num2and 及8is 是expected sum.
Here, the @parametrize decorator defines one (num1, num2, expected) tuple so that the test_sum function will run one time.
在这里,@parametrize decorator 定义了一个(num1,num2,expected)元组,以便 test _ sum 函数运行一次。

我们可以在上面示例中作为第二个参数传递的列表中添加几个元组(num1,num2,expected)。
import pytest@pytest.mark.parametrize('num1, num2, expected',[(3,5,8),              (-2,-2,-4), (-1,5,4), (3,-5,-2), (0,5,5)])
def test_sum(num1, num2, expected):
assert sum(num1, num2) == expected此测试test_sumtest 将对上述参数运行5次

在上面的代码中,我们已经直接传递了第二个参数的值(这是实际的测试数据)。我们也可以调用函数来获取这些值。
import pytestdef get_sum_test_data():
        return [(3,5,8), (-2,-2,-4), (-1,5,4), (3,-5,-2), (0,5,5)]@pytest.mark.parametrize('num1, num2, expected',get_sum_test_data())
def test_sum(num1, num2, expected):
        assert sum(num1, num2) == expected
这也会得到与上面相同的结果。
Step 5: Use of Fixtures
第五步: 使用装置
根据官方 pytest 文档: 测试装置的目的(http://en.wikipedia.org/wiki/Test_fixture#Software)是提供一个固定的基线,在这个基线上测试可以可靠地重复执行。
Fixture 可用于在测试之间共享测试数据,分别在测试执行之前和之后执行 setup 和 teardown 方法。
为了理解 fixture,我们将重写上面的test_sum 函数,并利用 fixture 获得测试数据-
import pytest@pytest.fixture
def get_sum_test_data():
        return [(3,5,8), (-2,-2,-4), (-1,5,4), (3,-5,-2), (0,5,5)]def test_sum(get_sum_test_data):
        for data in get_sum_test_data:
                num1 = data[0]
                num2 = data[1]
                expected = data[2]
                assert sum(num1, num2) == expected
这将给出输出-

如果查看上面的测试结果,您可能会怀疑测试是否运行了所有的值,因为从测试运行来看并不清楚。因此,让我们更改其中一个测试数据以包含错误并重新运行测试。

Scope of fixture—— Scope 控制 fixture 被调用的频率。默认是函数。以下是scope的选项:
- function: 功能:Run once per test 每次测试运行一次
- class: 类别:Run once per class of tests 每类测试运行一次
- module: 模块:Run once per module 每个模块运行一次
- session: 会议:Run once per session 每个会话运行一次
从最低到最高的可能范围是:
function < class <module<session.
Fixture 可以标记为 autouse=True,这将使您的套件中的每个测试默认使用它。
现在,我们将使用 fixture 来编写 setup_and_teardown 函数。Setup 函数在测试开始前从数据库中读取一些数据,teardown 函数在测试结束后将测试运行数据写入数据库。为了简单起见,我们的 setup_and_teardown 函数只是打印一条消息。
注意 setup 和 teardown 中的产量,任何在 yieldis 执行后写的代码都是在测试执行结束后写的。
@pytest.fixture(scope='session')
def get_sum_test_data():
        return [(3,5,8), (-2,-2,-4), (-1,5,4), (3,-5,-2), (0,5,5)]@pytest.fixture(autouse=True)
def setup_and_teardown():
        print '\nFetching data from db'
        yield
        print '\nSaving test run data in db'def test_sum(get_sum_test_data):
        for data in get_sum_test_data:
                num1 = data[0]
                num2 = data[1]
                expected = data[2]
                assert sum(num1, num2) == expected
还要注意,我们没有传递 setup _ 和 teardown 作为 test _ sum 函数的参数,因为 autusse = True 已经在 fixture 定义中设置了。因此,它将在每次测试运行之前和之后自动调用。我们现在需要使用-s 选项运行测试以打印到 stdout。
pytest test_example.py -v -s
Step 6: Test case Markings
第六步: 测试用例标记
Pytest 允许标记测试,然后有选择地运行它们。
通过使用 pytest.mark 助手,您可以轻松地在测试函数上设置元数据。有一些内置的标记,例如:
- skip 跳过 — always skip a test function 总是跳过测试函数
- skipif 船长 — skip a test function if a certain condition is met ー如符合某些条件,则跳过测试功能
- xfail — produce an “expected failure” outcome if a certain condition is met ー如符合某项条件,便会产生「预期失败」的结果
- parametrize 护理 to perform multiple calls to the same test function. ( 对同一个测试函数执行多个调用We already discussed this above. 我们在上面已经讨论过了)
在上面的例子中,我们可以将第一个测试函数标记为慢,并且只运行该函数。
@pytest.mark.slow
def test_sum():
    assert sum(1, 2) == 3def test_sum_output_type():
    assert type(sum(1, 2)) is int
现在,要在文件 test _ example.py 中只运行标记为慢的测试,我们将使用-
pytest test_example.py -m slowStep 7: Cheatsheet to run pytest with different options
第七步: 使用不同的选项运行 pytest
# keyword expressions
# Run all tests with some string ‘validate’ in the name
pytest -k “validate”# Exclude tests with ‘db’ in name but include 'validate'
pytest -k “validate and not db” #Run all test files inside a folder demo_tests
pytest demo_tests/# Run a single method test_method of a test class TestClassDemo
pytest demo_tests/test_example.py::TestClassDemo::test_method# Run a single test class named TestClassDemo
pytest demo_tests/test_example.py::TestClassDemo# Run a single test function named test_sum
pytest demo_tests/test_example.py::test_sum# Run tests in verbose mode:
pytest -v demo_tests/# Run tests including print statements:
pytest -s demo_tests/# Only run tests that failed during the last run
pytest — lf
这将介绍 pytest 的基础知识,在阅读本文之后,您应该可以开始使用 pytest 在 python 中编写测试了。
您可以在我的 github repo 中找到所有使用的👉代码(https://github.com/shashikumarraja/pytest_tutorial)。
Pytest 特性,你在你的(测试)生活中需要(https://martinheinz.dev/blog/7)
测试代码是开发的一个组成部分,质量测试可以为您节省很多麻烦。有很多关于用 Python 进行测试和用 Pytest 进行测试的指南,但是有一些特性我很少在任何地方看到,但是我经常需要。所以,这里列出了 Pytest 的一系列技巧和特性,这些是我离不开的(而且你也不能很快离开)。
例外测试
import pytest

def test_my_function():
    with pytest.raises(Exception, match='My Message') as e:
        my_function()
        assert e.type is ValueError
让我们从简单的开始。你有一个抛出异常的函数,你需要确保它在正确的条件下发生并包含正确的消息: import Pytest def test _ My _ function () : with Pytest.raises (Exception,match = ‘ My Message’) as e: My _ function () assert. type is ValueError 这里我们可以看到 Pytest 为我们提供的简单上下文管理器。它允许我们指定应该引发的异常类型以及异常的消息。如果在块中没有引发异常,则测试失败。当上下文管理器返回 ExceptionInfo 类时,您还可以检查异常的更多属性,该类具有类型、值或回溯等属性。
过滤警告
With exceptions out of the way, let's look at warnings. Sometimes you get bunch of warning messages in your logs from inside of libraries that you use. You can't fix them and they really just create unnecessary noise, so let's get rid of them:
import warnings
from sqlalchemy.exc import SADeprecationWarning

def test_my_function():
    # SADeprecationWarning is issued by SQLAchemy when deprecated API is used
    warnings.filterwarnings("ignore", category=SADeprecationWarning)
    ...
    assert ...

def test_my_function():
    with warnings.catch_warnings(record=True) as w:
        warnings.simplefilter("ignore")  # ignore annoying warnings
        ...
        assert ...
    # warnings restored
除了例外情况,让我们看看警告。有时候你会从你使用的库中得到一堆警告消息。您不能修复它们,它们实际上只是创建了不必要的噪音,所以让我们摆脱它们: 从 sqlalchemy 导入警告。Exc import SADeprecationWarning def test _ my _ function () : # SADeprecationWarning 由 sqllachemy 在使用已弃用的 API 警告时发出。Filterwarnings (“ ignore”,category = SADeprecationWarning) . 。。断言...使用警告来测试 _ my _ function () :。Catch _ warnings (record = True)为 w: warnings。Simplefilter (“ ignore”) # ignore annoying warnings..。。断言...# 警告恢复在这里我们展示了两种方法-在第一种方法中,我们直接忽略指定类别的所有警告,通过在过滤器列表前面插入一个过滤器。这将导致您的程序忽略此类别的所有警告,直到它终止,这可能不总是可取的。对于第二种方法,我们使用上下文管理器,在退出其作用域后恢复所有警告。我们还指定 record = True,以便在需要时检查已发出(忽略)警告的列表。
测试标准输出和标准错误消息
接下来,让我们看看下面的场景: 您有一个命令行工具,它具有一些函数,可以将消息打印到标准输出,但是不返回任何内容。那么,我们如何测试呢?Def Test _ my _ function (capsys) : my _ function () # function that prints stuff Capture = capsys.readouterr () # Capture output assert f“ Received invalid message...”in captured.out # Test stdout assert f“ Fatal error...”in captured.err # Test stderr 为了解决这个问题,Pytest 提供了一个名为 capsys 的 fixture,它可以捕获系统输出。所有您需要使用它的,是添加它作为参数到您的测试函数。接下来,在调用正在测试的函数之后,以 tuple-(out,err)的形式捕获输出,然后可以在 assert 语句中使用它。
修补对象
from unittest import mock

def test_my_function():
    with mock.patch('module.some_function') as some_function:  # Used as context manager
        my_function()  # function that calls `some_function`

        some_function.assert_called_once()
        some_function.assert_called_with(2, 'x')

@mock.patch('module.func')  # Used as decorator
def test_my_function(some_function):
    module.func(10)  # Calls patched function
    some_function.assert_called_with(10)  # True
from unittest import mock
def test_my_function():
with mock.patch.object(SomeClass, 'method_of_class', return_value=None) as mock_method:
instance = SomeClass()
instance.method_of_class('arg')
mock_method.assert_called_with('arg') # True
def test_my_function():
r = Mock()
r.content = b'{"success": true}'
with mock.patch('requests.get', return_value=r) as get: # Avoid doing actual GET request
some_function() # Function that calls requests.get
get.assert_called_once()有时在测试时,您可能需要替换被测试函数中使用的对象,以提供更可预测的数据集,或者避免该函数访问可能不可用的资源。Patch 可以帮助你: from unittest import mock def test _ my _ function () : with mock.patch (‘ module.some _ function’) as some _ function: # Used as context manager my function () # function that calls‘ some _ function’some _ function。Assert _ called _ once () some _ function.Assert _ called _ with (2,‘ x’)@mock。Patch (‘ module.func’) # 用作 decorator def test _ my _ function (some _ function) : module.func (10) # 调用 patched function some _ function。Assert _ called with (10) # True 在第一个例子中,我们可以看到可以对函数进行补丁,然后检查它们被调用了多少次以及使用了哪些参数。这些补丁还可以以 decorator 和 context manager 的形式进行堆叠。现在,有了一些更强大的用途: 从 unittest import mock def test _ my _ function () : with mock.patc.object (SomeClass,‘ method _ of _ class’,return _ value = None) as mock _ method: instance = SomeClass () instance.method _ of _ class (‘ arg’) mock _ method。Assert _ called _ with (‘ arg’) # True def test _ my _ Function () : r = Mock () r.content = b’{“ success”: True }’with Mock.patch (‘ requests.GET’,return _ value = r) : # Avoid 执行实际的 GET request some _ Function () # Function that calls requests.GET。在第二个更实际的例子中,我们通过替换 requests.get,使它返回我们提供合适数据的对象,从而避免依赖于远程 API/资源。
Mock 模块还可以为您做很多事情,其中一些非常疯狂——包括副作用、 mocking 属性、模仿不存在的属性等等。如果您在编写测试时遇到问题,那么您肯定应该签出这个模块的文档,因为您很可能会在那里找到解决方案。
Sharing Fixtures with 共用固定装置conftest.py
如果您编写了大量的测试,那么在某个时候您会意识到将所有 Pytest fixture 集中在一个地方是很好的,您可以从中导入它们,从而在测试文件之间共享它们。这可以通过 conftest.py 来解决。
Py 是一个驻留在测试目录树底部的文件。在这个文件中,您可以存储所有的测试装置,然后由 Pytest 自动发现它们,因此您甚至不需要导入它们。
如果您需要在多个测试之间共享数据,这也很有帮助——只需创建返回测试数据的 fixture 即可
另一个有用的特性是能够指定 fixture 的范围——这在创建非常昂贵的 fixture 时非常重要,例如到数据库的连接(会话范围)和在其他范围的连接需要在每个测试用例(功能范围)之后重置。治具范围的可能值是: 函数、类、模块、包和会话。
辅助设备
import pytest, os

@pytest.fixture(scope='function')
def reset_sqlite_db(request):
    path = request.param  # Path to database file
    with open(path, 'w'): pass
    yield None
    os.remove(path)

@pytest.mark.parametrize('reset_sqlite_db', ['/tmp/test_db.sql'], indirect=True)
def test_send_message(reset_sqlite_db):
    ...  # Perform tests that access prepared SQLite database
我们已经在上面的例子中讨论了 fixture,所以让我们再深入一点。如果您想通过参数化来创建一个更通用的 fixture,该怎么办?Import pytest,os@pytest.Fixture (scope = ‘ function’) def reset _ sqlite _ db (request) : Path = request.param # Path to database file with open (Path,‘ w’) : pass yield None os.remove (Path)@pytest。参数化(‘ reset _ SQLite _ db’,[’/tmp/test _ db.sql’] ,indirect = True) def test _ send _ message (reset _ SQLite _ db) : ... # Perform test that access prepared SQLite database Above 是一个 fixture 示例,它为每个测试准备 SQLite 测试数据库。这个 fixture 接收数据库的路径作为参数。这个路径使用 request 对象传递给 fixture,属性 param 是传递给 fixture 的所有参数的迭代,在这个例子中只有一个-路径。在这里,这个 fixture 首先创建数据库文件(为了清晰起见,还可以填充它省略) ,然后执行测试,测试完成后,fixture 删除数据库文件。
至于测试本身,我们使用@pytest。使用3个参数进行参数化——第一个是 fixture 的名称,第二个是 fixture 的参数值列表,它将成为 request.param,最后是 keyword argument indirect = True,它将导致参数值出现在 request.param 中。
我们需要做的最后一件事情是添加 fixture 作为参数来测试它自己,然后我们就完成了。
Skipping Tests
跳过测试
import pytest, os

@pytest.mark.skipif(os.system("service postgresql status") > 0,
                    reason="PostgreSQL service is not running")
def test_connect_to_database():
    ... # Run function that tries to connect to PostgreSQL database
有些情况下,跳过一些测试是合理的,不管是因为环境(Linux vs Windows)、互联网连接、资源的可用性或其他原因。那么,我们该怎么做呢?Import pytest,os@pytest.0,reason = “ PostgreSQL service is not running”)) def test _ connect _ to _ database () : ... # Run 函数,尝试连接到 PostgreSQL 数据库。在 Pytest 还有很多很酷的功能可以跳过或预测失败,这里已经有很好的文档说明,所以我不会在这里详细说明,因为在这里复制和粘贴现有的内容似乎是多余的。
总结
希望这些小技巧能让你的测试过程变得更加愉快和高效,从而激励你在之前写更多的测试。如果你有任何问题,请随时与我联系,如果你有自己的建议或技巧,请在这里分享。🙂
Pytest 导论(https://medium.com/@chilinski.a/intro-to-pytest-280f56e97f19)
编码最重要的一个方面是测试ーー确保你的代码在所有可能的情况下都能完成它应该完成的任务。当然,我经常使用 Python,Python 的主要测试框架称为 pytest(https://docs.pytest.org/en/stable/)。
就像任何 Python 包一样,您需要用 pip 安装它(最好是在项目的虚拟环境中https://medium.com/swlh/python-virtual-environments-221c39943bab)。所以运行命令:
pip install pytest确保安装时运行:
pip freeze一旦安装完毕,就可以开始测试了!请记住,在任何文件的顶部,您都需要导入 pytest:
import pytest我将展示一个非常简单的单元测试(测试一小段代码)。假设我们想要一个函数(例如,在一个名为 testing.py 的文件中) ,该函数以一个数字作为参数,当执行时,它会将该数字加上5。像这样:
def add_five(num):
   return num + 5
简单的东西。所以我们可以很容易地测试,以确保这个函数的工作,通过添加下面的代码:
def test_method():
   assert add_five(3) == 8
了解基本的数学知识,这个测试应该可以通过:
pytest testing.py你们会看到这样的反应:

pytest 通过pytest
瞧,测试通过了!现在,如果我们将测试函数更改为一个失败的函数,如下所示:
def test_function():
   assert add_five(3) == 3
3 + 5不应该等于3. 所以让我们看看运行 pytest testing.py 时会发生什么:

failing pytest 化脓失败试验
就是这样,它失败了。它显示了断言错误是什么(8不等于3)。因此,这两个测试都确保了原始的 add _ five ()函数能够完成它应该完成的任务。
还有很多需要测试的地方,我很可能在某个时候再写一篇关于它的博文。但这只是一个简短的介绍!
4个鲜为人知但很棒的 Pytest 技巧(https://towardsdatascience.com/4-lessor-known-yet-awesome-tips-for-pytest-2117d8a62d9c)

Motivation
动机
作为一个数据科学家,确保你的功能正常工作是很重要的。一个好的做法是编写一个小函数,然后用单元测试来测试您的函数。
与其试图调试大块的代码,不如将代码拆分成小块,并确保小块能够工作。
Pytest 是一个理想的框架,它使用 Python 编写小型测试变得容易。我在这里介绍了单元测试的好处以及如何开始 pytest。在上一篇文章中,我展示了如何:
- Test one function with multiple tests 用多个测试测试一个函数
- Combine multiple tests into one test function 将多个测试合并到一个测试函数中
- Test one function at a time 每次测试一个函数
- Test different functions using the same data 使用相同的数据测试不同的函数
- Structure your projects 组织你的项目
In this article, I will show you how to:
在本文中,我将向您展示如何:
- Filter warnings 过滤警告
- Print the output of the function being tested 打印被测试函数的输出
- Benchmark your code 基准测试你的代码
- Repeat a single test for a specific number of times 在特定的次数内重复一个测试
我们开始吧!
过滤警告
在运行 pytest 时经常会看到弃用警告。当我们只想调试代码时,这些警告可能是不必要的,并且显得很烦人。幸运的是,我们可以过滤 pytest 警告。
我将从我以前的 pytest 文章中借用这些例子。在这个例子中,我想测试 TextBlob 是否准确地预测了文本的情绪。如果您不了解 TextBlob,可以在这里了解更多关于该工具的信息。
当我们测试这个脚本时,使用
pytest test_example.py我们会看到警告。
为了过滤警告,在运行脚本的同一个目录中创建一个名为 pytest.ini 的文件
.
├── pytest.ini
└── test_example.py
然后将下面的内容插入到 pytest.ini 中
[pytest]addopts = -p no:warnings就是这样! 现在重新运行我们的测试。我们将得到一个没有警告的干净输出!
打印输出
有时候,我们可能希望在编写 assert 语句之前看到中间输出。为什么不打印输出来知道中间输出呢?
这也将帮助我们开发一个函数,生成我们想要的输出。
例如,我们可以打印 text.sentiment 来知道 text.sentiment 到底是做什么的
当运行 pytest _ example.py 时,我们将看不到任何输出。为了查看 print 函数的输出,我们需要在命令末尾包含-s
>>> pytest test_example.py -s====================== test session starts ======================
test_examply.py Sentiment(polarity=0.8, subjectivity=0.75)
======================= 1 passed in 0.49s =======================
太棒了! 现在我们知道我们可以用 text.sentiment.polarity来获取情绪的极性。
多次重复一个测试
有时我们可能想要运行一个测试100次,以确保函数始终按预期工作。
例如,我们发现了合并两个 Python 列表的方法
>>> l1 = [1,2,3]
>>> l2 = [4,5,6]
>>> l1.extend(l2)
>>> l1
[1,2,3,4,5,6]
从输出来看,列表 l2中的值似乎是插入在列表 l1中的值之后。但是每对列表的顺序都是这样的吗?
为了确保使用 functionextend 时保持插入顺序,我们可以创建两个随机列表,然后对其进行100次测试。如果所有测试都通过,我们确信函数将始终如我们所期望的那样工作
若要重复单个测试,请安装 pytest-repeat
pip install pytest-repeat现在使用 pytest.mark.repeat (100)作为我们要重复的测试函数的 decorator
>>> pytest test_repeat.py
====================== test session starts ========================test_repeat.py ...........                                  [100%]======================= 101 passed in 0.09s =======================
太棒了。现在我们可以确定,在使用 extend ()时,插入顺序将始终保留,因为101个测试已经通过。
如果你想更加确定,那就把数量增加到1000,然后看看你能得到什么。你可以在这里找到关于 pytest-repeat 的更多信息。
基准测试你的代码
我们可能不仅要断言输出是我们所期望的,而且还要比较不同函数的速度。
基准测试是一种测试,我们可以使用它来衡量我们的代码有多快。
幸运的是,有一个名为 pytest-benchmark 的库,它允许我们在用 pytest 测试函数时对代码进行基准测试!
Install pytest-benchmark with
安装 pytest-benchmark
pip install pytest-benchmark我将从关于高效 Python 代码计时的文章中借用一些示例来说明如何使用 pytest-benchmark。
在这里,我们测试使用 concat 方法创建一个列表需要多长时间
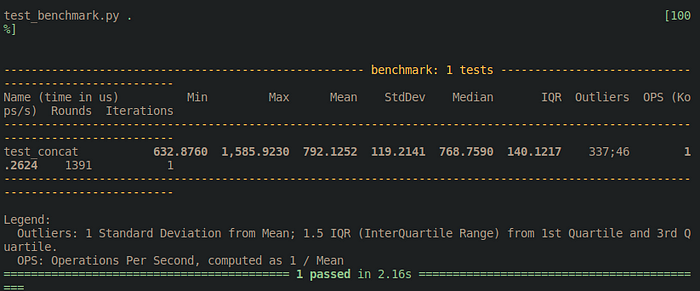
平均运行时间为792.1252微秒。我们可以看到其他测量,如最小时间和最大时间!
我们还可以为测试函数插入参数,并重复测试100次,以更准确地估计代码执行的速度。

我们得到了一个不同的平均值730微秒。
现在,让我们使用 pytest-benchmark 比较多个方法来创建一个范围从0到999的列表。

输出很好,很容易阅读!从输出中,我们知道 list range 方法执行时间最短,concat 方法执行时间最长!
我们知道 theconcat 方法比其他方法需要更多的时间来执行,但是需要多长时间呢?
我们可以使用——--benchmark-historgram来可视化结果
pytest test_benchmark.py --benchmark-histogram
哇! 与其他方法相比,Theconcat 方法需要更长的运行时间。
您可以在这里了解有关 pytest-benchmark 的更多信息。
总结
祝贺你!您刚刚学习了4种使用 pytest 测试函数的技巧。我希望这些能够帮助您更有效地测试函数并编写健壮的代码。
你的队友会感谢你编写的代码工作。
本文的源代码可以在这里找到
https://medium.com/testcult/intro-to-test-framework-pytest-5b1ce4d011ae
https://martinheinz.dev/blog/7
https://medium.com/@chilinski.a/intro-to-pytest-280f56e97f19
https://towardsdatascience.com/4-lessor-known-yet-awesome-tips-for-pytest-2117d8a62d9c
https://towardsdatascience.com/5-advanced-pytest-tricks-c5d733b2acc7
https://medium.datadriveninvestor.com/pytest-a-beginner-guide-9ba84a18d3dd
https://faun.pub/lets-learn-pytest-a2ab60600fab
https://betterprogramming.pub/understand-5-scopes-of-pytest-fixtures-1b607b5c19ed

-
6.53MB 下载次数:2次
- 点赞
- 收藏
- 关注作者
评论(0)