Java---实现运行任意目录下class中加了@MyTest的空参方法(实现图形界面)

【摘要】 说明:
因为上个代码,总是要输入完整的绝对路径,比较麻烦,于是,就写了这个小程序,直接进入文件对话框选择需要运行的class文件。
只需要提前输入完整的类名。
注意:加的MyTest必须打个包,加上: import cn.hncu.myJuniitApp.vo.MyTest; 不然不是同一个注解呢。
测试的类:
package cn.hncu.myJuni...
说明:
因为上个代码,总是要输入完整的绝对路径,比较麻烦,于是,就写了这个小程序,直接进入文件对话框选择需要运行的class文件。
只需要提前输入完整的类名。
注意:加的MyTest必须打个包,加上:
import cn.hncu.myJuniitApp.vo.MyTest;
不然不是同一个注解呢。
测试的类:
package cn.hncu.myJuniitApp;

import cn.hncu.myJuniitApp.vo.MyTest;

public class MyJunitTest { public void run1(){ System.out.println("run1()....."); } @MyTest public void run2(){ System.out.println("run2().....含有MyTest"); } public void run3(){ System.out.println("run3()....."); } @MyTest public void run4(){ System.out.println("run4().....含有MyTest"); } public void run5(){ System.out.println("run5()....."); }

}
- 1
- 2
- 3
- 4
- 5
- 6
- 7
- 8
- 9
- 10
- 11
- 12
- 13
- 14
- 15
- 16
- 17
- 18
- 19
- 20
- 21
- 22
- 23
- 24
- 25
- 26
- 27
- 28
- 29
- 30
然后是注解类:
package cn.hncu.myJuniitApp.vo;

import java.lang.annotation.ElementType;
import java.lang.annotation.Retention;
import java.lang.annotation.RetentionPolicy;
import java.lang.annotation.Target;

//运行时也存在的,如果想看到运行结果,必须定义这个注解的保持性为运行时
@Retention (RetentionPolicy.RUNTIME)
@Target (ElementType.METHOD)//限制这个注解只能用在方法上面
public @interface MyTest {
}
- 1
- 2
- 3
- 4
- 5
- 6
- 7
- 8
- 9
- 10
- 11
- 12
- 13
数据层:
接口:
package cn.hncu.myJuniitApp.dao.dao;

/**
 * 数据层接口
 * @author 陈浩翔
 *
 * @version 1.0  2016-5-6
 */
public interface JunitDao { public Class<?> findClass(String name,String className);
}
- 1
- 2
- 3
- 4
- 5
- 6
- 7
- 8
- 9
- 10
- 11
- 12
实现类:
package cn.hncu.myJuniitApp.dao.impl;

import java.io.ByteArrayOutputStream;
import java.io.FileInputStream;
import java.io.FileNotFoundException;
import java.io.IOException;

import cn.hncu.myJuniitApp.dao.dao.JunitDao;
/**
 * 数据层的实现类
 * @author 陈浩翔
 *
 * @version 1.0  2016-5-6
 */
public class JunitDaoImpl extends ClassLoader implements JunitDao{ @Override public Class<?> findClass(String name, String className) { byte buf[] = loadClassData(name); Class c = defineClass(className, buf, 0, buf.length); return c; } private byte[] loadClassData(String name) { byte buf[]=null; try { FileInputStream in  = new FileInputStream(name); ByteArrayOutputStream bout = new ByteArrayOutputStream(); int len=0; byte[] b = new byte[1024]; while((len=in.read(b))!=-1){ bout.write(b, 0, len); } in.close(); bout.close(); buf=bout.toByteArray(); } catch (FileNotFoundException e) { e.printStackTrace(); } catch (IOException e) { e.printStackTrace(); } return buf; }

}
- 1
- 2
- 3
- 4
- 5
- 6
- 7
- 8
- 9
- 10
- 11
- 12
- 13
- 14
- 15
- 16
- 17
- 18
- 19
- 20
- 21
- 22
- 23
- 24
- 25
- 26
- 27
- 28
- 29
- 30
- 31
- 32
- 33
- 34
- 35
- 36
- 37
- 38
- 39
- 40
- 41
- 42
- 43
- 44
- 45
- 46
- 47
- 48
工厂方法:
package cn.hncu.myJuniitApp.dao.factory;

import cn.hncu.myJuniitApp.dao.dao.JunitDao;
import cn.hncu.myJuniitApp.dao.impl.JunitDaoImpl;

/**
 * 数据层的工厂方法
 * @author 陈浩翔
 *
 * @version 1.0  2016-5-6
 */
public class JunitDaoFactory { public static JunitDao getJunitDao(){ return new JunitDaoImpl(); }
}
- 1
- 2
- 3
- 4
- 5
- 6
- 7
- 8
- 9
- 10
- 11
- 12
- 13
- 14
- 15
- 16
- 17
逻辑层:
接口:
package cn.hncu.myJuniitApp.business.ebi;

/**
 * 逻辑层接口
 * @author 陈浩翔
 *
 * @version 1.0  2016-5-6
 */
public interface JunitEbi { public void run(String name,String className);
}
- 1
- 2
- 3
- 4
- 5
- 6
- 7
- 8
- 9
- 10
- 11
- 12
实现类:
package cn.hncu.myJuniitApp.business.ebo;

import java.lang.reflect.InvocationTargetException;
import java.lang.reflect.Method;

import cn.hncu.myJuniitApp.business.ebi.JunitEbi;
import cn.hncu.myJuniitApp.dao.factory.JunitDaoFactory;
import cn.hncu.myJuniitApp.vo.MyTest;
/**
 * 逻辑层的实现类
 * @author 陈浩翔
 *
 * @version 1.0  2016-5-6
 */
public class JunitEbo implements JunitEbi{ //通过数据层获得对象的Class @Override public void run(String name, String className) { Class c = JunitDaoFactory.getJunitDao().findClass(name, className); try { Object obj = c.newInstance(); Method ms[] = c.getDeclaredMethods();//获得当前类的所有声明方法,包括私有的 for(Method m : ms){//增强for循环遍历 if(m.isAnnotationPresent(MyTest.class)){//如果这个方法有这个注解,就运行 m.invoke(obj, null);//现在知道为什么要无参了吧,这样方便很多,直接就可以调用了。 } } } catch (InstantiationException e) { e.printStackTrace(); } catch (IllegalAccessException e) { e.printStackTrace(); } catch (IllegalArgumentException e) { e.printStackTrace(); } catch (InvocationTargetException e) { e.printStackTrace(); } }
}
- 1
- 2
- 3
- 4
- 5
- 6
- 7
- 8
- 9
- 10
- 11
- 12
- 13
- 14
- 15
- 16
- 17
- 18
- 19
- 20
- 21
- 22
- 23
- 24
- 25
- 26
- 27
- 28
- 29
- 30
- 31
- 32
- 33
- 34
- 35
- 36
- 37
- 38
- 39
- 40
工厂方法:
package cn.hncu.myJuniitApp.business.factory;

import cn.hncu.myJuniitApp.business.ebi.JunitEbi;
import cn.hncu.myJuniitApp.business.ebo.JunitEbo;

/**
 * 逻辑层的工厂方法
 * @author 陈浩翔
 *
 * @version 1.0  2016-5-6
 */
public class JunitEbiFactory { public static JunitEbi getJunitEbi(){ return new JunitEbo(); }
}
- 1
- 2
- 3
- 4
- 5
- 6
- 7
- 8
- 9
- 10
- 11
- 12
- 13
- 14
- 15
- 16
- 17
界面和main方法:
package cn.hncu.myJuniitApp;

import java.awt.Dimension;
import java.awt.Toolkit;
import java.io.File;

import javax.swing.JFileChooser;
import javax.swing.JOptionPane;

import cn.hncu.myJuniitApp.business.factory.JunitEbiFactory;

/**
 *
 * @author 陈浩翔
 * @version 1.0  2016-5-6
 */
public class myJunit extends javax.swing.JFrame { public myJunit() { initComponents(); } private void initComponents() { jLabel1 = new javax.swing.JLabel(); tfdClassName = new javax.swing.JTextField(); jLabel2 = new javax.swing.JLabel(); btnFileName = new javax.swing.JButton(); btnRun = new javax.swing.JButton(); setDefaultCloseOperation(javax.swing.WindowConstants.EXIT_ON_CLOSE); //获得系统屏幕分辨率 Toolkit t = Toolkit.getDefaultToolkit() ; Dimension size=t.getScreenSize();   setBounds((int)size.getWidth()/4,(int)size.getHeight()/4,400,400); getContentPane().setLayout(null); jLabel1.setFont(new java.awt.Font("Dialog", 1, 30)); jLabel1.setForeground(new java.awt.Color(204, 0, 0)); jLabel1.setText("MyJunit-\u8fd0\u884c\u4efb\u610f\u7a7a\u53c2\u65b9\u6cd5"); getContentPane().add(jLabel1); jLabel1.setBounds(10, 20, 380, 80); tfdClassName.setFont(new java.awt.Font("Dialog", 1, 18)); tfdClassName.setForeground(new java.awt.Color(255, 0, 0)); getContentPane().add(tfdClassName); tfdClassName.setBounds(30, 180, 350, 40); jLabel2.setFont(new java.awt.Font("Dialog", 1, 18)); jLabel2.setForeground(new java.awt.Color(0, 0, 255)); jLabel2.setText("请先输入完整类名(再选择文件)"); getContentPane().add(jLabel2); jLabel2.setBounds(30, 120, 310, 80); btnFileName.setFont(new java.awt.Font("Dialog", 1, 18)); btnFileName.setText("\u9009\u62e9\u6587\u4ef6"); btnFileName.addActionListener(new java.awt.event.ActionListener() { public void actionPerformed(java.awt.event.ActionEvent evt) { btnFileNameActionPerformed(evt); } }); getContentPane().add(btnFileName); btnFileName.setBounds(40, 270, 110, 50); btnRun.setFont(new java.awt.Font("Dialog", 1, 18)); btnRun.setText("\u8fd0\u884c"); btnRun.addActionListener(new java.awt.event.ActionListener() { public void actionPerformed(java.awt.event.ActionEvent evt) { btnRunActionPerformed(evt); } }); getContentPane().add(btnRun); btnRun.setBounds(240, 270, 110, 50); } private void btnRunActionPerformed(java.awt.event.ActionEvent evt) { if(fileName==null){ JOptionPane.showMessageDialog(this, "请先选择文件!"); } JunitEbiFactory.getJunitEbi().run(fileName, className); } private void btnFileNameActionPerformed(java.awt.event.ActionEvent evt) { JFileChooser jfc = new JFileChooser(); //打开文件选择对话框 int result = jfc.showOpenDialog(this); File file=null; if(result==JFileChooser.APPROVE_OPTION){//选择了文件 file=jfc.getSelectedFile();//获得选择的文件 //System.out.println(file.getParent()); //System.out.println(file.getName()); fileName = file.getParent()+"\\"+file.getName(); className = tfdClassName.getText().trim(); if("".equals(className)){ JOptionPane.showMessageDialog(this, "请输入正确的完整类名!!!"); return ; } //System.out.println(fileName); //System.out.println(className); } } public static void main(String args[]) { java.awt.EventQueue.invokeLater(new Runnable() { public void run() { new myJunit().setVisible(true); } }); } private javax.swing.JButton btnFileName;//选择文件的按钮 private javax.swing.JButton btnRun;//运行含有@MyTest的空参方法 private javax.swing.JLabel jLabel1; private javax.swing.JLabel jLabel2; private javax.swing.JTextField tfdClassName; private String fileName =null; private String className =null;


}
- 1
- 2
- 3
- 4
- 5
- 6
- 7
- 8
- 9
- 10
- 11
- 12
- 13
- 14
- 15
- 16
- 17
- 18
- 19
- 20
- 21
- 22
- 23
- 24
- 25
- 26
- 27
- 28
- 29
- 30
- 31
- 32
- 33
- 34
- 35
- 36
- 37
- 38
- 39
- 40
- 41
- 42
- 43
- 44
- 45
- 46
- 47
- 48
- 49
- 50
- 51
- 52
- 53
- 54
- 55
- 56
- 57
- 58
- 59
- 60
- 61
- 62
- 63
- 64
- 65
- 66
- 67
- 68
- 69
- 70
- 71
- 72
- 73
- 74
- 75
- 76
- 77
- 78
- 79
- 80
- 81
- 82
- 83
- 84
- 85
- 86
- 87
- 88
- 89
- 90
- 91
- 92
- 93
- 94
- 95
- 96
- 97
- 98
- 99
- 100
- 101
- 102
- 103
- 104
- 105
- 106
- 107
- 108
- 109
- 110
- 111
- 112
- 113
- 114
- 115
- 116
- 117
- 118
- 119
- 120
- 121
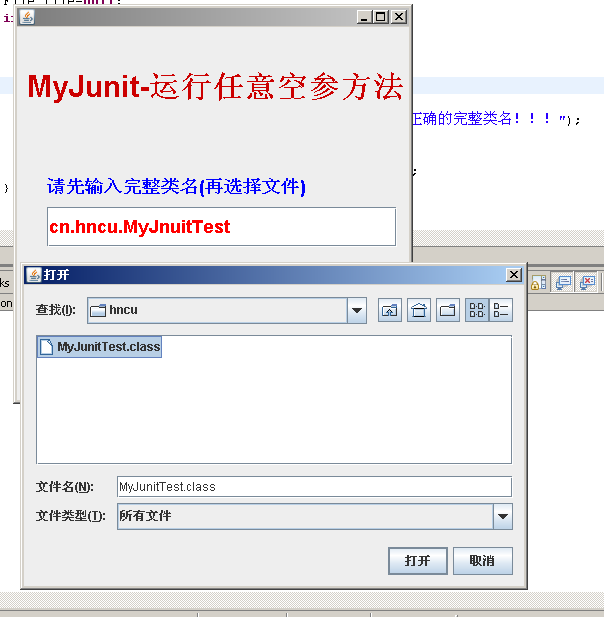
下面看看一些程序的图片:
先看下运行结果吧:我把那个测试类移到了d盘去了的。
run2().....含有MyTest
run4().....含有MyTest
- 1
- 2
- 3
也许有人认为一个类完全就可以解决这个问题了,你还写这么多的包,这么多类,这不是麻烦嘛。
我想说,虽然麻烦,但是可以让我们看起来结构清楚,谁调用谁也很明白,而且是面向接口编程。
这个写得更加规范,特别是以后到公司工作,基本上都是几个人开发同一个项目的,这个人写这里的,那个人写那里的,如果没有规范,怎么行呢。怎么合作开发同一个项目呢。
所以,分包是必须的。分逻辑层和数据层也是需要的。特别是一个层的铁三角,必须都要有。
接口,工厂方法,实现类,缺一不可!!!
文章来源: chenhx.blog.csdn.net,作者:谙忆,版权归原作者所有,如需转载,请联系作者。
原文链接:chenhx.blog.csdn.net/article/details/51334157

【版权声明】本文为华为云社区用户转载文章,如果您发现本社区中有涉嫌抄袭的内容,欢迎发送邮件进行举报,并提供相关证据,一经查实,本社区将立刻删除涉嫌侵权内容,举报邮箱:
cloudbbs@huaweicloud.com
- 点赞
- 收藏
- 关注作者
评论(0)