MySQL---数据库从入门走向大神系列(十)-Connection对象池、装饰模式与动态代理模式
问题概述:
之前本系列博客写的,全部都是一个connection对象,不知道大家发现没有,我们既然做了一个Connection工具类,那么大家肯定都是从那里面拿Connection对象的,之前的如果是多线程运行,很容易出问题的,你想想事务处理就知道了,同时用事务处理操作同一个Connection,肯定会出问题的。
例如:
一方的事务在提交的时候,你正好运行了一个事务中的一个操作,那么你这个操作也会被提交,而且你后面的提交或回滚失效的,如果对方把Connection关闭了,你的程序还会挂。
等等问题…
那么,我们就需要一个Connection对象池,谁来了,就去池中拿对象,不会再是同一个了,而且可以很好的控制池中Connection对象的数目,不可能一直new Connection对象的,如果池中的对象用完了,我们就让那个客户端等,等别人用完Connection对象还回到池中。
配置文件:jdbc.propertise
##MySQL
driver=com.mysql.jdbc.Driver
url=jdbc:mysql:///hncu?useUnicode=true&characterEncoding=utf-8
username=root
password=1234

##Oracle
#driver=oracle.jdbc.driver.OracleDriver
#url=jdbc:oracle:thin:@localhost:1521:orcl
#username=scott
#password=tiger
- 1
- 2
- 3
- 4
- 5
- 6
- 7
- 8
- 9
- 10
- 11
ConnsUtil:Connection池
package cn.hncu.pool;

import java.sql.Connection;
import java.sql.DriverManager;
import java.util.ArrayList;
import java.util.List;
import java.util.Properties;

public class ConnsUtil { //声明一个池 private static List<Connection> pool = new ArrayList<Connection>(); //声明池中的Connection对象个数 private static final int NUM = 3; static{ try { //读取配置文件 Properties p = new Properties(); p.load(ConnsUtil.class.getClassLoader().getResourceAsStream("jdbc.properties")); String driver = p.getProperty("driver"); String url = p.getProperty("url"); String user = p.getProperty("username"); String password = p.getProperty("password"); Class.forName(driver); for(int i=0;i<NUM;i++){ Connection con = DriverManager.getConnection(url, user, password); //加入池中 pool.add(con); } } catch (Exception e) { e.printStackTrace(); } } public static synchronized Connection getConnection() throws InterruptedException{ if(pool.size()<=0){ Thread.sleep(100); return getConnection(); } return pool.remove(0); } public static void back(Connection con){ System.out.println("还回来一个Connection连接..."); pool.add(con); }


}
- 1
- 2
- 3
- 4
- 5
- 6
- 7
- 8
- 9
- 10
- 11
- 12
- 13
- 14
- 15
- 16
- 17
- 18
- 19
- 20
- 21
- 22
- 23
- 24
- 25
- 26
- 27
- 28
- 29
- 30
- 31
- 32
- 33
- 34
- 35
- 36
- 37
- 38
- 39
- 40
- 41
- 42
- 43
- 44
- 45
- 46
- 47
- 48
- 49
- 50
- 51
测试类:
package cn.hncu.pool;

import java.sql.Connection;
import java.sql.SQLException;
import java.sql.Statement;

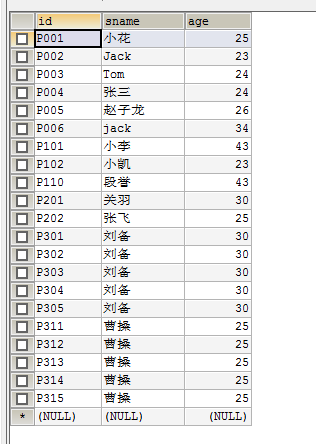
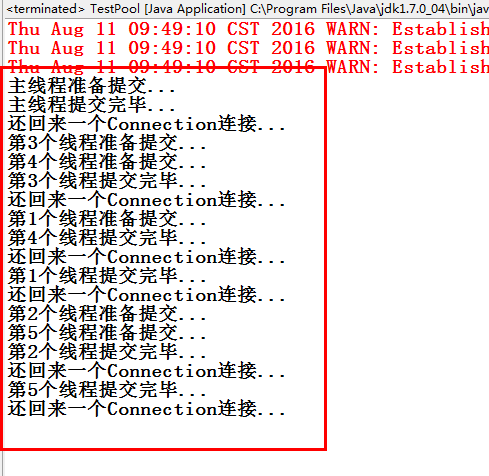
public class TestPool { public static void main(String[] args) { Connection con = null; try{ con = ConnsUtil.getConnection(); con.setAutoCommit(false); Statement st = con.createStatement(); String sql ="insert into stud values('P201','关羽',30) "; st.execute(sql); sql ="insert into stud values('P202','张飞',25) "; st.execute(sql); new OneThread(1).start(); new OneThread(2).start(); new OneThread(3).start(); new OneThread(4).start(); new OneThread(5).start(); System.out.println("主线程准备提交..."); con.commit(); System.out.println("主线程提交完毕..."); }catch (Exception e) { try { con.rollback(); System.out.println("主线程回滚了..."); } catch (SQLException e1) { throw new RuntimeException("主线程事务回滚失败!", e1); } }finally{ try { if(con!=null){ con.setAutoCommit(true); ConnsUtil.back(con); //con.close();//如果要把close内部的功能换成还连接,就需要我们以后的技术来实现 } } catch (SQLException e) { throw new RuntimeException("主线程连接关闭失败!", e); } } }
}

class OneThread extends Thread{ private int n; public OneThread(int n) { this.n = n; } @Override public void run() { Connection con = null; try{ con = ConnsUtil.getConnection(); con.setAutoCommit(false); Statement st = con.createStatement(); String sql ="insert into stud values('P30"+n+"','刘备',30) "; st.execute(sql); sql ="insert into stud values('P31"+n+"','曹操',25) "; st.execute(sql); System.out.println("第"+n+"个线程准备提交..."); con.commit(); System.out.println("第"+n+"个线程提交完毕..."); }catch (Exception e) { try { con.rollback(); System.out.println("第"+n+"个线程回滚了..."); } catch (SQLException e1) { throw new RuntimeException("第"+n+"事务回滚失败!", e1); } }finally{ try { if(con!=null){ con.setAutoCommit(true); //con.close();//这里就是我们需要改进的地方 ConnsUtil.back(con); } } catch (SQLException e) { throw new RuntimeException("第"+n+"连接关闭失败!", e); } } }

}
- 1
- 2
- 3
- 4
- 5
- 6
- 7
- 8
- 9
- 10
- 11
- 12
- 13
- 14
- 15
- 16
- 17
- 18
- 19
- 20
- 21
- 22
- 23
- 24
- 25
- 26
- 27
- 28
- 29
- 30
- 31
- 32
- 33
- 34
- 35
- 36
- 37
- 38
- 39
- 40
- 41
- 42
- 43
- 44
- 45
- 46
- 47
- 48
- 49
- 50
- 51
- 52
- 53
- 54
- 55
- 56
- 57
- 58
- 59
- 60
- 61
- 62
- 63
- 64
- 65
- 66
- 67
- 68
- 69
- 70
- 71
- 72
- 73
- 74
- 75
- 76
- 77
- 78
- 79
- 80
- 81
- 82
- 83
- 84
- 85
- 86
- 87
- 88
- 89
- 90
- 91
- 92
- 93


在调用返回Connection对象回到池中的时候,用普通的调用,不可避免的要去调用自己写的一个返回方法,如何在不改变程序员变成习惯(一般都习惯用close()去关闭那个对象)的情况下去实现Connection对象的回收呢,那就需要用到装饰模式,或者代理模式了。
装饰模式:
装饰模式又名包装(Wrapper)模式。装饰模式以对客户端透明的方式扩展对象的功能,是继承关系的一个替代方案。
装饰模式以对客户透明的方式动态地给一个对象附加上更多的责任。换言之,客户端并不会觉得对象在装饰前和装饰后有什么不同。装饰模式可以在不使用创造更多子类的情况下,将对象的功能加以扩展。
其实我们要做的就是写一个MyConnection类实现Connection接口,实现所有方法,再进行扩展!
public class ConnsUtil { private static List<Connection> pool = new ArrayList<Connection>(); private static final int NUM=3; static{ try { Properties p = new Properties(); p.load(ConnsUtil.class.getClassLoader().getResourceAsStream("jdbc.properties")); String drive = p.getProperty("driver"); String url = p.getProperty("url"); String user = p.getProperty("username"); String password = p.getProperty("password"); Class.forName(drive); for(int i=0;i<NUM;i++){ Connection conn = DriverManager.getConnection(url, user, password); } } catch (IOException e) { e.printStackTrace(); } catch (ClassNotFoundException e) { e.printStackTrace(); } catch (SQLException e) { e.printStackTrace(); } } public static synchronized Connection getConnection() throws InterruptedException{ if(pool.size()<=0){ Thread.sleep(50); return getConnection(); } return pool.remove(0); } static class MyConnection implements Connection{ //封装一个Connection private Connection con; public MyConnection(Connection con){ this.con=con; } @Override public <T> T unwrap(Class<T> iface) throws SQLException { return con.unwrap(iface); } @Override public void rollback() throws SQLException { con.rollback(); } @Override public Statement createStatement() throws SQLException { return con.createStatement(); } @Override public void setAutoCommit(boolean autoCommit) throws SQLException { con.setAutoCommit(autoCommit); } @Override public void commit() throws SQLException { con.commit(); } ...... //...需要把接口的所有方法都实现了,按照上面的样式去写就行,如果不用增加功能或修改的,直接返回con.方法(参数);就可以了。如果需要修改,就自己写。比如:这里我们需要修改close();方法. @Override public void close() throws SQLException { pool.add(this); //直接把自己这个对象加进去 } }
}
- 1
- 2
- 3
- 4
- 5
- 6
- 7
- 8
- 9
- 10
- 11
- 12
- 13
- 14
- 15
- 16
- 17
- 18
- 19
- 20
- 21
- 22
- 23
- 24
- 25
- 26
- 27
- 28
- 29
- 30
- 31
- 32
- 33
- 34
- 35
- 36
- 37
- 38
- 39
- 40
- 41
- 42
- 43
- 44
- 45
- 46
- 47
- 48
- 49
- 50
- 51
- 52
- 53
- 54
- 55
- 56
- 57
- 58
- 59
- 60
- 61
- 62
- 63
- 64
- 65
- 66
- 67
- 68
- 69
- 70
- 71
- 72
- 73
- 74
测试类:
package cn.hncu.pool2;

import java.sql.Connection;
import java.sql.SQLException;
import java.sql.Statement;

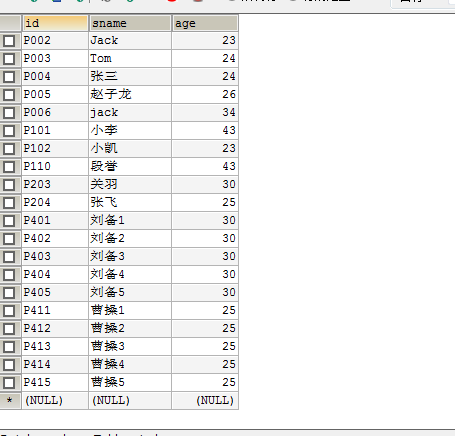
public class Testpool { public static void main(String[] args) { Connection con = null; try{ con = ConnsUtil.getConnection(); con.setAutoCommit(false); Statement st = con.createStatement(); String sql ="insert into stud values('P203','关羽',30) "; st.execute(sql); sql ="insert into stud values('P204','张飞',25) "; st.execute(sql); new OneThread(1).start(); new OneThread(2).start(); new OneThread(3).start(); new OneThread(4).start(); new OneThread(5).start(); System.out.println("主线程准备提交..."); con.commit(); System.out.println("主线程提交完毕..."); }catch (Exception e) { try { con.rollback(); System.out.println("主线程回滚了..."); } catch (SQLException e1) { throw new RuntimeException("主线程事务回滚失败!", e1); } }finally{ try { if(con!=null){ con.setAutoCommit(true); con.close();//这样,我们直接调用close方法就可以了!!! } } catch (SQLException e) { throw new RuntimeException("主线程连接关闭失败!", e); } } }
}

class OneThread extends Thread{ private int n; public OneThread(int n) { this.n = n; } @Override public void run() { Connection con = null; try{ con = ConnsUtil.getConnection(); con.setAutoCommit(false); Statement st = con.createStatement(); String sql ="insert into stud values('P40"+n+"','刘备"+n+"',30) "; st.execute(sql); sql ="insert into stud values('P41"+n+"','曹操"+n+"',25) "; st.execute(sql); System.out.println("第"+n+"个线程准备提交..."); con.commit(); System.out.println("第"+n+"个线程提交完毕..."); }catch (Exception e) { try { con.rollback(); System.out.println("第"+n+"个线程回滚了..."); } catch (SQLException e1) { throw new RuntimeException("第"+n+"事务回滚失败!", e1); } }finally{ try { if(con!=null){ con.setAutoCommit(true); con.close();//这样,我们直接调用close方法就可以了!!! } } catch (SQLException e) { throw new RuntimeException("第"+n+"连接关闭失败!", e); } } }

}
- 1
- 2
- 3
- 4
- 5
- 6
- 7
- 8
- 9
- 10
- 11
- 12
- 13
- 14
- 15
- 16
- 17
- 18
- 19
- 20
- 21
- 22
- 23
- 24
- 25
- 26
- 27
- 28
- 29
- 30
- 31
- 32
- 33
- 34
- 35
- 36
- 37
- 38
- 39
- 40
- 41
- 42
- 43
- 44
- 45
- 46
- 47
- 48
- 49
- 50
- 51
- 52
- 53
- 54
- 55
- 56
- 57
- 58
- 59
- 60
- 61
- 62
- 63
- 64
- 65
- 66
- 67
- 68
- 69
- 70
- 71
- 72
- 73
- 74
- 75
- 76
- 77
- 78
- 79
- 80
- 81
- 82
- 83
- 84
- 85
- 86
- 87
- 88
- 89
- 90
- 91
测试结果:

代理模式:
代理模式的作用是:为其他对象提供一种代理以控制对这个对象的访问。
好处就是:
在某些情况下,如果不想或者不能直接引用另一个对象,而代理对象可以在客户端和目标对象之间起到中介的作用。
可以为原来的方法增加或者修改动作!
代理模式一般需要3个角色:
抽象角色:声明真实对象和代理对象的共同接口(必须是接口;
代理角色:代理对象角色内部含有对真实对象的引用,从而可以操作真实对象,同时代理对象提供与真实对象相同的接口以便在任何时刻都能代替真实对象。同时,代理对象可以在执行真实对象操作时,附加其他的操作,相当于对真实对象进行封装与包装。
真实角色(被代理的角色):代理角色所代表的真实对象,是我们最终要引用的对象。
代理是一种常用的设计模式,其目的就是为其他对象提供一个代理以控制对某个对象的访问。 代理类负责为委托类预处理消息,过滤消息并转发消息,以及进行消息被委托类执行后的后 续处理。
接口:
package cn.hncu.proxy.demo1;

public interface IRenter { public void rent(int i); public String say();
}
- 1
- 2
- 3
- 4
- 5
- 6
- 7
实际对象:
package cn.hncu.proxy.demo1;

public class Renter implements IRenter{ @Override public void rent(int i) { System.out.println("给你"+i+"个房间,需要交500元!"); } public String say() { System.out.println("Renter:你好,我是房东,房子实际只要300元"); return "房东的返回结果..."; }
}
- 1
- 2
- 3
- 4
- 5
- 6
- 7
- 8
- 9
- 10
- 11
- 12
- 13
- 14
代理模式的核心部分:
package cn.hncu.proxy.demo1;

import java.lang.reflect.InvocationHandler;
import java.lang.reflect.Method;
import java.lang.reflect.Proxy;


public class Client { public static void main(String[] args) { //被代理的对象 final IRenter r = new Renter(); //这个obj是代理后的对象 Object obj = Proxy.newProxyInstance(Client.class.getClassLoader(), new Class[]{IRenter.class}, new InvocationHandler() { @Override //proxy是代理后的对象(等价于返回的obj),method就是类反射中的方法对象, args是执行method方法所需的参数 public Object invoke(Object proxy, Method method, Object[] args) throws Throwable { System.out.println("我是中介..."); //在这里,我们把房东说的话和返回值给拦截了。 if(method.getName().equals("say")){ System.out.println("我是中介,你还没交中介费,无法联系房东..."); return ""; } Object obj = method.invoke(r, args); System.out.println("欢迎再来找我中介..."); //r就是原来的对象 return obj; //这个返回结果是调用r中的方法method.invoke(r, args);返回的结果 } }); IRenter ir = (IRenter) obj; ir.rent(3); System.out.println(ir.say()); }
}
- 1
- 2
- 3
- 4
- 5
- 6
- 7
- 8
- 9
- 10
- 11
- 12
- 13
- 14
- 15
- 16
- 17
- 18
- 19
- 20
- 21
- 22
- 23
- 24
- 25
- 26
- 27
- 28
- 29
- 30
- 31
- 32
- 33
- 34
- 35
- 36
- 37
- 38
- 39
- 40
可以看出来InvocationHandler这个接口中的invoke方法是最核心的部分!!!
在里面我们利用类加载器和类反射,直接可以来调用原来的类,而且可以加上自己需要的功能,或者实现拦截!!!
上面的例子只能实现对Renter 类的代理。
通用的代理模板类:
public interface IAnimal { public void run();
}

public class Dog implements IAnimal{ private String name; public Dog(String name) { this.name = name; } @Override public void run() { System.out.println("Doge:"+name+"is

running..."); }
}
- 1
- 2
- 3
- 4
- 5
- 6
- 7
- 8
- 9
- 10
- 11
- 12
- 13
- 14
- 15
- 16
public interface IPerson { public void sayHi();
}

public class Person implements IPerson { private String name; public Person(String name){ this.name = name; } @Override public void sayHi() { System.out.println(name+"说:祝你快乐..."); }

}
- 1
- 2
- 3
- 4
- 5
- 6
- 7
- 8
- 9
- 10
- 11
- 12
- 13
- 14
- 15
- 16
ProxyUtil.java
import java.lang.reflect.InvocationHandler;
import java.lang.reflect.Method;
import java.lang.reflect.Proxy;

public class ProxyUtil implements InvocationHandler{ private Object srcObj=null; public ProxyUtil(Object srcObj) { this.srcObj=srcObj; } public static Object getProxy(Object srcObj){ Object obj = Proxy.newProxyInstance( ProxyUtil.class.getClassLoader(), srcObj.getClass().getInterfaces(), new ProxyUtil(srcObj)); //obj是代理后的返回结果其实就是method.invoke(srcObj, args)的返回结果 return obj; } //这个就是代理的方法了 @Override public Object invoke(Object proxy, Method method, Object[] args) throws Throwable { System.out.println("进入了代理区域~~"); //这个srcObj就是原来的对象 return method.invoke(srcObj, args); }
}
- 1
- 2
- 3
- 4
- 5
- 6
- 7
- 8
- 9
- 10
- 11
- 12
- 13
- 14
- 15
- 16
- 17
- 18
- 19
- 20
- 21
- 22
- 23
- 24
- 25
- 26
- 27
- 28
- 29
- 30
- 31
- 32
client
package cn.hncu.proxy.demo2;

import cn.hncu.proxy.demo2.domain.Dog;
import cn.hncu.proxy.demo2.domain.IAnimal;
import cn.hncu.proxy.demo2.domain.IPerson;
import cn.hncu.proxy.demo2.domain.Person;

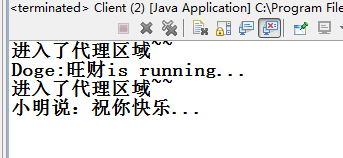
public class Client { public static void main(String[] args) { Dog dag = new Dog("旺财"); IAnimal iDag = (IAnimal) ProxyUtil.getProxy(dag); iDag.run(); Person p = new Person("小明"); IPerson ip =(IPerson)  ProxyUtil.getProxy(p); ip.sayHi();  }
}
- 1
- 2
- 3
- 4
- 5
- 6
- 7
- 8
- 9
- 10
- 11
- 12
- 13
- 14
- 15
- 16
- 17
- 18
- 19
输出结果:

我们现在再来把之前用装饰模式写的ConnsUtil类改写成代理模式:
ConnsUtil类的代理模式:
package cn.hncu.pool3;

import java.lang.reflect.InvocationHandler;
import java.lang.reflect.Method;
import java.lang.reflect.Proxy;
import java.sql.Connection;
import java.sql.DriverManager;
import java.util.ArrayList;
import java.util.List;
import java.util.Properties;

public class ConnsUtil { private static List<Connection> pool = new ArrayList<Connection>(); private static final int NUM=3; static{ try { //读取配置文件 Properties p = new Properties(); p.load(ConnsUtil.class.getClassLoader().getResourceAsStream("jdbc.properties")); String driver = p.getProperty("driver"); String url = p.getProperty("url"); String user = p.getProperty("username"); String password = p.getProperty("password"); Class.forName(driver); for(int i=0;i<NUM;i++){ final Connection conn = DriverManager.getConnection(url, user, password); //只需要改这里就行了! //使用动态代理代理conn对象,实现对close方法的拦截 Object obj = Proxy.newProxyInstance( ConnsUtil.class.getClassLoader(), conn.getClass().getInterfaces(), new InvocationHandler() { @Override public Object invoke(Object proxy, Method method, Object[] args) throws Throwable { if(method.getName().equalsIgnoreCase("close") && (args==null || args.length==0)){ pool.add((Connection)proxy); return null; }else{ return method.invoke(conn, args); } } }); pool.add((Connection)obj); } } catch (Exception e) { e.printStackTrace(); } } public static synchronized Connection getConn() throws Exception{ if(pool.size()<=0){ Thread.sleep(100); return getConn(); } return pool.remove(0); }

}
- 1
- 2
- 3
- 4
- 5
- 6
- 7
- 8
- 9
- 10
- 11
- 12
- 13
- 14
- 15
- 16
- 17
- 18
- 19
- 20
- 21
- 22
- 23
- 24
- 25
- 26
- 27
- 28
- 29
- 30
- 31
- 32
- 33
- 34
- 35
- 36
- 37
- 38
- 39
- 40
- 41
- 42
- 43
- 44
- 45
- 46
- 47
- 48
- 49
- 50
- 51
- 52
- 53
- 54
- 55
- 56
- 57
- 58
- 59
- 60
- 61
- 62
- 63
大家可以自己动手写一写,加深印象, Proxy.newProxyInstance(类加载器,class数组(被代理对象的接口的class数组),new InvocationHandler());
记住这个就可以了!
被代理对象的接口的class数组可以用conn.getClass().getInterfaces(),来获得。
conn为被代理的对象!
动态代理比装饰模式方便很多!
文章来源: chenhx.blog.csdn.net,作者:谙忆,版权归原作者所有,如需转载,请联系作者。
原文链接:chenhx.blog.csdn.net/article/details/52173862
- 点赞
- 收藏
- 关注作者


评论(0)