Java---布局管理代码简单使用(解答)
【摘要】 1.流布局管理器: FlowLayout布局管理器中组件的相对位置随窗口大小而变化。 下面是流布局演示代码:
package cn.hncu.MyJFrame1;
import java.awt.FlowLayout;
import javax.swing.JButton;
import javax.swing.JFrame;
public clas...
1.流布局管理器:
FlowLayout布局管理器中组件的相对位置随窗口大小而变化。


下面是流布局演示代码:
package cn.hncu.MyJFrame1;

import java.awt.FlowLayout;

import javax.swing.JButton;
import javax.swing.JFrame;

public class FlowLayoutJFrame extends JFrame { public FlowLayoutJFrame(){ JButton Jbtn1,Jbtn2,Jbtn3; this.setBounds(300, 300, 400, 100); this.setDefaultCloseOperation(EXIT_ON_CLOSE);//使关闭按钮有作用 this.setLayout(new FlowLayout());//组件相应位置随容器大小变化。 Jbtn2 = new JButton("bbbbb");
// Jbtn2.setLayout(new FlowLayout(FlowLayout.CENTER, 5, 6));//中间对齐,水平间隔为5,垂直间隔为6 this.add(Jbtn2,"CENTER"); Jbtn3 = new JButton("ccccc");
// Jbtn3.setLayout(new FlowLayout(FlowLayout.RIGHT, 5, 6));//右对齐,水平间隔为5,垂直间隔为6 this.add(Jbtn3,"RIGHT"); Jbtn1 = new JButton("aaaaa");
// Jbtn1.setLayout(new FlowLayout(FlowLayout.LEFT, 5, 6));//左对齐,水平间隔为5,垂直间隔为6 this.add(Jbtn1,"LEFT"); this.setVisible(true); } public static void main(String[] args) { new FlowLayoutJFrame(); }

}
- 1
- 2
- 3
- 4
- 5
- 6
- 7
- 8
- 9
- 10
- 11
- 12
- 13
- 14
- 15
- 16
- 17
- 18
- 19
- 20
- 21
- 22
- 23
- 24
- 25
- 26
- 27
- 28
- 29
- 30
- 31
- 32
- 33
- 34
- 35
- 36
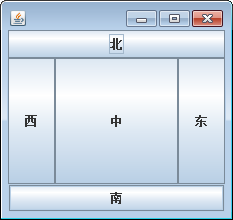
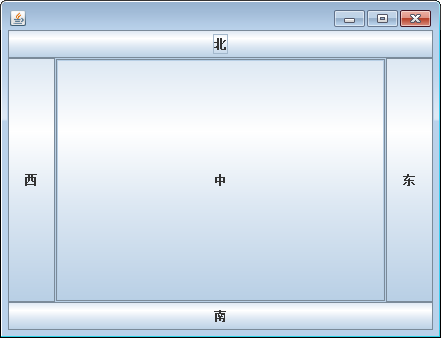
2.边布局管理器:
BorderLayout,当容器大小改变时,四边组件的长度或者宽度不变,
中间组件的长度和宽度都随容器大小而变化。


下面是边布局管理器的演示代码:
package cn.hncu.MyJFrame1;

import java.awt.BorderLayout;

import javax.swing.JButton;
import javax.swing.JFrame;

public class BorderLayoutJFrame extends JFrame{ public BorderLayoutJFrame(){ JButton Jbtn[] =new JButton[5]; this.setBounds(300, 300, 400, 300); this.setDefaultCloseOperation(EXIT_ON_CLOSE); this.setLayout(new BorderLayout(5,6));//指定组件之间的间隔,水平间隔为5,垂直间隔为6(像素) String strJbtns = "北东南西中"; for(int i=0;i<strJbtns.length();i++){ Jbtn[i] = new JButton(""+strJbtns.charAt(i)); }

this.getContentPane().add(Jbtn[0],BorderLayout.NORTH);//北 this.getContentPane().add(Jbtn[1],BorderLayout.EAST);//东 this.getContentPane().add(Jbtn[2],BorderLayout.SOUTH);//南 this.getContentPane().add(Jbtn[3],BorderLayout.WEST);//西 this.getContentPane().add(Jbtn[4],BorderLayout.CENTER);//默认为中 //this.add("Center",new JButton("中间"));//也可以 this.setVisible(true); } public static void main(String[] args) { new BorderLayoutJFrame(); }

}
- 1
- 2
- 3
- 4
- 5
- 6
- 7
- 8
- 9
- 10
- 11
- 12
- 13
- 14
- 15
- 16
- 17
- 18
- 19
- 20
- 21
- 22
- 23
- 24
- 25
- 26
- 27
- 28
- 29
- 30
- 31
- 32
- 33
- 34
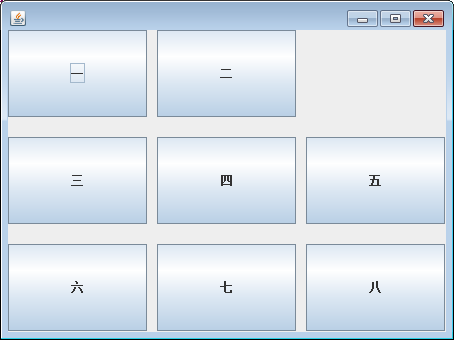
3.网格布局管理器:
GridLayout布局管理器将容器划分为大小相等的若干行乘若干列的网格,
组件大小随容器大小而变化。


下面为网格布局演示代码:
package cn.hncu.MyJFrame1;

import java.awt.BorderLayout;
import java.awt.GridLayout;
import java.awt.Label;

import javax.swing.JButton;
import javax.swing.JFrame;

public class GridLayoutJFrame extends JFrame{ public GridLayoutJFrame(){ this.setBounds(300, 300, 400, 300); this.setDefaultCloseOperation(EXIT_ON_CLOSE); this.setLayout(new GridLayout(3,3,10,20));//(行,列,水平间距,垂直间距); String strJbtns[]  = {"一","二","三","四","五","六","七","八"}; for(int i=0;i<strJbtns.length;i++){ this.add(new JButton(strJbtns[i])); } this.add(new Label(""),2);//以指定位置的方式添加,比未指定位置的方式优先级更高 this.setVisible(true); } public static void main(String[] args) { new GridLayoutJFrame(); }

}
- 1
- 2
- 3
- 4
- 5
- 6
- 7
- 8
- 9
- 10
- 11
- 12
- 13
- 14
- 15
- 16
- 17
- 18
- 19
- 20
- 21
- 22
- 23
- 24
- 25
- 26
- 27
- 28
- 29
- 30
- 31
文章来源: chenhx.blog.csdn.net,作者:谙忆,版权归原作者所有,如需转载,请联系作者。
原文链接:chenhx.blog.csdn.net/article/details/50249633
【版权声明】本文为华为云社区用户转载文章,如果您发现本社区中有涉嫌抄袭的内容,欢迎发送邮件进行举报,并提供相关证据,一经查实,本社区将立刻删除涉嫌侵权内容,举报邮箱:
cloudbbs@huaweicloud.com
- 点赞
- 收藏
- 关注作者


评论(0)