Spring引入外部属性文件配置数据库连接(超详细)
【摘要】
目录
直接配置数据库的信息引入外部属性文件配置数据库连接1.引入德鲁伊连接池jar包2.配置德鲁伊连接池
直接配置数据库的信息
xml配置文件直接配置:
<?xml version="1.0" encoding="UTF-8"?>
<beans xmlns="http://www.springframework.org/schema/beans" ...
直接配置数据库的信息
xml配置文件直接配置:
<?xml version="1.0" encoding="UTF-8"?>
<beans xmlns="http://www.springframework.org/schema/beans" xmlns:xsi="http://www.w3.org/2001/XMLSchema-instance" xmlns:p="http://www.springframework.org/schema/p" xmlns:util="http://www.springframework.org/schema/util" xmlns:context="http://www.springframework.org/schema/context" xsi:schemaLocation="http://www.springframework.org/schema/beans http://www.springframework.org/schema/beans/spring-beans.xsd http://www.springframework.org/schema/util http://www.springframework.org/schema/util/spring-util.xsd http://www.springframework.org/schema/context http://www.springframework.org/schema/context/spring-context.xsd"> <!--直接配置连接池--> <bean id="dataSource" class="com.alibaba.druid.pool.DruidDataSource"> <property name="driverClassName" value="com.mysql.jdbc.Driver"></property> <property name="url" value="jdbc:mysql://localhost:3306/userDb"></property> <property name="username" value="root" ></property> <property name="password" value="root" ></property> </bean>

</beans>
- 1
- 2
- 3
- 4
- 5
- 6
- 7
- 8
- 9
- 10
- 11
- 12
- 13
- 14
- 15
- 16
- 17
- 18
- 19
- 20
一般不会这样用,不便于修改,我们看下面的引入外部属性文件配置的方法
引入外部属性文件配置数据库连接
1.引入德鲁伊连接池jar包
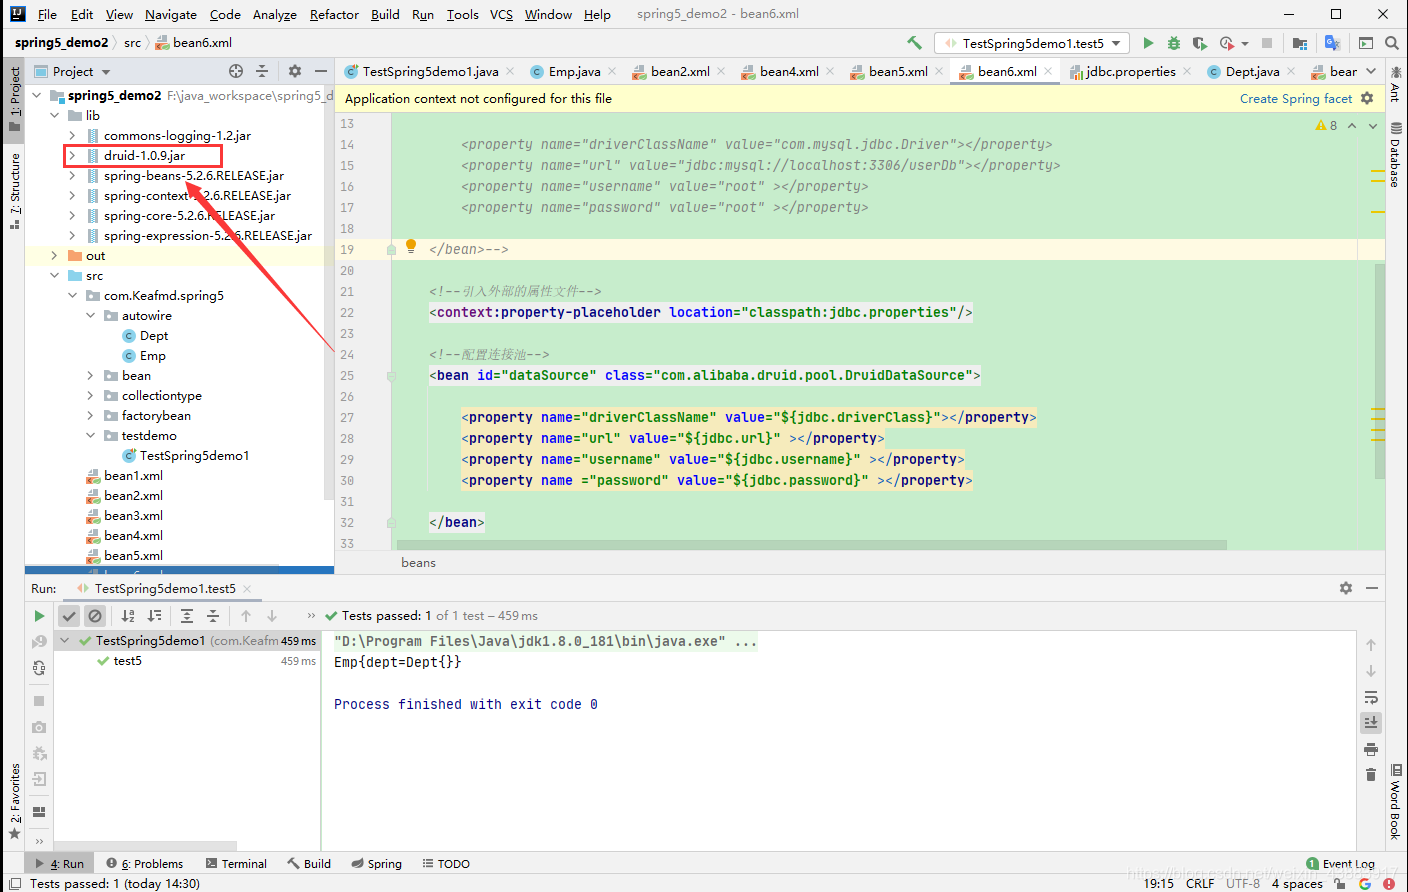
(1)导入进来一个druid-1.0.9.jar,直接复制粘贴到当前目录就可以了。

(2)引入到当前项目。


2.配置德鲁伊连接池
(1)新建一个jdbc.properties文件,写数据库的相关信息。
jdbc.properties:
jdbc.driverClass=com.mysql.jdbc.Driver
jdbc.url=jdbc:mysql://127.0.0.1:3306/userDb?characterEncoding=utf8&useUnicode=true&useSSL=false
jdbc.username=root
jdbc.password=root
- 1
- 2
- 3
- 4
(2)新建一个配置文件。
bean6.xml:
<?xml version="1.0" encoding="UTF-8"?>
<beans xmlns="http://www.springframework.org/schema/beans" xmlns:xsi="http://www.w3.org/2001/XMLSchema-instance" xmlns:p="http://www.springframework.org/schema/p" xmlns:util="http://www.springframework.org/schema/util" xmlns:context="http://www.springframework.org/schema/context" xsi:schemaLocation="http://www.springframework.org/schema/beans http://www.springframework.org/schema/beans/spring-beans.xsd http://www.springframework.org/schema/util http://www.springframework.org/schema/util/spring-util.xsd http://www.springframework.org/schema/context http://www.springframework.org/schema/context/spring-context.xsd"> <!--引入外部的属性文件--> <context:property-placeholder location="classpath:jdbc.properties"/> <!--配置连接池--> <bean id="dataSource" class="com.alibaba.druid.pool.DruidDataSource"> <property name="driverClassName" value="${jdbc.driverClass}"></property> <property name="url" value="${jdbc.url}" ></property> <property name="username" value="${jdbc.username}" ></property> <property name ="password" value="${jdbc.password}" ></property> </bean>

</beans>
- 1
- 2
- 3
- 4
- 5
- 6
- 7
- 8
- 9
- 10
- 11
- 12
- 13
- 14
- 15
- 16
- 17
- 18
- 19
- 20
- 21
- 22
- 23
- 24
- 25
完成以上步骤,就完成了引入外部属性文件配置数据库连接。
看完如果对你有帮助,感谢点赞支持!
如果你是电脑端的话,看到右下角的 “一键三连” 了吗,没错点它[哈哈]

加油!
共同努力!
Keafmd
文章来源: keafmd.blog.csdn.net,作者:牛哄哄的柯南,版权归原作者所有,如需转载,请联系作者。
原文链接:keafmd.blog.csdn.net/article/details/112711437
【版权声明】本文为华为云社区用户转载文章,如果您发现本社区中有涉嫌抄袭的内容,欢迎发送邮件进行举报,并提供相关证据,一经查实,本社区将立刻删除涉嫌侵权内容,举报邮箱:
cloudbbs@huaweicloud.com
- 点赞
- 收藏
- 关注作者


评论(0)