Android 安卓DataBinding(五)·单向绑定 ObservableCollection(集合使用)

前景回顾
Android 安卓DataBinding(一)·基础
Android 安卓DataBinding(二)·入门
Android 安卓DataBinding(三)·单向绑定 BaseObservable
Android 安卓DataBinding(四)·单向绑定 ObservableField
上一期讲到 ObservableField 单向绑定,和 BaseObservable 相比之下,ObservableField 简单了许多,只需要用它的方法即可,提供了自动刷新UI的方法。
如果用到 Map 或者是 List,同样 DataBinding 还提供了 ObservableMap 和 ObservableList,下面来基本使用一下吧!
单向绑定
使用单向绑定刷新UI有三种
- 使用 BaseObservable
- 使用 ObservableField
- 使用 ObservableCollection
ObservableMap
写出布局文件,布局文件添加 android.databinding.ObservableMap 包,然后再使用variable标签引用 :
还是一样,如果是int类型,要转成String类型,否则会报错!
<?xml version="1.0" encoding="utf-8"?>
<layout xmlns:android="http://schemas.android.com/apk/res/android" xmlns:app="http://schemas.android.com/apk/res-auto" xmlns:tools="http://schemas.android.com/tools"> <data> <import type="android.databinding.ObservableMap" /> <!--注意这个地方,一定要用 "<"和 ">",这里不支持尖括号--> <variable name="people" type="ObservableMap<String,Object>" /> </data> <android.support.constraint.ConstraintLayout android:layout_width="match_parent" android:layout_height="match_parent" android:background="#FFFFFF" tools:context=".MainActivity"> <TextView android:id="@+id/name1" android:layout_width="match_parent" android:layout_height="50dp" android:layout_marginStart="8dp" android:layout_marginLeft="8dp" android:layout_marginTop="20dp" android:layout_marginEnd="8dp" android:layout_marginRight="8dp" android:background="#03A9F4" android:gravity="center" android:text='@{String.valueOf(people["NorthernBrain1"])}' android:textColor="#FFFFFF" android:textStyle="bold" app:layout_constraintEnd_toEndOf="parent" app:layout_constraintStart_toStartOf="parent" app:layout_constraintTop_toTopOf="parent" tools:ignore="MissingConstraints" /> <TextView android:id="@+id/name2" android:layout_width="match_parent" android:layout_height="50dp" android:layout_marginStart="8dp" android:layout_marginLeft="8dp" android:layout_marginTop="8dp" android:layout_marginEnd="8dp" android:layout_marginRight="8dp" android:background="#03A9F4" android:gravity="center" android:text='@{people["NorthernBrain2"]}' android:textColor="#FFFFFF" android:textStyle="bold" app:layout_constraintEnd_toEndOf="parent" app:layout_constraintHorizontal_bias="0.0" app:layout_constraintStart_toStartOf="parent" app:layout_constraintTop_toBottomOf="@+id/name1" tools:ignore="MissingConstraints" /> <TextView android:id="@+id/name3" android:layout_width="match_parent" android:layout_height="50dp" android:layout_marginStart="8dp" android:layout_marginLeft="8dp" android:layout_marginTop="8dp" android:layout_marginEnd="8dp" android:layout_marginRight="8dp" android:background="#03A9F4" android:gravity="center" android:text='@{people["NorthernBrain3"]}' android:textColor="#FFFFFF" android:textStyle="bold" app:layout_constraintEnd_toEndOf="parent" app:layout_constraintHorizontal_bias="0.0" app:layout_constraintStart_toStartOf="parent" app:layout_constraintTop_toBottomOf="@+id/name2" tools:ignore="MissingConstraints" /> <TextView android:id="@+id/name4" android:layout_width="match_parent" android:layout_height="50dp" android:layout_marginStart="8dp" android:layout_marginLeft="8dp" android:layout_marginTop="8dp" android:layout_marginEnd="8dp" android:layout_marginRight="8dp" android:background="#03A9F4" android:gravity="center" android:text='@{String.valueOf(people["NorthernBrain4"])}' android:textColor="#FFFFFF" android:textStyle="bold" app:layout_constraintEnd_toEndOf="parent" app:layout_constraintHorizontal_bias="0.0" app:layout_constraintStart_toStartOf="parent" app:layout_constraintTop_toBottomOf="@+id/name3" tools:ignore="MissingConstraints" /> </android.support.constraint.ConstraintLayout>
</layout>
- 1
- 2
- 3
- 4
- 5
- 6
- 7
- 8
- 9
- 10
- 11
- 12
- 13
- 14
- 15
- 16
- 17
- 18
- 19
- 20
- 21
- 22
- 23
- 24
- 25
- 26
- 27
- 28
- 29
- 30
- 31
- 32
- 33
- 34
- 35
- 36
- 37
- 38
- 39
- 40
- 41
- 42
- 43
- 44
- 45
- 46
- 47
- 48
- 49
- 50
- 51
- 52
- 53
- 54
- 55
- 56
- 57
- 58
- 59
- 60
- 61
- 62
- 63
- 64
- 65
- 66
- 67
- 68
- 69
- 70
- 71
- 72
- 73
- 74
- 75
- 76
- 77
- 78
- 79
- 80
- 81
- 82
- 83
- 84
- 85
- 86
- 87
- 88
- 89
- 90
- 91
- 92
- 93
- 94
- 95
- 96
- 97
- 98
- 99
- 100
- 101
- 102
- 103
- 104
写一段demo,用到 ObservableMap<String,Object> ,如下放进去四条信息:
package com.lkdot.data;

import android.annotation.SuppressLint;
import android.databinding.DataBindingUtil;
import android.databinding.ObservableArrayMap;
import android.databinding.ObservableMap;
import android.support.v7.app.AppCompatActivity;
import android.os.Bundle;
import android.view.View;

import com.lkdot.data.databinding.ActivityMainBinding;

public class MainActivity extends AppCompatActivity { private ActivityMainBinding activityMainBinding; private ObservableMap<String, Object> people; @SuppressLint({"SetTextI18n", "InlinedApi"}) @Override protected void onCreate(Bundle savedInstanceState) { super.onCreate(savedInstanceState); setContentView(R.layout.activity_main); activityMainBinding = DataBindingUtil.setContentView(this, R.layout.activity_main); //这句不用管,是关于安卓状态栏的 getWindow().getDecorView().setSystemUiVisibility(View.SYSTEM_UI_FLAG_LIGHT_STATUS_BAR); people = new ObservableArrayMap<>(); people.put("NorthernBrain1", 25); people.put("NorthernBrain2", "NorthernBrain2 = 26"); people.put("NorthernBrain3", "NorthernBrain3 = 27"); people.put("NorthernBrain4", 28); activityMainBinding.setPeople(people); }
}
- 1
- 2
- 3
- 4
- 5
- 6
- 7
- 8
- 9
- 10
- 11
- 12
- 13
- 14
- 15
- 16
- 17
- 18
- 19
- 20
- 21
- 22
- 23
- 24
- 25
- 26
- 27
- 28
- 29
- 30
- 31
- 32
- 33
- 34
- 35
- 36
- 37
- 38
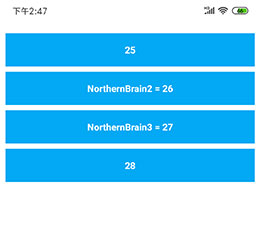
ObservableMap 运行效果
ObservableList
布局文件稍微改动以下,导入 ObservableList ,老规矩,如果你用的是int类型的值,就转成String,这里是String类型的值:
<?xml version="1.0" encoding="utf-8"?>
<layout xmlns:android="http://schemas.android.com/apk/res/android" xmlns:app="http://schemas.android.com/apk/res-auto" xmlns:tools="http://schemas.android.com/tools"> <data> <import type="android.databinding.ObservableList" /> <!--注意这个地方,一定要用 "<"和 ">",这里不支持尖括号--> <variable name="people" type="ObservableList<String>" /> </data> <android.support.constraint.ConstraintLayout android:layout_width="match_parent" android:layout_height="match_parent" android:background="#FFFFFF" tools:context=".MainActivity"> <TextView android:id="@+id/name1" android:layout_width="match_parent" android:layout_height="50dp" android:layout_marginStart="8dp" android:layout_marginLeft="8dp" android:layout_marginTop="20dp" android:layout_marginEnd="8dp" android:layout_marginRight="8dp" android:background="#03A9F4" android:gravity="center" android:text='@{people[0]}' android:textColor="#FFFFFF" android:textStyle="bold" app:layout_constraintEnd_toEndOf="parent" app:layout_constraintStart_toStartOf="parent" app:layout_constraintTop_toTopOf="parent" tools:ignore="MissingConstraints" /> <TextView android:id="@+id/name2" android:layout_width="match_parent" android:layout_height="50dp" android:layout_marginStart="8dp" android:layout_marginLeft="8dp" android:layout_marginTop="8dp" android:layout_marginEnd="8dp" android:layout_marginRight="8dp" android:background="#03A9F4" android:gravity="center" android:text='@{people[1]}' android:textColor="#FFFFFF" android:textStyle="bold" app:layout_constraintEnd_toEndOf="parent" app:layout_constraintHorizontal_bias="0.0" app:layout_constraintStart_toStartOf="parent" app:layout_constraintTop_toBottomOf="@+id/name1" tools:ignore="MissingConstraints" /> <TextView android:id="@+id/name3" android:layout_width="match_parent" android:layout_height="50dp" android:layout_marginStart="8dp" android:layout_marginLeft="8dp" android:layout_marginTop="8dp" android:layout_marginEnd="8dp" android:layout_marginRight="8dp" android:background="#03A9F4" android:gravity="center" android:text='@{people[2]}' android:textColor="#FFFFFF" android:textStyle="bold" app:layout_constraintEnd_toEndOf="parent" app:layout_constraintHorizontal_bias="0.0" app:layout_constraintStart_toStartOf="parent" app:layout_constraintTop_toBottomOf="@+id/name2" tools:ignore="MissingConstraints" /> <TextView android:id="@+id/name4" android:layout_width="match_parent" android:layout_height="50dp" android:layout_marginStart="8dp" android:layout_marginLeft="8dp" android:layout_marginTop="8dp" android:layout_marginEnd="8dp" android:layout_marginRight="8dp" android:background="#03A9F4" android:gravity="center" android:text='@{people[3]}' android:textColor="#FFFFFF" android:textStyle="bold" app:layout_constraintEnd_toEndOf="parent" app:layout_constraintHorizontal_bias="0.0" app:layout_constraintStart_toStartOf="parent" app:layout_constraintTop_toBottomOf="@+id/name3" tools:ignore="MissingConstraints" /> </android.support.constraint.ConstraintLayout>
</layout>
- 1
- 2
- 3
- 4
- 5
- 6
- 7
- 8
- 9
- 10
- 11
- 12
- 13
- 14
- 15
- 16
- 17
- 18
- 19
- 20
- 21
- 22
- 23
- 24
- 25
- 26
- 27
- 28
- 29
- 30
- 31
- 32
- 33
- 34
- 35
- 36
- 37
- 38
- 39
- 40
- 41
- 42
- 43
- 44
- 45
- 46
- 47
- 48
- 49
- 50
- 51
- 52
- 53
- 54
- 55
- 56
- 57
- 58
- 59
- 60
- 61
- 62
- 63
- 64
- 65
- 66
- 67
- 68
- 69
- 70
- 71
- 72
- 73
- 74
- 75
- 76
- 77
- 78
- 79
- 80
- 81
- 82
- 83
- 84
- 85
- 86
- 87
- 88
- 89
- 90
- 91
- 92
- 93
- 94
- 95
- 96
- 97
- 98
- 99
- 100
- 101
- 102
- 103
- 104
修改 MainActivity.java,稍微变动一下即可:
package com.lkdot.data;

import android.annotation.SuppressLint;
import android.databinding.DataBindingUtil;
import android.databinding.ObservableArrayList;
import android.databinding.ObservableList;
import android.support.v7.app.AppCompatActivity;
import android.os.Bundle;
import android.view.View;

import com.lkdot.data.databinding.ActivityMainBinding;

public class MainActivity extends AppCompatActivity { private ActivityMainBinding activityMainBinding; private ObservableList<String> people; @SuppressLint({"SetTextI18n", "InlinedApi"}) @Override protected void onCreate(Bundle savedInstanceState) { super.onCreate(savedInstanceState); setContentView(R.layout.activity_main); activityMainBinding = DataBindingUtil.setContentView(this, R.layout.activity_main); //这句不用管,是关于安卓状态栏的 getWindow().getDecorView().setSystemUiVisibility(View.SYSTEM_UI_FLAG_LIGHT_STATUS_BAR); people = new ObservableArrayList<>(); people.add("NorthernBrain1"); people.add("NorthernBrain2"); people.add("NorthernBrain3"); people.add("NorthernBrain4"); activityMainBinding.setPeople(people); }
}
- 1
- 2
- 3
- 4
- 5
- 6
- 7
- 8
- 9
- 10
- 11
- 12
- 13
- 14
- 15
- 16
- 17
- 18
- 19
- 20
- 21
- 22
- 23
- 24
- 25
- 26
- 27
- 28
- 29
- 30
- 31
- 32
- 33
- 34
- 35
- 36
- 37
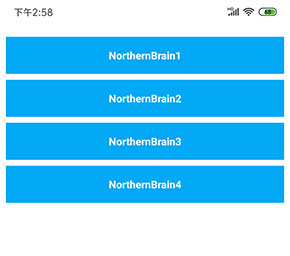
ObservableList 运行效果
更新UI
下面呢,我写出一个更新UI的操作,这里以 ObservableList 为例,Map也一样。
加上点击事件:
package com.lkdot.data;

import android.annotation.SuppressLint;
import android.databinding.DataBindingUtil;
import android.databinding.ObservableArrayList;
import android.databinding.ObservableList;
import android.support.v7.app.AppCompatActivity;
import android.os.Bundle;
import android.view.View;

import com.lkdot.data.databinding.ActivityMainBinding;

public class MainActivity extends AppCompatActivity { private ActivityMainBinding activityMainBinding; private ObservableList<String> people; @SuppressLint({"SetTextI18n", "InlinedApi"}) @Override protected void onCreate(Bundle savedInstanceState) { super.onCreate(savedInstanceState); setContentView(R.layout.activity_main); activityMainBinding = DataBindingUtil.setContentView(this, R.layout.activity_main); //这句不用管,是关于安卓状态栏的 getWindow().getDecorView().setSystemUiVisibility(View.SYSTEM_UI_FLAG_LIGHT_STATUS_BAR); people = new ObservableArrayList<>(); people.add("NorthernBrain1"); people.add("NorthernBrain2"); people.add("NorthernBrain3"); people.add("NorthernBrain4"); activityMainBinding.setPeople(people); //注意加上这一句,否则你的事件没反应 activityMainBinding.setChangeui(new ChangeUI()); } public class ChangeUI { public void changeName() { for (int i = 0, size = people.size(); i < size; i++) { people.set(i, "改变UI:" + i); } } }
}
- 1
- 2
- 3
- 4
- 5
- 6
- 7
- 8
- 9
- 10
- 11
- 12
- 13
- 14
- 15
- 16
- 17
- 18
- 19
- 20
- 21
- 22
- 23
- 24
- 25
- 26
- 27
- 28
- 29
- 30
- 31
- 32
- 33
- 34
- 35
- 36
- 37
- 38
- 39
- 40
- 41
- 42
- 43
- 44
- 45
- 46
- 47
- 48
布局文件增加按钮和事件:
<?xml version="1.0" encoding="utf-8"?>
<layout xmlns:android="http://schemas.android.com/apk/res/android" xmlns:app="http://schemas.android.com/apk/res-auto" xmlns:tools="http://schemas.android.com/tools"> <data> <import type="android.databinding.ObservableList" /> <import type="com.lkdot.data.MainActivity.ChangeUI" /> <!--注意这个地方,一定要用 "<"和 ">",这里不支持尖括号--> <variable name="people" type="ObservableList<String>" /> <variable name="changeui" type="ChangeUI" /> </data> <android.support.constraint.ConstraintLayout android:layout_width="match_parent" android:layout_height="match_parent" android:background="#FFFFFF" tools:context=".MainActivity"> <!--此处省略,参照上面的布局文件--> ...... <!--这里是增加的按钮和事件(我没有用Button的习惯)--> <TextView android:id="@+id/cahngeUI" android:layout_width="match_parent" android:layout_height="50dp" android:layout_marginStart="8dp" android:layout_marginLeft="8dp" android:layout_marginTop="15dp" android:layout_marginEnd="8dp" android:layout_marginRight="8dp" android:background="#FFB51A" android:gravity="center" android:onClick="@{()->changeui.changeName()}" android:text="更新UI" android:textColor="#FFFFFF" android:textStyle="bold" app:layout_constraintEnd_toEndOf="parent" app:layout_constraintStart_toStartOf="parent" app:layout_constraintTop_toBottomOf="@+id/name4" /> </android.support.constraint.ConstraintLayout>
</layout>
- 1
- 2
- 3
- 4
- 5
- 6
- 7
- 8
- 9
- 10
- 11
- 12
- 13
- 14
- 15
- 16
- 17
- 18
- 19
- 20
- 21
- 22
- 23
- 24
- 25
- 26
- 27
- 28
- 29
- 30
- 31
- 32
- 33
- 34
- 35
- 36
- 37
- 38
- 39
- 40
- 41
- 42
- 43
- 44
- 45
- 46
- 47
- 48
- 49
- 50
- 51
- 52
- 53
更新UI运行效果
下一篇文章 Android 安卓DataBinding(六)·双向绑定
文章来源: blog.csdn.net,作者:第三女神程忆难,版权归原作者所有,如需转载,请联系作者。
原文链接:blog.csdn.net/qq_40881680/article/details/101993642

- 点赞
- 收藏
- 关注作者
评论(0)