TensorFlow中 tf.space_to_depth()函数的用法

【摘要】 目录
一、函数定义
二、解释范例
三、代码验证
一、函数定义
通俗易懂些,就是把输入为[batch, height, width, channels]形式的Tensor,其在height和width维的值将移至depth维
      space_to_depth(


       input,


       block_size,


       data_format="NHWC",


       name=None)
...
目录
一、函数定义
通俗易懂些,就是把输入为[batch, height, width, channels]形式的Tensor,其在height和width维的值将移至depth维
-
space_to_depth(
-
input,
-
block_size,
-
data_format="NHWC",
-
name=None)
input:就是输入的Tensor
block_size:就是块大小,一般≥2
data_format:数据形式,如下表,默认“NHWC”
| NHWC | [ batch, height, width, channels ] |
| NCHW | [ batch, channels, height, width ] |
| NCHW_VECT_C | qint8 [ batch, channels / 4, height, width, 4 ] |
name:名字
*输出张量的深度是block_size * block_size * input_depth
二、解释范例
一共三种Tensor:
(1)输入大小为:[1, 2, 2, 1]
-
test_tensor_1 = [[[[1], [2]],
-
[[3], [4]]]]
输出大小:[1, 1, 1, 4]
[[[[1 2 3 4]]]]
(2)输入大小为:[1, 2, 2, 3]
-
test_tensor_2 = [[[[1, 2, 3], [4, 5, 6]],
-
[[7, 8, 9], [10, 11, 12]]]]
输出大小:[1, 1, 1, 12]
[[[[ 1 2 3 4 5 6 7 8 9 10 11 12]]]]
(3)输入大小为:[1, 4, 4, 1]
-
test_tensor_3 = [[[[1], [2], [5], [6]],
-
[[3], [4], [7], [8]],
-
[[9], [10], [13], [14]],
-
[[11], [12], [15], [16]]]]
输出大小:[1, 2, 2, 4]
-
[[[[ 1 2 3 4]
-
[ 5 6 7 8]]
-
-
[[ 9 10 11 12]
-
[13 14 15 16]]]]
三、代码验证
test_space_to_depth.py
-
import tensorflow as tf
-
import os
-
os.environ['TF_CPP_MIN_LOG_LEVEL'] = '3'
-
-
test_tensor_1 = tf.placeholder('float32', [1, 2, 2, 1], name='test_tensor_1')
-
test_tensor_1 = [[[[1], [2]],
-
[[3], [4]]]]
-
test_tensor_1 = tf.space_to_depth(test_tensor_1, 2)
-
-
test_tensor_2 = tf.placeholder('float32', [1, 2, 2, 3], name='test_tensor_1')
-
test_tensor_2 = [[[[1, 2, 3], [4, 5, 6]],
-
[[7, 8, 9], [10, 11, 12]]]]
-
test_tensor_2 = tf.space_to_depth(test_tensor_2, 2)
-
-
test_tensor_3 = tf.placeholder('float32', [1, 4, 4, 1], name='test_tensor_1')
-
test_tensor_3 = [[[[1], [2], [5], [6]],
-
[[3], [4], [7], [8]],
-
[[9], [10], [13], [14]],
-
[[11], [12], [15], [16]]]]
-
test_tensor_3 = tf.space_to_depth(test_tensor_3, 2)
-
-
sess = tf.Session()
-
print(test_tensor_1)
-
print(sess.run(test_tensor_1))
-
-
print(test_tensor_2)
-
print(sess.run(test_tensor_2))
-
-
print(test_tensor_3)
-
print(sess.run(test_tensor_3))
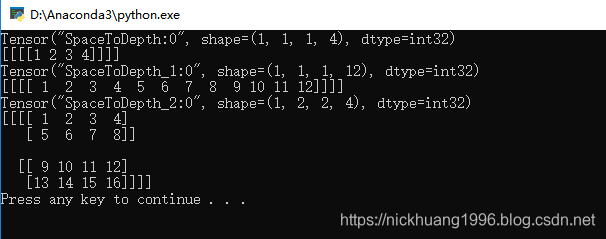
结果:
文章来源: nickhuang1996.blog.csdn.net,作者:悲恋花丶无心之人,版权归原作者所有,如需转载,请联系作者。
原文链接:nickhuang1996.blog.csdn.net/article/details/89471553

【版权声明】本文为华为云社区用户转载文章,如果您发现本社区中有涉嫌抄袭的内容,欢迎发送邮件进行举报,并提供相关证据,一经查实,本社区将立刻删除涉嫌侵权内容,举报邮箱:
cloudbbs@huaweicloud.com
- 点赞
- 收藏
- 关注作者
评论(0)